Apparently, computer users with any level of training know that in any operating system and on almost any device known today, you can create so-called screenshots or, more simply put, snapshots of what is currently displayed on the screen of a computer monitor, laptop or mobile device. Such pictures can be quite simply sent to friends, acquaintances or colleagues by e-mail or in messenger programs for “live” communication via text messages. But how to take such a photo and how to send a screenshot by email? Despite the apparent simplicity of this issue, unfortunately, very often users have many problems, since they are not always aware of all the possible methods for performing such operations. Let's look at the most popular and simplest methods.
How to take a screenshot on different devices: preliminary procedure
So, the first thing you need to do is create that very picture or, if you want, “photograph” what is currently displayed on the screen of a computer or mobile device. If we are talking specifically about computer technology, the easiest way (in the absence of installed special software) is to perform such an action even using the operating system itself, using the keyboard.
On standard PS/2 keyboards, a special Print Screen (PrntScr) button is provided for this, which can be used either separately or in combination with the Alt or Win keys (for Windows systems). In the case of laptops, the situation is almost the same as the previous one, only Fn is used as the second key.
On mobile devices, some options are also provided for such purposes, but depending on the type of operating system installed or even its version, they can vary quite significantly.
The simplest method, say, for Android devices with OS version 4.4 and below is considered to be a long press of the power button and selecting from the menu that appears to take a screenshot, which, by the way, will be saved automatically directly in the device’s memory. It goes without saying that at the moment the screen should display exactly what you want to “photograph” (active application, notification, picture, etc.).
How to upload a screenshot to the Internet and show it to others?
Now we’ll find out how to store and share screenshots in this service, go to the project website, and select the desired pictures with the “Select files” button (up to 20 pieces), then click the upload button.
After this, we get direct links to the picture, copy it (keys Ctrl+A - selection, Ctrl+C - copy and Ctrl+V - paste) and paste it anywhere, for example, on social networks, or you can try pasting the picture in your comment.
I’ll say right away that VKontakte, or email, has built-in functions for these purposes
, and
they are much more convenient to use
. How to do it? Now we will find out too.
How to quickly send a photo in a VKontakte message?
In the message form there is a special icon (photo camera) for sending screenshots and photos, and if you click the “Attach” button, you can add other different files: video recording, audio recording, document, etc.
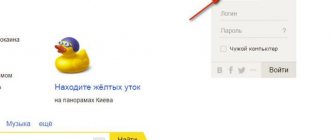
How to send a screenshot via the Yandex.Mail service?
When replying to a message, click on the paperclip icon, select the desired photo, after downloading it will appear to the right of the message form.
It’s about the same here, click on the icon that looks like a paperclip, a list of icons will open, select “Add photo”, and that’s it, the picture is ready to be sent.
This is where I end the article, good luck with your screenshots and photos!
Apparently, computer users with any level of training know that in any operating system and on almost any device known today, you can create so-called screenshots or, more simply put, snapshots of what is currently displayed on the screen of a computer monitor, laptop or mobile device. Such pictures can be quite simply sent to friends, acquaintances or colleagues by e-mail or in messenger programs for “live” communication via text messages. But how to take such a photo and how to send a screenshot by email? Despite the apparent simplicity of this issue, unfortunately, very often users have many problems, since they are not always aware of all the possible methods for performing such operations. Let's look at the most popular and simplest methods.
Editing and saving a photo
In theory, there will be no problems with creating a photo. But “photographing” the active contents of the screen on computer devices initially comes down only to the fact that the picture is placed on the clipboard, and not automatically saved on the hard drive or connected removable storage device. Thus, the next step will be to insert the contents of the buffer into any graphic editor, edit it and then save it in the desired format. Since many of these programs can be too difficult for the average user to master, we can recommend the most common Paint editor, which is available in absolutely all versions of Windows, as a simple tool.
In it you just need to use the insert command. Please note that the standard image size offered by the application when you first open it or when you start it again, when by default the size that was used when working previously is saved, may be too large. Therefore, you can set a deliberately shorter side length using the menu called up with the combination Ctrl + W, or cut out the necessary part of the image, copy it to the clipboard, reduce the size, and then paste the image. After this, all that remains is to save the document in the desired format, selecting in the file type field the format with the most reduced file size (for example, JPG or PNG). You should not save the file in the BMP format, since the file will be too large, and your email client or online service may set a limit on the size of sent messages.
Editing a Screenshot
So, we have described two ways to take a screenshot in VK. Now let’s clarify how to edit (change) a photo of your screen. Such a task may appear before you if, for example, you need to change some data: paint over something, highlight, change, apply some effect, and so on. In this case, it will be necessary to use a graphic editor.
That is, using the first method (via the clipboard), you insert the photo into the editor and can work on it; and in the case of using the second method (special program), it will be enough to open an already saved image and carry out the necessary actions on it. Again, it all depends on the complexity of the task: a banal shading can be done in Paint, but you only need to “falsify” something in Photoshop, since the functionality there is much broader.
You see, the question of how to take a screenshot in VK is not something complicated. This is done simply and quickly. Try it yourself!
How to insert a screenshot into an email: standard technique
We've sorted out the creation of pictures and their saving. Now let's see how to send a screenshot by email or instant messenger. This can be done in two main ways.
In the first case, in an email client or service, you can use a file attachment, for which you press the corresponding button in the interface, usually marked with a paperclip icon, or select a similar item from the menu (something like attaching a file or inserting). In this case, the recipient will need to either open it in a browser or client (if supported) or save the downloaded file to their computer to view the attachment.
But how can I send a screenshot via email so that there is no need to download the file for viewing? If the service or program you are using has the function of sending images directly in a letter without the need to create attachments and attach files, the copied object (either into an image in a graphics editor or a file in Explorer) simply needs to be pasted into the field of the letter where the text of the message is typed. The same applies to all kinds of instant messengers that send pictures directly from text fields.
Creating and uploading a screenshot to photo hosting
So, the first method is classic. Its advantage is that you don’t need to install anything additional, because everything is done with standard tools.
To take a screenshot on a laptop, press the Fn + Alt + Prt Scr keys.
On computers there is no Fn button, so there you just need to click Alt + Prt Scr.
The system will take a screenshot and save it to the clipboard (in its “memory”, so to speak). Next, go to Start - All Programs - Accessories, open Paint and press Ctrl + V (or right-click - Paste). You will immediately see the screenshot you took earlier. If necessary, it can be processed: cropped, drawn arrows, written text. Then save the file in any desired format.
In principle, you can use any other graphics editor (the same Photoshop), but Paint is available by default on any Windows system.
So, the screenshot is ready and saved on the computer. Next you can send it:
- by email;
- in Vkontakte;
- link.
In the first two cases, you just need to attach the file, indicating where it is located. If you want to send a screenshot, for example, in Skype or ICQ, then the latter option is better suited here.
- Visit the website radikal.ru.
- Click on the "Select Files" button and specify the path to the image you want to send.
- Click "Upload to Server".
Using the Snipping Tool
Now let's look at how to send a screenshot by email using a more rational method. A tool called Snipping Tool can be used to do this in Windows. Its advantage is that this applet can not only quickly create pictures and save them in the right place, but also instantly send them by e-mail. To do this, first select the creation of a snapshot, then set the shape for selection, and after that the desired area is selected.
The content is copied automatically, and then in the result preview window you can choose to either save or send by mail. It is noteworthy that you can send a photo both in the body of the letter and as an attachment, which makes this tool the most preferable to use, however, to perform the transfer you can only use an email client “linked” to the user’s registration record.
Quickly sending screenshots to VK
I like this method the most. It's fast, convenient, very practical and sends pictures right away. You can use it either by simply taking screenshots without programs, or by using a special application. I will show this whole thing using the LightShot program as an example. You can download the program from here, it is completely free.
Once you have everything installed, we can start shipping.
- We take a screenshot of the screen by pressing the familiar PrtSc (print screen) key. Your screen should go dark. In order to select only a specific fragment, hold down the left mouse button and drag it to another corner so that the necessary information is inside.
- Next, click on the “Upload to printscr.com” icon and wait just a couple of seconds until a small window appears in the corner of the screen.
- Now copy the link from this window by clicking on the corresponding button or the key combination CTRL+C .
- Next, go to your VK page and select a personal message, conversation, or group wall. It doesn’t matter what you choose, in any case you can send a screenshot to VK via a computer or laptop to any place. After that, paste the copied link and send the message. You can see that the image is picked up immediately after you pasted the link.
Now, by clicking on this link, anyone will be able to see the image you sent. But the disadvantage of this method is that the image is loaded from a separate server, so if the Internet is weak, the download may take a long time. But there is an even faster and better way that does everything at once and without unnecessary manipulation.
- Take a screenshot by pressing the same PrintScreen key and select the area you want to send.
- Now, without clicking any icons, just copy the fragment by pressing the key combination CTRL+C .
- Now, go to messages or chat again and paste the screen by pressing CTRL+V . After that, send everything as usual. Here you can see that no link appears and only the image itself is available.
The advantage of this method is that this time the image is not inserted onto a separate server and does not open in a separate window. Therefore, everything happens very quickly and the whole process takes literally a few seconds.
How to send a link to a screenshot via email?
As for how to send a screenshot by email not as a picture, but as a link to an image that can be saved on some server on the Internet, everything is simple.
To do this, today there are quite a lot of special portals (for example, Radikal.Ru), where you just need to upload images to the server using the add files button, after which you can copy the links to them and paste them directly into the text of the letter. In the same way, you can simply upload photos to popular social networks like Facebook, Instagram, VK, etc., and then copy links from there.
How to send a screenshot?
So, after placing the image in the field of the graphic editor, it is time to save the photo. This is done simply: open the “File” menu, then “Save As” and select the name of the screenshot and the address where it will be placed. In the future, to transfer a photo that you took earlier, you can use mail, social networks, Skype and other programs. In this aspect, your choice depends solely on which one you are used to using. This is already much simpler than the question of how to take a screenshot on VKontakte.
Using cloud storage
However, the above method is not good enough just because your information will not be confidential. If you are registered in some cloud like Google Disk, Yandex.Disk or Dropbox, the problem of how to send a screenshot by email is even easier to solve. For example, in the Yandex service you can create a screenshot using the combination Shift + Ctrl + 2, after which you will be presented with a link to the file uploaded to the cloud. In Dropbox, a similar procedure is carried out using the standard methodology described above, and to receive the link you need to click the corresponding button in the program.
How to send a photo from your phone to Android
Now let’s figure out how to send a screenshot you just took on VK to another user from a phone or tablet.
Find a conversation with the person you want and click on it.
The following window will open. At the top, make sure the “Photo/Video” icon is active. Just below, the “Photo” tab should be selected. Find the screenshot in the list of photos and click on it. If you have several, select them immediately. After that, click on the “Attach” button.
The photo will be attached to the message. Click on the arrow at the bottom right to send a photo.
I think everything worked out for you. Now you can either describe your problem to the support service more precisely by attaching a file with screenshots in a message, or show another user what you see on the VKontakte page on your device.
Good day, dear visitor!
In today's article I want to show how to take a screenshot on a computer and laptop. I will provide a link to this article to everyone who asks me a question through the feedback form on how to take a screenshot. Follow all the instructions below and you will succeed.
I would like to note that now I will show you how to take a screenshot in the Windows operating system, in particular Windows XP. If you installed a Mac or some other operating system, then the process of creating a screenshot is different.
Working with images in Lightshot
One of the most interesting programs is the small utility Lightshot. It works almost similarly to Yandex cloud storage in combination with the capabilities of the Scissors tool.
That is, you need to select the desired area, upload the “photographed” object to the server, receive the link and paste it into the correspondence you send.
How to take a screenshot of an email?
Finally, the main issues have been clarified. It remains to figure out what actions you can take if you just need a screenshot of your email. By and large, you can use the standard method. But if an email program or service has support for quickly creating snapshots, it is better to use just such a tool.
If you are taking a picture in a browser, but the full text of the letter does not fit on the screen, simply reduce the page scale, and when editing in a graphics editor, try to slightly increase the image size and bring it, for example, to 125%. However, don't get carried away too much, as the quality may suffer if the scale is too high.
How to attach pictures to a letter?
The processes for downloading individual images and an archive with images are no different from each other. Also, to send a photo by email, regardless of the service used, you need to perform an almost identical set of actions.
1. Open the “Mail” section, click “Write a letter”.
2. Fill out the form to send a letter (read more about this procedure here).
3. After you prepare the text of the message:
To load images from a PC disk:
- click “Attach file”;
- Select the picture by clicking the mouse and click “Open”.
To download content from storage:
- Click the “cloud” icon next to the button;
- in the additional panel, select files/archive;
- click "Attach".
Yandex.ru
- Under the field for entering the text of the letter, click “Attach files”.
- In the Windows window, go to the folder with the prepared photos or archive, select the objects with a mouse click.
- Click "Open".
To upload files from Yandex.Disk, click the “flying saucer” icon. Then in the “My Disk” panel, select the images (select them by clicking) and click “Attach”.
Gmail
1. In your service account, click the “Write” button.
2. Formalize the message (specify the recipient's address, title, print and edit the text).
3. To upload a photo from a PC, click the “paperclip” button in the bottom panel.
If you need to send pictures from Google.Disk, click the adjacent button (service logo). Mark the required files with a mouse click and click “Add”.
1. If there are a lot of pictures in the folder, in order not to make a mistake with the choice, click on the “picture” icon (Change view) in the right part of the top panel of the system window and use the slider to set the display mode to “Huge icons” or “Large...”.
2. If you need to select several pictures in a directory so as not to perform the download operation multiple times, do the following:
- while holding down the “Ctrl” key, click the left button to mark the images that you want to send to the recipient;
- click “Submit” (they will all be uploaded to the server at once).
3. To upload a group of photos that are located next to each other:
Hold down the Shift key and click the mouse to select the first photo of the group and the last one;
click “Open”;
wait for the selected group of pictures to be uploaded to the mail service.
Digital technologies have taken root in our lives forever. Live communication over evening tea has been replaced by social networks and forums. Sometimes a situation arises when you need to send a screenshot to your virtual interlocutor
from a computer (). The easiest way to do this is to press the Print Screen button on your keyboard.
The computer will save the image currently displayed on the monitor. The snapshot will be saved in , where the temporarily copied information is located. You can transfer from the clipboard to any folder on your computer or other recording device. To do this, after you have done this, open the Paint program, which is located in the Start menu and is indicated by an icon in the form of a brush and a paint palette. In the “edit” tab, select the “paste” function. From the clipboard, the image is transferred to the Paint workspace. You can also save it through Photoshop. This is somewhat more difficult than using Paint, but has its advantages, for example, pictures can be edited. To save via Photoshop, open this program, press Print Screen on your keyboard and paste the file from the clipboard. These methods of saving information are suitable for the Microsoft operating system. However, not everyone prefers to work with it; there are fans of the Linux operating system. To save a snapshot in Linux, also press the Print Screen key and in the dialog box that appears, select the path where
you would like to save the file.
The positive aspect of this system is that you will not forget to save it, and it will not be lost. It is also easy to do on Apple computers. To save a screenshot in
the Mac OS X operating system, use the Screenshot Plus widget, it is convenient for any user and can do all kinds of things.
Sources:
- where does print screen save
If any problems arise with the installation of equipment or the operation of a program, users usually contact support. To effectively resolve the problem, the author of the request may be asked to send (a screenshot) of the error message. The image of what is displayed on the monitor most often gives a more complete picture of the situation that arises than its verbal description. You can send a screenshot using any modern computer.
You will need
- - computer
- - Internet
- - own email
Instructions
If you need a snapshot of only one currently active window, then press and hold the Alt key with your left hand and click on Print Screen with your right hand. Pressing a special button stores the image into RAM.
In order to take a screenshot, you must press the Print Screen (PrtScn) button. Typically, this button is located in the upper right corner of the keyboard, to the right of the function keys F1 - F12. After pressing the PrtScn key, Windows saves the screen image to the clipboard - a virtual temporary storage of data.
In order to view or send the received image to someone, you need to save it to your computer’s hard drive. Any graphic editor will help with this. The simplest and most accessible option is the Paint program. This is a standard program that is found on every computer on which the Windows operating system is installed.