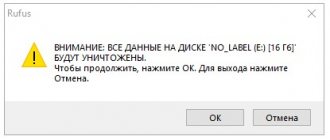
Instructions for setting up BIOS
In order to enter the BIOS settings on an ASUS laptop, you need to press and hold the “F2” key while the laptop boots. After this, the settings we need will open.
It is worth noting that in this case a lot depends on the operating system that is installed on your laptop. The F10 or Del keys can be used to open the BIOS menu.
One way or another, after calling the settings you will see the BIOS menu. Let's look at several options to make it easier for you to configure the system.
The “Main” or “Main” option (see figure above) allows you to see all the necessary information about your motherboard. The memory capacity and other system data will be right in front of you, you can easily familiarize yourself with them.
The “Advanved” or “Advanced” option will allow you to enable or disable additional processor capabilities (overclock or slow down). Here you will have access to network and graphics settings.
The “Boot” or “Download” option will allow you to activate or deactivate fast boot. Here you can set the necessary settings so that your laptop boots from a disk or from a flash drive.
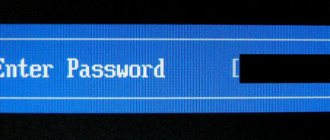
The “Security” or “Security” option gives you the opportunity to protect your data from interference. You can set a password to enter the BIOS, or disable fast booting into external media.
In turn, the “Save & Exit” or “Save and Exit” option allows the user to save the desired configurations, changes made, and exit the BIOS menu. Also, you can use the “Discard Changes and Exit” option, that is, reset the configuration to factory settings and exit the program.
Using BIOS options as intended, you can make it easier for you to work with your device.
You can contact the masters from our service center by calling or writing your question on the feedback form.
Your message has been sent.
Thank you for your request.
Author:
You might also be interested in
Asus motherboards
Products from Asus are basically the same. Only there you should find a section called “Boot”. In the same parameter “Boot Option #1”, in the same way as the top ones, in the window that appears, set the required flash drive.
There is only one difference here, if you opened the Boot Option #1 boot option, and your USB flash drive is not there, then you need to go to the “Boot Sequence” section, it is located slightly below the “Boot Priority” item (in which you set flash drive). In it, at the top there will be an option of the same name “Boot Option #1” (Boot Option #1) and there you should set the desired flash drive. After all this, exit by pressing the “Back” or “Esc” button. At the end, you can use the F10 hotkey to save the settings results; in the window that appears, you will need to agree with the system’s warning about changing the settings and finally exit the BIOS.
First we need to go into the BIOS.
To do this, press the power button and immediately begin pressing the “F2” or “Delet” key before the Asus logo appears or the Window loads.
If everything is done correctly, we will see the BIOS, as in the photo.
Here is a brief description of the laptop, but we are not interested in this. Now the fun begins.
Go to the “Security” tab.
We go down to the “Secure Boot menu” and go to this option. We see there.
And here we turn off “Secure Boot Control”, that is, we change it from “Enabled” to “Disabled”.
Then we return to the initial menu, that is, to the “Security” tab, using the “Esc” key.
And go to the “Boot” tab.
And here we enable the “Launch CSM” option. We do it as in the photo.
After selecting, a warning window will appear, which in short means “For the settings or option to become active, a reboot will be required.”
Well, save the settings and reboot the laptop. Press “F10” and select “Y (Yes)”, press “Enter” and the Asus X751La laptop reboots.
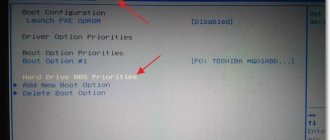
Again, enter the BIOS and go to the “BOOT” tab, you should see a new option there.
Here we set the priority for loading from devices, in this example I set my flash drive, you can also set the drive to boot.
How to enable processor cache in BIOS
Each processor has such high-speed memory as a cache, thanks to it the performance of the processor and the computer itself can become much better. But in the BIOS it can be disabled in the standard settings. In order to check this, you need to go to the Advanced BIOS Features section, find the CPU L3 Cache parameter and enable it. After this, the CPU on your PC will be faster and more productive.
Selecting a device to boot
The computer can be booted from a hard drive, CD drive and other storage media. To speed up loading, you need to set boot from the HDD in the first position so that the PC does not waste time trying to boot, for example, from a disk drive and only then switches to the hard drive. To do this, you need to go to the Advanced BIOS Features section, then to Boot Sequence and at the very first item set to boot from the HDD, which can be selected in the list of devices.
How important is it to configure the BIOS?
It all depends on whether you bought a fully assembled laptop/computer or assembled it yourself. In the latter case, you need to configure the BIOS for normal operation. Many purchased laptops already have the correct settings and an operating system ready for use, so there is no need to change anything in it, but it is recommended to check that the settings from the manufacturer are correct.
Setting up on ASUS laptops
Since all the settings have already been made by the manufacturer, all you have to do is check their correctness and/or adjust some to suit your needs. It is recommended to pay attention to the following parameters:
- Date and time. If you change it, then it should also change in the operating system, but if the time is set on the computer via the Internet, then there will be no changes in the OS. It is recommended to fill out these fields correctly, as this may have a certain impact on the operation of the system.
Configuring the operation of hard drives (parameter “SATA” or “IDE”). If everything starts up normally on the laptop, then you shouldn’t touch it, since everything is configured correctly, and user intervention may not have the best effect on the work.
- If the design of the laptop implies the presence of disk drives, then check whether they are connected.
- Be sure to check if USB interface support is enabled. This can be done in the “Advanced” section in the top menu. To see a detailed list, go to "USB Configuration" from there.
- Also, if you think it necessary, you can set a password on the BIOS. This can be done in the “Boot” section.
In general, on ASUS laptops, BIOS settings do not differ from normal ones, therefore, checking and changing are carried out in the same way as on any other computer.
Configuring security settings on ASUS laptops
Unlike many computers and laptops, modern ASUS devices are equipped with special system overwrite protection - UEFI. You will have to remove this protection if you would like to install some other operating system, for example, Linux or older versions of Windows.
Fortunately, removing the protection is not difficult - you just need to follow these step-by-step instructions:
- Go to "Boot" in the top menu.
- Next, go to the “Secure Boot” section. There you need to set “Other OS” in front of the “OS Type” parameter.
On ASUS laptops, you need to configure the BIOS in rare cases, for example, before reinstalling the operating system. The rest of the parameters are set for you by the manufacturer.
Thank the author and share the article on social networks.
Did this article help you?
More articles on this topic:
Hello! I came across a very useful site, but I have a question. How many times can I use a bootable USB flash drive with Windows 7? I made it, but I’m keeping it as a last resort, but now a friend’s Windows has crashed and he’s asking me for it, will he have to? do everything from scratch again, please tell me.
Nikolay, hello. You can safely let a friend use the flash drive. The boot drive can be used until the flash drive itself fails or the information is deleted from it.
Hello! Thank you very much.
I can’t switch boot in the BIOS via a USB flash drive. ASUS UX302L/
I have a basic question. On an ASUS laptop, in the BIOS there is no information in any of the sections about what OS is installed and which one can be selected.
Hello, before installing Windows, I reset the BIOS settings to standard, the laptop now does not see the hard drive, tell me what to do.
Artem, hello. Try changing the settings in the "Boot" tab. In this article, the author mentioned hard drives in the second paragraph of the “Setup on ASUS laptops” section.
Hello, Artyom! I have a laptop ASUS X502CA, Intel CORE i3-3217U, 1.8 GHz, 4/500GB, 15.6″ diagonal; resolution WXGA (1366×768) HD, Generic PuP Monitor and Inte(R) HD Graphics 4000, manufactured in 2013. I have never updated anything in it. Please tell me, is it possible to somehow update it using drivers and improve image quality?
Hello. Not updating anything on your laptop for five years is not a good decision. To update the BIOS specifically, use the following instructions:
And yet, do not rush to do this, but first just update all the drivers. This can be done according to one of the instructions below. They are for other ASUS laptops, but in your case the procedure and methods will be exactly the same.
Update drivers on ASUS laptops:
This is unlikely to improve image quality, but overall performance should improve. Actually, for possible improvement, use the Intel HD Graphics control panel (it is always minimized to the system tray), there you can change many picture parameters.
Hello, the Asus R512M laptop has stopped recognizing the audio device, there are no audio settings in the BIOS, how can I solve the problem?
I have a different BIOS on my computer, I’m very familiar with this, do the same article but with a newer generation of Asus!
Hello Anonymous. Please specify the model and revision of your motherboard so that we can accurately determine the version of the installed BIOS or UEFI. In addition, tell me what settings you are interested in and we will personally provide you with all the necessary information about this.
Hello, please help. Asus fx505gm-bn017. There is no ssd disk in the BIOS in Boot, it doesn’t see it in the BIOS at all, which is why I can’t install Windows from a flash drive. Help install Windows 10 on an SSD drive.
German, hello. In your laptop, the SSD is integrated into the motherboard, because it has an m2 format and is connected via a PCI-E connector. In this case, it is quite possible that the drive is not displayed in the BIOS until the operating system is installed on it. In your case, you need to solve the problem with SSD display when installing the OS. There is no need to install any additional drivers, since you are installing Windows 10. Just make sure that the following parameters are activated in UEFI:
1. First, go to the “Advanced” menu, find the “PCH Storage Configuration” item there, and then open it. Set the “M.2 SATA mode” value to “Enabled”. This manipulation will help if the SSD and HDD use the same physical channel. 2. Now you need to go to the “Boot” section and select “CSM (Compatibility Support Module)” there. Find “Boot from PCI-E” or “Pci expansion device” and change the value to “UEFI” if Legacy is there. Not every SSD similar to yours supports Legacy mode, since it is simply unnecessary.
Be sure to save your settings before exiting by pressing F10. Then all that remains is to restart the laptop, insert the Windows drive and proceed to the installation, selecting SSD. If such manipulations do not help, try removing the HDD and trying the installation again. If unsuccessful, you will have to contact the store where you purchased the laptop, since this situation may indicate a faulty SSD.
or leave your opinion Cancel comment
Booting ASUS laptops from a flash drive
In general terms, the algorithm repeats the same method for everyone, but there are several nuances, which we will get acquainted with later.
- Of course, you will need the bootable USB flash drive itself. Methods for creating such a drive are described below.
Read more: Instructions for creating a multiboot flash drive and bootable flash drive with Windows and UbuntuPlease note that at this stage, problems most often arise, described below in the corresponding section of the article!
- The next step is setting up the BIOS.
The procedure is simple, but you need to be extremely careful. Read more: Setting up BIOS on ASUS laptops - The next step is to directly boot from an external USB drive. Provided you did everything correctly in the previous step and did not encounter any problems, your laptop should boot correctly.
If problems occur, read below.
Setting up Bios Asus
Almost every computer user has come across the abbreviation BIOS. Translated from English, it means “basic input/output system”. BIOS is a kind of “layer” between system programs and PC hardware. In order for the interaction between them to occur without failures, it is important to set the correct settings for the BIOS.
To enter the BIOS during system startup, after the boot message appears on the screen, press the F2 key several times. You will be taken to a window where you can set any settings for the BIOS. Some modifications of motherboards are adapted for the “DEL” key; the correct combination is indicated at the bottom of the monitor.
Let's get acquainted with the functions of BIOS
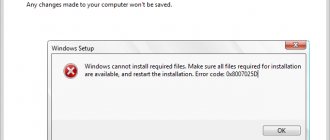
Before starting Windows, the BIOS checks all important components; if no problems are found, then control of the processes is transferred to the operating system. If a problem is detected, an alert is displayed on the display containing the error code and brief information about it.
Surely any PC user has encountered similar situations at least once in their life. For example, during work the keyboard suddenly turns off, and a notification immediately appears on the screen that the device is not detected. Also, the BIOS instantly responds to the smallest failures in the hard drive.
However, such information is not stored on the hard drive, but in a chip located on the motherboard.
Menu sections
There are several menu options, differing in the location of items and their number. Ami is the most commonly used, but most new Asus models come with an improved UEFI BIOS. Key menu sections include:
After making the necessary adjustments or reviewing the information, press Exit to exit the settings menu. All changed data is saved automatically.
Main menu or Main
The section is used to make changes to the hard drive settings. You can also change time indicators, independently adjust the time and date on the device, and set settings for connected hard drives and other storage devices.
For example, to format the operating mode of a hard drive, select the required media. You will be able to change the following settings:
- Type — specify the type of connected disk;
- LBA Large Mode - this item is “responsible” for supporting drives with a capacity of more than five hundred megabytes. It is recommended to set this item to “Auto”;
- Blok - to speed up the system, you should also use Auto;
- PIO Mode - activates the hard drive in the old data exchange mode;
- Smart monitoring is a unique technology that analyzes disk activity. If there is a risk of drive failure, it will alert the user;
- 32 bit Data transfer - the option is used to determine whether a 32-bit data exchange system will be used.
Use Enter to select the required value. At each point it is better to choose Auto, with the exception of the 32 bit section, here you need to fix the Enabled indicator.
Additional settings or Advanced
The section has several sub-items. The first step is to set the parameters for the processor in the Jumper Free Configuration category.
Clicking on a line will open the Configuration System Frequency subcategory, where you can perform the following actions:
- Al Overclocking - manual or automated overclocking of the hard drive;
- DRAM Frequency - clock frequency adjustment for memory modules;
- Memory Voltage - manual chipset configuration mode;
- Serial and Parallel Port—port address settings;
- Onboard Devices - setting up controllers.
Computer power or Power
This menu section contains several settings:
- Suspend Mode — set the value to Auto;
- ACPI APIC - set the indicator to Enabled;
- ACPI 2.0 - fix the Disabled mode.
But in the Hardware Monitor section you can set the temperature mode and adjust the operation of coolers.
Boot Control or Boot
Here you can select the desired drive, it can be a flash card, hard drive or floppy drive. The Boot Setting section configures the boot configuration for the computer; it contains several sub-items:
- Quick Boot - to speed up the startup of the operating system;
- Logo Full Screen - activates an information window with data about the download process, while the usual screen saver is deactivated;
- Add On Rom - used to set the queue of all information modules of the motherboard;
- Wait for F1 if Error - launches the option of forcing the F1 key to be pressed when an error is detected in the system.
In the Supervisor Password subcategory, you can set a password for the BIOS, then only you will have access to the computer.
Configuring Basic Settings or Tools
There are several main points that you should pay attention to when setting up the BIOS:
- ASUS EZ Flash - using this function, you can update the system from a disk or flash drive at any time;
- AI NET - this option provides information about the cable connected to the network controller.
Exit and save or Exit
The Exit section can operate in four modes, it is important to know this when setting up BIOS settings:
- Save Changes - saving the adjustments made;
- Discard Changes + EXIT - saving factory settings;
- Setup Defaults - entering all system parameters by default;
- Discard Changes—cancels all actions taken.
After exiting the BIOS system settings menu, the PC will automatically reboot.
Any user can set basic parameters for the BIOS and optimize the system. However, most often people prefer to turn to specialists, without risking setting up one of the main “organs” of a personal computer on their own.
How to set up BIOS on an Asus laptop
It would seem that it costs a lot to reinstall the operating system on a computer; nothing is difficult, especially if you have done it many times already. The very first thing you need to do is set the BIOS to boot from the disk or flash drive where the distribution kit with the installation of the operating system is located. It turns out that everything does not always happen as usual, the ASUS X550c had the Windows 8 operating system preinstalled, the manufacturer configured the BIOS in such a way that it is not immediately possible to find the boot priority, that is, booting from a disk or flash drive.
To change the settings, you need to go into the BIOS by pressing the F2 key when turning on the computer.
In the Boot , you need to set Launch CSM Enabled . If it is not active, which is often the case, you need to go to the Security set Disabled opposite Secure Boot Control .
After that, press the F10 key and re-enter the BIOS . After the reboot, the Launch CSM will become active. As I wrote above, you need to change the parameter to Enabled .
Launch PXE OpROM item will appear with the Disabled ; you do not need to change it. For further settings, you will need to save and reboot, press the F10 key, go back to the BIOS. Boot tab again . Now we have two loading areas available.
The first boot option in priority is to install the DVD disc. Save the settings and reboot. After these simple manipulations, the first boot will be from disk. There is no point in describing the further process of installing the operating system; I think you can handle it yourself.
BIOS partitions
Having figured out how to enter the BIOS software on an ASUS laptop, a blue partition window opens. Among which:
- Power is responsible for electricity consumption and the presence of constant voltage in the switched-on elements of the system.
- Main contains information about the type, amount of installed memory, date and time.
- Boot determines the order in which system parameters are loaded.
- Advanced includes advanced type settings. Inexperienced users should not experiment with this section.
- Exit prompts you to leave the system.
Confirm the selection of any of the sections by pressing Enter. The cursor arrows on the keyboard are responsible for moving between sections. To make changes to the selected type of menu section, use the PgUp or PgDn keys.