An operating system is an environment used to operate and interact with software. But before using various kinds of applications, they must be installed. For most users, this will not be difficult, but for those who are new to computers, this process may cause problems. The article will provide step-by-step guidance on installing programs on your computer, and will also offer solutions for automatically installing applications and drivers.
Installing applications on your computer
To install a program or game, use an installer or, as it is also called, an installer. It may be on the installation disk, or you can download it from the Internet. The software installation process can be divided into stages, which is what will be done in this article. But unfortunately, depending on the installer, these steps may differ, and some may be completely absent. Therefore, if following the instructions you notice that you do not have a window, then simply move on.
It is also worth saying that the appearance of the installer may vary significantly, but the instructions will apply to everyone equally.
Step 1: Run the installer
Any installation begins by running the application installation file. As already mentioned, you can download it from the Internet or it may already be on disk (local or optical). In the first case, everything is simple - you need to open the folder in Explorer where you downloaded it and double-click on the file.
Note: in some cases, the installation file needs to be opened as an administrator; to do this, right-click on it (RMB) and select the item of the same name.
If the installation will be performed from a disk, then first insert it into the disk drive, and then follow these steps:
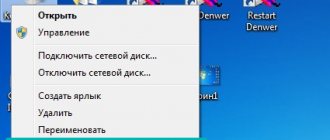
- Launch File Explorer by clicking its icon on the taskbar.
- In the sidebar, click on “This PC”.
- In the “Devices and Disks” section, right-click on the drive icon and select “Open”.
- In the folder that opens, double-click on the “Setup” file - this is the application installer.
There are also cases when you download from the Internet not an installation file, but an ISO image, in which case it must be mounted. This is done using special programs such as DAEMON Tools Lite or Alcohol 120%. Now we will provide instructions for mounting the image in DAEMON Tools Lite:
- Launch the program.
- Click on the “Quick Mount” icon, which is located on the bottom panel.
- In the Explorer window that appears, go to the folder in which the ISO image of the application is located, select it and click the Open button.
- Left-click once on the mounted image to launch the installer.
Read more: How to mount an image in DAEMON Tools Lite How to mount an image in Alcohol 120%
After this, the “User Account Control” window will appear on the screen, in which you will need to click “Yes” if you are sure that the program does not contain malicious code.
Step 2: Select Language
In some cases, this step can be skipped; it all depends directly on the installer. You will see a window with a drop-down list in which you need to select the installer language. In some cases, Russian may not be in the list, then select English and click “OK”. Further in the text, examples of two installer localizations will be given.
Step 3: Getting to know the program
After you have selected the language, the first window of the installer itself will appear on the screen. It describes the product that will be installed on your computer, provides installation recommendations, and suggests next steps. There are only two buttons to choose from; you need to click “Next”.
Step 4: Select Installation Type
This stage is not present in all installers. Before proceeding directly to installing the application, you must select its type. Often in this case, the installer has two buttons “Configure” / “Customization” and “Install” / “Install”. After selecting a button for installation, all subsequent steps will be skipped, up to the twelfth. But after selecting the advanced installer settings, you will be given the opportunity to independently specify many parameters, ranging from selecting the folder into which the application files will be copied, and ending with the choice of additional software.
Step 5: Accept the License Agreement
Before you begin setting up the installer, you must accept the license agreement and read it first. Otherwise, you cannot continue installing the application. Different installers perform this action differently. In some, you just need to click “Next”, while in others, before doing this, you will need to set the switch to “I accept the terms in the License Agreement” or something similar in content.
Step 6: Selecting a folder for installation
This step is mandatory in every installer. You need to indicate in the appropriate field the path to the folder where the application will be installed. Moreover, you can do this in two different ways. The first is to enter the path manually, the second is to click the “Browse” button and navigate it in Explorer. You can also leave the default installation folder, in which case the application will be located on the “C” drive in the “Program Files” folder. Once all the actions have been completed, you need to click the “Next” button.
Note: for some applications to work correctly, it is necessary that there are no Russian letters on the path to the final directory, that is, all folders must have a name written in English.
Step 7: Selecting a Folder from the Start Menu
It’s worth saying right away that this stage is sometimes combined with the previous one.
They are practically no different from each other. You need to specify the name of the folder that will be located in the Start menu, from where you can launch the application. As last time, you can enter the name yourself by changing the name in the corresponding column, or click “Browse” / “Browse” and specify it through “Explorer”. After entering the name, click the “Next” button.
You can also refuse to create this folder by checking the box next to the appropriate item.
Step 8: Selecting Components
When installing programs that contain many components, you will be asked to select them. At this stage you will have a list in front of you. By clicking on the name of one of the elements, you can see its description to understand what it is responsible for. All you need to do is check the boxes next to the components you want to install. If you cannot fully understand what exactly this or that item is responsible for, then leave everything as it is and click “Next”; by default, the optimal configuration is already selected.
Step 9: Selecting File Associations
If the program you are installing interacts with files of various extensions, then you will be asked to select those file formats that will be launched in the installed program by double-clicking LMB. As in the previous step, you also need to check the box next to the items in the list and click the “Next” button.
Step 10: Create Shortcuts
In this step, you can locate the application shortcuts that are required to launch it. Usually it can be placed on the “Desktop” and in the “Start” menu. All you need to do is check the appropriate boxes and click “Next”.
Step 11: Install additional software
It’s worth saying right away that this step can happen either later or earlier. It will prompt you to install additional software. Most often this happens in unlicensed applications. In any case, it is recommended to refuse the proposed option, since in themselves they are useless and will only clog up the computer, and in some cases, viruses will spread in this way. To do this, you need to uncheck all the boxes and click the “Next” button.
Step 12: Review the report
Setting up the installer parameters is almost complete. Now you will see a report of all the actions you have performed previously. At this step, you need to double-check the information provided and if there is a discrepancy, click “Back” to change the settings. If everything is exactly as you indicated, then click “Install”.
Step 13: Application Installation Process
Now you have a bar in front of you that displays the progress of installing the application into the previously specified folder. All you need to do is wait until it is completely filled with green. By the way, at this stage you can click the “Oh, if you change your mind about installing the program.
Step 14: Finish installation
A window will appear in front of you, informing you that the application has been installed successfully. As a rule, only one button is active in it - “Finish” / “Finish”, after clicking which the installer window will close and you can start using the newly installed software. But in some cases there is a “Launch program now” item. If there is a mark next to it, then after pressing the previously mentioned button, the application will launch immediately.
There will also sometimes be a "Reboot Now" button. This happens if the installed application requires a computer restart for it to work correctly. It is advisable to complete it, but you can do it later by clicking the appropriate button.
After completing all the steps described above, the selected software will be installed on your computer and you can immediately begin using it. Depending on the actions taken previously, the program shortcut will be located on the “Desktop” or in the “Start” menu. If you refuse to create it, then you must launch it directly from the directory you chose to install the application.
How to reinstall Windows 7 from a flash drive via BIOS?
Everyone knows that Windows 7 was sold on discs. This disk was also called the boot disk. But for a long time there have been devices, such as ultrabooks or netbooks, that do not have a CD drive. In this case, there is no escape - you need to make a bootable USB flash drive with Windows7 and install from it. In addition, installation from a flash drive is much faster, since the data transfer speed is much higher.
In order to install Windows from a flash drive, you first need to prepare it, write the disk image that we downloaded in the previous part of the article onto the flash drive. Use a 4 GB flash drive.
We'll make the flash drive become a boot drive, then we'll tell the computer that it's a hard drive and needs to boot from it. Let's do so. Simply copying the image to a flash drive will not do anything. Therefore, open the UltraIso program:
File - Open - open the folder where the Windows 7 disk image is located:
.....and then use the mouse to open the image itself:
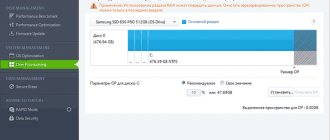
Then insert the flash drive into the slot and go to Bootstrapping - burn a hard disk image:
In the window, select our flash drive (be careful not to confuse it if you have other drives inserted into the USB connector), check the settings as shown in the picture, click “write”:
We are waiting for the recording to finish. Typically two to four minutes. The USB flash drive with Windows 7 is ready.
We insert it into the socket and restart the computer. You need to go into the BIOS, to do this press the Del key
In the settings, select the boot menu and in the boot settings select our flash drive. Press F10 and when exiting, save the settings by pressing the “yes” key:
You can also try to boot from a flash drive without going into the BIOS. On modern computers and laptops, when loading, you can press the F9 or F12 key to bring up the boot menu and then move the cursor to select our flash drive in this way:
The installation has begun, we repeat the whole process as in the previous chapter.
After that, we prepare the system for operation - install drivers, upgrade the version if necessary, then install updates.
Software installation programs
In addition to the above method of installing programs, there is another one that involves the use of special software. All you need is to install this software and install other applications using it. There are many such programs, and each of them is good in its own way. We have a special article on our website that contains a list of them and a brief description.
Read more: Programs for installing programs on your computer
We will look at using such software using Npackd as an example. By the way, you can install it using the instructions given above. To install the program, after launching the application you need to do the following:
- Go to the "Packages" tab.
- In the “Status” field, select the “All” option.
- From the Category drop-down list, select the category that the software you are looking for belongs to. If you wish, you can also define a subcategory by selecting it from the list of the same name.
- In the list of all found programs, left-click on the one you are looking for.
Note: If you know the exact name of the program, you can skip all the above steps by entering it in the Search and pressing Enter .
- Click the "Install" button located on the top panel. You can perform the same action through the context menu or using the hot keys Ctrl+I.
- Wait for the download and installation process of the selected program to complete. By the way, this entire process can be tracked on the “Tasks” tab.
After this, the program you have chosen will be installed on your PC. As you can see, the main advantage of using such a program is that there is no need to go through all the steps that are in the usual installer. You just need to select the application to install and click “Install”, after which everything will happen automatically. The only disadvantage is that some applications may not be on the list, but this is compensated by the ability to add them yourself.
How to reinstall Windows 7 from “home basic” to “maximum” (or any other)?
If you downloaded the distribution from the links in this article, then you need to upgrade the version. After all, the basic one is the simplest “seven” in terms of design and functions. Yes, and it’s difficult with the seven-pack of pure distribution kits on the Internet now, it takes a long time to search and download. It is not known which one you will end up with. They write one thing, you insert the disc, and there is another edition. Updating to the required edition can be much easier than searching for a long time.
Updating to the required edition occurs “bottom up”, from less functional to more functional. The process does not work in reverse. I did this, it’s true, but glitches, glitches... It’s not worth it.
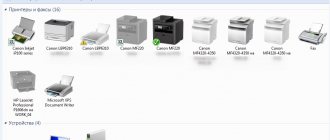
Everything is just outrageous. You don't even need to connect to the Internet. After all, our “new” computer now has no drivers for the network card... Go to Start - Computer - Right mouse button properties:
Then click on the link:
Windows Anitime Upgrade welcome form (popularly just Wow!)Waauuuuu!
Next, copy from here and paste one of the keys you like into the form:
Home Extended/Home Premium:
6RBBT-F8VPQ-QCPVQ-KHRB8-RMV82
Professional
VTDC3-WM7HP-XMPMX-K4YQ2-WYGJ8 6RQ9V-6GCG4-8WV2H-966GF-DQ4DW 32KD2-K9CTF-M3DJT-4J3WC-733WD
Maximum/Ultimate
FJGCP-4DFJD-GJY49-VJBQ7-HYRR2 342DG-6YJR8-X92GV-V7DCV-P4K27
The key verification will begin:
Next, we agree to the license terms:
And then we start updating:
The process has begun.
The system will reboot during the update. The process itself goes quite quickly, about 10-15 minutes. But everything will depend on your Internet connection, which, if there is one, will simultaneously download about 120 more updates to the new installation and install them. After this we get this window:
For those who like to listen and watch, here is a video on this topic
Phew...And finally, we have the finished Windows 7 Home Premium. This is what I have today. You can reinstall to any edition. The higher the edition, the more functions :). This is how my big article turned out today. I hope it's useful. Write to whom you helped, if it doesn’t work, write the same.. See you on the blog!!
Author of the publication
offline for 5 days
Driver installation programs
In addition to programs for installing other software, there are software solutions for automatically installing drivers. They are good because they are able to independently determine which drivers are missing or outdated and install them. Here is a list of the most popular representatives of this segment:
- DriverPack Solution;
- Driver Checker;
- SlimDrivers;
- Snappy Driver Installer;
- Advanced Driver Updater;
- Driver Booster;
- DriverScanner;
- Auslogics Driver Updater;
- DriverMax;
- Device Doctor.
Using all of the above programs is very simple, you need to run a system scan, and then click the “Install” or “Update” button. We have a guide on how to use such software on our website.
Read more: Update drivers using DriverPack Solution Update drivers using DriverMax
Creating a boot disk
Before installing Windows from disk, the user needs to do some preparatory manipulations. To install any OS, the user will need a disk with an image recorded on it. Moreover, the recording must be done using a special program so that the disk comes out bootable, and not a regular disc with recorded files. To prepare a boot disk you will need:
- Program for burning images: Ultra ISO, Image burn.
- Downloaded image of the required system in iso format.
- Blank disk (blank). The type of disc will depend on how much the image weighs and what optical drive is on the PC: CD-R or DVD-R. Since we are talking about the Windows 7 operating system, you need to choose the second option.
If necessary, you need to download the necessary program and install it by running the install.
Having all the components, you can start recording the image. Typically, in recording programs, everything is intuitive and requires minimal user intervention. You just have to specify the path to the OS image and the optical drive that will be used for recording, and press start or another button with a similar meaning. It is noteworthy that recording is usually carried out at low speeds (4x, 8x), this, of course, takes a little longer, but the recording result is obtained at a high level.
Once you have finished recording, you can proceed to the next steps of reinstalling the operating system.
How to download for free from file hosting services?
There are many different file hosting services. However, almost all popular FOs (turbobit.net, Rapidshare.com, letitbit.net, Depositfiles.com) allow you to download a file for free, but with some restrictions. These restrictions in most cases relate to download speed, there is a limited number of downloads from one IP, you will also not be able to download the file, and so on. Everything is designed to ensure that if the file is small, 15-20 MB, then you can download it, but if it weighs about 700 MB or more, you are unlikely to download it. And if you really need this file, then you will send this ill-fated SMS. File hosting companies share profits with site owners and it is good for them to cooperate.