Format the computer while saving Windows 7
A method that will allow you to clean your PC or laptop and save the system is to use third-party software known as Acronis True Image. First of all, you need to download the program.
The procedure itself consists of several stages: preparatory, creating a system backup, formatting the disk and restoring the OS from a copy.
Stage 1: Preparation
The first and most important stage in achieving the goal set today is preparation, since the final success depends on correctly carried out operations. At this stage, all hardware and software should be prepared.
- For hardware, we will need a flash drive with a capacity of at least 4 GB and an external hard drive of 256 GB or more, or a stable Internet connection and an account in one of the popular cloud storages. The flash drive will be used as a boot drive, the external HDD will be used as backup storage. If there is no disk, but you have fast Internet and an Acronis cloud service account, you can use the latter.
- As for the software, in addition to the aforementioned Acronis True Image, you will need a bootable image with the ability to format the computer - this can be Acronis Disk Director, one of the WinPE images or any other suitable package.
- After you have everything you need, create bootable media or media with Acronis True Image and software for formatting your computer.
Check the functionality of all drives and proceed to the next step.
Step 2: Create a Backup
The next step, which will allow you to save the installed OS, is to create a backup copy of it. This is done as follows:
- Connect the drive with Acronis True Image and boot from it. Wait for the software to launch.
- In the menu on the left, select the backup item - it is not signed, so refer to the screenshot below - then click on the large “Select storage” button.
A menu will open allowing you to select your preferred backup location. We need either a connected external drive or cloud storage.
Note! In the newest versions of Acronis True Image, only the program's own cloud service is available via a paid subscription!
Select the required type by simply left-clicking on it.
After returning to the previous screen, use the “Create a copy” button.
The process of creating the OS image will begin - depending on the volume being saved, it may take several hours, so please be patient.
After the program signals the end of the copying procedure, close Acronis True Image.
- Also back up your user files if required, then turn off your computer and continue to the next step.
Step 3: Formatting your computer
At this stage, we will clean up the target computer's drive. For this purpose, you can use any means - the main thing is that the process is carried out from under the boot image. The available HDD formatting options are described in a separate section.
For example, let's use another program from Acronis, Disk Director.
- Boot from the flash drive with the program image. In the options menu that appears, select the item that corresponds to the bitness of your OS.
After a short boot, a list of recognized drives will appear. Select the one you want, then use the menu on the left, where you select the “Format” option.
A window with procedure options will appear. Select your preferred file system, configure the cluster size, and click OK.
Step 4: Restore from Backup
After the computer disk is cleared, you can and should use the backup copy made in the first stage.
- Repeat steps 1-2 of the sequence from Stage 1, but this time switch to the Recovery tab. Select the source - external HDD or cloud storage.
Now, to avoid problems, we recommend that you enable backup verification. To do this, click on the “Recovery Options” button.
Next, switch to the “Advanced” tab and expand the “Verification” section. O and “Check file system”, then click “OK”.
Check if you are going to restore the correct image, then click “Restore”.
As with copying, recovery time depends on the volume of data, so this procedure will also take a lot of time. During operation, the program will ask you to reboot - do so.
If the operation completed without errors, the program will notify you of its successful completion. You can close Acronis True Image and turn off your computer. Don’t forget to remove the flash drive and switch the BIOS to boot from the hard drive and check the result - most likely, your system will be restored to a freshly formatted disk without any consequences.
Solving some problems
Alas, the process described above does not always go smoothly - at one or another stage of its implementation you may encounter certain errors. Let's look at the most common of them.
The computer does not recognize a flash drive or external hard drive. This is one of the most common problems, which can have many reasons. Most likely, either the drive itself is faulty in one way or another, or you made a mistake during the preparation stage. The best solution would be to replace it.
Errors appear during the creation of a backup If errors with different codes occur during the creation of a backup, this may indicate problems with the storage on which this backup is created. Check the external hard drive for errors.
If everything is fine with the drive, the problem may be on the program side. In this case, contact Acronis technical support.
Errors occur when restoring from a backup If errors appear when restoring a backup, most likely the backup copy was damaged. In most cases, this means that it will not be possible to return the system. However, it is still possible to save some data - to do this, you need to open the backup file in TIB format and try to restore the information.
Conclusion
We looked at a method by which you can format a computer without deleting the OS, in our case Windows 7. As you can see, the procedure is simple, but takes a lot of time.
Thank the author and share the article on social networks.
Hard drive formatting methods
There are different ways to format a drive in the Windows operating system. Choose your option after doing a little research on each one. Some of the most convenient ways:
- Through the built-in menu.
- Using third party programs.
- When installing the OS.
Each one is suitable for a different situation, so do your research before using them. Because you can format a hard drive with Windows through the built-in menu using “quick format”, which does not delete data, and this can lead to an unplanned outcome.
When installing Windows
If you have ever installed Windows, then you know that during installation you can select the “Format” option. This is done through the BIOS.
To open this menu you need to:
- Connect the installation disk or flash drive to your computer.
- After that, go into the BIOS and assign this device as the startup device.
- When you restart your computer, at a certain moment, press the desired key on the keyboard. It will be marked on the screen.
The installation window will open
OS. It will show the drives installed on the computer. After any of them is selected, a button will be highlighted at the bottom: “Disk Settings”. It is there that you can clear the drive of all data.
You can completely clean the disk with the installed operating system only during installation. This is done to prevent a user who does not have the installation disk from uninstalling the OS and losing access to the computer.
This is the only way to clean the hard drive that contains the Windows operating system. The remaining methods presented in this article are capable of formatting a hard drive that does not have Windows. With their help, you can format a drive with the former Windows if you start with the new one.
Built-in menu
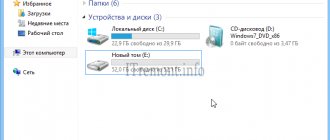
The hard drive is divided into partitions that have names. They can be found in the My Computer folder. Sometimes there is only one partition on a disk. Using this method, you can format only the volume without the operating system. There is a Windows icon where it is installed.
You can format a partition by right-clicking on it and clicking on the button: “Format...”. In the window that appears, select the file system type
, which the formatted partition will have, format mode or restore default settings.
There are two formatting modes: quick and normal. With normal recovery, files cannot be restored, but with fast recovery, this will be possible using special programs. When you try to format a Windows partition, an error will appear. This is done to prevent an unknowing user from deleting important data, without which the computer will not work.
Third party programs
The essence of such programs
There is a convenient menu and additional functions. A very interesting option is Acronis Disk Director. In addition to formatting functions, it allows you to split the drive into volumes, change their size, and the like. You can download the program on the Internet, the main thing is to try to use trusted sources.
Once launched, the program will open a window in which the drives connected to the motherboard will be displayed. By right-clicking, you can open a window with functions, including “Format”. After pressing this key, a window will open where you can select basic formatting settings, for example, file system or type of formatting.
It is recommended to use the default file system. Between quick and regular formatting, you need to choose one that suits your purpose. Quick formatting will only remove the table of contents. The computer will show that the drive is empty, but there will be data on it and it can be recovered.
If you use full formatting, the data will be deleted permanently. You can also try to restore them using special software, but the chance that the actions will lead to the desired result is very small.
There are many answers to the question : “How to format a hard drive in Windows 7?”
. Any user can use the above methods to delete the local disk of their computer.
Formatting a system disk, as a rule, is not associated with something easy and good. But formatting any hard drive partition is not a problem - just select the appropriate option in the partition's context menu or use a special program. in this article we will tell you in detail how to format a disk with Windows 7
Let's be smart
Above we mentioned a certain trick, thanks to which you can format your computer while maintaining Windows functionality. Formatting a PC means cleaning a single hard drive.
If the computer has only one magnetic storage device, for some reason you want to format it but keep Windows with programs and settings, we will need a few things:
If user data is also located on the HDD, it will have to be uploaded to the cloud or copied to another medium.
Formatting the C:/ drive using the Windows 7 installation disc
There are many programs through which you can do this procedure, but in fact, you only need to know 2-3 methods, since situations are different, and only you can find a solution.
I’ll say right away that you won’t be able to format it directly from the system (meaning right-clicking on the disk and selecting “Format”). To format a disk, you need to boot from the installation disk, and then use it to format the C:/ drive or any other drive.
Now I will describe how to format the C drive in Windows 7, or to be more precise, we will do the formatting using the distribution kit. This principle is the same for all versions of systems! When you have started the installation and reached the step where you need to select the hard drive where you would like to install Windows, select the C drive to format. Click once on the C:/ drive with the left mouse button, thereby selecting it. Then click on the item: “Disk Settings” - “Format”. All information will be deleted, including viruses, if there were any, of course.
Let's get started
- We restart the computer and boot from the flash drive, be it bootable media with True Image or WinPE with this program included.
- In the main window, click on the button icons as shown in the screenshot to open the window for creating a new copy of the disk.
- We indicate the target disk that we will format, making sure to select the space reserved by the system.
If all the information has been transferred to another medium, uploaded to the cloud, or is not valuable, select only the system volume.
- We decide on the storage location for the image. What’s remarkable is that the program allows you to save it in the cloud or transfer it over a local network, which is what we need.
Keep in mind that when transferring an image, which can occupy a couple of tens of GB, it will take a lot of time to the cloud service, in contrast to saving it to a computer on the same local network or to a portable HDD.
- We boot from the flash drive and run the program that allows you to format the computer.
A tool that can format hard drives can be DOS, WinPE, Acronis DiskDirector, Partition Manager or another specialized utility.
It is recommended to format the hard drive completely to check for damaged clusters on its magnetic platters.
- Again, boot from a flash drive with Acronis or WinPE and launch True Image.
- Select “Backup” and our copy of the hard drive or its system partition. Click “Restore disks” that you were able to format in step 8.
- Select the disk image that needed to be formatted and click “Restore...”.
- We agree to a reboot.
- The disk(s) will be restored in DOS mode when the computer reboots.
That's all. We were able to format the computer's hard drive while preserving the installed Windows and can continue working on the already configured system without losing data.
Instructions
Formatting is a responsible process and only strict adherence to the recommendations below can guarantee the subsequent normal functionality of Windows 7 and the preservation of user information stored in the computer’s memory.
Depending on the goals set, the user can immediately begin performing the described actions from the paragraph he is interested in (1st or 2nd).
It should be noted that difficulties rarely arise in following the instructions from section 1 and even beginners can easily cope with them, but in order to format the system volume of a computer without uninstalling Windows 7 (part 2), you will need to show much more diligence and care, so how failure to comply with the requirements described below is likely to lead to subsequent system inoperability.
Preliminary activities
Before the procedure, you should copy all important information that the PC owner wants to save from the formatted disk.
If the amount of information being stored is small, then copying can be done to external media, for example, to a CD or flash memory.
If the volume of stored information amounts to gigabytes, then it is recommended to use an external hard drive or cloud storage.
Part 1: Working with logical partitions and additional disks
To format a volume that is not a system volume or a connected separate physical hard drive, you must perform the following sequential steps:
- In the window of Explorer or any other file manager, open the contents of “Computer”;
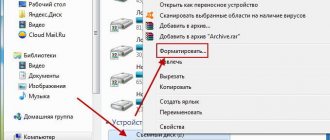
- Call the context from a logical partition of a hard drive or a separate connected physical hard drive (not from the system volume, which is usually designated by the letter “C”);
- Click on the line with the inscription, “Format”;
Attention: We remind you that after formatting the files will be erased, so if the user does not intend to delete them permanently, then you must first copy them to another disk, external storage device, or to the cloud (as already noted in the preliminary steps section).
4. Next, check the box indicated by the red arrow (see figure below);
5. Click “Start”;
7. Done. The disk is formatted.
In a similar way, you can format using third-party applications, for example, Acronis Disk Director.
If it is impossible to use the methods described above, “KS” (Command Line) will come to the rescue. With its use, it will take even less time to complete the task.
On a Windows 7 PC, you will need to complete the following sequential steps:
- Launch “KS” by typing only three letters in the “Run” menu: “cmd” and clicking “Ok”;
Note for beginners: You can open the Run menu through Start.
2. Then the format command containing the drive letter (which needs to be formatted) before the colon performs formatting;
3. In the example shown in the screenshot above, after pressing “Enter” the disk will be formatted under the letter “H”.
Note: In this way, you can format any disk in a PC, and after the command you can specify the file system in which you want to perform the operation.
Using the above methods, you can format all computer disks except the system one, i.e. without uninstalling Windows 7.
It is advisable to completely remove the system volume from the OS partition by formatting it only during a clean reinstallation of the system.
But what to do when you need to format a volume on which “Seven” is installed without subsequently reinstalling the operating system? In the second part of this manual, Windows 7 users will find the answer to this difficult question.
Part 2: Formatting the system volume on which the OS is installed without removing Windows 7
It will not be possible to carry out the operation using the above methods, and the system itself simply will not allow this.
The success of the operation can be ensured by the presence of the following two things:
- Availability of PC access to the World Wide Web for uploading information to cloud storage or availability of an external storage device with sufficient memory capacity;
- You will need bootable media with Acronis True Image.
Note: If there is no user data on the PC or it is not needed, then the first point can be ignored.
How to format a drive with Windows 7
Backing up important data
Before formatting the system partition, if we have access to the disk, we must make a backup copy of the files that are important to us.
Remember that after formatting the system partition, we will lose all files saved on it!
If we have other partitions created on the disk (for example, Local Disk (D:), Local Disk (E:), etc.), we can transfer all the files that we want to save there. Another option could be external memory devices such as USB flash drives, memory cards, external drives and, increasingly popular, virtual disks in the cloud (Cloud data storage).
When it comes to saving data, in addition to music, photos and documents, you should also remember about bookmarks in the Internet browser, saved passwords, databases, instant messaging programs, etc.
What needs to be prepared?
Traditional formatting of the system partition on drive C is usually combined with the installation of a new operating system, so in this case you will need a Windows 7 installation disk with the correct and verified key, which can be found on the package.
In addition, we can prepare disks with drivers for all devices installed in the computer, i.e. for the motherboard, video card, music, network, etc. If we use programs every day - for study, work, etc. . – we can prepare the necessary disks so that soon after installing the system, drivers and their configuration, you can restore the basic functionality of your computer.
It's also worth purchasing a regular keyboard with a PS2 connector. In some cases, wireless keyboards connected to the computer via USB may not work in the motherboard BIOS, which may be necessary for proper boot configuration. In such cases, finishing formatting the system partition and installing a new copy of the operating system may go wrong.
You should also remember that the process of formatting the C drive and installing the operating system can take several tens of minutes, so reserve yourself enough time to do everything correctly and without haste.
First steps - formatting a hard drive using an operating system disk
If we have completed everything that was described in the two previous paragraphs, then we can proceed to the appropriate steps - formatting the Windows 7 system disk.
First of all, insert the disk into the drive, and then restart the computer. Immediately after startup, a message should appear on the screen stating that pressing any key will launch the CD or DVD loader (in Russian and English). If such a message is not displayed and the computer starts to boot as before, then we need to change the cbcntvs boot configuration in the motherboard BIOS.
In this case, you need to restart your computer, and then. In most cases, you will need to press the F1 or Delete key on your keyboard. If these keys do not work and nothing happens on the screen, then you need to look in the instruction manual of the motherboard.
Some manufacturers use other key combinations. For example, in Abit motherboards, the BIOS key is Delete, in Asus the Delete or F2 key is used, while in DFI the F8 key is used.
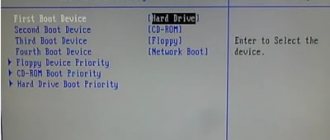
After entering the BIOS menu, you need to find a function called “First Boot Device”, “Boot Device Priority” or similar, containing the word “Boot” in its name. After entering the priority item for loading individual disks, a numbered list of devices will appear; in the first place you need to put the equipment (disk drive) that contains the installation disk with the Windows 7 operating system.
After setting the appropriate order, we exit the BIOS menu, saving the previous settings. In most cases, the F10 key or the “Save & Exit” item is responsible for this. After exiting the menu, the computer will reboot, and then the option mentioned at the beginning to start booting from a CD or DVD should appear on the screen after pressing any key.
Once the Windows 7 operating system installation from the DVD has initialized, the file download process will begin and may take a few minutes. The next steps are quite simple and you just need to follow the installer's instructions.
Along the way, we can select the installation language (this is important, because this language will later be used in the system), keyboard language, time format, time zone, etc. After several successive steps and approval of the license terms, we will reach the point which is decisive.
Remember, we need to select the custom installation option!
Only in this case will we be able to format the system partition of drive C with the ability to install a new copy of the Windows operating system.
In the next step, select the partition on which we want to install Windows. You should select the partition on which the old version of the system was located! If we select another partition, we will lose all the data saved on it.
After selecting the desired position, click on additional disk options, and then specify the partition to be deleted - all files recorded on it, along with the operating system, will be permanently deleted. In the next step, select the option to create a new partition – “New”, and then enter its size in MB, we can enter the value that was indicated when deleting the system partition.
We confirm the operation by clicking on the “Apply” button. Remember that 8 to 16 MB is always reserved - this is the disk cache. Now select the newly created partition and click the “Format” button, being careful not to mistakenly format another local drive.
After selecting the appropriate item, click on “Next” to proceed to the further process of installing Windows 7.
4. Installation of the Windows 7 operating system and preliminary configuration
The entire process of installing the Windows 7 operating system can take from several minutes to several tens of minutes, depending on the performance of the available equipment. At this time, the installer will copy the installation files to your hard drive, configure services and updates, and then automatically restart your computer when installation is complete.
When completely installing the Windows 7 operating system, it is recommended to first format the hard drive. Unlike regular deletion, formatting completely deletes all files from the disk, their paths and completely clears the headers. In addition, during the formatting process, you can select the type of file system, which will significantly affect the operation of the computer. During installation of Windows 7, before formatting, you need to become familiar with the basic concepts: file system, volume label, formatting method and partition types.
What is disk formatting?
Formatting is a software process of marking out the data storage area, which is located on solid-state drives, flash cards or SSD drives and the magnetic surface of hard drives.
There are 2 types of formatting:
- low-level , which is performed at the drive manufacturer;
- high-level , which can be performed using standard operating system tools.
The first is a complex technological process and cannot be carried out without special equipment. The second is performed using standard operating system tools and can be performed by any user. That's what we'll talk about.
Formatting during installation
At a certain step, the installation program prompts you to select the partition where the operating system will be installed. At the same step, you can perform a number of the most basic work with the hard drive: create and delete partitions, as well as resize them.
Step-by-step instruction
1. After selecting the installation type, a window appears asking you to select a disk to install Windows 7:
2. Here you need to select the required disk and click the “disk setup” link and an additional set of functions will appear, where you need to select the “format” item:
3. In the warning window that pops up, you need to confirm the action:4. We wait until the process is completed and proceed to installing Windows 7:
The disk program when installing Windows 7 uses a quick formatting method and does not have additional functionality, so you can use additional disk utilities that can work even without an operating system on the PC.
The easiest to learn and easy-to-use program is Acronis Disk Director Suite (the program is paid, but you can find pirated versions on the World Wide Web or use a demo version of a licensed program).
High-level formatting
High-level formatting is performed after the hard drive is partitioned into logical partitions. It applies to all storage media except optical discs.
This type of formatting of storage media is divided into two types:
- Full formatting , in which the disk is checked for damaged areas, which are marked with special markers, and logical structures (file tables) and boot files are written to the disk.
- Quick formatting eliminates disk scanning and only records service information about the logical structure and boot files.
Now let's move from theory to practice.
Formatting Methods
When installing Windows 7, it is advisable to format the disk, but it is divided into 2 types:
- fast - clears only the paths to the files, after which the computer does not see them, and all new data is written over the old ones;
- full - the hard drive or its partition is completely cleared, all new data is written to new cells. (it is recommended to use this type).
Partition types for Windows 7 also come in two main types: primary and logical. One hard drive can have only one main and several logical ones, as well as a hidden partition of about 100 megabytes for Windows 7 system files.
How can I format my hard drive when installing the Windows 7 operating system?
There are many formatting methods, which can be divided into two types: formatting during the installation process and using third-party programs.
Algorithm for formatting flash drives and hard drives in Windows 7
Let's look at the algorithm for formatting storage media in the Windows 7 operating system.
Do not forget that a formatted disk becomes blank and all information on it is deleted. If you accidentally formatted a disk with important information, then read my article on data recovery. So, to format a flash drive or any other storage medium, you need to follow these steps:
- Go to Computer from the Start menu.
Computer in the Start menu
- Find the required disk in the list, for me it is “Removable disk (J:)”, and right-click on it to bring up the context menu. Find the item “ Format… ” and click on it with the left mouse button.
Format item in the disk context menu
- A small window with formatting settings will appear. Here you will need to specify:
- capacity (1), which in most cases does not change,
- file system (2), for flash drives NTFS or FAT32 is usually used, for hard drives only NTFS,
- the cluster size (3) to “Standard cluster size”,
- volume label (4) – you can specify any name for the disk, for example, “DATA” or “WORKING FLASH DRIVE”, it will be displayed when you connect the disk to the computer, you can leave the field empty,
- formatting methods (5 ) to perform a quick format without checking the disk for faulty blocks, check the box next to the “ Quick (cleaning table of contents) ” item; if you want to perform a full format, then uncheck this item.
You can set the settings as in the picture below:
- Now press the “ Start ” button (6). If you perform a quick format, it will complete in a few minutes, but if you perform a full format, the process will take quite a long time, it all depends on the size of the media. The system will warn you about the destruction of data on the media, click the “ OK ”
System warning about data destruction
- The formatting process will start, the progress of which can be monitored by the bar at the bottom of the window
Current process bar
- Once formatting is complete, a message indicating the completion of the operation will appear.
Formatting completion message
Your disk is now completely clean. If you have any questions, I’m waiting for them in the comments.
And if you don’t want to read, then watch the video:
Disk Management
More advanced functionality for working with all drives is found in the integrated Windows software - Disk Management. You can format a Windows 10 disk like this:
- Press "Win+R" and enter "diskmgmt.msc".
- Once in the application, click on the drive you need in the main window, where they are all arranged in a table.
- Right-click on it, then “Format”.
- Confirm your choice after assigning the required parameters. Leave the file system and cluster sizes as they are assigned by default.
This utility allows you to put broken HDD partitions back together. To do this, you need to format the disk (all partitions), then use the function of “gluing” the drive together using the option located below the table.
How to format a computer without deleting windows. How to format your computer so Windows doesn't get erased
Formatting a hard drive means deleting all files and data from the storage medium. In Windows XP, you can format an ordinary removable hard drive with user data (D). The hard disk partition on which the operating system is directly installed is formatted only through a special BIOS system menu.
The data disk is formatted directly from the OS. Go to “My Computer” and find the disk partition you need to format. Right-click on the disk and select “Format”. In the window that appears, confirm the operation to complete formatting. You cannot simply format the system disk from the BIOS menu. This was possible back in the days of the first Pentium. You will need a bootable installation disk with a system image. You can buy it. If you have knowledge in this area, then you can create it yourself.
Insert the CD with the operating system image into the drive or connect a bootable USB flash drive. Restart your computer. Immediately after the system starts booting, press the “Del” key. The specific key combination may differ on different motherboards. The required combination is specified in the instructions for the motherboard. The Internet contains complete information on all BIOS key combinations for different computers (www.pc-bios.net).
The BIOS utility will load. In the menu, go to Adavanced Settings-First Boot Device. Select CD ROM. Depending on the type of motherboard, the names of menu items may differ slightly. Save the settings with the “Save” button. The PC will automatically reboot.
The installation disk menu will appear on the screen. Click Install Windows XP. Then select the drive with the operating system installed. Specify the encryption type - “NTFS”. A window may open asking you to press the "F" key to confirm the operation. The hard drive will be formatted and the new Windows XP will be installed on it. The computer will restart.
Formatting a removable hard drive is used to clean the system from viruses or install a new version of the operating system. Formatting not only deletes all files, but also corrects errors in Windows.
I’ll explain so that the author of the question can calm down. There is a computer. It has a hard drive on which everything is recorded. It has a certain structure. We will not consider structures hidden from the naked eye; we will pay attention only to the partitions of the hard drive. In the data area of a hard drive, one or more partitions, also called logical drives, are created to store data. All data storage devices, including hard disk partitions in the Windows operating system are designated by Latin letters. In Windows, there is usually a drive "A" for 3.5" floppy disks, then, starting with the letter "C", the hard drive partitions are listed, after which all other external storage devices (CD, DVD, flash memory) are listed. Each hard drive partition has its own internal structure. The creation of this structure is performed during the so-called formatting. There are several types of formatting, two of which are quick formatting and full formatting. With any formatting, the data structure of a hard disk partition is formally returned to its original state, that is, to the state of no data on the disk (on the disk partition). However, if a full format resets the structure records of the entire disk partition, a quick format resets only the information about the location of these structures. For the user, these operations lead to the same result: the data disappears, everything is empty. But, since formatting is a partially reversible process (after formatting there is a chance to restore the data partially or completely despite people’s misconceptions to the contrary), then with quick formatting all the data seems to remain in its place, only the information about its location is reset (recoverable). All this can be done with special software. This is a lyrical digression for Dima. Now, to the essence of the issue. Your hard drive (if there is one at all) may consist of one or more partitions. This is usually easy to find out for sure by doing the following. In “My Computer”, right-click on the “C” drive, call up properties (menu item “Properties”), select the “Hardware” tab. In the list of all storage devices, the first one should be the hard drive, so you need to select it and click on the “Properties” button, where you select the “Volumes” tab. On this tab, you need to click the “Fill” button, after which a list of all partitions of this hard drive (“volume”) will be displayed and their capacities will be indicated. Thus, if Windows is installed on the first partition (C), then Windows will be erased only when this partition is formatted. Formatting other Windows partitions does not affect. And here comes the most important point. I suspect that you see the need for formatting in solving certain problems in the operation of the computer. Something is buggy somewhere, errors, viruses. However, formatting partitions on which Windows is not installed cannot, in principle, solve any problems, since Windows remains in its current state. Accordingly, formatting in any form that does not affect the partition with the operating system makes very little sense, unless formatted for the sake of pampering. To eliminate serious problems in the operation of the computer that are not related to hardware malfunctions, in any case you will have to reinstall Windows, but it is not necessary to format it at all (if it is reliably known that there is no strong virus infection affecting not only system folders, but also the Program Files, Document and Settings folders and other folders of the “SE)b section, it is enough to start the Windows installation in the usual way from the distribution disk and, when notified that the Windows operating system is installed on the “C” partition, confirm its overwriting. The old operating system will be removed and the new one will be installed, the remaining folders on the “C” partition will remain untouched.
Cleaning the system disk
How to completely format a computer? To do this, you will need an installation disk with the operating system. If there is one, then you need to set the BIOS to boot from this media. Some people ask about how to format a computer using a flash drive. If there is no installation disk, then the flash card can be made bootable and perform exactly the same steps.
So, the OS media is available. What's next? There are two ways.
- Cleaning using the built-in tools of the installer. Everything is very simple here. You need to go through the steps of installing the OS and get to selecting the system drive. Next, select the disk with the system and click the settings icon. A panel with available actions will open. There is also formatting here. Once the cleaning is complete, OS installation will continue.
- Cleaning using third-party applications. Many assemblies contain additional software for operation. There are also utilities for working with hard drives. After downloading one of these programs, you need to select the system disk in the main menu and format it. Typically, such utilities perform the operation much faster than the OS itself. You can now restart your computer. All information will be deleted.