A guest account in Windows allows you to use the system in conditions where an unlimited number of people have access to the computer. “Guest” will become a universal login that can be used by all family members, friends or acquaintances without a password. Using a reduced account makes sense even for one person: it will increase the level of security and protect the system from a significant part of viruses.
How to create a guest account on Windows 10
General account settings are determined by the Accounts policy. The policy has three possible states: working, not working, undefined. If guest access is disabled, the new account will not work. A working guest account allows the connection of a network user with a limited set of rights without a password.
In the tenth version of Windows OS, guest login was disabled by default to enhance security. On OS version 1803 it can still be enabled in two ways, but the setup will be a little more complicated than in Windows XP or Windows 7.
Benefits and Limitations of Guest Posting
How is a guest account convenient in practice? Limited access will help the PC owner in the following ways.
- safety. People logged in through the guest group will not be able to access files in the “Images”, “Videos”, “Documents” folders. Visitors will not have the opportunity to install or uninstall the program, and it will become more difficult to “catch” the virus due to a lack of rights for its operation.
- confidentiality. There is no need to give access to your desktop and personal files to strangers. When you try to open your files, the system will automatically request the login and password for the main account.
- convenience. There is no need to create an account for each user on the computer. A guest account is enough to use the Internet, games, and use the media library in the vast majority of cases.
- control. The system administrator has the rights to configure all groups, which allows you to configure access restrictions in any convenient configuration.
Guest account
Guest account in Windows 10
The "Guest" account in Windows allows you to provide temporary access to the computer to users without the ability for them to install and uninstall programs, change settings, install hardware, and open applications from the Windows 10 Store. Also, with guest access, the user will not be able to view files and folders, located in user folders (Documents, Pictures, Music, Downloads, Desktop) of other users or delete files from the Windows system folders and Program Files folders.
This guide will walk you through step-by-step two easy ways to enable the Guest account in Windows 10, taking into account the fact that the built-in Guest user in Windows 10 has recently stopped working (starting with build 10159).
Note: To limit a user to a single app, use Windows 10 Kiosk Mode.
Possible problems
Question: When I sign in to a new account, the screen turns off or starts flashing. What to do?
Answer: This problem occurred in early builds of Windows 10. Update the system, reinstall the drivers for the latest version of the video card, then re-create your account.
Question: I log into a new account, the windows stop displaying and an error message appears: Shell infrastructure Host. How to fix it?
Answer: At your account's command prompt, run sfc /scannow.
Question: Why can't I add an account to a group?
Answer: Check if the Guests group has been deleted. You can view the list of groups in the lusrmgr.msc snap-in.
Video - How to create a guest account on Windows 10
Special Guest
“Guest” account is a universal solution, convenient if you often have to host guests who always urgently need to log into their social network for a couple of minutes. If the circle of guests is narrow, you can please, for example, your beloved grandmother by creating her personal guest account. In the same lusrmgr.msc utility, you need to select a new user in the “Action” , give him a name and uncheck the need to change the password (so that the account is not password-protected). Then click “Create” .
Then double-click on grandma’s account and in the properties window switch to the “Group Membership” . Delete the “Users” .
And add the “Guests” .
If grandma starts coming less often, her account can be temporarily disabled so that it doesn’t hang out on the lock screen. This is done in the same account properties window.
***
You can further reduce the capabilities of a guest or standard user using local group policies. The restrictions they entered in the gpedit.msc editor window will work for all computer accounts. And so that restrictions do not affect the administrator and apply only to individual users, you need to work with policies through the MMC .
Let's launch it:
mmc.exe
New equipment needs to be added.
Click "Group Policy Object Editor" . Click “Add” , then “Browse” .
Select the desired user.
Ready.
Close the form for adding snap-ins. We save the gpedit.msc snap-in, created for the selected user, in a convenient place.
From this place we will continue to launch this equipment. And limit the rights of users in it. For example, the three methods suggested below.
How to enable guest account in windows 10
Hello, dear readers of the mixprise.ru blog, in this article we will look at the topic of enabling a guest account in Windows 10
What is a Guest account for? The Guest account is used to log into the computer, but with limited rights!
Let’s say you need to give access or leave the computer to your friend, but you don’t want him to have full rights to change the settings of your operating system; a guest account will handle this task.
The guest account in Windows 10 has the following rights restrictions:
1) Prohibition of installing and uninstalling programs 2) Prohibition of changing passwords and managing accounts 3) Prohibition of changing computer configuration
These are the basic settings to which access is limited by the system for the Guest account
Basic removal methods
The Seven has all the necessary tools to solve this problem.
If there is an unused account in the system, you can quickly get rid of it. However, if the PC is in a domain, then only the local account will be deleted, and domain records will remain untouched. It is necessary to take into account that files that were created under the account being deleted will also be erased from the PC.
Method 1. Through the control panel (CP)
You must log in with administrator rights and perform the following sequential steps:
- Click “Start”;
- Click PU;
- Enter the “User and Family Accounts...” tab;
- Next, in the menu that appears, go to the “User Accounts” section;
- Click on the “Manage another account” link;
- Then click on the user to be deleted;
- Click “Delete account”;
- Next, two scenarios for the development of events are provided. The first involves deleting the profile along with all its files, and the second involves the same action, but with the preservation of the files of the liquidated user;
- After clicking on one of the two buttons, a warning menu will appear in which you need to confirm the steadfastness of your intentions by clicking on “Delete account”;
- Ready. The assigned task is completed and the user is deleted.
As you can see, the technique is simple and the vast majority of people will not have any difficulties. The only difficulty that a beginner may have is logging into the system with extended privileges. Therefore, below is a brief instruction on how to solve this problem.
How to get extended powers?
The above technique started with the fact that it requires administrator rights to perform it. To obtain them, you must complete the following sequential steps:
- While holding down “Win”, press the key with the letter “R”;
- In the menu that opens, type “control userpasswords2”;
- Click “Ok”;
- Next, a menu will appear in which you should enter the “Advanced” tab;
- Then click the virtual button “Advanced”;
- Double click on “Administrator”;
- Remove o;
- Click “Apply”;
- Click “Ok”;
- Restart your computer.
Method 2. Using an account manager (AM)
If, due to problems in the system, the profile that is planned to be deleted has been damaged, then the first method will not solve the issue, but will need to take advantage of the opportunities provided by the MUS. This method, just like the first, is carried out with extended rights.
The following steps need to be followed:
- While holding down “Win”, press the key with the letter “R”;
- In the menu that appears, type “control userpasswords2”;
- Click “Ok”;
- Next, in the “Users” tab, put o;
- Select the unwanted user and click “Delete”;
- Click “Yes”;
- Ready.
Note: This technique allows you to delete unnecessary accounts, but the folders will not be erased from the system volume, so if necessary, you will have to remove them manually later.
Method 3: Through PC Control
Sequencing:
- Click “Start”;
- Right-click on “Computer”;
- Click on the line “Management”;
- Click “Local users and groups”;
- Then enter the “Users” directory;
- Call the context menu for the account you plan to remove and click “Delete”;
How to remove a user using the command line
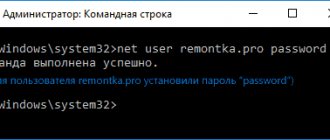
The next option is to use the command prompt, which should be launched as an administrator (in Windows 10, this can be done through the right-click menu on the Start button), and then use the commands (pressing Enter after each):
- net users (will give a list of user names, active and not. We enter this to check that we correctly remember the name of the user who needs to be deleted). Attention: Do not delete the built-in Administrator, Guest, DefaultAccount, and defaultuser accounts this way.
- net user Username /delete (the command will delete the user with the specified name. If the name contains problems, use quotes, as in the screenshot).
If the command was executed successfully, the user will be removed from the system.
How to create a guest account on Windows 10
A guest account in Windows allows you to use the system in conditions where an unlimited number of people have access to the computer. “Guest” will become a universal login that can be used by all family members, friends or acquaintances without a password. Using a reduced account makes sense even for one person: it will increase the level of security and protect the system from a significant part of viruses.
General account settings are determined by the Accounts policy. The policy has three possible states: working, not working, undefined. If guest access is disabled, the new account will not work. A working guest account allows the connection of a network user with a limited set of rights without a password.
In the tenth version of Windows OS, guest login was disabled by default to enhance security. On OS version 1803 it can still be enabled in two ways, but the setup will be a little more complicated than in Windows XP or Windows 7.
