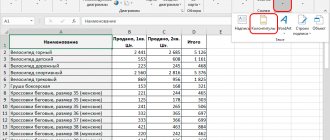
Column headings on each MS Excel page
If the table is large enough and does not want to fit into the size of one printed sheet, the first step would be to duplicate the table column headings on each page of the printed document.
Go to the Page Layout
", and in the "
Page Setup
" group, select the "
Print Headers
" tool.
On the “ Sheet
” tab in the window that appears, pay attention to the “End-to-end rows” and “End-to-end columns” fields. The first is suitable for horizontal tables, the second for vertical ones.
Click on the “Through lines” field and select the area on the sheet that you would like to see on all sheets of your document when printed. Ready.
Printing headings in Excel
If your table has headings, especially when the table is large enough, it is very important that these headings appear on every page when printed. It will be very inconvenient to read a printed Excel workbook if the headings are only on the first page. Print Headers command allows you to select specific rows or columns and print them on each sheet.
- Click the Page Layout and select Print Headers .
Headers and footers and page numbers in MS Excel
Open “Print Headers” again and go to the “Header and Footer” tab. Click the “Create header” button and fill in the required fields, as our imagination requires. Pay attention to the control buttons:
- Date (automatically inserts the document creation date)
- Time (automatically inserts creation time)
- Page number (the serial number of the page in the document)
- Number of pages (number of pages in the document)
- Text Format (allows you to set the font size and style)
- File path (path to the file on your computer)
- File name (document file name)
- Sheet name
- Picture (inserting a picture in the footer)
Moreover, if everything is clear with the date, time and page number without problems, then the path to the file and the file name at first raise questions. Do not doubt their usefulness - you will need them when you need to find a file on your computer in a month and edit it!
Once the header and footer text is entered, click the “OK” button and apply the changes.
We split the MS Excel sheet into printable sheets
By default, Excel sometimes splits the page into sheets in a completely different way than we would like. To take control of the process, the easiest way is to go into page mode
markings.
Your table on the sheet will immediately appear surrounded by a thick blue line. Don’t be alarmed - its vertical borders show the boundaries of the sheet, and the horizontal ones show how the document will be broken when printed. If you are not satisfied with the result, just move the mouse cursor to the border and when it changes shape, hold down the left button and drag the border to where you think it will be more appropriate.
Please note that if you return to normal editing mode from the page, the blue borders will disappear, but the places where they passed will remain visible as thin dotted lines. These lines seem to split our electronic Excel table into imaginary printed ones.
I have always really liked this “feature”, so I usually “set boundaries” as soon as I create a new document. To do this, nothing more is required than simply switching to the “page” view and immediately returning back to the “normal” view.
And here is the final view - how our table will be printed. The title, date and time, as well as the sheet number in the footers and the first line duplicated on all pages with an explanation of the column names have been added to all printed sheets of the document.
Excel sheets designed for printing often have elements at the top or bottom of the page. They contain company logos and details, the date and time the document was created, page numbers, etc. These elements are called headers and footers in Excel. Let's learn how to work with them.
In versions 2013 and 2020
Let's look at how to work with headers and footers in Excel 2013 and 2016 versions. The main function is to create headers for large tables. In this case, headings will be displayed for each sheet.
Reading a printed version of an Excel document is always inconvenient, so it is necessary to delimit all parts of the tables and their boundaries.
The user will be able to configure the same headings, logos and date for all pages, or can configure the display of a different set of data for sheets.
Follow the instructions:
- Open the document you want to edit;
- Select the “Page Layout” tab;
- Click the Print Headers tile;
Fig. 17 – “Page Layout” option
- In the window that opens, select the “Sheet” tab and fill in the “End-to-end lines” fields. The first field indicates the beginning of the document with text, the second - the end of the sheet. The resulting text will be added to the body of the document as a header and footer.
Fig. 18 - adding headers
To add more than just text to the header and footer, in the Page Setup window, click on the tab and create an object, as described for the Excel 2010 version.
Fig. 19 – window for creating a document header and footer in Excel 2013/2016
To create a header and footer faster, you can use the document markup builder. Click on the indicated key, which is located at the bottom of the sheet:
Fig.20 – opening the visual editor
Now select top or bottom by clicking on the top or bottom of the page, respectively.
Fig. 21 - selecting a page area
Open a designer window. Then click on one of the three header/footer parts (left, center, right). Next, click on the desired icons in the “Header and Footer Elements” field.
Fig. 22 – markup elements
Result of adding page number:
Fig. 23 - creating numbering
Page layout
When working with a file, headers and footers can only be seen when the sheet is displayed in Page Layout mode. You can select this mode on the “View” tab in the “Book viewing modes” block.
Let's add text - the page title. For example, let's indicate the name of the travel company for the report table on hotel orders for the period. To do this, select the “Header and Footer” menu item in Excel in the list of “Text” commands on the “Insert” tab.
The sheet will immediately appear in layout mode, and we will see highlighted text fields at the top and bottom of the page. Here you can insert the necessary information. Both headers and footers are divided into three parts, each with a different text or object added to it. Thus, you can add, for example, a company logo on the top left, the name in the center, and details on the right. Likewise at the bottom of the page.
It should be noted that the ampersand (&) is a special character. Therefore, if the text you want to add contains this character, enter 2 characters in a row. That is, in the text “Horns & hooves” write “Horns && hooves”.
After completing entering and changing headers and footers in Excel, click in any cell to exit editing mode. If you do not want to save your changes, press the Esc key.
From the “Page Layout” tab you can open the parameters window. To do this, click on the form open button in the lower right corner of any of the tab toolbars: “Page Options”, “Fit In” or “Sheet Options”. The window that opens contains 4 tabs, of which we are interested in “Header and Footers”.
This form allows you to customize the page headings and footers as much as possible, including or excluding them. To get started, click the “Create Footer (or Header)” button. Here you can not only enter the necessary text, but also format it.
The same window allows you to make settings: set special headers for even and odd, first and subsequent pages, scaling and alignment of fields, and also remove headers and footers in Excel. The same settings are available in the panel for working with headers and footers in the “Design” tab. The tab is only available in header and footer editing mode.
Working in Excel 2003, 2007
In versions of Excel 2003 and 2007, the functionality for working with them is implemented in the same way.
The only difference is that in the 2007 version, users have access to a larger number of visual designs for the header and footer.
You can create a header and footer in one of two ways:
:
Layout of document pages;
Inserting header and footer using the control panel.
Method No. 1
Open the document and in the top menu of the application, click on the “Page Layout” tab.
Then find the “Options” field and in it click on the “Additional options” button, which is located in the right corner of the field:
Fig.4 – “Page Layout” tab
In the window that opens, go to the "Header and Footer" tab.
Select the desired header and footer display option from the list. To create a custom top or bottom, click on the corresponding buttons, and then click on “OK”.
Fig.5 - Page parameters
After pressing one of the keys to create a top/bottom, a content formatting window will appear.
In it you can create any text content for the header or footer, configure the display of date, time, additional calculations and other information.
The figure below shows an example of creating a top one that will display the date the document was printed on the left, and the company logo (or other custom design) on the right.
Selecting the desired function (date, time, calendar, text, file path, formula) is carried out using one of the ten keys that are located in the center of the header and footer editing window.
Fig.6 - creating a custom header
Method 2 (available starting from version 2007)
As a second way to create, you can use the “Insert” tab on the Excel toolbar. Next, click on the “Header and Footer” item to go to the designer.
Fig. 7 - adding a header and footer to a sheet using the “Insert” menu
After opening the designer, a place for the top will be displayed at the beginning of the table, and a place for the bottom at the end.
Using the menu that opens, you can add data exactly as it was written in the first method.
Built-in elements
MS Excel offers built-in elements and even entire headers and footers that are already pre-installed and ready to use. They are available for selection in the menu, respectively, of the top header and the bottom “footer” in the menu for working with footers.
The most suitable text is selected from the list, containing the page number, date, name or path to the file. If none of the options is suitable, you can arbitrarily combine the necessary elements using the buttons on the “Header and Footer Elements” panel in Excel (the “Design” tab), adding not only the serial number, but also the number of pages, the date and time the file was created, the name and path to the file, name of the sheet or drawing.
After working with the headings, you can click anywhere on the page to edit the rest of the information on the sheet. At the same time, you will continue to see headings with “footers”. If you need to switch to normal sheet viewing, just turn on normal mode on the “View” tab, “Book View Modes” toolbar.
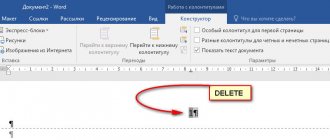
Sometimes there is a need to remove the header and footer in Excel. For example, if the file came from outside, and for work and subsequent use the information contained in the headers is not valuable and even undesirable.
To remove headers and footers, switch to page layout mode using the corresponding button on the View tab. Excel will display information that is normally hidden. The second way to display headers and footers is to use the tool of the same name in the Text panel of the Page Layout tab.
To delete one or more blocks, select the one you need and press the Delete or Backspace key on your keyboard. If you want to remove the header, footer, or both entirely, you can do this in Design mode by selecting “none” in the Header or Footer menu in the Header or Footer panel, respectively.
Now you know how to insert headers and footers in Excel, make settings and remove them if necessary.
Using headers and footers in Excel will allow you to design the final version of the document for subsequent printing.
Headers and footers
– these are the header parts of each page of an electronic document, which contain text and graphic information. In the program, they are intended to indicate the name of the file, author, page or company.
By the way, to work more efficiently with tables, you can read our material Excel Hot Keys - The Most Necessary Options.
Kinds
They can be:
- Top ( Header
) – located at the beginning of each page of the document; - Bottom ( Footer
) – automatically added to the end of the Excel sheet.
Fig. 2 – document structure
Also, in
Excel they may differ in content type:
- Constant
– duplicated on each table sheet. Typically contains information about the file name. A permanent footer is created if there is a need to confirm that each table belongs to one document; - Intermittent –
changes on each sheet;
- Stepped –
contains headings of several levels;
Fig. 3 – header location
return to the menu Work in
Excel 2003, 2007
In versions of Excel 2003 and 2007, the function of working with them is implemented in the same way.
The only difference is that in the 2007 version, users have access to a larger number of visual designs for the header and footer.
You can create a header and footer in one of two ways:
:
- Layout of document pages;
Inserting header and footer using the control panel.
Method No. 1
Open the document and in the top menu of the application, click on the “Page Layout” tab.
Then find the “Options” field and in it click on the “Additional options” button, which is located in the right corner of the field:
Fig.4 – “Page Layout” tab
In the window that opens, go to the “Header and Footer” tab.
Select the desired header and footer display option from the list. To create a custom top or bottom, click on the corresponding buttons, and then click “OK”.
Heading previews are available at the top of the window.
In this settings menu, you can also change the appearance of the margins of each sheet of the document, as well as the display of pages.
Fig.5 - Page parameters
After pressing one of the keys to create a top/bottom, a content formatting window will appear.
In it you can create any text content for the header or footer, configure the display of date, time, additional calculations and other information.
The figure below shows an example of creating the top
, which will display the date the document was printed on the left, and the company logo (or other custom design) on the right.
Selecting the desired function
(date, time, calendar, text, file path, formula) is carried out using one of the ten keys that are located in the center of the header and footer editing window.
Fig.6 - creating a custom header
Method 2 (available starting from version 2007)
As a second way to create, you can use the “Insert” tab on the Excel toolbar. Next, click on the “Header and Footer” item to go to the designer.
Fig. 7 - adding a header and footer to a sheet using the “Insert” menu
After opening the designer, a place for the top one will be displayed at the beginning of the table, and a place for the bottom one at the end.
Using the menu that opens, you can add data exactly as it was written in the first method.
The convenience of the second creation method lies in its clarity.
You immediately see all the changes on the sheet and can easily delete/correct them. To edit fields, use the keys from the “Header and Footer Elements” section.
What data can be added
- Page number;
- Total number of pages;
- Date the document was created or printed;
- Current time;
- Path to the file specified on the PC;
- Document name;
- Drawing;
- Sheet name;
- Picture format.
Fig. 8 – working with the title designer
As a result of adding a file with an image of the logo and date, we get the following Excel sheet design:
Fig.9 - the result of adding information to the header
Similarly, data is added to the footer. It usually indicates the title of the document, the name of the author, and the page number.
To see how the resulting document will look on a printed sheet, open the “Main Menu” button.
From the list, select “Print” - “Preview”.
Do not skip this step, because the created header and footer may not fit on a standard A4 sheet, although it will be displayed in the program without problems.
Fig. 10 – document preview
Removal
If you need to delete the created header and footer, for Excel 2003 version, open the “Insert” tab and go to the “Header and Footer” window again.
In a new window, select the object and delete it using the DELETE key.
To remove it in the 2007 version of the program, click on the header or footer. Go to the Design tab and click on the Header/Footer tile.
Select "No" from the list that appears.
Fig. 11 – deleting an object
return to menu Instructions for
Excel
Follow the instructions to create headers and footers in the
Excel 2010 spreadsheet processor:
1 Create a document or open a previously used sheet;
2 Go to the “Insert”
;
3 Find the Page Layout
and click on the button shown in the figure below;
Fig. 12 – “Page Options” key
4 A dialog box will appear containing 4 tabs.
Each of these tabs is designed to edit a separate part of the document layout - pages, fields, footers and sheets.
Select the "Header and Footers"
;
Fig. 13 – design settings window
5 Enter the top and bottom text in fields (2) and (5) respectively.
Field (1) will display a preview of what was added. To set up a unique header or footer for the first page, check the box (4) – special header or footer for the first page;
Fig. 14 - header and footer settings
6 If you do not want to use only text symbols, click on the New
and customize your own headers and footers by adding date, time, logos, file names, and more.
Fig. 15 – window for creating custom sheet headings
Once you've finished creating your item, be sure to click on the Preview button to see how the item will look when printed.
The window for creating custom headers and footers is useful if you cannot find the desired format from the list of default options.
As shown in Figure 15
, it can be created using ready-made tools and functions.
Enter the text of the headings in the appropriate parts of the line (“Left”, “In”).
Click the buttons above to add features to the header and footer field.
Removing titles
Typically, the header and footer is divided into three parts:
- On the left
is the company logo; - In the center
(or on the left if there is no logo) – the title of the document; - On the right
is the date, number of pages or author's name.
To delete a header and footer, simply select each of its elements one by one and press the DELETE key; if the header field is empty, it will no longer be displayed on the Excel sheet.
Fig. 16 - deleting header elements in the 2010 version of the program
return to menu In
versions 2013 and 2016
Let's look at how to work with headers and footers in Excel versions 2013 and 2016. Main function
– creating headers for large tables. In this case, headings will be displayed for each sheet.
The user will be able to configure the same headings, logos and date for all pages, or can configure the display of a different set of data for sheets.
Follow the instructions:
- Open the document you want to edit;
Select the “Page Layout” tab;
Click the Print Headers tile;
Fig. 17 – “Page Layout” option
- In the window that opens, select the “Sheet” tab and fill in the “End-to-end lines” fields. The first field indicates the beginning of the document with text, the second - the end of the sheet. The resulting text will be added to the body of the document as a header and footer.
Fig. 18 - adding headers
To add more than just text to the header and footer, in the Page Setup window, click on the tab and create an object, as described for the Excel 2010 version.
Fig. 19 – window for creating a document header and footer in Excel 2013/2016
To create a header and footer faster, you can use the document markup builder.
Click on the indicated button, which
is located at the bottom of the sheet:
Fig. 20 - opening the visual editor
Now select top or bottom
by clicking on the top or bottom of the page, respectively.
Fig. 21 - selecting a page area
Open a designer window. Then click on one of the three header/footer parts
(left, center, right). Next, click on the desired icons in the “Header and Footer Elements” field.
Fig. 22 – markup elements
Result of adding page number:
Fig. 23 - creating numbering
return to Insert Picture
The function of adding pictures to the footer field is necessary to create a logo for a company or organization.
Also, this field can display the name of the employee who created the document, contact information and other data.
The logo is added to the upper left part of the page. If necessary, you can place the graphic in any other area of the header/footer.
Follow the instructions:
- Open the document and click on the “Page Layout” button, which is located at the bottom of the Excel workspace;
Fig. 24 – viewing sheet markings
- Click on the left header area;
In the mode of viewing and editing markup, press the “Drawing” key. It is located on the program toolbar;
Fig. 25 - adding a logo
into each top and bottom section .
Try to maintain the size of the logo (no more than 200 pixels in width, otherwise it will be printed on top of the created data table).
- In the window that appears, select the image storage. You can add files from your computer, search for them in the Bing search engine, or use your personal OneDrive storage.
Fig. 26 – choosing a method for loading a picture
Result of adding a logo to the header field:
Fig. 27 – ready-made company logo in the document field
Thematic videos:
Everything about headers and footers in Excel: creating, editing, deleting
Inserting a picture
The function of adding pictures to the footer field is necessary to create a logo for a company or organization.
Also, this field can display the name of the employee who created the document, contact information and other data.
The logo is added to the upper left part of the page. If necessary, you can place the graphic in any other area of the header/footer.
Follow the instructions:
- Open the document and click on the “Page Layout” button, which is located at the bottom of the Excel workspace;
Fig. 24 – viewing sheet markings
- Click on the left header area;
- In the mode of viewing and editing markup, press the “Drawing” key. It is located on the program toolbar;
Fig. 25 - adding a logo
into each top and bottom section . Try to maintain the size of the logo (no more than 200 pixels in width, otherwise it will be printed on top of the created data table).
- In the window that appears, select the image storage. You can add files from your computer, search for them in the Bing search engine, or use your personal OneDrive storage.
Fig. 26 – choosing a method for loading a picture
Result of adding a logo to the header field:
Fig. 27 – ready-made company logo in the document field
Thematic videos:
If you have Telegram, you can now download any software or game through our bot, just follow the link and try it!
« Previous entry
Working with headers and footers in Word. Part 2
Hello, friends and colleagues! Today in our “Crib Sheet” we continue the topic of headers and footers with answers to the questions:
- how to make different headers and footers in Word for the first and other pages;
- how to make different headers and footers in one WORD document (at least for each page - one);
- how to add a footer from the second page;
- How to remove headers and footers in Word from one or more pages.
Let me remind you that in the first part of the “Crib”, dedicated to headers and footers, the following topics were discussed in detail:
- how to create a footer in Word (with video tutorial);
- how to remove headers and footers completely in Word;
- how to change word footer size.
So those of you who are still interested in these questions can refresh your knowledge in the article “How to create a header and footer in Word 2016.” Yes, it is with examples of the Microsoft Word 2020 text editor that I show all the algorithms for working with headers and footers.
How to make different headers and footers in Word for the first and other pages
This operation can be performed in two ways:
1.1 In the first case, we work through the “Designer” panel.
In order to enable it, you need to activate the header and footer fields.
This can be done by double clicking on their area. After this, you need to go to the “Options”
and check the box
“special header for the first page”
. Figure 1 shows the entire chain of actions.
Picture 1
1.2 The same procedure can be carried out in another way: through the “ Layout”
-
“Page Settings”
-
“Paper Source”.
The line
“Differentiate headers and footers on the first page”
must be checked (see Fig. 2).
figure 2
After this, all that remains is to enter one text in the footer of the first page and another in the second; On all subsequent pages, the text from the second page will be duplicated automatically. Different headers and footers in one Word document are ready.
How to make different headers and footers in one Word document for any pages
A clarification is necessary here: this problem can only be solved if the pages belong to different sections. To make it completely clear, let me explain: different headers and footers are only possible in different sections. Moreover, the concept of “section” in Word is a technical term that can, but does not have to, repeat the structure of your document. If desired, each page can be marked with a section break mark. And only under this condition in one Word document can you write different headers and footers on different pages.
So, in order to make different headers and footers in separate sections of a Word document, you first need to enable the break mechanism. To do this, perform the following actions: place the cursor at the end of the page or other desired place, then the “Layout” tab - “Page Options”
—
“Insert a break”
—
“Break sections from the next page”
(see Fig. 3).
figure 3
Please note that this is how you need to separate each section, that is, highlight pages intended for some special headers and footers in a similar way. Next in the “Design”
, in the
“Transitions”
, deactivate the
“Same as previous”
, if it was clicked (see Fig. 4). This procedure is used when it comes to headers, footers and, in some cases, side footers.
Figure 4
After this, on each page of the new section in manual entry mode you need to add your own header and footer. This work is painstaking and slow, but, as they say, “hunt is worse than captivity.” The main thing is that there is some logical sense in this.
If the author has the intention of placing a center footer, that is, an insert to highlight any part of the text, only on one page, then in the “Page Breaks”
you need to follow the green arrow. How to insert side and center footers was discussed in the first part of this article (see link above). In Fig. Figure 5 shows an example of such formatting.
Figure 5
How to remove headers and footers in Word from one or more pages except the first
This task is the opposite of the one we considered in point 2. You can remove headers and footers in the Word text editor from several pages at once only if they are pages of the same section. If you need to remove the header and footer from only one page, then it will have to be separated into a separate section. Don’t forget, colleagues, to check the “same as previous”
. It has an unpleasant feature of turning on/off spontaneously. After that, you need to go to the “Designer” and delete the header and footer separately.
When it comes to inserts (side, central), the same rule for highlighting sections applies. After which they are deleted by first clicking the right mouse button to open a window with the line “cut”
, and then left-click on the indicated inscription. If the insert already contains text, then first delete it, and then the field itself.
So, friends, today we looked at all the possible cases of creating headers and footers in Word documents. If you still have any questions, ask them in the comments. In the near future, I will most likely record a video on the same topic, and then insert it into the post.
Goodbye. Your guide to ms Word 2020 GALANT.
Excel sheets designed for printing often have elements at the top or bottom of the page. They contain company logos and details, the date and time the document was created, page numbers, etc. These elements are called headers and footers in Excel. Let's learn how to work with them.
Creating unique headers and footers for the first page
In Excel, you can set a separate header and footer for the first page, different from the rest. To do this, just check the Special header and footer for the first page checkbox in the Options the Design tab .
After checking this box, set the header and footer for the first page and the second page for the header and footer for the rest of the pages. Creating your own headers and footers was discussed in the previous section.
This feature is typically used when the report contains a cover page with a footer. As an example, let's say that in our report, on all pages except the title page, the footer should display the current page and the total number of pages. To do this, you need to select the Special header and footer for the first page , and then define a centered header and footer with a code for the page number and total number of pages on the second page, leaving the header on the first untouched.
Excel will keep the correct numbering without displaying it on the cover page. So, if the report consists of six pages (including the title page), then the second page, from which the factual information begins, will contain the header Page 2 of 6, the next one - Page 3 of 6, etc.
Page layout
When working with a file, headers and footers can only be seen when the sheet is displayed in Page Layout mode. You can select this mode on the “View” tab in the “Book viewing modes” block.
Let's add text - the page title. For example, let's indicate the name of the travel company for the report table on hotel orders for the period. To do this, select the “Header and Footer” menu item in Excel in the list of “Text” commands on the “Insert” tab.
The sheet will immediately appear in layout mode, and we will see highlighted text fields at the top and bottom of the page. Here you can insert the necessary information. Both headers and footers are divided into three parts, each with a different text or object added to it. Thus, you can add, for example, a company logo on the top left, the name in the center, and details on the right. Likewise at the bottom of the page.
It should be noted that the ampersand (&) is a special character. Therefore, if the text you want to add contains this character, enter 2 characters in a row. That is, in the text “Horns & hooves” write “Horns && hooves”.
After completing entering and changing headers and footers in Excel, click in any cell to exit editing mode. If you do not want to save your changes, press the Esc key.
Inserting headers and footers in Excel
You can make your book more interesting and professional by adding headers and footers. The header is located at the top of the page, and the footer is at the bottom of the page. Headers and footers contain information such as page number, date, book title, or section titles.
- Switch to Page Layout by clicking the command at the bottom of the Excel window. The sheet will open in Page Layout mode.
- Select the header or footer you want to change. In our example we will change the footer.
Excel uses the same header and footer tools as Microsoft Word. Review the Guide to Working with Headers and Page Numbers in Word 2013 for more information.
Page settings
From the “Page Layout” tab you can open the parameters window. To do this, click on the form open button in the lower right corner of any of the tab toolbars: “Page Options”, “Fit In” or “Sheet Options”. The window that opens contains 4 tabs, of which we are interested in “Header and Footers”.
This form allows you to customize the page headings and footers as much as possible, including or excluding them. To get started, click the “Create Footer (or Header)” button. Here you can not only enter the necessary text, but also format it.
The same window allows you to make settings: set special headers for even and odd, first and subsequent pages, scaling and alignment of fields, and also remove headers and footers in Excel. The same settings are available in the panel for working with headers and footers in the “Design” tab. The tab is only available in header and footer editing mode.
Simple pagination
See also: “Finding a solution in Excel: an example of using a function”
The simplest method is to number all the pages in the open file. The procedure is performed as follows:
- To activate headers and footers, go to the “Insert” tab.
- Click on the “Text” section and select “Header and Footer” from the list that opens.
Note: Headers and footers, and therefore page numbers, can be located both at the top of the sheet and at the bottom. By default, their values are not specified and, accordingly, they are not displayed on the page. A distinctive feature of headers and footers is that the information entered into them is displayed on all sheets of the current file. - The program should automatically go to the “Header and Footer” tab, where it will display the layout of the current sheet and the header, which is divided into 3 parts. If desired and necessary, you can switch to the lower one by clicking on the corresponding button.
- Now you need to select a suitable header and footer and one of its parts where the page numbers will be located. In practice, the left side of the header is most often chosen. Click on the selected part, then click on the “Page Number” button.
- A tag in the following format will be inserted on the sheet in the footer area: &[Page].
- Now click anywhere in the document outside the header and footer area to enter the page number.
- To quickly find the page number, give it a nice look, and also highlight it among other information, you can use the formatting function. Select information in the footer by hovering the cursor over the desired area and clicking the left mouse button. Next, go to the “Home” tab (if this did not happen automatically) and you can start customizing the appearance of the headers and footers:
- change font
- apply bold/italic or underline text
- adjust text size
- choose its color
- After all the adjustments have been made, click again on any area outside the footer and you're done.
Note: Please note that all work with headers and footers (except for customizing their appearance) is carried out from the “Header and Footers” tab in the top menu bar of the program.
Built-in elements
MS Excel offers built-in elements and even entire headers and footers that are already pre-installed and ready to use. They are available for selection in the menu, respectively, of the top header and the bottom “footer” in the menu for working with footers.
The most suitable text is selected from the list, containing the page number, date, name or path to the file. If none of the options is suitable, you can arbitrarily combine the necessary elements using the buttons on the “Header and Footer Elements” panel in Excel (the “Design” tab), adding not only the serial number, but also the number of pages, the date and time the file was created, the name and path to the file, name of the sheet or drawing.
After working with the headings, you can click anywhere on the page to edit the rest of the information on the sheet. At the same time, you will continue to see headings with “footers”. If you need to switch to normal sheet viewing, just turn on normal mode on the “View” tab, “Book View Modes” toolbar.
Removing headers and footers
Sometimes there is a need to remove the header and footer in Excel. For example, if the file came from outside, and for work and subsequent use the information contained in the headers is not valuable and even undesirable.
To remove headers and footers, switch to page layout mode using the corresponding button on the View tab. Excel will display information that is normally hidden. The second way to display headers and footers is to use the tool of the same name in the “Text” panel of the “Page Layout” tab.
To delete one or more blocks, select the one you need and press the Delete or Backspace key on your keyboard. If you want to remove the header, footer, or both entirely, you can do this in Design mode by selecting “none” in the Header or Footer menu in the Header or Footer panel, respectively.
Now you know how to insert headers and footers in Excel, make settings and remove them if necessary.
Headers and footers are text placed in the top and bottom margins of an Excel sheet. Headers and footers can contain headings or technical information about the document.
This function is not used often, so many users do not know how to remove headers and footers in Excel. If you also encounter a similar problem, we suggest you read this article. The information will be relevant to users of all modern versions of Excel, including Excel 2007, 2010, 2013 and 2020.
When users ask how to remove headers and footers, they often mean not the headers themselves, but the display mode of the Excel document in which they are displayed. The fact is that if the “Page Layout” display mode is enabled in an Excel document, then instead of one solid sheet, the user will see a sheet divided into pages. In this case, at the top and bottom of each page, where there should be headers and footers, the following inscriptions will be displayed: “Header” and “Footer”.
If you have exactly this problem and want to remove the display of these labels, then you just need to change the page display mode to “Normal”. To do this, go to the “View” tab and click on the “Normal” button.
You can also switch to normal display mode using the small buttons in the lower right corner of the Excel window (next to the scale slider).
Adding and editing
Notes in tables can be edited in two ways. Through parameters they can be attached to sheets and diagrams, through markup - only to sheets.
Page settings
To make headers and footers in Excel, follow the instructions.
- Select a chart or worksheet. To “hook” several parts, click on them while holding down the Ctrl key.
- If you need to cover the entire document, right-click on the sheet tab (at the bottom of the window) and select “Select All”.
- Open the "Markup" section in the menu bar at the top.
- In the Page Setup panel at the bottom right there is a small button in the form of a corner with an arrow. Click it.
- Go to "Header and Footer". Their settings are located here.
- Click on the “Top” or “Bottom” drop-down list and select one of the templates. There is a numbering of sheets, their number, the name of the book, used for editing utilities, and the like.
- To add information there that is not in the list, click on “Create top”/“Create bottom”.
- There will be three blocks in the window that opens. They correspond to three header and footer fields.
- Type something in them to make a text note.
- Above these blocks there are buttons responsible for the content. Hover your cursor over them and a tooltip will appear. If you click, for example, “Insert Picture,” you can add a picture.
- Information and links in these objects are displayed as formulas. The path will be indicated as &[Path]&[File], and the current date will be indicated as &[Date]&[Time].
- To remove this, simply erase the formula.
To make headers and footers in Excel, follow the instructions.
If you want to make special data for the first page or different text in even and odd sheets, check the boxes next to the desired options.
- Open Settings - Header and Footer.
- There are settings at the bottom of the window.
- O and “Change scale” so that when editing a document you do not have to change the size of the notes at the same time.
- There is also an item “Different for even and odd pages”. If you enable this function and click on “Create top” (or “Create bottom”), the window that opens will have two tabs - for even and odd.
- To make a “Cover Page,” check the box next to “Special for First Page.” Accordingly, if you activate this setting and click “Create Top”, a window will also appear with two sections - for inserting regular notes and one unique one.
Page layout
Here's another way to work with these objects:
- Insert tab on the menu bar.
- In the "Text" panel, click on "Header and Footer".
- Marking will turn on.
- Click on the area above or below the table.
- Write the desired text in it.
- If you want to add pictures, folder paths or anything like that, use the designer. It will appear in the menu bar when you click on a header or footer.
- It has buttons that allow you to insert a graphic, date, number, and so on.
- There you can also find settings responsible for creating special notes on the first page, even and odd sheets.
- If you check the box next to one of these items, the markup mode will display which specific block you are filling out - even or odd.
If you want to add pictures, folder paths or anything like that, use the designer
How to remove headers and footers
If you actually have headers and footers that appear at the top or bottom of the page when printed, and you want to remove them, then on the contrary, you need to enable the “Page Layout” mode. To do this, go to the “View” tab and change the page display mode from “Normal” to “Page Layout”.
After switching to the “Page Layout” mode, you need to double-click with the left mouse button on the footer.
As a result, the header and footer will be highlighted, and you can remove it from the page using the Delete button on your keyboard.
After this, the inscription “Header” will appear in place of the header and footer, which will not be displayed when printing. In order to continue working with the document, you can return to the normal display mode (Tab “View” - “Normal”).
Adding a picture to the footer
In Excel, you can even insert a picture as a page footer. However, there is a certain “complication” associated with this - the image must fit the size of the element itself, otherwise it can fill the entire space (or part of it), as shown in the image below.
Formulas in Excel - creating simple formulas
However, in this way you can create a background for the entire document, the main thing is to pre-process the image. A picture is added as follows (using Office 2016 as an example):
- Go to the “ View ” – “ Page Layout ” mode.
- Click on “ Header and Footer ” to open the designer.
- Click "Drawing».
- Choose image source.
- Select an image and click “ Ok ”.
For editing, the designer provides a “ Picture Format ” button, but it only helps to adjust the size of the image, and not to adjust colors and make other settings.
This way you can cover even the entire page with an image. Just a couple of minutes is enough. In general, the opportunity is interesting, but practically little used, since a couple of marks with text are simpler than creating a logo.