First launch of the device
When you turn it on for the first time, the device will ask you to make minimal settings. You can't refuse this. First, you need to select the interface language. The main thing is not to rush in this matter. If you accidentally select, for example, Chinese, then it will be difficult to find the corresponding menu item and return to Russian.
Next, the device will prompt you to enter your Google account information. You can skip the procedure, but it is not advisable to do so. Without an account, you will not be able to download games, use mail, maps and other applications from the Play Market. If you don’t have an account, you can quickly register one (You can read about this in our separate article). The process is quite simple and takes no more than five minutes.
After authorization, the device will ask several more questions to which you need to give a positive answer. Particularly important is the point regarding data backup. Be sure to check the box. Different situations happen in life. The phone can be stolen, drowned, broken, or information simply accidentally erased. Backup will help protect yourself from losing important data. It will be enough to log in from any other device or computer and restore all the necessary data. This completes the initial Android setup. A welcome message appears on the display, after which you can start using the gadget. The process may differ slightly on different versions of the operating system. Despite this, the main stages remain unchanged. Above are only the basic settings that are necessary to turn on the gadget. This stage can only be considered the beginning. There are still many parameters ahead that can be changed depending on personal preferences.
Install the necessary applications
Most smartphones come with basic apps like Gmail, Skype or Facebook Messenger installed out of the box. However, such “starter packages” vary noticeably from manufacturer to manufacturer, and it often turns out that instead of the programs you need, the desktop is filled with some incomprehensible rubbish. Many people immediately after purchase pay extra to the store’s specialists for installing additional software, but this does not seem entirely reasonable to us. Since they install mostly free applications on their smartphones like Instagram, TikTok, FBReader, Pocket, VLC directly from Google Play.
Popular smartphones on Android 10 Q
Xiaomi Poco X3 from 9,559 UAH. Xiaomi Redmi Note 9 Pro 128GB from 6,700 UAH. Xiaomi Redmi Note 9 Pro 64GB from 6,039 UAH. Xiaomi Redmi 9 64GB from 3,877 UAH. Xiaomi Redmi Note 9 128GB/4GB from 4,777 UAH. Xiaomi Poco F2 Pro 128GB from 11,799 UAH. Xiaomi Redmi 9 32GB from 3,399 UAH. Samsung Galaxy S10 128GB from 15,799 UAH. Samsung Galaxy M31 128GB from 6,399 UAH. Samsung Galaxy S20 Plus from 19,595 UAH. Samsung Galaxy M21 64GB from 5,312 UAH. OnePlus 8 128GB from 15,049 UAH. Xiaomi Mi 10 Lite 128GB/6GB from 8,749 UAH. Xiaomi Redmi Note 9S 64GB from 5,449 UAH. Xiaomi Mi Note 10 Lite 128GB/6GB from 8,669 UAH. Samsung Galaxy S10 Plus 128GB from 16,749 UAH. Samsung Galaxy A51 128GB from 7,345 UAH. Xiaomi Redmi 9A from 2,749 UAH. Xiaomi Redmi Note 9S 128GB from 5,599 UAH. Xiaomi Redmi Note 9 64GB/3GB from 4,299 UAH.
Then why not do it yourself? We look for the Google Play icon in the menu or on the desktop, click on it and enter the name of the desired application in the search bar. Then we go to it, select “Install” and give it the necessary permissions to use the smartphone. And so we repeat the process for each application. Everyone has their own list of “needs,” so it’s difficult to give any recommendations. If you don’t know what you need, then be sure to look at thematic recommendations on Google Play itself or Google “the best apps for Android.” The main thing is not to rush to fill your smartphone to capacity, then you will forget what you installed and why, and the smartphone may slow down.
Top curtain on screen
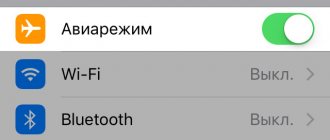
This is a very convenient and useful tool that opens with a swipe. Just swipe down from the top of the screen. The curtain includes a menu with the most popular settings. Depending on the company, device model and firmware version, the set of tools may differ. In most cases, the curtain contains the following buttons:
- Silent mode. A very convenient button that allows you to turn off all sounds of the device at once. This feature can be useful during meetings and other situations where complete silence is required.
- Airplane mode. By activating this key, the phone completely loses the mobile network. No one will be able to call the user or send an SMS message. In this case, the phone remains turned on and can be used as a multimedia device.
- Bluetooth. Allows you to quickly start data transfer without going into the main settings.
- Adjust brightness using the slider. This setting can be adjusted several times a day. This is due to the degree of illumination in the room and the battery charge level.
- Turning the Internet on and off. It is also a convenient feature that allows you to save mobile Internet traffic and battery power.
How to set up an Android phone after purchase?
You have decided to buy yourself a new smartphone running the Android operating system. When we turned it on for the first time, we discovered that the phone needed to be configured. Have you asked yourself how to set up your Android phone?
when you turn it on for the first time, what to do with it next. Here we will talk and discuss this topic. How to use your smartphone to the fullest.
First start and setup of your Android phone!
The first thing you need to do is check the equipment of your smartphone. After you are sure that everything is in place, it’s time to turn it on. To do this, simply open the lid of your Android phone and insert the SIM card. Having completed all these manipulations, all that remains is to turn it on and carry out the first basic setup of your smartphone.
Having turned on the phone, the first thing you need to do is, of course, select the language in which our phone will be in the future, I recommend choosing the language that you can understand. Our next step in setting up the phone and one of the main ones is creating and linking a Google account. You can create it during the settings or enter your own pre-created one. Of course, you can skip this step and enter your credentials later, but I strongly recommend creating it, or entering it at this stage of the setup. Thanks to this account, we can then easily download programs or games, both free and paid, from the Google Play Store, and if you decide to create it right away, read this article “New Google account on an Android phone.”
Thanks to this account using the mail service (Gmail), you will have access to synchronization with different services and a sea of various other tasks. If you do not have a pre-created Google account, then select “No” and proceed to create a new account. It seems to me that this stage is not very difficult, I think that everyone is able to cope with it themselves.
After you have logged into your account, you will be asked a couple of questions, which we agree with; they will be useful to us in the next phone settings. One of the points is backup; it will create a backup copy of your important data, and if it is deleted or lost, it will help restore it. There is only one simple step left in setting up your Android smartphone: entering your first and last name. This data is required to sign email messages. I think this stage is not difficult. There shouldn’t be any problems.
I’ll add a little, different models sometimes contain different Android settings, since manufacturers try to differ a little from the standard template, but I assure you, the basic settings of the phones are the same.
Where to turn on mobile Internet and Wi-fi on Android!
Enable/disable mobile Internet
In order to fully begin to use all the capabilities of our device on the Android operating system, we need the Internet. It is needed to communicate with family and friends using social networks, as well as to download and install the necessary applications and popular games from the official Google Play market. To enable mobile Internet, you can use a couple of methods: the first and easiest is to simply move the curtain from the top of the screen to the bottom and click on the “Mobile Data” icon and if you have the Internet settings specified by your operator, then the mobile Internet will work.
The next option is a little more complicated; for this we need to go to the main menu of our smartphone on Android and follow this path “Menu” -> “Settings” -> “Connections” -> “Other networks” -> “Mobile networks” in the drop-down menu - > “Mobile data” check the box, at this stage the activation of the mobile Internet is completed. If you are interested in the complete process of setting up mobile Internet, and where to register the network parameters and configuration settings themselves, see the next article - “Manually setting up mobile Internet on Android.”
Enable/disable Internet Wi-fi!
In the modern world, almost every home has a Wi-Fi router, and most likely you purchased your Android smartphone in order to connect it to a wireless network. As in the first case, you can simply turn on Wi-Fi by sliding the top screen down. The second method is a little more complicated, go to the main menu and follow the specified path “Menu” -> “Settings” -> “Connections” -> select Wi-Fi, the first time you connect, it will begin searching for all available networks that are within reception range, after will find your network, click on it and enter the password you know, it happens that networks without a password in this case do not need to enter anything. In the case of entering a password, it is entered once; in the future, if you connect to this network again, you will no longer need to enter the password. I just want to say that there is nothing complicated about this, but if you don’t understand something in the next topic, I will definitely write how it’s done - “Setting up WiFi on an Android phone.”
The main source for downloading and installing Google Play Market applications!
So we have reached the point for which we will need the account previously created when setting up the phone, thanks to it we will now be able to access the Google Play market. This is a standard application in Android phones and is the main source for downloading both paid and free applications, games and installing them on any smartphone.
You can find downloaded and installed applications on the desktop simply as an icon or in the main menu of our smartphone. In the Google Play market, you can set up notifications to notify you about some achievements in games or simply notifications about the availability of important updates.
But the Google Play market is not the only place where you can download and install applications and games. The installation can also be done from a computer by first downloading them to a flash card that is or will be in your phone. This is a very important setting when downloading applications and games from other sources. To do this, you need to enable the installation of applications with “Unknown sources” in the smartphone settings. You can do this by following the following instructions “Menu” -> “Security” and check the box next to the unknown sources section - this is will give you the right to install any applications and games.
After these manipulations, all we have to do is connect and download the necessary software into our Android smartphone connected via USB and download programs, games or widgets, etc. to the folder we need.
I hope that the brief instructions for installing and downloading programs and games will help you, and if for some reason you do not understand something, then detailed instructions will be written a little later and you will soon find them here “How to install applications from third-party sources on Android”
Setting up and installing security on Android!
After all the studying about installing applications and games from the Google Play market, I strongly recommend that you immediately download and install the free 360 Total Security antivirus for your Android smartphone. This wonderful antivirus will not only protect your smartphone running Android, but will also be able to speed up the operation of the device, no matter how they assure you that mobile phones are not susceptible to virus infection, believe me, this is not so, I have repeatedly had to flash phones because they were blocked , thrones extorting money from the user. Please note that if you do not secure your phone yourself, then no one will do this for you. I will tell you in more detail in an article that will be written specifically about “how to protect Android from viruses”!
How to customize desktops on your Android phone!
Each Android smartphone contains up to five additional desktops. These parameters depend on the manufacturer and may differ from each other. Each table on your smartphone is independent and you can customize them to suit your needs. By forming on them the applications and games you need for quick access, to put it simply, you can form a group of applications on one table; place widgets and widgets on the next. etc. How to do this is very simple, just in the main menu, hold any icon with your finger and move it to any desktop, you can also create a group of applications in one folder, for this you just need to hold any icon on the desktop with your finger and point it at another icon, thereby automatically creating a folder with a group of applications or games. If you want to change the appearance of your smartphone completely, in order to do this, the article “How to install themes on Android” will be written.
We transfer the phone book from a SIM or memory card!
Next, one of the most important settings on the phone is backing up and restoring contacts to a phone with an Android system. I recommend that you continue to make a backup copy of your phone book on a SIM card, and even better, store important data on a memory card, especially since all modern devices allow you to do this and you will forever forget what it means to lose unsaved data.
In order to make a backup copy, that is, “import / export” of contacts, you should follow the following instructions: take open -> “Contacts” press the call button and additional functions where in the additional menu and select -> “Import / export” it may look like this so “Import from a memory card” or “Import from a SIM card”, after which in the window that appears with contacts, select those contacts that need to be reserved or simply check the box to select all and then click on the “Done” button. More detailed information on how to transfer the phone book from other phones to an Android smartphone can be found in the following news “How to transfer phone contacts to Android”.
When buying a phone, the seller said “Overclock the battery”, should I do this or not?
I will say this, do not listen to those sellers who advise you to overclock the battery by completely discharging and charging the smartphone battery at least three times. This one is not so, they still seem to live in the distant 90s, when there were batteries such as Ni-Cd that really needed such manipulations.
Modern batteries do not require such actions, since all modern batteries are made of Li-Ion, and such actions are not required for them. Charge your phone as soon as it asks for it or when the charge indication is at least 10-20%. Tips to help you calibrate your phone battery
.
I recommend following simple rules when using the battery:
— I recommend not to completely discharge the battery to zero;
— Don’t forget your smartphone in the cold;
— It is necessary to charge the battery completely until it is fully charged, in this way you will increase the service life of the battery through discharge/charge cycles;
— Don’t worry that the first time you use your Android mobile phone, the battery will run out quickly - this means that you have started using the phone intensively and the battery is being adjusted to accommodate this.
No need to hack firsthand using ROOT rights on Android
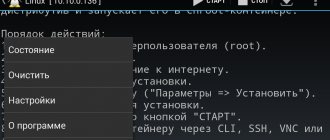
Let's say someone advised you to open full access to the operating system on Android, I will say this, do not rush to do this. Since you are a beginner and “ having received ROOT rights
“, you just can’t do it, and if something goes wrong, the phone will simply die and without the help of a specialist, that is, you won’t be able to restore it for money. I want to warn you that these actions can not only damage your Android smartphone, but also deprive you of warranty service. And the most important thing is that over time, when you really understand this, everyone can easily make ROOT rights, of course, if you understand that this is necessary for you. Well, if you really need to do this, I will write a separate article entitled: “Why do you need Root rights on Android and how to get them.”
I hope this guide helped you set up your new smartphone on the Android operating system. I think that this manual will help you limitlessly expand the capabilities of your phone and, of course, the most important thing is to protect it. I tried to present as much information as possible about the basic settings; if something is not clear, I think that I will soon present the extended manuals and explanations for this article section by section step by step. I wish you a wonderful time with gadgets on the Android system and good luck in mastering it!
Android home screen
The home screen consists of one or more desktops. They are necessary to place the most popular icons. Adding and removing desktops works differently depending on the launcher. On certain models, the menu is called up by pinching the screen. After this, all desktops appear on the screen and you can add new ones. On other gadgets, you need to move the application icon to the area where the desktop is not present.
All Android devices have the ability to add widgets. This allows you to read important information directly from your desktop. There are a large number of widgets. Among them you can find a clock, weather display, latest messages, system parameters, music player and much more.
Installing Play Market applications
To fully customize your Android smartphone after purchase, you need to install additional applications. You can find the Play Market on the main screen of your smartphone.
If you don’t know which applications to install, we can recommend the following:
- VKontakte is a popular social network
- WhatsApp – free communication and calls
- Telegram – free communication and calls
- Viber – free communication and calls
- Instagram – photo sharing service
- Periscope – video calls
- Online Sberbank – mobile payments and transfers
- Kate Mobile - the same VK, but with an invisible function
- Government services - a service for receiving government. services
- Yula – you can sell and buy goods
- Avito is the same as Yula
- AliExpress – profitable ordering goods from China
- Yandex taxi - order a taxi
- BlaBlaCar – profitable trips with a travel companion
- Yandex Navigator - if you get lost
- Yandex Transport - see where your tram/trolleybus is located
- Yandex Electric Trains – train schedules
- Tutu.ru – train schedule
- Trivago – find a hotel at a good price
- Diverly Club – ordering food
- Burger King – coupons and discounts at Burger King
- 2 GIS maps
- Clean Master – clean your phone
- Cian – rent/buy an apartment
- Badoo – dating service
- Delimobil – cashing
- Wallpaper HD – set custom wallpaper
- Zedge – set a custom ringtone
Main menu of device settings
To make finer adjustments to your device, you need to go to the “Settings” item. This is a kind of gadget control center. All available functions are concentrated there. Let's look at them in more detail below.
Wi-fi
To connect to a wireless network, you need to click on this icon. Next, move the slider to the active position. The system automatically starts scanning available networks. The display will display a list of found networks. There are unprotected connections. In most cases, they are located in public places (cafes, restaurants, hotels). One click is enough to connect to them. The situation changes if a padlock icon appears next to the connection. This means that this network is password protected. After entering the password, you can freely use the Internet.
There is a very useful item in the Wi-fi settings - “Enabled in sleep mode”. By activating this function, Wi-fi will be turned off when the phone is at rest. This allows you to save battery power.
Screen
You need to pay special attention to setting up the screen. Firstly, this is a key part of the android, and secondly, it is the main consumer of energy.
It is possible to change the following parameters:
- Wallpaper. The user has the right to install any image on the device desktop. Factory screensavers are not original, so they quickly become boring. Using this feature, you can set any photo or positive picture on the main screen. In addition, there are live wallpapers that are made in the form of animation.
- Sleep mode. This function allows you to set the period of time after which the phone will go into sleep mode. If you do not touch the phone for a specified time, it will turn off the backlight and lock the screen.
- Brightness. Your vision and the duration of operation on a single battery charge depend on the brightness of the screen. Settings are made by moving the slider. There is also an “Auto Configuration” item. If activated, the display will change brightness depending on the lighting level in the room.
- Auto-rotate screen. A very convenient feature. The screen automatically reorients depending on the position of the smartphone in space. If necessary, this function can be disabled.
Sound
Android capabilities allow you to set any melody for incoming calls, messages, alarms, etc. In addition, you can set the volume level for each sound category. All smartphones have the ability to enable or disable vibration during calls. The Silent switch turns off all sounds on the device.
Special abilities
This menu may differ depending on the functionality of a particular gadget. On top models, you can activate call acceptance by shaking the phone and much more. These functions are optional and are rarely used in practice.
Safety
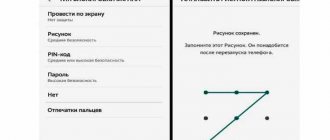
If you store important information on your smartphone, you need to take care of security. The Android system offers a number of solutions for this:
- graphic key;
- digital password;
- alphanumeric password;
- fingerprint scanner (if this function is available in the device).
This is quite enough to protect the gadget from unauthorized access. In addition, the device tries to protect itself from all kinds of viruses. Therefore, an “Unknown Sources” button is provided. By default, Android does not allow you to install applications from third-party sites and other sources. To install a third-party program, you need to activate this function.
date and time
There are a number of cases when the date and time on the device is lost. You can configure them in the main menu. To do this, just click on the appropriate tab and indicate the current digital values. You can take a simpler route. By activating the “Network Date and Time” function, the device will synchronize time from the Internet.
Battery
Here you can not only see the condition of the battery, but also reduce its consumption. There is a special “Energy Saving” tab for this purpose. By following it, we will see several ways to optimize consumption:
- CPU limitation;
- reducing brightness, disabling screen rotation and reducing backlight time;
- disabling the Internet, Bluetooth and navigation;
- disabling vibration alerts and vibration in applications.
You can activate all categories at once or select one. Unfortunately, the battery saving feature is only available on new versions of Android.
Applications
This is one of the main menu items. From here you can manage all applications on the device, as well as delete them. If the device does not have enough RAM, you need to look at the “Running” tab. The currently active applications will be listed there. They can consume a lot of resources and cause the device to slow down. To fix this, the user needs to stop unnecessary applications. Often you can see unused and useless programs there.
Each manufacturer produces gadgets with a certain set of built-in applications. In most cases, they turn out to be of little functionality and take up extra space. Some of them can be removed. To do this, find the application and click on it. Next, a window will open in which you need to click the delete button and confirm your actions. This way, you can free up internal memory and clean your phone of junk.
Search software
If a user has lost his Android phone, he can find the gadget via the Internet using special applications. They are designed to perform the same function as the “Device Manager” built into the operating system. Although there are quite a few such programs, it is worth talking about only a few.
Lost Android
This program is the most famous and is used by many smartphone owners to find Android. After installing the utility, the Personal Notes application will appear on the phone - this is how the developers decided to disguise Lost Android. It should be noted that installation of the program is possible only if the user has root rights.
To search for a mobile device, the owner of the gadget must go to the application website and register using his Google account. After this, a connection will be established between the Internet service and the client activated on the phone. The smartphone search process is carried out remotely using the following functions:
- Receive an extract from the call log by email.
- Determining the location of the phone on the map. If GPS service is disabled on your device, you can activate it remotely.
- Blocking the gadget and deleting all information from it.
- Sending pop-up messages and SMS.
- Carrying out shooting with cameras built into the phone.
This is only the basic functionality available on the site. You can also interact with the missing mobile device using another phone. To do this, the user needs to perform several actions with the web interface:
- Go to the “SMS” tab.
- Enter the phone number from which you plan to send the message in the SMS allow field.
- In the next line, indicate one of the commands, a list of which is presented on the same page of the interface.
Avast Anti - Theft
The mobile antivirus program also has a function to search for a lost mobile gadget. To activate it you need to perform two steps:
- Go to the “Settings” menu, checking the “Deletion Protection” and “PIN Code Protection” items there. If an attacker finds an antivirus application, he will not be able to remove it without entering the password.
- Create an account on the program's web resource by entering your email address and password.
The Anti-Theft utility has a lot of functionality. In the security options section, the user can lock the device and also set an alarm. In addition, it is possible to track your smartphone using GPS and enter a blocking test.
Lookout Security & Antivirus
This application is able to provide comprehensive protection for your phone from various dangers. In addition to fighting virus programs, the user can block the gadget, activate a sound alarm and determine the location of the device. The utility has an attractive design that should appeal to fans of high-tech style. Lookout Security & Antivirus is one of the most popular in its segment. This is eloquently evidenced by the number of downloads and user ratings on Google Play.
It is worth paying attention to the Where's My Droid program. According to the principle of operation, it differs from the utilities discussed. Using special codes, the owner of a lost device can force the phone to send its coordinates or make a call. The extended version provides the ability to take hidden photographs and then send the finished photos to a specified email address.
Of course, all methods of searching for a mobile device cannot guarantee complete success. If you are unable to detect your smartphone using software or utilities, you will have to contact law enforcement.
Developer Settings
There is a separate menu item for advanced users. Initially it is not displayed in the system. To use it, you need to find the “About phone” tab and then “Build number”. After that, click on it about ten times. The message “You have become a developer” should appear on the screen. After this, hidden settings will become available. Here you can activate many functions. For example, change the speed of graphic effects, set a limit for background processes, and much more. The main thing is not to press everything. This may affect the operation of the device.
We use mobile traffic wisely
Although mobile operators are handing out increasingly generous monthly packages with mobile traffic, it would be a good idea to monitor it. Step one - go to the system settings, look for the “Network and Internet” item, then “Data transfer”. There we will find the “Set traffic limit” menu, in which you can specify how many megabytes the smartphone can download before you are shown a notification. After reaching this limit, mobile Internet will be disabled.
It would also be a good idea to limit application updates via the mobile network. To do this, open Google Play and click on the icon with three vertical stripes in the upper left corner. An additional window will open in which you need to select the “Settings” menu. In it we look for the item “Auto-update applications” and select “Only via Wi-Fi”.
Summary
The prospect of setting up a smartphone yourself scares many buyers, but in reality there is nothing difficult about it. Android has come a long way from a clumsy “bucket” to an extremely convenient and well-thought-out operating system, so reading these instructions will most likely take you even more time than the setup itself. The main thing is don’t be afraid to “do something wrong” (it will be difficult) and don’t panic if you can’t find the right item in some menu. As we have already said, each smartphone manufacturer tweaks Android in accordance with its ideals of beauty, so some menu items may be called a little differently than in the text, or hidden in another section.
Installing the launcher
Manufacturers of Android-based devices are trying to stand out and create an individual graphical shell. In this regard, menus, icons, buttons and other elements look different on all devices. In some cases, the factory shell can be boring and not very functional. There is no need to be upset in this case, since this operating system allows you to install any design. Just go to the application store and download the launcher you like. This is not just a design theme, but a radically new system shell. As a result, the user can set the design to his taste.
Phone drain and battery test
The first thing to do when setting up the battery is to set the minimum charge level threshold at which the power saving mode will be activated (most often the value is 5%, 15% or 20%). One of the functions – Battery Manager or Adaptive Battery – will allow you to save battery power. The first will notify the user about the applications that consume the most battery power, and will offer to disable or limit their operation.
The second function will allow you to independently monitor such offers and limit their operation without user intervention.
To track the battery level, there is a “Battery Percentage” on the main screen of the phone.
To save battery power, there is an energy saving mode, as well as manual settings. For the first option: find the corresponding item in the settings menu and check the “Enabled” .
We recommend: How to set a password for an Android folder
With independent settings: disable auto-update of applications, set the screen backlight to automatic level, disable unused applications, etc.
Settings with Root rights
By setting this type of rights, the user receives unlimited access to system files. As a result, you can delete system files, adjust the processor frequency, change the built-in system sounds, and much more. You need to use root rights extremely carefully. Careless actions may cause the device to fail. It is also worth remembering that installing root rights entails loss of warranty from the manufacturer. You can read more about root rights on our website in the corresponding article.
Reset
If the Android settings are not carried out correctly and there is no desire to correct your mistakes, you can reset it. This will cause all previously made changes to be returned to factory defaults. But it’s worth remembering that this erases some of the data stored in the gadget’s memory. Therefore, before resetting, you must back up all important information. It often helps in troubleshooting problems related to incorrect operation of the device. Read our article about how to do this correctly.
Setting Do Not Disturb Mode
Many users want to avoid being disturbed by calls, messages or notifications on certain days or times. In order not to delve into the settings of sound profiles every time, you just need to set up the Do Not Disturb mode once in your new phone. For this:
- Open the Profiles section in settings
- Select "Do not disturb"
- Click the "Rules" button
Here you can select a preset time when the phone will go into silent mode, for example on a weeknight or weekend. Each profile sets the days, time and type of mute (Important only, alarm only and complete silence). By selecting “Only important”, you can specify specific numbers from which the sound will be turned on when calling or SMS. The user can also set a new rule, for example, for an evening walk, a date, a trip to the cinema, or a child’s nap.