Smartphone setup
Let's start first with the question of how to set up email on an Android phone. When you access Email on Android OS, you will be prompted to find your existing mail. For example, enter a password. If you have not previously registered, you should go through this stage. For ease of use, you need to immediately set up Email. It is possible to enter a couple of accounts at once, if you have them. The settings in this case will be general. There are initial ones. You can also make personal settings for each account. Let's take a look at them too.
Setting up mail in Mozilla Thunderbird
The situation is similar here. Most often, it is enough to enter only your email address and password. The client does the rest for the user, immediately uploading the necessary correspondence.
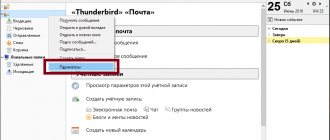
If for some reason this does not happen, you should open the “Tools” submenu and click on the “Account Settings” item. A window will open in front of you asking you to enter the server name (indicated in the first paragraph in the “Data for the IMAP incoming mail server”), specify the port and encryption type. It's important to note that Thunderbird only works over IMAP, which means you won't need POP3 data. Once you have finished setting up incoming mail, go to the “Outgoing Mail Server” submenu and add a new SMTP server by entering the appropriate data, including the port (specified in the first paragraph).
Personal settings
You can decide for yourself what categories of letters you will receive. For example, it could be exclusively social networks and notifications from various stores on the Internet. In order not to miss important messages, it is worth indicating that you would like to receive notifications about new messages on the Android OS. The notification method can also be chosen by you personally.
If messages come only from real users, and you need to leave your email, then you can select the option to install an autoresponder. You'll be able to choose how you want to download attachments, whether they'll show up right away or you'll be able to open them later. Those. If you have unlimited internet connected, there will be no inconvenience.
How to set up mail on Android
If you already have an account for any service, it will be enough to download and install the client and simply log in after launching it; if not, then you can create a mailbox in a matter of minutes. Setting up email on Android devices is no different; the principle of operation is the same for all email service utilities. To create a mailbox, you will need to select the “Create a new account” option in the menu and enter the appropriate data in the form fields. As a rule, the application independently determines the necessary settings and connects to the service, but if this does not happen, you will need to manually configure the mail transfer settings.
This is easy to do; all input data is provided by the mail service. Using the POP3 protocol to transport mail, the client delivers messages to devices without synchronization with the service; all mail changes will be made only in the application, while on the server the data will remain as is. When installing the IMAP protocol, mail is synchronized, that is, all manipulations with letters in the application are reflected on the server.
Setting up Yandex mail
The Yandex client on Android is convenient, creative in design and easy to navigate. For maximum user comfort, there is a swipe action system. It is also possible to add additional accounts. After installing the client from the Play Market on the device (the process occurs automatically after clicking the corresponding button on the store page), the user needs to log in or register. If the application does not determine the settings on its own, you will have to configure it manually. The procedure may also be necessary if you are using a universal client. You just need to select the installation manually, specify the type of protocol you need and fill in the fields for incoming and outgoing email servers.
Basic settings of Yandex mail on Android using protocols:
- Incoming messages.
- For POP3 protocol:
- We register the address: pop.yandex.ru;
- For the connection security item, select: SSL/TLS;
- Connection port: 995;
- For IMAP protocol:
- In the Address column we write: imap.yandex.ru;
- Connection security: SSL/TLS;
- Connection port: 99
- Outgoing messages (SMTP server).
- We register the address: smtp.yandex.ru;
- Connection security: SSL/TLS;
- Connection port: 46
The login and password fields are filled out individually; this is your Yandex account data. From the moment the setup is completed, the mail will begin to fully function.
Setting up Mail
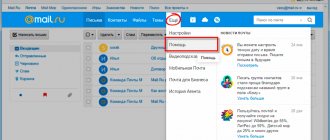
One of the most popular email services, Mail.ru, is as easy to set up as Yandex. You can use both a native client and a universal one, the user is not limited in this. As in the previous case, install the utility from the store, select manual configuration and enter the necessary data in the fields. Setting up Mail.ru mail on Android devices is done in the same way, only the server addresses will be different, for incoming messages - pop. mail.ru (POP3 protocol) or imap.mail.ru (IMAP protocol), for outgoing – smtp.mail.ru. The remaining settings, port and security type will be the same as in the case of Yandex. Next, you can configure the synchronization parameters with the My.mail.ru service, the frequency of checking letters and other details, and also enter the name in the appropriate field that will appear in the “from whom” column when sending messages.
Setting up Google mail
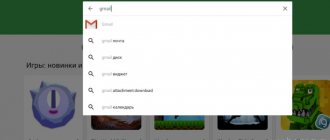
Google's mail app is almost always already installed on Android, so you're unlikely to need to install it. If you do not yet have an account, you will need to register, where you will be asked to enter your credentials. It is possible to add other accounts, for which you should select the appropriate option in the settings, select the one you need from the list of email clients, and then enter your credentials. After such manipulations, mail from other mailboxes will be available in Gmail.
All email clients perform automatic mail setup from Google. The incoming mail server will be imap.gmail.com, and the outgoing mail server will be smtp.gmail.com. In this case, Gmail settings can be changed. By default, the IMAP protocol is used, but as a result of synchronization, battery costs, traffic consumption increase, and some devices even have heating problems. If you want to switch to POP3, you can do this by going to Mail Settings, where in the “Forwarding and POP/IMAP” section, check the boxes next to the items “Enable POP for emails received from now on” and “Disable IMAP”.
Gmail users can also take advantage of Google's interesting Inbox utility, which includes many useful tools and is equipped with the ability to read and delete messages by swiping right and left. The client has a more original design and a greater number of features, and is available for download from the Play Market.
Setting up Rambler mail
The Rambler.ru service has also enjoyed considerable popularity for many years. Setting up Rambler mail on Android devices is similar to the Yandex and Mail.ru services described above. We select the POP3 or IMAP protocol for incoming letters, register the addresses pop.rambler.ru (port 995, SSL) or imap.rambler.ru (port 993, SSL), respectively, for outgoing ones - smtp.rambler.ru (gjhn 465, SSL) . The settings are suitable for any client and domain offered by the service. Before using a third-party utility, it is important to go to the “Mail Programs” menu in the mailbox settings, where you check the box next to the item indicating that you plan to use third-party clients to receive mail.
Data about servers is always present in the help section of each mail service, so if you choose another option, you can find information to fill out the settings directly on the service.
As you can see, there is nothing complicated about filling out these protocols for email clients yourself; they are all configured in the same way, so now you can choose any email client for yourself, and even if the application does not detect the settings, you can always configure the connection manually. All you need to guarantee the functioning of mail on your Android is proper configuration and a working Internet.
General settings
If you resort to frequent archiving or delete emails, you can make the actions performed by simply swiping. This gesture will really make your task easier.
When replying to messages from a conference, your message is sent only to the sender of the letter. In this case, you should change your Yandex mail or e-mail in the settings. Then the answer will come to everyone.
In fact, we have covered the most important settings of the application. There is no point in dwelling on those that are less popular. But this article does not end there.
Setting up Rambler Mail on iPhone or iPad
Apple devices are very popular, and email is an integral feature on them. This allows you to receive and send emails almost anywhere. Before setting up Rambler Mail, you need to make sure that your mobile device has an Internet connection. After this, you need to launch the Mail application. If you are setting up Rambler Mail on an iPhone or iPad for the first time, and there are no other email accounts on the device, you can immediately select the “Other” item in the window that appears. In other cases, you will first have to go to the program settings and create a new email account.
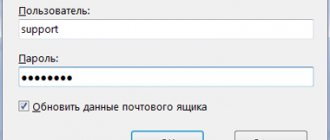
After starting the setup process, a form will appear on the screen in which you must enter your name and selected address and click the “Forward” button. In the second step, you need to fill in the servers for incoming messages (pop.rambler.ru) and outgoing mail (smtp.rambler.ru), and also enter your email address twice in the username and password field.
About the mail.ru application
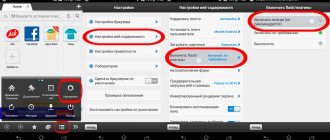
The article discusses the most popular postal service today. A user of an Android OS device can use the application that we described above. You can also customize your gadget for yourself. You don't have to use anything specific. When you log in, you will be asked to enter your mailing address.
The application settings are very similar to those we discussed above. For this reason, there is no point in repeating. The choice of an email application for the Android OS will depend only on you. You have the right to personally determine which interface you prefer to work with, where the space is more conveniently organized, and other aspects.