Users who upgraded to Windows 10 from earlier versions of the OS may have noticed that the Photos app has become the recommended and default photo viewer instead of the usual Windows Photo Viewer.
Surely, there will be those who like this replacement, and they will be happy to start using the new tool. However, some users will certainly want to return to the earlier option for viewing photos, and also be able to select it in the “Open with” item in the context menu of the image file.
Below we will look at how all this can be done.
Reset Photos app preferences
This manipulation will clear the cache and roll back the program to its original settings. Here's how to implement it.
Right-click on “Start” and go to the “Applications and Features” tab. Scroll down and select "Photos". Then click “Advanced options”, and in the window that appears, click on “Reset”.
This will erase all data from the app, including any saved image settings, and return it to its original state.
How to Install Photo Viewer on Windows 10
I propose to consider 3 simple ways that will help you return the classic viewer from the seven and make it the default program for opening pictures and photos. Unfortunately, the process for solving this problem differs depending on whether you installed Windows from scratch or performed the update that Microsoft talked so much about.
It would be cool if, like in the BIOS, you checked “activate windows photo viewer” and everything works. In practice, this is exactly what happens - in a couple of clicks
A clean installation of Windows was performed
The problem with a clean system (I am a supporter of this particular installation of Windows) is the absence of the tails of previous versions - there are no entries in the Windows 10 registry for the photo viewer (although the application itself has not gone away). Therefore, these parameters must be returned, which is what we will do now!
Via the registry
The process of editing the registry is quite a difficult task for a beginner. Incorrect actions can disrupt the operation of the operating system, so I suggest using a ready-made script to activate photo viewing on Windows 10. You can download it from the link below:
Script to activate photo viewing [v1_2020][3kb]
The downloaded archive needs to be unpacked, there are two files there - now we are interested in “ENABLE_Windows_10_Photo_Viewer” . Run it and agree to import the data file into the registry.
What happened? - We brought back the ability to select the Windows Photo Viewer when opening images and made it like in Windows 7! Just right-click on the file with the image and in the “Open with” option, find the built-in application in the system.
Of course, each time choosing how to open JPG files in Windows 10 is not very convenient... therefore, it is necessary to configure the system so that pictures and photos themselves open in the program we need
Click “Start” and go to “Settings” (eh... gone are the days of settings in the Control Panel).
Find the “Applications” section.
On the left side of the window, activate the “Default Applications” item and on the right click on “Photos” (almost at the very beginning).
And select the convenient “Windows Photo Viewer” application that we need! ALL!
You can rollback all changes by running a second script to make entries in the registry! (from the archive you downloaded - “DISABLE_Windows_10_Photo_Viewer” )
Via PowerShell
You can configure the classic Windows photo viewer to open pictures in Windows 10 via PowerShell - you don’t even have to download anything... this method has differences in the way the default program is assigned, now we’ll look at everything in detail.
Right-click on the “Start” menu and select “Windows PowerShell (Administrator)” in the context menu - this method will not work without admin rights!
Copy the commands below, paste them into the PowerShell window and press Enter (to paste, just right-click anywhere in the window).
If ( -Not ( Test-Path "Registry::HKEY_CLASSES_ROOT\Applications\photoviewer.dll")){New-Item -Path "Registry::HKEY_CLASSES_ROOT\Applications\photoviewer.dll" -ItemType RegistryKey -Force} If ( -Not ( Test-Path "Registry::HKEY_CLASSES_ROOT\Applications\photoviewer.dll\shell")){New-Item -Path "Registry::HKEY_CLASSES_ROOT\Applications\photoviewer.dll\shell" -ItemType RegistryKey -Force} If ( -Not ( Test-Path "Registry::HKEY_CLASSES_ROOT\Applications\photoviewer.dll\shell\open")){New-Item -Path "Registry::HKEY_CLASSES_ROOT\Applications\photoviewer.dll\shell\open" -ItemType RegistryKey -Force} Set-ItemProperty -path "Registry::HKEY_CLASSES_ROOT\Applications\photoviewer.dll\shell\open" -Name "MuiVerb" -Type "String" -Value "@photoviewer.dll,-3043" If ( -Not ( Test-Path "Registry::HKEY_CLASSES_ROOT\Applications\photoviewer.dll\shell\open\command")){New-Item -Path "Registry::HKEY_CLASSES_ROOT\Applications\photoviewer.dll\shell\open\command" -ItemType RegistryKey -Force} Set-ItemProperty -path "Registry::HKEY_CLASSES_ROOT\Applications\photoviewer.dll\shell\open\command" -Name "(Default)" -Type "ExpandString" -Value "%SystemRoot%\System32\rundll32.exe `"% ProgramFiles%\Windows Photo Viewer\PhotoViewer.dll`", ImageView_Fullscreen %1″ If ( -Not ( Test-Path "Registry::HKEY_CLASSES_ROOT\Applications\photoviewer.dll\shell\open\DropTarget")){New-Item - Path "Registry::HKEY_CLASSES_ROOT\Applications\photoviewer.dll\shell\open\DropTarget" -ItemType RegistryKey -Force} Set-ItemProperty -path "Registry::HKEY_CLASSES_ROOT\Applications\photoviewer.dll\shell\open\DropTarget" -Name "Clsid" -Type "String" -Value "{FFE2A43C-56B9-4bf5-9A79-CC6D4285608A}" If ( -Not ( Test-Path "Registry::HKEY_CLASSES_ROOT\Applications\photoviewer.dll\shell\print")){ New-Item -Path "Registry::HKEY_CLASSES_ROOT\Applications\photoviewer.dll\shell\print" -ItemType RegistryKey -Force} If ( -Not ( Test-Path "Registry::HKEY_CLASSES_ROOT\Applications\photoviewer.dll\shell\print \command")){New-Item -Path "Registry::HKEY_CLASSES_ROOT\Applications\photoviewer.dll\shell\print\command" -ItemType RegistryKey -Force} Set-ItemProperty -path "Registry::HKEY_CLASSES_ROOT\Applications\photoviewer. dll\shell\print\command" -Name "(Default)" -Type "ExpandString" -Value "%SystemRoot%\System32\rundll32.exe `"%ProgramFiles%\Windows Photo Viewer\PhotoViewer.dll`", ImageView_Fullscreen % 1″ If ( -Not ( Test-Path “Registry::HKEY_CLASSES_ROOT\Applications\photoviewer.dll\shell\print\DropTarget”)){New-Item -Path “Registry::HKEY_CLASSES_ROOT\Applications\photoviewer.dll\shell\ print\DropTarget" -ItemType RegistryKey -Force} Set-ItemProperty -path "Registry::HKEY_CLASSES_ROOT\Applications\photoviewer.dll\shell\print\DropTarget" -Name "Clsid" -Type "String" -Value "{60fd46de-f830 -4894-a628-6fa81bc0190d}" #
After completing the command, the window can be closed, now all that remains is to configure the automatic opening of pictures!
Go to the folder with the images and right-click on it, in the menu that appears, select “OPEN WITH” > “SELECT ANOTHER APPLICATION”...
... we go down to the very bottom and find there the built-in application “Windows Photo Viewer” (don’t forget about).
Unfortunately, this process will have to be done for all known image formats (though in 90% of them I use JPG - so this is probably not a problem).
Via command line
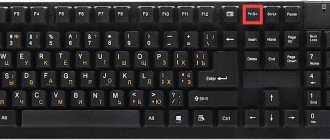
If you do not want to make changes to system files, but you need the classic photo viewer for Windows 10, you can always use the command line functionality. Press the combination WIN + R on the keyboard and in the “Run” window type “cmd” without quotes.
The command below opens the usual Windows image viewer...
rundll32 “%ProgramFiles%\Windows Photo Viewer\PhotoViewer.dll”, ImageView_Fullscreen
...however, you won’t be able to use it in this form: neither dragging nor the “Open” command works in this case - you need to add the path to the folder with photos to the end of the command, separated by a space. For example, my pictures are on the C:\ drive in the “pic” folder - in this case, in the command line you need to type the following text:
rundll32 “%ProgramFiles%\Windows Photo Viewer\PhotoViewer.dll”, ImageView_Fullscreen C:\pic
This combination will open Windows Photo Viewer with all the images in this folder and you can scroll through them using the keyboard or navigation buttons in the program window.
Updated from Windows 7
If you upgraded to Windows 10 on a desktop or laptop that was originally running Win 7 or Win 8.1 (or worse, Windows 8), then you don't need to download or install anything - everything you need to get back the system's built-in JPG viewer and There are already other images. All that remains is to teach the system to use the application we are familiar with!
You need to set Windows Photo Viewer as the default application for image files. The process is described in detail in points 1 and 2 - just choose the one that suits you best
Reinstall again
The next method is a radical solution to our problem. Its meaning is to forcefully remove the program from the PC and then install it back. Unfortunately, this procedure cannot be done through the “Applications and Features” list. Instead, you will have to use a PowerShell command.
Namely: open “Start”, enter “PowerShell” and right-click on it.
Next, let’s do “Run as administrator” and type:
Get-AppxPackage Microsoft.Windows.Photos | Remove-AppxPackage
Now, when you press Enter, the program will be completely removed from the PC. Then look at the Microsoft Store, find “Photos” there and reinstall it back.
How to re-register the Windows 10 Photos app
Application re-registration is used to restore the functionality of standard applications in Windows 10 with the Microsoft Store. After executing literally one specific command in Windows PowerShell, the application corrected in this way begins to work normally.
- Launch Windows PowerShell by selecting Windows PowerShell (Administrator) .
- In the window that opens, run the command: Get-AppXPackage | Foreach {Add-AppxPackage -DisableDevelopmentMode -Register "$($_.InstallLocation)\AppXManifest.xml"}
After executing the command, all standard Windows 10 applications will be re-registered. To re-register only the photography application, you must run the command: Get-Appxpackage -Allusers -Name Microsoft.Windows.Photos
Next, copy the full name of the photo application in the PackageFullName and paste it into the command instead of PackageFullName . It is not possible to copy a universal command and simply execute it, since the PackageFullName is different in different versions of the operating system.
Add-AppxPackage -register "C:\Program Files\WindowsApps\PackageFullName\AppxManifest.xml" –DisableDevelopmentMode
System Restore
If you roughly remember when you started having problems with the application, you can roll back the system to that period.
It's easy to do. Again, go to “Start”, enter “Restore” and click “Create a restore point”.
In the new window, click on “System Protection” “Recovery”, and then follow the instructions until you select the desired restore point. Ideally, you need to choose the point of the moment when there were no problems with the photographs.
Using the Troubleshooter in the Windows 10 Settings app.
This utility from Microsoft can automatically find and fix some problems with Universal apps. The troubleshooter is available in different languages and works on any operating system language.
If you're having problems with the Windows Store Photos app, use Microsoft's troubleshooter
- Open Windows Settings by pressing the Win + I key combination or click on the Start gear icon.
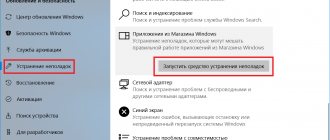
- Go to the following path Update and Security → Troubleshooting.
- On the page, in the “ Find and fix other problems” , find and click the item – “ Windows Store Apps” , the “Run the troubleshooter” , click it.
If running this utility does not help, use the following tips to solve the problem with the application yourself.
Method 2 of 4.
Just use the old program
Some people still think the best photo app is the old Windows Photo Viewer. Yes, it may not be as sophisticated as Photos, but it knew its job well, was functional and convenient.
But that's all in the past. Microsoft now has a modern photo app. Therefore, if Windows 10 is installed on your PC, you can manually make “Photo Viewer” the default application and use it.
Selecting an app to view photos in Settings
See also: “How to open the Run dialog box in Windows 10”
To implement this task, we need to get into the “Default Applications” section.
- Launch System Settings by pressing the Win+I key combination. In the window that opens, click on the “Applications” section.
- In the new window, click on the “Default Applications” subsection. The right side will display programs that the system automatically uses when performing certain actions or opening files. Here we can also find the “View Photos” item.
- Click on the current application installed by default and select “Windows Photo Viewer” from the list that opens.
- After these steps, we can see that the required program is now used by default to view photos.
In general, the results obtained should be sufficient for most users. But these are not all the settings that we can set here.
- Scroll down the contents of the right side of the same subsection, find the inscription “Select standard applications for file types” and click on it.
- This window provides a list of possible file extensions and in the column on the right - the programs that are used by default to open them. We check whether all the required graphic formats will be opened through the previously assigned “Windows Photo Viewer”. For example, the most common formats are: jpeg (in the picture below), png, tif.
- If for a certain format we want to reassign the default program, click on the current option and select the desired application from the proposed list. After this, you can return to the previous window by clicking the arrow in the upper left part of the current window.
- You can also use the “Set default values by application” button.
- Scroll down the list of programs, find the “Windows Photo Viewer” item, click on it, then click on the “Manage” button.
- The window that opens presents a list of formats for which the program we are considering is assigned by default.
- However, please note that not all image files can be set to “Windows Photo Viewer”, for example the “bmp” format.
For those who updated from Windows 7 or 8 to the new tenth version
As it became known, viewing images or photos of the most popular formats is only possible in the Photos application. Therefore, I decided to write a review article, which I hope you will really like and will find useful in the future, namely: it will provide solutions to the problem described above. Interested? - then make yourself comfortable.
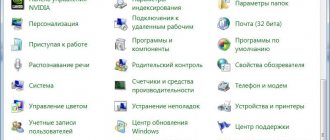
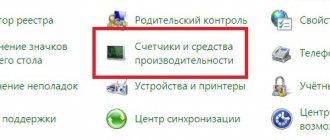
As for me, in this situation you will not have any problems. After all, the ability to return the photo viewing program remains in the graphical interface of the operating system. If you still haven’t done the update, then read my article and switch from Windows 8 to Windows 10. The viewer has not gone away, since it is still recorded in the library (photoviewer file in dll format). In order to select such a function, all you need to do is go to the control panel settings or the “Open with” menu.
Your next step will be to open the “Select another application” tab. In the menu that opens, you will be able to select the required program with which further imaging will be carried out. You can also o. If the required software was not found in the pop-up list, you can use the “More applications” tabs.
Turn thumbnails on or off in File Explorer options
To enable or disable the function, perform the following procedure:
- Launch Explorer by clicking on its icon on the taskbar (or using the Win+E key combination).
You can also simply open the folder for which we want to set the preview mode (or any other folder).
- Go to the “File” menu, in which we select the “Change folder and search options” command.
You can also get to the folder parameters through the button of the same name, which is located in the “View” tab.
- In the window that opens, switch to the “View” tab, where we find the item “Always display icons, not thumbnails.” Check the box next to it if you want to disable file previews and always show only their icons, then click OK. To return sketches, uncheck the box.