If you need to change the “This PC” icon, the recycle bin icon, folder and some other system locations, you can simply do this using the system’s built-in tools. Moreover, there are third-party options for changing other Windows 10 system icons to your own.
This manual contains details of both simple built-in methods for beginners and other “advanced” methods for changing icons in Windows 10 and installing them to your liking. See also: How to change the icon of a disk or flash drive in Windows.
Changing the Computer, Recycle Bin, and Other Icons
If you want to set your own icons for some system folders on the desktop, you can do this in Windows 10 as follows:
- Go to Settings - Personalization - Themes.
- In the right panel, select Desktop Icon Settings.
- In the next window, you can enable or disable individual desktop icons, as well as set your own.
- Simply select from system libraries or specify your own file in .ico format after clicking the “Browse” button.
Just in case, here is a list of built-in Windows 10 libraries where the main system icons are stored (all are located in C:WindowsSystem32):
- shell32.dll (selected by default when changing icon).
- imageres.dll
- ddores.dll
Of course, there are others, but all the main things that the operating system uses are collected in these DLLs.
Replacing the icon
First of all, you need to download the desired icon or their library if the standard set of Windows 10 icons is not satisfactory.
There are plenty of them on the Internet, and finding the right one is not a problem. The link contains a huge library of icons in ico format: https://drive.google.com/file/d/16C2IN7CaoBVPHdp2woGGYo_zpbz4ED4h/view?usp=sharing
1. Unpack the contents of the archive.
2. Call the “Properties” of the directory, go to the “Settings” tab and click “Change icon”.
3. Select the appropriate one from the shell32.dll library, or click “Browse” to specify a third-party one.
4. Specify the folder in which files with icons or a dynamic library (with a dll extension) with icons are located and click “Open”.
5. Confirm your choice by clicking on the “OK” button to replace the standard icon with your own.
6. Save all changes and update the Explorer state with the F5 button if the folder has not taken on the new look.
- To return the usual directory design in the icon selection window, click “Restore default value” or specify a second icon.
Custom icons are created both in web applications through the browser, and in programs such as IconFX and the like. Nobody forbids taking a photograph or a fragment of it and turning it into an icon.
How to change folder icon Windows 10
Changing the icons of individual folders in Windows 10 is a very simple task, just follow these steps:
- Right-click on any folder and select "Properties".
- Go to the Settings tab and click Change Icon.
- As in the previous method, specify the desired icon from Windows libraries, exe files of programs or your own .ico file.
- Sometimes after this you need to close and reopen the window with this folder or press F5 for the changes to take effect.
How to pin the Recycle Bin to the Start menu or taskbar
It’s a little more complicated, but it also doesn’t require two higher education degrees. Click anywhere on the desktop with the RIGHT mouse button and “Create” - “Shortcut” ...
In the window that appears, enter...
explorer.exe shell:RecycleBinFolder
(can be copied and pasted)
"Further" …
And so, a shortcut appears on the desktop...
But he looks a little un-Korzin-style, doesn’t he? Go to its properties (RIGHT BUTTON on the shortcut) and “Change icon”. Again, we indicate the icon from the downloaded archive, for example. Or in the “Look for icons in the next file” field, enter or better paste after copying this line...
%SystemRoot%\system32\imageres.dll
And "Ok".
Now it's beautiful! All that remains is to click on the trash can icon with the RIGHT mouse button one last time and...
Congratulations, we have moved the Recycle Bin to the taskbar and Start button menu. But we no longer have access to such a convenient cart menu! From which, by the way, it was possible to rename the basket.
Programs for changing Windows 10 system icons
There are quite a lot of programs available on the Internet that can change Windows 10 system icons by editing resource files.
This is not something I would recommend to a novice user, as it can potentially lead to problems (for example, when checking the integrity of system files, the test will find that it is broken), but, just for information, I will demonstrate one such program - CustomizerGod, available on website www.door2windows.com/customizergod/
What can the program do? First of all, replace the main system icons of Windows 10 (in the “General Icons” section. For example, if you needed to change the icons of all folders at once, you can do this in this section. Not only .ico files are accepted, but also other graphic formats (for example, png with a transparent background).
Changing the icons of the main desktop shortcuts
The main desktop shortcuts include links such as “ This PC ”, “ Control Panel ”, “ Trash ”. To change these icons, you need to go to the “ Options ” panel and click on the “ PERSONALIZATION/Themes ” links.
In the window that opens, you need to open the “ Desktop icon settings ” link. This link will open an additional window in which you can make changes.
Now let's try to change the " Trash " label. To do this, select the trash can and click on the Change icon button.
In the list of shortcuts that appears, we will select the one we like and confirm our decision with the Apply button. Below is a basket with a different image.
Users can also use icons not from the standard Windows 10 libraries, but from third-party sources. One such source is the Open Icon Library, . You can download this package on its official website https://sourceforge.net/projects/openiconlibrary. After downloading and unpacking the archive, about 10 thousand icons of various formats will be available to you. To use them from the “Open Icon Library”, click on the same button Change icon for the recycle bin shortcut. In the window that appears, click on the Review button. . . . After that, select one of the “Open Icon Library” shortcuts. Below is a cart using images from the Open Icon Library.
Changing shortcut icons
To replace the native program icon, you will need to use special applications, but you can create a shortcut for it and change its appearance. To do this we will perform the following operations:
- Click on the “Properties”
from the shortcut menu. - After that, click on the “Change icon”
. - Next, using the “Browse” button,
we download the file that contains the icon that suits us. - Select it and click “Apply”
. - At this stage, the system may request administrative access. We provide it by clicking “Continue”
. - After that, click “OK”
and the icon will change to the selected one.
We create icons ourselves
For this example we will use the IcoFX . This program can easily create various icons from bitmap images. For this example, we'll take a free photo from https://pixabay.com. This site has thousands of free images.
We will also download and install the IcoFX . After that, open the IcoFX program, and also open our image in it.
When opening an image, the utility prompts us to make a choice. We will focus on the “ Create an icon from the image ” option. This option will open our image in a reduced resolution, which can be saved for use as an icon.
Once you select the appropriate icon size, you can save it. In our case, the size is 256 × 256. It is saved in the “*ico” file format. Below is an example of a Shortcut user shortcut with our icon.
Setting label sizes
Changing the size of desktop shortcuts is quite easy. To do this, go to the active desktop and right-click on it. After this action, a context menu will open in which you need to go to the “ View ” line.
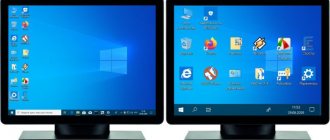
As you can see in the image above, you can make the size large, regular, and small. This setting allows you to adjust the size for monitors with different resolutions and diagonals. For example, for large monitors you can reduce the size of the labels, and for small diagonals you can make them larger. It is also worth noting that in the “View” item you can pin shortcuts in a grid and pin them automatically to the desktop.
Change the Recycle Bin icon in System Settings
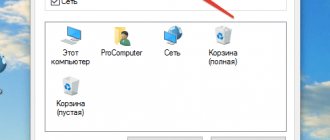
1. Open “Desktop Icon Options”: in the search bar or in the Run menu (Run is called with the Win+R keys) write rundll32.exe shell32.dll,Control_RunDLL desk.cpl,,0 and press the Enter key (you can also go to Start menu => Settings => Personalization => Themes => in the right column you need to open “Desktop Icon Settings”).
2. In the window that opens, there are "Trash (Full)" and "Trash (Empty)", let's first change the icon for the full Trash. Select "Trash (Full)" and below click "Change Icon".
3. Click on “Browse” => open the folder in which the new icon is located (the icon should be in ico format, if you have a different image format - there are many online converters from one format to another, for example image.online-convert.com/ ru/convert-to-ico) => select an icon and click “Open” => select the desired icon and click “OK”.
4. Now select “Trash (empty)” => Change icon => do the same as in the third point. In the last window, click OK.
How to set up the Recycle Bin in Windows 10
Windows 10 comes with a set of Recycle Bin customization features that we haven't seen in many other operating system versions. Something completely new for this iteration of Windows is a set of options exclusive to the Recycle Bin, such as increasing the size of the Recycle Bin and more.
Up until Windows 8, the Recycle Bin is what it is - a container for your deleted files. In Windows 10, we can make changes to the Recycle Bin, making it behave in several new and useful ways.
For many, we only know how to periodically empty the Recycle Bin so that it does not take up precious disk space. However, you have the option to change the maximum size of the Recycle Bin, set the Recycle Bin to be emptied automatically after a few days, or bypass it entirely to permanently delete all deleted files.
In this article, I am the administrator of the site kaknastroit.com, I will try to explain how to perform each of these three steps on any computer with Windows 10.
How to change the cart size to the maximum
The default recycle bin is about 5% of the total size of your disk volume. With this in mind, let's assume that you have allocated 500 GB of space for your volume. For this volume, the Recycle Bin will automatically begin permanently deleting the oldest files if just over 25 GB has been used.
For the vast majority of users, 5% is more than enough cart space. However, you may find yourself in the middle of an OCD-induced cleansing session where you want to be extra careful that whatever you delete doesn't disappear forever. In this case, you may want to consider changing the maximum cart size.
To do this, simply right-click the Recycle Bin icon on your desktop. If you don't have an icon on your desktop, look in Windows Settings
>
Personalization
>
Themes
, scroll down to the
Related Options
.
In it, select “ Desktop Icon Settings
”.
In the window that opens, check the box
into the cell opposite the Recycle Bin, after which it will appear on the computer desktop.
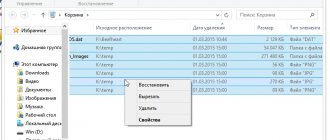
Click on the “ Trash”
"Right-click and select "
Properties
", the "
Properties: Recycle Bins
" window will open, in which you can set the maximum size for each volume.
By selecting the “ Set size”
", you can easily enter the maximum size in megabytes that interests you after reaching it, filling which will permanently delete the files from the recycle bin.
How to Bypass the Recycle Bin and Delete Files Permanently
If the Recycle Bin isn't useful in your workflow, you can set a default action to delete files to bypass the Recycle Bin entirely and remove permanently deleted files.
This can be done in the same menu “ Properties: Recycle Bins”
" if you right-click on the trash can icon.
By selecting " Shred files immediately after deletion, do not move them to the Recycle Bin"
" This option will delete files immediately after deletion, after which Windows will do just that every time.
How to make the recycle bin delete files after a few days
One feature of the Windows 10 Recycle Bin that everyone can benefit from is cleaning up Windows after itself. This feature is built into Windows 10 Sense storage, which helps users automatically clean up their drives. This is comparable to the native Windows solution for something like CCleaner.
To start using Storage Sense to free up space in your Recycle Bin after a few days, press Windows key + I
to open
Windows Settings
.
From there, click on " System
".
In this window, click on “ Device Storage
” in the menu on the left.
After this, you should be in a window that looks like the screenshot below; in the same window below, click on “ Change how you automatically free up space
.”
In this window, you will see a drop-down list related to the option “ Delete files in my Recycle Bin if they have been there for more than
" The following options are available:
- Never;
- 1 day;
- 14 days;
- 30 days;
- 60 days.
Using the drop-down to select one of these options will save that change in the Device Storage
" This change will be retroactive, so if you have files that have been in your Recycle Bin for 80 days and you choose Storage Sense to delete them after 60 days, they will be deleted after this change is applied.
While maintaining a healthy Recycle Bin is just a few clicks away, it's important to understand that Windows 10 offers users settings that help automate and better control one of the longest and most important parts of the operating system. These three simple cart settings are worth a look and only take a few seconds!
If you want to learn more ways to customize your Windows 10 computer, be sure to check out our article on How to Open Hidden System Files and Folders in Windows 10
" With respect to you, the administrator of the site Kaknastroit.com!
Change the Recycle Bin icon in Registry Editor
Before editing the registry, it is recommended to create a system restore point.
1. Open the registry editor: in the search bar or in the Run menu (Run is called with the Win + R keys), enter the regedit and press Enter.
2. Navigate to the path HKEY_CURRENT_USER Software Microsoft Windows CurrentVersion Explorer CLSID <645FF040-5081-101B-9F08-00AA002F954E> DefaultIcon. In the DefaultIcon section, the empty is responsible for an empty cart, and full for a full one.
3.Open the parameter empty => in the “Value” field, enter the full path to the new icon (the icon must be in ico format, if you have a different image format - there are many online converters from one format to another, for example image.online-convert. com/ru/convert-to-ico) and click “OK”. For example, the file with the image of the new icon w5Full.ico is located in C:UsersLiliDownloads, the path to “Value” should be written as follows: C:UsersLiliDownloadsw5Full.ico and click “OK”.
4. Now open the full and change the “Value” as described in the third paragraph.
Close Registry Editor, log out, and log back in for the changes to take effect.
The Recycle Bin icon is missing from the Windows 10 desktop.
If the Recycle Bin icon is missing from your Windows 10 desktop, this post will show you how to restore it using UI options or through the registry.
There is no need to tell you what the Recycle Bin means in Windows. Recycle Bin helps you easily remove unnecessary files from your system and provides a reverse deletion process. The Recycle Bin on your desktop allows you to delete files by simply dragging and dropping onto its icon. You can even select some unwanted files on your desktop and drag them to the trash icon to delete them.
Imagine what you would do to delete multiple items from your desktop if the trash icon disappeared from your desktop? Well, you can delete files by right-clicking and selecting Delete from the context menu, but the above-mentioned simple drag-and-drop method will not work in this scenario.
So if you don't see the trash icon and want to restore it, here's how you can do it:
Return the Recycle Bin icon to the desktop in Windows 10.
Method 1 – using Parameters.
Start button or press the Win + X keys and select Settings .
2. In the Settings app, go to Personalization → Themes .
3. Under Related Options, click the Desktop Icon Options .
4. In the window that opens, make sure that the checkbox opposite the trash can is enabled. Click Apply and then OK.
This should restore the Recycle Bin icon to your desktop. If the Recycle Bin does not appear on your desktop, try Method 2.
Method 2 - Return the trash icon using the registry.
Disclaimer: further steps will involve editing the registry. Registry manipulation errors can affect your system. So be careful when editing registry entries.
1. Press Win + R and type regedit in the Run dialog box to open Registry Editor (if you are not familiar with Registry Editor, click here ). Click OK.
2. On the left side of the Registry Editor window, navigate to the following registry key:
HKEY_LOCAL_MACHINE\SOFTWARE\Microsoft\Windows\CurrentVersion\Explorer\Desktop\NAMESPACE
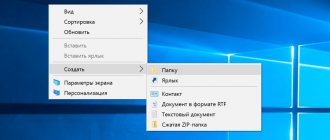
3. Expand the registry key NameSpace , right-click on it, select “Create” → “Section” . Name the newly created registry key as {645FF040-5081-101B-9F08-00AA002F954E} .
4. On the right side of the registry key {645FF040-5081-101B-9F08-00AA002F954E}, open the string parameter (Default) and change the Value to: Recycle Bin
5. Click OK and close Registry Editor. Restart your PC to apply the changes.
All - The Recycle Bin icon on the desktop has been restored.
We recommend: How to pin the Recycle Bin to the Quick Access Toolbar in Windows 10.
Restore default trash icons
1. Open “Desktop Icon Options”: in the search bar or in the Run menu (Run is called with the Win+R keys) write rundll32.exe shell32.dll,Control_RunDLL desk.cpl,,0 and press the Enter key (you can also go to Start menu => Settings => Personalization => Themes => in the right column you need to open “Desktop Icon Settings”).
2.Select “Trash (full)” and click on “Regular icon”, now select “Trash (empty)” and also click on “Regular icon”, click “OK”.
That's all for today, if you know other ways or have any additions - write a comment! Good luck to you