In this guide, you will learn about 2 ways to recover data on your hard drive using popular recovery programs Recuva, EaseUS Data Recovery Wizard and DiskDigger. If we talk in detail, you will find out:
- how to recover deleted files using the EaseUS Data Recovery Wizard;
- how to return the trash can to the desktop;
- what is the most reliable way to restore a deleted folder to your hard drive;
- how to recover files deleted by an antivirus after resetting settings, reinstalling Windows 7, from the lost dir folder, etc.
- How to recover all deleted files from the recycle bin area to your computer.
- Is it possible to restore the contents of the Recycle Bin after emptying it?
What is a Cart?
When you delete a file through Explorer or another file manager, it is placed in a special staging area in Windows - the Recycle Bin. Generally speaking, this area is present in any normal operating system with a graphical interface: not only Windows, but also Mac OS or Linux. The recycle bin (or Recycle Bin, as it is called in the original version) can even be installed on a mobile phone running Android or iOS.
One way or another, deleted files are stored in the Recycle Bin for a certain time, until one of two situations occurs:
- You are emptying the system Recycle Bin because there is no free space left on your hard drive
- The Recycle Bin uses limited space to store “erased” data. When there is not enough space, old files are simply overwritten by newer ones on top of existing information without the user's knowledge
Thus, the Windows “Trash Can” plays the role of a kind of intermediate clipboard, backup space on the HDD. If you decide that you still need some files, you can rummage through the system Recycle Bin, dig out directories, folders, and erased items from there, and quickly restore them.
Sometimes you look in the Windows Recycle Bin - and the most necessary things are no longer there: in fact, there is only useless “garbage” left! Most likely, you simply emptied the Windows system Recycle Bin and your valuable files have actually disappeared. We will look at ways to restore the Recycle Bin in other ways. A video version of the article is available here:
What to do before recovering deleted files
It is necessary to exclude any recording of information on a disk with deleted files. If this is a system volume (for example, files were deleted from the desktop), then to achieve the best result, it is recommended to turn off the computer. Then connect the hard drive to another computer and perform recovery from it. If the information is not deleted from the system disk, then you don’t have to look for another computer, just don’t write anything to this disk.
You already know that deleting files does not erase them. They are not erased even if the hard drive is fully formatted. Only the entry in the file table about it (the file) is erased. Thus, the operating system is able to write to the location of the deleted file. Many computers, including mine, have scheduled defragmentation enabled. Once a day or once a week, your hard drive is tidied up (Programs for defragmentation here). In this case, some files are overwritten to other locations. And there is a huge probability that some file will be written, at least partially, in place of the deleted one. In this case, the likelihood of successful recovery will sharply decrease. That’s why you shouldn’t delay restoring deleted files.
Is it possible to recover files deleted from the Recycle Bin?
From time to time, you can empty the Recycle Bin to free up disk space. But do you think that files cleaned in this way will be quite difficult to get back? So the question arises: how to restore the Trash after emptying? To do this, you will need special programs for file recovery, and not two mouse clicks. Therefore, I advise you to always think about what actions you are taking, especially when it comes to emptying the Trash.
When a file is erased from the Recycle Bin, many users think that it is sent to /dev/NULL and that deleted files cannot be recovered in the future even with the help of recovery programs. Even the Windows operating system displays a message saying, “Deleting a file from the Recycle Bin will permanently delete the file/folder from your computer.” However, in reality this is far from the case. I think that my article is also read by experienced users who do not believe what the operating system tells them and can do things that are incomprehensible to mere mortals. So listen to me carefully.
Windows (or another OS) changes one character in the file table, after which the file and folders are simply not displayed in Explorer, My Computer or another file manager. However, now we can get any file recovery program using the functionality for its intended purpose. In principle, any recovery program from this category will be able to scan your hard drive and effectively recover deleted files from the Recycle Bin. I will recommend you a time-tested, effective toolkit. First of all, we are talking about such a well-known utility as EaseUS Data Recovery Wizard.
Windows to the rescue
Windows has a system restore feature. If you have it active, it can be used to recover files (but only if they were located on the system drive).
For example, you can select the “Desktop” folder in Explorer and right-click on it and select the “Restore previous version” menu item.
Having selected a saved copy of this folder for a certain period, you can click on the “Restore” button. In this case, all objects in the “Desktop” folder that existed at that time will be restored (Fig. 4).
How to Recover a Recycle Bin or Deleted Folder Using EaseUS Data Recovery Wizard
Data Recovery Wizard is an excellent, effective program that has helped me more than once restore the Recycle Bin and find files deleted after it was emptied. In addition, it will help you recover a deleted folder. I used it under Windows and it actually restored everything that I stupidly cleared. One of the key features of this program is that you can quickly look at the files, that is, preview them, before the actual recovery. This can save you a lot of time, especially if there were a lot of files in the Recycle Bin and they all ended up, as they say, being distributed. Next, read my guide on how to recover erased files from the Recycle Bin using EaseUS Data Recovery Wizard.
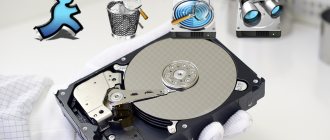
The Recycle Bin is the area from which you can recover a deleted file or folder
Step 1. Download Data Recovery Wizard
You can download the program from the catalog on this site, on torrents or, of course, on the Recovery Wizard manufacturer’s website. Only there it is paid; but if you have some money, then why not support the guys who have made a good recovery program? The free version is also capable of recovering files in demo mode, so feel free to download it, and then decide for yourself whether it’s worth your dollars or not.
Step 2. Launch the program to recover deleted files
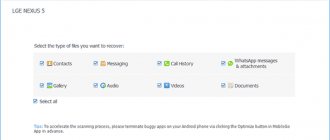
Launch the EaseUS Data Recovery Wizard, select the types of deleted files you want to recover from the Recycle Bin. Then click “Next” to continue the file and folder recovery procedure in the next step.
Selecting data types to search for
Step 3. Select a drive to scan deleted data in EaseUS Data Recovery
Select the disk, hard drive partition where you lost the file, click the “Scan” button. The program will quickly scan the selected source in search of files deleted from the Recycle Bin (everything here depends on the size of the source; be patient). By the way, if you have erased an entire disk partition, you can use the “Search for lost disks” software option. Then click “Scan” and wait.
Selecting a disk with erased files and folders in the Easeus Data Recovery Wizard application
Step 4. Recovering files and saving the resulting data to disk
After scanning, you can preview the desired deleted files in the Recycle Bin for recovery and then select one or more items to save to disk.
Tip of the day . I strongly advise you to save files and directories NOT on the disk where the files for resurrection from the Recycle Bin are located. Copy them to another partition: this will avoid overwriting data that, in fact, is still at the recovery stage (and it’s not a fact that you will be able to recover a deleted file - although let’s not talk about sad things). It is very easy to mistakenly erase information needed for reconstruction. However, it is not always possible to return deleted files from the recycle bin back to the storage source.
EaseUS Data Recovery Wizard application : whoever looks for will always find
I hope this lesson helped some of the readers answer the question: “How to recover deleted files or folders from the Recycle Bin”: photos of kittens, favorite movies about love or an essay on the topic of finding deleted files files in the Trash.
Recovering files before and after emptying the Recycle Bin
Recovering deleted data from the Recycle Bin is quite simple. To do this you need to have minimal computer skills. If the trash has already been emptied, it will be more difficult to return lost documents. To make things easier for themselves, many people use special recovery programs, but you can cope without them.
Before cleaning was carried out
Folders sent to the trash are stored there for quite a long time, so you need to look for a lost document there. If the user has not cleared the storage, the probability of finding a loss is almost 100%. To restore a file, you must:
- Open the cart by double-clicking with the left mouse button.
- Find the required document and click on it.
- In the top panel, click the “Restore selected objects” button.
After this, the lost file will return to its original location. You can also use another method: left-click the document found in the trash and drag it to the desktop.
In shadow copies without programs
Many users, when deleting files, immediately empty the recycle bin. After this, all documents disappear from this folder, but they do not disappear without a trace. The fact is that Windows 7 creates backup copies of all folders in which your document may be stored. To restore a file, you must:
- Open File Explorer and find the folder where the document was previously stored.
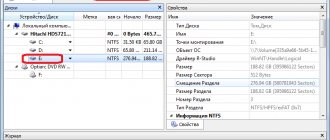
- Right-click on it and select “Properties”.
- Switch to the "Previous Versions" tab.
- Among the many shadow copies, select the closest one in date and look for a loss in it.
- If the file is not there, go to an earlier copy.
This method will only work if “System Protection” is not disabled on the computer. Otherwise, you will have to use special utilities.
Using File History
In fact, File History is the same thing as a shadow copy. It’s just that different experts call this function differently. This method is used in exactly the same way as the previous one. It helps to recover not only lost files, but also old versions of various documents.
Features of recovery on Android
On Android devices, there is no Recycle Bin program by default, so restoring files is a little more difficult than on a computer.
To search for missing documents, special utilities have been developed, such as Disk Digger, Restoration, UnDelete Plus, GT Recovery, EASEUS Mobisaver, etc.
Also, to avoid irretrievable loss of files in the future, owners of Android devices can download the Dumpster application. It plays the role of the usual recycle bin and stores all deleted files for a certain time.
How to recover all files deleted from the Recycle Bin using the DiskDigger utility
If you've emptied the Recycle Bin or deleted some files from it, you still have the option to get those trashed, deleted, or accidentally erased files back. To do this, follow a few simple steps in the DiskDigger application.
When selecting a drive, select the one that contained the files before they were moved to the Windows Recycle Bin. Explorer will only display the system Recycle Bin, but in fact, files that were moved from another drive are stored in different system directories. This is why it is so important to specify the correct drive to recover data from the Recycle Bin.
After selecting the desired drive, click the “Analyze” button. Upon completion, select the “Recycle Bin” folder in the DiskDigger program window that appears. It contains files and folders that you can recover deleted files in the usual way using the "Recover" button on the toolbar or a similar reconstruction command from the context menu. You can restore a deleted folder using the same principle as a file.
If you do not see files in the specified directory, you can go to DiskDigger for an advanced analysis of the hard drive file system. Let's move on. If you still don't find the items you're looking for after extensive analysis, try looking for files in the system folder related to the Recycle Bin. The folder name depends on the OS and the theme of the disk file system. Let's say, in Windows 2000 and XP, the folder will be named "$RECYCLE.BIN".
Download DiskDigger
Using Recuva
A completely free utility will help you find lost data through quick analysis. Due to its simple interface, such a program can restore deleted files from the recycle bin in a few minutes.
Manual:
- Download the program from . Install.
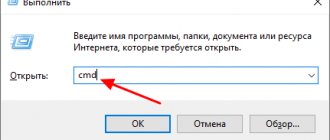
- Launch the application. Select the desired hard drive at the top.
- Click the "Analysis" line. Wait 3-10 minutes. The scanning speed depends on the amount of information.
- The contents will be highlighted. Anything marked in red is non-refundable. Yellow – damaged, but possible to repair.
Pros:
- Russian localization support;
- fast scanning;
- information is color coded.
Minuses:
- support only for windows 7 and older;
- can sometimes freeze;
- there is no search for erased disk partitions.
The utility is recommended only if information is lost before overwriting. Otherwise, the search will not yield positive results.
Configuring Recycle Bin options
Configuring internal settings of the Windows Recycle Bin
It’s quite simple and won’t require much of your time. Basically, it comes down to setting two main settings: setting the maximum size of disk space allocated for servicing deleted files, and setting the instant deletion option.
Typically "Windows Recycle Bin"
has a shortcut created during the initial installation of the operating system, located on the desktop.
To access the settings window, click on the “Windows Recycle Bins”
and call up the pop-up context menu.
Then, from the list of proposed action options, select the “Properties”
.
a Windows Recycle Bin shortcut on your desktop
is missing (you may have forcibly changed the settings when installing the operating system), then follow these steps to enable its display.
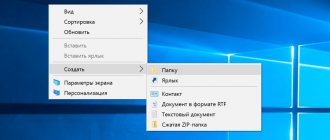
There are several ways to perform this procedure. For example, right-click on an empty space on the desktop and call up the pop-up context menu, and then select the “Personalization”
.
The window of the main operating system settings application “Settings”
on the
Personalization
.
In the left panel of the window, go to the “Themes”
, and in the right panel, using the scroll bar, move the slider to the bottom of the page and find the
“Related options”
.
Now click on the Desktop Icon Options
.
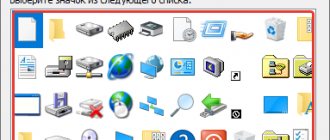
The corresponding settings window will open, in which, in the “Desktop Icons”
You must check the box
“Trash”
to subsequently display the
“Windows Recycle Bin”
on the desktop.
Then click the “Apply”
and
“OK”
to save the settings.
In the "Properties: Recycle Bin"
select the location of
the “Windows Recycle Bin”
(for example, Local drive
“C:”
), the maximum storage size of which you want to change.
Now in the "Options for the selected location"
set the indicator (dot) opposite the
“Set size: Maximum size (MB):”
.
Then, in the appropriate cell, enter the amount of disk space (1024 MB = 1 GB) that you allocate for the needs of the Recycle Bin
.
Then click the “Apply”
and
“OK”
to save the specified
Windows Recycle Bin
.
Note
: Typically, the default maximum storage size for
the Windows Recycle Bin
is about five percent of the free disk space.
Windows Recycle Bin size limits
for all local drives displayed in the properties window. Select the desired drive and repeat the procedure for resizing the storage.
If, for some reason, you do not intend to set the final size of the Windows Recycle Bin
or want to disable it (for example, there is not enough free disk space to store user information), then you can activate the function of permanently deleting files.
To do this, in the “Properties: Recycle Bin”
in the
“Options for the selected location”
, set the indicator in the
“Destroy files immediately after deletion, without placing them in the Recycle Bin” cell
.
Then click the "Apply"
and
"OK"
for the changes to take effect.
Now any files and folders you delete will bypass the reserved storage area of the Windows Recycle Bin.
and erased immediately directly.
This means that you can recover such files using the internal capabilities of the Windows Recycle Bin tool.
, which we will talk about later in our article, you will no longer be able to.