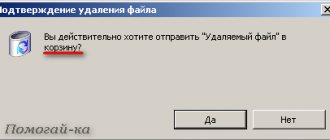
Even the most inexperienced user is familiar with the “Trash” folder. It stores all unnecessary files and folders, so to speak, system garbage. Sometimes users are bothered by an extra shortcut on the desktop. Also, the system disk can become very clogged when the recycle bin stores all unnecessary files and folders. The system begins to freeze and slow down.
Alternative option
You can remove the shortcut from the desktop itself, but pin it to a panel or menu.
- “Taskbar”: select the trash can on the table and drag it onto the panel; after the pin message appears, release it.
Drag the trash can to the “Taskbar”
- Context menu: right-click on the trash can on the table and click on “Pin to Start Screen”.
Click on “Pin to Home Screen”
In this case, when you open the menu through Explorer, this icon will be displayed along with the others.
Pinned icons in Explorer Start menu
Location of the recycle bin in different OS versions
The application icon is located on the desktop, its appearance changes in accordance with the operating system, but often it looks like a bucket or box, and it can be empty (if empty) and filled with papers (if it contains elements):
- LiveJournal
- Blogger
The Trash shortcut is most often located on the desktop and looks like this
. What is presented to the user’s gaze is only the tip of the iceberg. Application data and main folder on local disk. If the user does not know where the Recycle Bin is located in Windows 7, no problem. The folder can be found in the following path: C:\RECYCLE.
- LiveJournal
- Blogger
Application data and main folder on local disk.
You immediately need to make an allowance for the fact that its meaning is hidden. Therefore, for detection, the user must activate the hidden folders visibility feature. If the user is interested in the Recycle Bin in Windows XP, it is located in the same place.
If you don't know, the default deleted item storage capacity is 10% of the total local disk space, with a separate folder created for each item.
Let’s say if a device has 3 local disks, then 30% of the total volume is allocated for storage. When downloading and installing, you come across hefty programs that exceed the total amount of allocated space. Initially, the application will delete an old file or several, and try to move the uninstalled one; if impossible, it will ask you to confirm the permanent deletion.
Limiting the size of files in the recycle bin
In this case, the recycle bin icon must be present on the desktop.
- Right-click and go to “Properties”.
Go to “Properties” of the “Trash” folder
- In the “Maximum size” item, set the value we need and “Apply”. Then click "OK".
In the “Maximum size” item, set the desired value, click “Apply” and “Ok”
How to empty the Windows 10 Recycle Bin when you turn off your computer
| Estimate |
Article read: 936
As any computer user who saw a mouse and keyboard for the first time not yesterday knows, the Recycle Bin on the Windows desktop is emptied using the context menu. It opens by right-clicking on the trash can icon and selecting the appropriate command. However, there is another way to permanently delete files from your computer.
Deleting files from File Explorer should not be done manually. Windows 10 has the ability to automate the entire process and forget about deleting files forever. For example, you can delete files using the Shift + Delete keys. The files are not sent to the trash, but are still erased without the possibility of recovery.
If you want to use the shopping cart, you can configure it to happen automatically. Now we will look at how to force the Recycle Bin to delete all data when the computer turns off.
This method requires Windows 10 Pro edition. The reason is that it uses the Local Group Policy Editor, which is not available on Windows 10 Home. You also need to work with an administrator account.
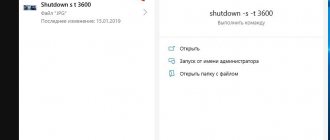
You need to create a script that will be responsible for emptying the recycle bin. Create a text file and enter the following command there:
PowerShell.exe -NoProfile -Command Clear-RecycleBin -Confirm:$false
Save the file and give it a name like Empty Recycle Bin script so you always remember what the purpose of the script is. This is especially useful if you have more than one script stored in the same folder.
Since you used a text format, the file will have a .txt extension. Change it to .bat. As a result, you will have a file called
Related posts:
- Steam statistics for November show a drop in share...
- Windows 10 November 2020 Update is available...
- How to download torrents on Android
- How to prepare your Android device for a factory reset...
- Review of the Windows 10 November 2020 Update operating system
Empty Recycle Bin script.bat
To check, you can place some files in the trash and run the script. If the recycle bin is empty, everything works fine.
Now we need to make this script run when the computer is turned off. There are several ways, but on Windows 10 Pro we will use the Local Group Policy Editor.
Click on the Start button and enter the command
gpedit.msc
Go to address
Computer Configuration > Windows Configuration > Scripts > Shut Down.
Click on the “Add” button and specify the path to the script file you created. There is no need to specify any additional script parameters, since they are all included in the command.
Now everything is ready. The next time you restart your computer, Windows will automatically run the script and the Recycle Bin will be emptied. Keep this in mind so you don't accidentally put files you need into the trash.
Found an error in the text? Report it to the author: select it with the mouse and press Ctrl+Enter.
Additional Information
Sometimes it happens that the trash icon on your desktop shows that there is something in it, but in fact it is empty.
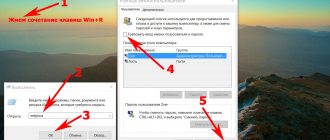
- We follow the path described earlier: “Personalization” -> “Themes” -> “Desktop icon settings”.
- Select the empty cart icon and click “Change icon…”.
Click "Change icon..."
- In this window, select the appropriate icon. Select it and click “Ok”.
Select the appropriate icon and click “OK”
- You will be returned to the options window again. Here, uncheck the box next to “Allow themes to change desktop icons.” Next “OK”.
Uncheck the box next to “Allow themes to change desktop icons” and click “OK”
Read interesting and useful information in the new article - “How to recover data deleted from the Recycle Bin.”
How to change the icon
This can be done in the same menu with the desktop icon settings from the previous paragraph.
To do this, click on the silhouette of the object and “Change icon...” . There are two types of icons: empty (nothing inside) and full (clogged with something). Each one has a separate label, so select both icons.
Choosing an icon is a simple process. After clicking on a shift, a list of system icons appears from which you can choose any one. It is also possible to download an icon from the Internet in .ico format and apply it through “Browse...” .
If you need to insert some image as an icon, but it is not in .ico format, use the services of an online converter. There are plenty of such services - for example, this site.
How to remove the Recycle Bin shortcut from the desktop
The Recycle Bin in Windows is a folder into which files are moved to be deleted. In this article we will talk about what you can do with its desktop shortcut. When we put a beautiful screensaver on the Windows Desktop, unnecessary icons can ruin the whole impression. Especially the basket sign. Well, who would like a trash can against the backdrop of a beautiful car? Fortunately, this is easy to fix in the latest versions of Windows - Vista/7/8.
- To do this, right-click on the desktop. In the context menu that appears, select “Personalization”
- Next, in the window that opens, select “Change desktop icons”:
- A window for setting up desktop shortcuts will open, where with one click we uncheck the box next to the Recycle Bin.
- That's it, our problem is solved:
It is worth noting that files in the Recycle Bin will still be deleted (if you have not disabled this separately) and you can always enable its display again. But if you still actively use the Recycle Bin, then turning it on here and there will not be very convenient. We need to make sure that it doesn’t get in the way on the Desktop, but at the same time is always at hand. To do this, return it to the Desktop and right-click to bring up the menu and create a shortcut for the Recycle Bin.
After that, we can safely hide it back. We can rename the created shortcut for the Recycle Bin as we wish. Now you need to create a folder where this shortcut will be stored. Create in a place where it will not disturb you. For example, in your home folder. Let's call it “Shortcuts” and transfer the shortcut we created for the Trash to it.
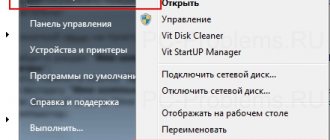
Now right-click in the lower right corner of the screen, where the clock is in Windows. This area is called Trey. Here are icons for programs that are already running on the computer in the background. And this is where we will send our cart. To do this, you need to select the item in the context menu - “Create Toolbar”
In the window that opens, we will be asked to select a folder. Here we select the “Shortcuts” folder that we created, in which our shortcut for the recycle bin should already be located.
As a result, we have such a panel with the name of our folder, in which our Trash shortcut is visible along the arrow. In order to go to the shortcut itself, right-click on our panel and uncheck the “Lock the taskbar” checkbox. After this, right-clicking our panel again will bring up a menu with other items. Here you need to uncheck the “Show title” and “Show captions” boxes. After this, we get a neat Trash shortcut in the Tray. It should be noted that in this way you can create not only a shortcut for the recycle bin, but also other personal toolbars, for example for programs that you often use.
How to restore the Recycle Bin on your desktop
Some users delete storage at their own discretion, but this does not always happen. Sometimes, in the chaos, you may not even notice that you uninstalled the tool, but when you need it again, you find out that the Recycle Bin has disappeared from the Windows 7 desktop, and what to do in this situation?
To fix this, you need to restore the Recycle Bin on your desktop. There is a solution:
- We clear the workspace of shortcuts and right-click on the free space, select the “Personalization” menu from the list that opens:
- LiveJournal
- Blogger
- Just as we removed the icon, open the icon management menu:
- LiveJournal
- Blogger
- We look for the basket and put a mark in front of it. Click the “OK” button:
- LiveJournal
- Blogger
These steps will help you restore the Recycle Bin shortcut. If you are not satisfied with the appearance of the storage, then here you can select icons for the Windows 7 recycle bin.
WATCH THE VIDEO
A simple fix for the error “The Recycle Bin on the disk is corrupted”
The simplest method for fixing a recycle bin error, provided you don't need any of its contents, consists of the following steps:
- Run Command Prompt as an administrator: In Windows 10, this can be done by typing “Command Prompt” into the taskbar search, then right-clicking on the result and selecting the desired item. Other methods are described here.
- Enter the command (in this command you need to replace the letter Z with the letter of your drive where the recycle bin is damaged): rd /s /q Z:\$Recycle.bin and press Enter.
The cart will be deleted along with its contents, and then automatically created again. Unfortunately, this method does not always work: sometimes you may receive information that access to a certain folder is denied, the path to which looks like $Recycle.bin\S-set-of-numbers\folder, or a message that the folder is not empty.
Possible solutions are in the next section, but first there is another simple method that may also help:
- Right-click on the Recycle Bin, select “Properties” and make sure that the Recycle Bin on the problem disk is set to “Set Size” and is set to a certain size.
- Open Explorer and in it, right-click on the drive where the problem is, open “Properties”.
- Click the Disk Cleanup button.
When cleaning the disk, select Empty Trash. If everything goes well, the recycle bin will be cleared and the error will not reappear.