We create our own Windows 7 image with updates.
Hello everyone, in this article I will show you one of the simplest and fastest options with which you can create an image of Windows 7 with updates. Perhaps I’ll make a few assumptions right away. Firstly, calling this method “fast” is a stretch: it will take us a LOT of time to (1) download the updates themselves and (2) integrate them into a future build. Plus the creation of the Windows 7 image itself. Much depends on the performance of the computer and the network bandwidth. But the simplicity of this option lies in the fact that you don’t have to do or configure ANYTHING MANUALLY. And if you have to, you will make sure that you can handle all the actions on an intuitive level. In one of the articles About Windows 7 with a set of updates, we already did this manually. Today we will approach this issue from a different angle.
Secondly , about the completeness of the downloaded updates. It is, of course, conditional. In any case, 0-day updates to your collection (especially with regard to security updates). However, my option is in any case better than sitting for hours every time after reinstalling Windows 7 and waiting for the next download of essential updates. At the same time clogging the network channel. And this is against the backdrop of the fact that Microsoft is no longer going to support the W7 system. No updates, no support. So let's try to create an image of Windows 7 with a set of all updates once and forever.
Third : while working, refrain from other tasks. If the process of creating your own build of Windows 7 is important to you - otherwise why did you come here? - be patient. Let Windows devote all the resources of the machine to performing this particular task. And you will need a lot of them:
You can create your own image of Windows 7 (8 or 10) based on your own Windows. There will be updates, programs and all your accounts with your unique settings.
As for the Windows 7 image...
I won't tell you where to find it. With the end of the Windows 7 era looming on the horizon, Microsoft has excluded it from almost all previously available official download sources. However. Whatever builds of Windows 7 you have, use the official (uncorrected) release as a basis. This will avoid a type installation error later
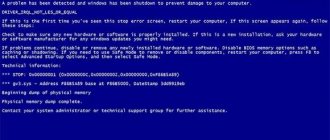
...could not display images available for installation...
and the window for selecting the Windows version is simply empty
And here again I don’t give any advice on choosing a suitable image: I traditionally have several official assemblies stored, and not even all of them “worked”. Alas: you will have to train your hand yourself.
About updates
As I already said, RT 7 Lite requires MSU update files: splitting them into CAB files can be painful. I suggest you download the largest, as well as the necessary (related) packages. And you have to prepare. Please note right away: we download packages for your version and bit depth ! And this is what I usually throw into personal Windows 7 images:
- We mean that you already have Windows 7 SP1 ... That is. We will not download the official service pack separately. But if you already have an old licensed disk/image of a clean release of Windows 7 close to your heart, then here is a link to SP1.
- April 2020 update (aka critical service stack updates); Without it, further updates will not work. On this page you will find links to packages of the corresponding bit depth.
- security update ( KB3020369 ) (so that DISM works as it should)
- Windows 7 SP1 Convenience Rollup . Download 64-bit and 32-bit versions of packages;
I suggest that RT 7 Lite indicate them in exactly that order . Thus, in my own builds, updates from SP1 to May 2020 are automatically installed. I wasn’t particularly looking for large update packages, but given the fact that Microsoft monthly updates (for now) with bug fixes and increased stability, it is likely that they and exist. Here I appeal to my readers: post links; Let Windows 7 live a little longer at least on the pages of blogs like mine. And in this regard, I myself can recommend one of the most effective programs of its kind for downloading Windows 7 updates. For our case, it may be useful. For those who don't know, get acquainted:
Windows Update Downloader
This small utility allows you to download updates to your computer until the beginning of 2020. At the same time, it breaks the updates into groups:
You can select the ones you like by activating or unchecking the checkboxes (by default, all will be downloaded, and this is not necessary at all - you won’t be able to stuff them into install.wim of the original Windows; however, you can try). There will be no errors - they simply will not appear during installation:
In this article I will continue to integrate not only the updates I specified, but I will also try to push in the ones downloaded by the WUD utility. Let's look at the result.
About RT 7 Lite
A few words about the description of how the program works. Read before work.
The program is very serious and can do much more than integrate updates. With its help, you can cram anything into a Windows image, even hidden processes, and also change its appearance beyond recognition. But today there are only updates.
- The link I give is the first one that I personally Googled in RuNet. The program has not been updated for a long time; the parent site has long stopped supporting it. And the link inside the program inviting you to download the updated version leads to dubious resources.
- The fact that the program is free is partly a disadvantage. During operation, script errors from loaded scripts are common: advertising appears. So while working with RT 7 Lite, I turn off the Internet.
- The program works in a unique way: by all indications, it seems to “freeze”; if you minimize the window, you may not see it for a long time. So, don’t believe it - everything works , just wait until all processes are completed.
- While working, do not, under any pretext, view either the folder with the future Windows or the folder with Windows 7 donor. Otherwise, mistakes cannot be avoided.
nLite 1.3 - the final version of the utility for cutting Windows distributions
The promised quick release of the final version of the nLite utility was clearly delayed; let me remind you that at the time the last preliminary build appeared, the author promised to present the final version in a few weeks, but testing and debugging for unknown reasons dragged on for more than two months. However, just yesterday a new release was presented, number 1.3, which automatically means the program will work as correctly as possible. Designed for preliminary preparation of Windows installation distributions of the 2000/XP/2003/x64 family virtually from scratch, allows you to integrate the necessary updates, drivers, cut out individual components, integrate some programs, apply advanced settings and automate the installation process itself. Creates and writes a boot disk from which you can install an operating system fully customized to your needs. The interface has been translated into many languages, including Russian.
The author did not limit himself to eliminating only the errors found, but also added a number of new functions:
- new: detection of damaged CAB archives
- new: direct integration of Windows Media Player 11
- new: OOBE skip option for silent installation mode
- new: custom region setting for silent installation
- new: localization into Indonesian
- new: option for compatibility with Tablet PCs
- fixed: display of “show desktop” icon for Windows XP
- fixed: Internet Explorer 7.0 browser integration for Windows 2003 Server x64
- fixed: Intel graphics driver integration
- fixed: missing text mode driver system files
- fixed: integration of updates KB841356, KB924667, KB925876, KB928090, KB928255
- fixed: removal of Intel processor driver
To run the utility, .NET Framework version 2.0 components are required:
- .NET Framework 2.0 x86 (22 MB, depending on language)
- .NET Framework 2.0 x64 (45 MB, depending on language).
announcements and advertising
2080 Super Gigabyte Gaming OC for 60 rubles.
Compeo.ru - the right comp store without any tricks
RTX 2060 becomes cheaper before the arrival of 3xxx
Ryzen 4000
series included in computers already in Citylink
The price of MSI RTX 2070 has collapsed after the announcement of RTX 3xxx
Core i9 10 series is half the price of the same 9 series
The price of memory has been halved in Regard - it’s more expensive everywhere
An alternative .NET Framework 2.0 x86 package is available on the official website, just over 6.6 MB in size.
Additions that can be applied to the distribution using nLite:
- RyanVM's Windows XP Post-SP2 Update Pack 2.1.7 – a fix package for the English version of Windows XP with integrated Service Pack 2.
- NFM's x64 Post-SP1 Update Pack 1.73 is a fix package for English versions of Windows XP x64 and 2003 x64 operating systems.
- Xpize MCE 4.6 – a package for decorating the system, adds new design elements (icons and pictures).
- Vista Transformation Pack 6.0 is another system beautification package that applies the style of the new Windows Vista operating system to Windows XP.
Additions for preliminary application to the distribution:
- UpdatePack-XPSP2-Rus 7.2.15 – a fix package for the Russian version of Windows XP with integrated Service Pack 2.
- UpdatePack-W2k3sp1 from 02.22.07 - a fix package for the Russian version of Windows 2003 Server with an integrated service pack 1.
You can download the final version in an SFX archive from our file server:
- nLite 1.3 (1.9 MB, freeware).
The discussion is taking place in this thread of our conference.
Creating a Windows 7 image with a set of updates using RT 7 Lite
Be prepared for a long process. The updates have been downloaded and are in some folder (I have Downloads).
- Let's create an empty folder for the files of the future Windows. Anywhere.
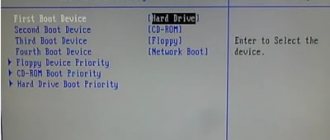
- Launch RT 7 Lite as administrator. In the central part of the program, use the Browse button to point to the donor image:
- A window will appear with 2 buttons: Select ISO and Extract Path. As you can see, both the donor Windows and the mount folder for the future Windows are on my Desktop:
unpacking the image into a new folder
In the next window I select Windows 7 Professional:
Wait for the image to finish loading:
Upon completion, the left panel of the program is partially activated. We are interested in buttons
- Task (change selection window); in the central quadrant of the utility, select only the checkbox with the Integration item;
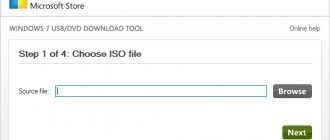
- In the left panel, click on Integration. The window that opens begins with the desired Updates tab. We are looking for our MSU update files:
you'll have to wait a long time
At some point, RT 7 Lite transfers the powers to DISM - everything is ultimately resolved through the tool built into Windows:
After a long wait, RT 7 Lite will ask if it's time to proceed to media generation?
The ISO-Bootable button is activated. I choose to install to a USB flash drive, it is visible in Explorer as drive G :. Naturally, it will be formatted before recording:
We wait until the flash drive is written:
That's it, close the program. It will unmount the created image. The new folder with the unpacked files can be deleted.
How to create your own build of Windows 10
How to create your own reference build of Windows 10 - a distribution kit with system settings, tweaks installed and desktop software installed? This process will be discussed in detail below, but first let’s talk about the features of our own system builds.
Pros and cons of native Windows builds
What are the advantages of native Windows builds? Assembling your own system saves time and effort when installing the system. For example, you can prepare a Windows 10 distribution kit with a standard set of programs for a circle of loved ones: a browser, archiver, torrent downloader, cleaner, uninstaller and similar software for a wide audience will be installed along with the system. The benefits compared to a regular Windows distribution are obvious, but what will we get as opposed to other methods of system deployment? Your own Windows build, the reference image of which was created on a GPT disk, can later be deployed on an MBR disk and vice versa. Whereas transferring the system using backup programs or disk space managers will not help when changing the style of disk partitions. Unlike the latter, the native build on the installation media will not be linked to a backup file on a non-system disk partition or removable device, and you will not need to connect the destination hard drive to clone Windows.
Native builds of Windows have three disadvantages. The first is that the distribution kit of its assembly will take up more space than a pure Microsoft distribution kit. But this problem can be solved by using a flash drive with a capacity of at least 8 GB. The second disadvantage is that the Windows installation process will take a little longer than usual, which is due to the deployment of added software. The third disadvantage is the red tape involved in creating the assembly. The effort is unlikely to be worth it if the system is rarely reinstalled.
Algorithm of actions
The process of creating your own Windows 10 build will take place in several main stages:
- Creation of a reference image of the system - an ideal state of the system prepared for deployment (with the settings carried out and the software installed, without reference to computer components);
- Capture the reference image into the install.esd file;
- Repacking the original installation ISO image of the system with the replacement of the install.esd file.
Windows 10 reference image
The Windows 10 reference image can be prepared in different ways, it could be:
- An established system with remote binding to components using the Sysprep utility (see paragraph 7 of the article);
- New Windows 10 installed on a different disk partition;
- New Windows 10 on board the virtual machine.
The established system must be thoroughly cleaned - delete files in the user profile folders, clean the “Temp” folders, etc. Otherwise, the distribution kit will turn out to be gigantic in size. It’s easier with new systems: firstly, the distribution package based on them will take up less space, and secondly, during the installation process, a reference image of Windows 10 can be created from scratch in audit mode - a special mode of system operation without the participation of a user account. The audit mode is provided by Microsoft for the implementation of corporate settings and software by OEM suppliers and large organizations before delivering computers to customers and hired personnel, respectively. The end result is a properly configured system with installed desktop software, during the installation phase of which you can create new accounts, set regional parameters, disable options for sending data to Microsoft, etc. In this case, the old account will not be hanging around anywhere.
In our case, we will create a reference image of Windows 10 from scratch in audit mode using Hyper-V. This hypervisor was chosen due to its ease of use and ease of transferring large amounts of data from a virtual machine to the main system. VHDX and VHD disks used in Hyper-V virtual machines are mounted into the main system using File Explorer. Supporters of other hypervisors - VMware Workstation and VirtualBox - can use them. To simplify access to virtual disk data from the main system and not bother with guest OS additions, virtual machines can be created based on VHD disks. Both VMware Workstation and VirtualBox work with VHD disks.
Those who have decided to create a reference image of Windows 10 on the second partition of the disk of a real computer for the future to help with instructions on editing the boot menu of several systems and completely removing an unnecessary system.
Nuances with activation
The concept of your own build of Windows must be distinguished from pirated assemblies of the system that are delivered activated or with an activator on the desktop. The purpose of this article is to simplify the Windows installation process, but not to solve the issue of activating it. The reference image of Windows 10 will be created using tools that do not contradict Microsoft's policies - in fact, its own tools. And their use does not guarantee the functionality of activated system builds. Let us remind you that Microsoft's requirements are as follows: activation of each copy of Windows, no matter what distribution it is installed from, on each individual computer. If the reference image is an activated, established Windows, during the process of removing the binding to components using the Sysprep utility, you must reset the activation (see paragraph 7 of the article).
Those looking for a way to transfer activated Windows to other computers here.
Creating a Hyper-V virtual machine
So, to prepare a reference image of Windows 10, we create a virtual machine. The conditions for working with Hyper-V, activating the hypervisor, as well as the process of creating a virtual machine are described in detail in the site article “Hyper-V as part of Windows 10”. Only, unlike the example discussed in paragraph 5 of this article, the choice of generation of virtual machines is not important; you can create a machine of the 1st generation. If you do not plan to implement resource-intensive software such as games, we can limit the volume of the created VHDX hard drive to 50-60 GB. Well, the hackneyed advice for SSD owners is that the path for storing virtual machine files and VHDX disk must be specified on the HDD partition. At the last stage of creating a virtual machine, we specify an ISO image with a fresh Windows 10 distribution, turn on the machine and start the system installation process. The latter will be different from how it usually happens.
Installing and configuring Windows 10 in audit mode
We go through the Windows 10 installation process to the stage of selecting the installation type and select the second option.
We will need two partitions - one for Windows, the other non-system, where the install.esd file will subsequently be saved. We create partition C from 30-40 GB.
We give the remaining space to another section.
Installing Windows.
After completing the file copying stage, we do not extract the installation ISO image from the virtual machine; we will need it later. At the installation stage, where you need to set the first settings, we don’t touch anything, just press the Ctrl+Shift+F3 keys.
5
Let's enter audit mode by connecting a hidden administrator account.
Upon logging into the system in audit mode, we are greeted by the Sysprep utility window. The utility will wait for its fate to unbind the configured system from its components. You can start setting up the system. One caveat: Microsoft Edge does not work in audit mode; to access the Internet you need to run Internet Explorer.
7
As for the limits of intervention in the system, in audit mode we can work with everything that does not relate to user accounts. We can install desktop software, change system settings, apply tweaks, leave folders or files on the desktop. But you won’t be able to install universal apps from the Windows Store. Like Microsoft Edge, the store does not work in audit mode. Even if the system is activated, it will not be possible to change the theme or other personalization parameters. To install universal apps and apply personalization settings, you need a user account, not a hidden administrator account.
If you need to reboot the system, for example, this is required to reinstall some programs, this process must be carried out using the Sysprep window: you must set the values “Switch to audit mode” and “Reboot”. Then click “Ok”.
In parallel with setting up the system, you need to do an important thing - format the non-system partition of the disk.
Removing binding to components (Sysprep)
So, the reference system image is ready. Now we can begin the process of removing the binding to components. Open the open Sysprep utility window or launch it by pressing Win+R and entering:
sysprep
The folder that opens will contain the EXE file for launching the utility.
In the Sysprep window, set the action to “Go to the welcome window (OOBE)”. Check the “Preparing for use” checkbox to reset the activation. In the Shutdown settings, select “Shutdown”. And click “Ok”.
We wait until Sysprep finishes running and the virtual machine is turned off.
Creating the install.esd file
We check whether it is worth starting the virtual machine from an ISO image of installing Windows 10, and boot from it. We use the installation disk to access the command line. If the Windows 10 reference image was created on the second disk partition of a real computer, simply go to the main operating system and open the command line there.
At the first stage of installing the system, press the Shift+F10 keys.
Using the DISM utility, we will capture the reference system image and save it to the install.esd file. But first, let’s see under what letters the two required partitions are listed - the system partition and the destination partition where install.esd will be saved. Enter:
diskpart
lis vol
exit
In our case, the system disk is listed as D, and the non-system disk is listed as E. Therefore, the command to capture a system image will be as follows:
dism /capture-image /imagefile:E:\install.esd /capturedir:D:\ /name:windows
In this command, accordingly, in each individual case it is necessary to replace the letters E and D with your own.
12
Upon completion of the operation, turn off the virtual machine. We won't need it anymore.
Mounting a virtual machine disk on the main system
In order for the virtual machine’s disk to be displayed in the main system, where further actions will take place, open the VHDX (or VHD) disk file of this machine in Explorer. In the context menu, click “Connect”.
13
All partitions of the virtual disk will appear in Explorer as separate disks. In our case, we select the last drive M, this is where the install.esd file is stored. After repacking the ISO image, the virtual disk will need to be unmounted; this is done using the “Eject” option in the context menu of any of the added virtual disk partitions.
14
We will replace the original one as part of the official Windows 10 distribution with the newly created install.esd file.
Repackaging an ISO image of a Windows 10 distribution
Many programs can replace one file with another as part of a bootable ISO image; in our case, the UltraISO program was selected for repacking. Let's launch it. Click the “File” menu, then “Open” and in Explorer indicate the path to the ISO image from which Windows 10 was installed on the virtual machine.
15
The contents of the ISO image will appear at the top of the UltraISO window. Here we open the “sources” folder and delete the source file install.esd in it. In our case, it weighed 3.7 GB. The lower part of the UltraISO window is the system explorer; here we open the mounted disk partition (or the desired partition of the real disk), on which the newly created install.esd file is stored. In our case, it weighs 4.09 GB. We either drag the newly created file to the top of the window - where the original file was, or add it using the context menu.
16
Let’s check: in the “sources” folder of the disk image there should be not the original install.esd with a weight of 3.7 GB, but the newly created install.esd with a weight of 4.09 GB.
17
Repack the image: click the “File” menu, then “Save As” and save the disk image with a name different from the source.
18
We are waiting for the progress of the operation to complete.
***
Now all that remains is to test your Windows 10 build on a new virtual machine.