When a user is working with Windows 8, regardless of whether the administrative account is enabled or not, all applications will work as before. With the new updates, the developers decided to change the settings of these accounts. Now the user will not be able to have a full set of rights, as was possible with Windows XP. These steps were taken to avoid running malware. However, if the user needs to get full administrator rights, then there is nothing complicated about it.
How to get Administrator rights in Windows 8
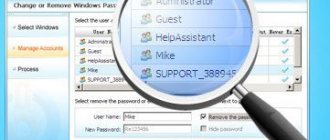
Getting full administrator rights in Windows 8 using local security policy
The second way to enable an account is to use the Local Security Policy Editor. You can access it through Control Panel - Administrative Tools or by pressing the Windows key + R and typing secpol.msc into the Run window.
In the editor, open the item “Local Policies” - “Security Settings”, then in the right pane find the item “Accounts: Administrator account status” and double-click on it. Enable the account and close the local security policy.
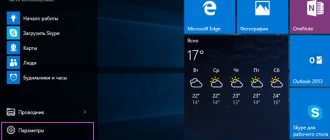
Enabling Administrator from System Management
Like other versions of Microsoft operating systems, Eight has a built-in administrator account, which is hidden in the default settings. It is created at the moment when the system is installed, after which it automatically goes into a disabled state. This entry can be renamed, but cannot be deleted. But others can create and delete accounts in Windows 8 without any restrictions. By logging into the system under this account, you can perform any actions, since there are no restrictions for it.
To do this, click on the My Computer shortcut. In the list of actions that opens, select Manage. A new tab appeared in front of us. Look at the left side of the panel. There is a Local Users item here. Click on the small triangle next to it to open a list of folders. There are usually two of them: Users and Groups.
We are interested in the first folder. Opening it we find the Administrator account. Place the cursor over it and press the right mouse button. In the context menu, select Properties.
In the window that appears, we are interested in the General tab, which usually opens by default. Here you need to uncheck the box next to Disable account and click OK. Now all that remains is to restart the computer or change the user. If everything is done correctly, when you log in, two accounts will appear: Administrator and User. You can log into the system in the way that suits you.
Disabling from the command line
The above method for disabling UAC is one of the simplest. If for some reason you are not satisfied with it, then you can use the registry and the command line. To do this, you need to press the Win+Q combination and enter regedit in the search. Please note that you must run the utility as an administrator.
So first you need
In the open registry branch, select HKEY_LOCAL_MACHINE, then Software, the Microsoft folder and the Windows partition. After that, go to CurrentVersion, Policies section, System folder. In it we are interested in the EnableUA parameter. Click on it twice. In the window that opens, change the value 1 to 0. In order for the changes to work, you will need to reboot.
To launch the command line, enter cmd in the search. Next, enter the command C:\Windows\System32\cmd.exe /k, continue C:\Windows\System32\reg.exe. At the end of the command, mark Policies\System /v EnableLUA/t REG_DWORD /d 0 /f.
After running this command, UAC in Windows 8 will be completely deactivated. You can re-enable this function by entering the same command, however, at the end, instead of 0, enter 1. In order for the changed parameters to start working, you will need to reboot the system.
If you do decide to disable UAC, the security of the system will be significantly reduced. In order to fix this, you should activate Windows Defender or use another antivirus. You can read how to enable Defender in Windows 8 here. Such a program will help prevent your computer from becoming infected with malware.
So, we looked at the main ways to deactivate UAC in the eighth version of Windows. To do this, you will need to open this tool directly and change its parameters. You can use the command line or add new characteristics in the system registry. The latter methods are more complex, although even an inexperienced user can do them. After the operation, do not forget to restart your computer, as only after this the changes will begin to work.
Hello everyone, today I’ll tell you how to delete a Microsoft account in Windows 8.1. If, for one reason or another, you decide that logging into Windows 8.1 using a Microsoft account is not suitable for you and are looking for how to disable or delete it, and then use a local user, in these instructions there are two simple and quick ways to do this.
Removing your Microsoft account may be necessary if you don’t like the fact that all your data (Wi-Fi passwords, for example) and settings are saved on remote servers; you simply don’t need such an account, since it is not used, but was accidentally created during installation Windows and in other cases.
Additionally, at the end of the article, the possibility of completely deleting (closing) an account not only from the computer, but also from the Microsoft server in general is described.
other methods
In rare cases, the methods described above do not help, so you have to resort to the help of third-party programs. “Win8 Admin Enable Boot Disk” will help solve the problem, which will help you obtain administrator rights. The user will need to boot it from a bootable USB flash drive.
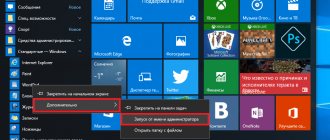
- As soon as the utility has been launched, you should press the “Y” key in the black window, and then press “Enter”. The PC will immediately restart, and the user will now work in administrative mode. Press the “Y” key, then “Enter”
- In the lower left corner you need to find the “Start” menu, right-click on it, and from the drop-down list click on “Control Panel”. Right-click on “Start”, then left-click on “Control Panel”
- The computer settings settings will open, where the user will need to click on “User Accounts”. In “View” mode, select “Large Icons”, find and open “User Accounts”
- Using the utility, you logged in with administrator rights, therefore, this window will open. You need to find “Manage another account.” Click on the link “Manage another account”
- The existing user records will open. From the list you need to select the one that needs to be changed. Click on the entry you want to change
- Then click on the “Change account type” link. Click on the link “Change account type”
- By default, the checkbox will be next to “Standard”. You need to change to “Administrator” and save the changes by clicking on the “Change account type” column. Oh, then click “Change account type”
- At the very top of the screen you can disable the administrator. By clicking on the corresponding icon, just click “Yes, I’m Done” and then restart your PC. Click on the “Yes, I’m Done” button
The latest instructions are suitable for both Windows 8 and later versions thanks to a single algorithm of actions. Knowing how to enter and enable this entry, it becomes easy to change, delete and configure various files and applications at your discretion.
Video - How to get administrator rights
08 April 2017
When working in Windows 8.1, even if the administrative account is enabled, all programs are launched in the usual way. The developers have made a number of changes to the operating system (OS). Regular user accounts, including those with administrator status, do not have full rights, as was the case, for example, in Windows XP. This is done to prevent the launch of unsafe software, including viruses. If you need to get full administrator rights, then use the simple methods given below.
Enable the Windows Superuser account.
I offer you several options for activating a hidden Administrator account. Several, because there are many options for the development of events. Including for cases when you cannot log into your account .
Let's start with something simple. Launch the command console as administrator ( WIN + R – write cmd -> Ctrl + Shift -> click on the shortcut). Let's type a command taking into account Russian localization:
net user administrator /active:yes
You can assign a password and activate your account. I set the password to 12345 and forced Windows to display the superuser account when logging in:
net user administrator 12345
What are administrator rights
These are full rights that allow you to make absolutely any changes on your PC without restrictions. It is worth noting that users get full access to all files. This means that such rights are granted only to advanced users who know the PC well enough. Otherwise, you may harm your computer.
It is for this reason that developers do not provide administrator rights, hiding this function from inexperienced users. You can use it in several ways. The simplest is to download an administrator profile. Let's look at what it is.
Create a secret section without access rights support
Sometimes admins only prohibit the execution of files. For example, so that the user cannot run some program. You can get around this limitation by simply copying it to a FAT32 partition (or, alternatively, to the same flash drive), where access rights can no longer be set. The file system itself simply does not support them. If constantly using a flash drive is too risky, then you can do something smarter. Run any disk partition editor from it once, reduce the size of the system one, and in the free space create a new FAT32 volume and (optionally) hide it.
Create a hidden FAT32 partition
Hidden partitions are not assigned a drive letter, so they are not displayed in Explorer and file managers. You can mount it in Windows via Disk Management - diskmgmt.msc. You have already assigned yourself the necessary rights to run this tool at the previous stage, when you found out the admin password or created a new one.
If documents, databases or media files were copied to the FAT32 partition, they will open without problems. Nothing can stop you from launching simple software, which is installed by unpacking: in the new place everything will work as before. With installed programs, not everything is so simple. They will have to change the paths in the settings. These are either .cfg and .ini files in the same directory, or registry keys. You can change the keys using a remote registry editor launched from a flash drive in the same WinPE.
Editing the registry of another OS
With such a tool, you can bypass other restrictions specified in the registry.