In Windows 10, updates are installed in the background and are downloaded and installed automatically. Sometimes errors occur and the update center is unable to install the update, which causes it to stop downloading new updates and applying them to the system. In today's article we will look at how to fix errors in Windows Update.
Previously, we looked at how to prevent updates from being installed automatically - stop the automatic download and installation of updates in Windows 10. We also wrote about how to remove an unnecessary update and prevent the installation of this particular update.
Check update services
The lack of system updates is sometimes due to a disabled service that is responsible for this process. In this case, the service must be enabled.
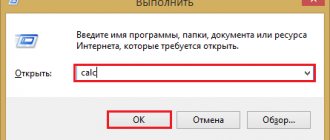
Step 1. Press “Win+R” on your keyboard.
Press “Win + R” on the keyboard
Step 2. Type “services.msc” in the window and click “OK”.
Type “services.msc” in the window and click “OK”
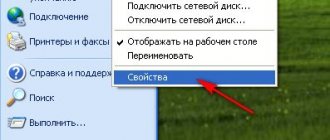
Step 3. Right-click on “Update Center…” and left-click “Properties”.
Right-click on “Update Center…” and select “Properties”
Step 4. Select “Startup Type”: “Automatic”, click on the “Run” button and click “OK”.
Select “Startup type”
Apply the update by restarting your PC
Many updates require you to restart your computer after they are completed.
Step 1. Save your work and close all open applications on your PC.
Save your work and close all open applications on your PC
Step 2: Click Start, click Shut Down, and click Update and Restart.
Click “Update and reboot”
Increase free space
You need to make sure that there is enough space on the system hard drive (where Windows is installed) to carry out updates.
Reference! To update the 32-bit version of the system, 16 GB of free hard disk space is required, and to update the 64-bit version, 20 GB is required.
To remove unnecessary files, you can use the Disk Cleanup utility.
Step 1: Click the Search button (the magnifying glass icon next to the Start button) and type Disk Cleanup. Click on the found utility.
Go to the desired item “Disk Cleanup”
Wait while the program evaluates the amount of freed space.
The program estimates the amount of freed up space
Step 2: Check the boxes next to the files and trash items that the user has selected for deletion. Next, click the “Clean up system files” button.
Check the boxes next to the files and trash items and click “Clean up system files”
Step 3. Select system files to be deleted.
Selecting system files to delete
Note! When uninstalling, you can also specify files from a previous version of Windows. This will uninstall the large Windows.old folder, but will not allow you to “roll back” to earlier versions of the OS if necessary.
Step 4. Click “OK”, then “Delete files”, waiting for the system to clean up the hard drive.
Click “OK”, then “Delete files”
Clear Temp folder
Lack of space can arise, incl. due to the Temp folder being filled with Microsoft Store installation files (.appx).
Troubleshoot Store
Step 1. Press “Win+I” and select “Updates and Security”.
Press “Win+I” and select “Updates and Security”
Step 2: Select "Troubleshoot" and click "Windows Store Apps" on "Run the troubleshooter."
Click on “Run the troubleshooter”
Problems will be diagnosed and recommendations for troubleshooting will be provided.
Troubleshooting
Clear Store cache
Press the “Win + R” keys together, type “wsreset.exe” in the menu and click “OK”.
Press the “Win+R” keys together, enter the command “wsreset.exe” and click “OK”
When clearing the cache, a window will open for about 10 seconds, then the Store will launch automatically.
Troubleshoot Windows Update
Step 1: Press “Win+I” and click “Updates and Security.”
Press “Win+I” and select “Updates and Security”
Step 2. Select “Troubleshoot” and click in “Update Center…” on “Troubleshooter”.
Click on “Run the troubleshooter”
Step 3. Once the tool is done working, close it and restart the PC.
After completing the diagnostics, click on “Close”
Clear the Update Center cache
Sometimes, if there are update problems, you need to clear the Update Center cache.
Step 1. Press “Win+R”, type: C:WindowsSoftwareDistribution and press Enter.
Type the command and press Enter
Note! In place of the letter “C:” you must specify the drive letter with Windows installed on a specific PC.
Step 2. In the “SoftwareDistribution” folder, go to the “Download” folder, select all the files in the folder with the mouse and delete them with the “Del” button on the keyboard.
Open the “Download” folder
Step 3. Click “Continue”.
Click “Continue”
Step 4. Restart your PC, go to Windows Update and run Check for Updates.
Open "Windows Update" and run "Check for updates"
Basic ways to solve problems installing updates on Windows 10
The operating system has many tools and modules that can solve the problem of updating it. Determine the error code and act on it using our instructions.
Recommendations from Microsoft
Tens developers give the following tips for troubleshooting errors during system updates:
- To start searching for an update, click on the “Check for updates” button. If the search does not start or an error occurs, close the center, wait 15 minutes, enter it again and run the scan.
In the Settings window, select the section called Update & Security
- Open the “Windows Settings” window on the display: press the two Win and I buttons on the keyboard at once. If nothing appears, use the Start menu. Click on the gear above the power off button.
Click on the gear to open the Windows Settings window
- On the panel, go to the “Update and Security” block.
Click on the "Check for updates" button
- Also follow the "Advanced Options" link at the bottom of the button. Set up automatic installation for the update. In the drop-down menu, select the first item “Automatic”
This solution can only help in a number of cases, for example, when the download of updates was interrupted due to some single failure in the system or due to a temporary lack of Internet.
Solve problems using the Computer Troubleshooter
The developers have built into Windows a special tool that allows you to find various problems in the system and fix them immediately. We will tell you how to use this tool in the instructions:
- We will launch the tool through the “Control Panel”. You can open it through the “Run” module: hold down Win and R, type the control request in the empty field and click OK.
In the “Open” line, enter the command control
- You can also launch the panel through “Search”. We enter the appropriate query and open the classic application in the results.
Search for "Control Panel" and open the desktop app
- On the panel, click on the “Troubleshooting” section.
In the Control Panel window, find and run the Troubleshooting block
- In the left column, click on the second link “View all categories”.
Go to the list of all categories for troubleshooting
- We are waiting for the system to detect available diagnostic packages.
Searching for diagnostic packages will take some time - please wait a moment
- At the end of the list there will be a “Windows Update” module. Right-click and select the “Run as administrator” option. Run the Windows Update troubleshooter as an administrator
- In the troubleshooting tool window, click on “Next” so that it begins the search. Click “Next” to start searching for problems on your computer
- Again, we wait until the tool completes the problem detection procedure.
Wait until the search for problems on your device is completed
- If problems are found, the tool will notify you about this and immediately provide the opportunity to correct them. For example, the module may offer to run a pending update. Click on “Apply this fix”.
Click on “Apply fix” to have Windows fix the problem with the update
- The system may also find any additional problems. You will learn about the success of the operations in the report, where there will be a list of errors and a mark opposite each one - “Fixed”, “Not fixed” or “Detected”. If any problems remain unresolved, run the diagnostic tool again. You can also view additional information about the problems.
Click “Close” to exit the module
- If the module does not find any problems in the operation of the update center, move on to other solution methods. The tool may not detect any problems on your PC related to Windows Update.
Checking services
The Windows service corresponding to the Update Center may simply be turned off on the device at the moment. For the update to take place, you need to activate it and set it to turn on automatically every time the system starts:
- Call up the “Run” window using a simple combination of Win + R. In the free field, write services.msc or copy and then paste. To execute, click on OK or Enter.
Paste the short command services.msc into the empty field
- In services we find “Windows Update” at the very end of the list. Double-click on it so that a second window appears on the display. If the click does not work, right-click and select the last element “Properties”. In the context menu of the service, click on the penultimate item “Properties”
- For the startup type in the menu, set the value to “Automatic” - the selected service will start working immediately after Windows loads. After that, click on “Run” and apply the changes. Close all windows and try to update again in class=”aligncenter” width=”1365″ height=”725″[/img] Set automatic activation in the “Launch type” menu
Clearing the update cache manually
Removing all data from the update cache is quite simple - even a beginner can do it. Follow the short instructions:
- Before getting rid of information about the previous system update, you need to deactivate the service responsible for the operation of the “Update Center” in the “Services” window. Open it using the instructions from the previous section.
- In the list of components we look for “Update Center”. In the middle part of the window, click on the “Stop” link. We don’t close the window with services yet.
Disable the Windows Update service temporarily using the Stop link
- Launch Windows Explorer and immediately go to the directories on the system drive. Here we need to open the following folders: Windows - SoftwareDistribution - Download.
On the system drive, open the SoftwareDistribution folder, and in it - the Download directory
- In the last section, select everything with the mouse, right-click and select delete from the options menu.
Delete all contents of the Download folder using the context menu
- We return to the “Services” window. Click on the “Run” link so that the update service starts working again. Let's see if the problem with the system update has been resolved. To do this, follow the steps from the “Recommendations from Microsoft” section.
Click on “Run” to reactivate the center service
Video: what to do if Windows 10 updates are not downloaded
Checking your computer for viruses
Even the presence of an antivirus on a PC cannot guarantee absolute security - a virus can penetrate through the protection. In addition, antivirus software may not be updated and therefore vulnerable. Let's look at how to identify and neutralize a threat on a PC, using the example of the standard Windows Defender antivirus, which is built into the Windows system:
- Open the Windows tray - the down arrow icon in the lower right corner of the display. Click on the small white shield.
- You will immediately see a window with the “Security Center” on the screen. Immediately click on the first tile “Protection against viruses and threats”.
In the Security Center window, click on the first tile “Virus and Threat Protection”
- Click on “Run check now”. Defender will immediately launch a quick scan. If the program does not detect anything, follow the link at the bottom of the “Run a new advanced scan” button.
To get started, you can run a quick scan and, if the defender does not detect anything, enable advanced scanning
- Select the first or third option. Please note that a full scan will take a lot of time, but you will be able to work in parallel on a PC. To perform the third option - offline - you will need to restart the PC. Within 15 minutes, the defender will search for and remove threats. After selecting, click on “Run Scan Now”.
Select the scan type depending on whether you want to wait a long time for the scan to finish
- Wait for the verification to complete. In the results you will see a list of actions that can be performed with the detected threat. Select removal for all viruses found, if present. Wait for the advanced scan to complete and remove viruses if Defender finds them
You can also be helped by the small utility Dr.Web CureIt!, which can work with other antiviruses on the device without any conflicts and has a simple and user-friendly interface that is understandable to a beginner. It is better to download it from the official website. It is free for home use.
Fixing damaged system files
After scanning with an antivirus, it is necessary to “treat” the system files - restore them. Of course, they could have been damaged not due to viruses - in any case, checking for damage and eliminating it will not hurt. Do the following:
- Expand the “Search” panel through the “Taskbar” (magnifying glass icon). Enter cmd in the empty field.
Write a simple cmd code in the search bar of the panel
- Right-click on the classic Command Prompt application - in the small menu, click on the option to launch the console with administrator rights. Click on the “Run as administrator” option
- Allow the module to make changes in the operating system by clicking on “Yes”.
- Now type or paste the command DISM.exe /Online /Cleanup-image /Restorehealth. After that, immediately press Enter to execute it. The console will start the process of searching and healing damaged system files. Wait for it to finish - the module will provide you with a report on the work done. After that, restart your PC and try to update.
Paste the copied command DISM.exe /Online /Cleanup-image /Restorehealth using the combination Ctrl + V
Video: how to check the integrity of system files and “cure” damaged ones
Cleaning the system disk from “garbage”
You can remove temporary files and clear various types of system cache, such as the DNS cache, using the built-in Disk Cleanup tool or third-party utilities. Let us describe the procedure using the example of the well-known free application CCleaner from the developer Piriform:
- We launch the official application page using any browser. On it, click on the first green button “Download free version”.
Click on the first button “Download free version” if you do not want to buy the Pro version
- After the file has been completely downloaded, launch it and install the software, following the installer’s simple instructions.
- Now open the utility and go straight to the required “Cleaning” section. All the necessary checkboxes are already selected in the columns on the left side of the window. You don’t need to change anything in the Windows tab, but in the “Applications” block you can optionally set checkboxes for the browsers you use most often. If you do not clear their cache, they will collect a lot of unnecessary information on the system disk and work very slowly. Click on “Analysis”.
Select the required sections to clean and click on “Analysis”
- The system will estimate the number of megabytes or even gigabytes that are recommended to be deleted, and will also inform you about the types of data that can be safely disposed of. Click on “Cleaning”. When the analysis is finished, look at the amount of data that will be free on the disk and click on “Cleanup”
- We confirm our desire to get rid of unnecessary information and free up the disk. We wait for the procedure to complete, close the utility, restart the device and try to update the system in class=”aligncenter” width=”1365″ height=”629″[/img] Click on “Continue” to confirm your intention to delete unnecessary system files
Video: Smart cleaning of the system from unnecessary files using CCleaner
Temporarily disabling antivirus and Windows Defender Firewall
Deactivating your antivirus and Windows Defender Firewall can help install the necessary updates, the download of which is blocked by security programs by mistake. First, let's look at disabling the antivirus using the Avast utility as an example:
- Bring up the Windows tray on the display - find the Avast icon in it. Right-click on it.
- In the context menu, place the cursor on the second item “Manage Avast Screens”. In the following list, select the time for which antivirus protection will be disabled or select “Disable permanently.” In the latter case, then do not forget to activate Avast yourself after downloading and installing the updates. In the context menu of the Avast icon, select the period during which the program's protection will not work
- Start downloading or installing the system update again in the center.
You can temporarily deactivate Windows Defender in its settings:
- Open the Defender panel through the Windows tray (image of a white shield). In the window, immediately look at the lower left corner - click on the “Options” link.
Click the "Options" link at the bottom left of the window
- In the notifications section, click on “Virus and threat protection settings.”
Click on “Virus and threat protection settings”
- Use the switch to deactivate the Real-time Protection option.
Click on the first switch to deactivate standard antivirus protection
- Click "Yes" to allow the defender to change anything on your device.
Click on “Yes” so that the “Security Center” can make changes to the system
- You will see that a cross in a red circle has appeared in the window. Repeat the update in the center. The protection will turn on itself after a while - there is no need to enter the defender again.
When you disable the antivirus, try updating the system again in the center
Now let's look at how to disable the "Firewall" to bypass the blocking of downloading system updates:
- Call the “Control Panel” through the “Run” window and the control command or using the “Windows Search” window. Find the “Windows Defender Firewall” link and click on it.
Select from all sections “Windows Defender Firewall”
- In the left column with links, click on the fourth one - “Turn on and off...”.
Click on the "Turn firewall on or off" link to go to the next page
- Check the boxes next to the “Disable” values for two types of network at once. At the bottom of the page, click OK to save the settings changes.
About two kinds of network
- Red shields with crosses inside will appear on the screen. Try the update again. After this, be sure to manually enable Windows Defender Firewall protection.
Make sure Windows Firewall is disabled and try updating your system
Video: How to disable Windows Firewall in several ways
Clean restart of Windows
Booting the operating system in clean mode means disabling all third-party services along with starting Windows, that is, utility processes that the user independently installed on the device earlier. This way, all extraneous components that could interfere with the installation of the update will be deactivated:
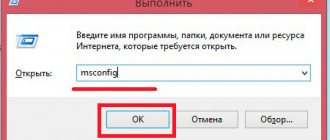
- In the “Search” panel, type the msconfig command into the line and launch the proposed classic utility with one click. The same code can also be entered in the Run window (Win and R).
Enter the query msconfig in the “Search” or in the “Run” window
- In the configuration window, switch directly to the third section “Services”. At the bottom of the list, click on “Hide Microsoft services.”
- After that, click on the “Disable All” button. Apply the changes and go to the next tab called Startup.
Deactivate all extraneous services using a special button
- To open an additional window, click on the blue “Open Task Manager” link. In the “Startup” tab, click on the link to launch “Task Manager” on the screen
- In the manager, deactivate all program services in the list one by one using the “Disable” button in the lower right corner or through the corresponding item in the context menu. In Task Manager, disable all services in the list one by one
- Return to the “System Configuration” window and in the “Startup” section, click on “Apply” and OK. Restart your device and try updating again in the center. If it does not work, run the troubleshooter again in clean boot mode using the instructions from the section of the same name in this article.
- Upon a clean start, the PC will lose some functionality. After a successful update, return everything to its place in the “System Configuration” window - enable all third-party services in the list using the special button.
Checking Device Manager for errors
If your PC has damaged drivers, they can be a barrier to installing updates. You need to check the serviceability in the “Device Manager”:
- Going to its window in the “ten” is quite simple: right-click on the “Start” button in the lower left corner of the display and select the manager from the list that appears.
In the context menu of the Start button, find the item "Device Manager"
- If the context menu does not appear for some reason, hold down R and Win and insert the code devmgmt.msc into the empty line. After that, click on OK or Enter to execute it. In the “Open” line, enter the request devmgmt.msc and click OK
- Take a close look at the list of connected devices and their drivers. Modules that are indicated by an exclamation point in a yellow triangle or a question mark are problematic.
See if there is an exclamation mark next to any device in the list
- To fix a problem with the driver, update it using the special item in the context menu.
Click on "Update Driver" in the context menu
- In the new window, click on “Automatic search”.
Click on the first link to start automatically searching for updates for the problematic driver
- Wait while the system searches for an available upgrade on official resources. If present, it will be successfully downloaded and installed without any user action.
Wait for the end of the search for an update for the driver with which you are having problems
- If there is no update, you will see a corresponding message in the window. In this case, click on “Close”. Call up the driver context menu again, but this time click on “Remove device”. After a couple of seconds it will disappear from the list. Try installing the update without this device.
A message may appear in the window stating that you currently have the latest driver installed.
- After this, be sure to return it in place. In the manager, there is an “Action” section on the top panel. Open its panel with one click and select Update Configuration.
In the “Action” menu, select the first item “Update hardware configuration”
- If this method does not work, install the driver by downloading it from the official website of the manufacturer of the specific hardware or the PC itself. It also makes sense to contact the company's technical support to find out if your device is compatible with the update that the center cannot install.
Removing duplicate profiles
You can remove an extra account using the Registry Editor. However, any changes to it must be made with the utmost caution:
- Hold down the Win + R key combination on your keyboard and write the regedit code in the empty field. To execute it, press Enter or OK in the “Run” window itself.
In the "Open" line, enter the command regedit and click on OK
- Click "Yes" to allow the editor to make changes to the system. Double-click to expand the third branch called HKEY_LOCAL_MACHINE.
Open the HKEY_LOCAL_MACHINE section on the left side of the editor window
- Now open the following directories one by one: SOFTWARE - Microsoft - Windows NT - CurrentVersion - ProfileList.
In the ProfileList folder, look for directories with long names
- See if there are directories with long names in the last folder. Open them and notice the ProfileImagePath entry. If these files in the folders have the same path, delete one of them. Usually the name of the duplicate has the word bak at the very end.
If you find a duplicate entry, delete it using the context menu
System rollback
You can return the system to the state it was before errors with updates occurred using a restore point, a system backup (which is stored in an image file), and also by resetting to initial settings. Let's look at recovery using a point. Before applying any important changes to the system, for example, installing updates, the operating system automatically creates a restore point, so in most cases there are several points on the disk. Let's start following the instructions:
- On the “Desktop”, find the standard “Windows” “This PC” icon, which is usually used to open “Explorer”. Right-click on this icon and select the last item “Properties”.
Select Properties from the context menu of the This PC icon
- Now click on the “System Protection” link in the left pane of the window.
- You will immediately be taken to the desired tab. Click on the "Restore" button to launch the rollback tool.
Click on "Restore" to open the module to restore the previous system state
- On the initial screen of this tool, you either select the last point created (recommended value) or open a list with all available states. After that click on “Next”. You can select a restore point from the list yourself or immediately roll back to the previous state
- If you want to select a point yourself, click on the desired item to highlight it. You can find out which programs and drivers will be affected when you restore to a specific state using the button at the bottom of the list. After selection, click “Next”. Select the point with the left mouse button and click on “Next”
- In the next window, you can see the date and time when the restore point was created and its description. Click on “Finish” - the system will begin restoring to the previous state. During the rollback process, the computer will restart. When the procedure is completed, run the system update manually in the Update Center.
Click “Finish” for the module to begin restoring the system to its previous state
Run Windows Update again
Even if an update is downloaded, sometimes there are still unloaded parts of it in the Update Center that need to be downloaded.
Step 1: Click Start and click Settings.
In “Start” select “Settings”
Step 2: Select Update & Security.
Select “Update and Security”
Step 3: Click “Windows Update” on the left and click “Check for updates” on the right.
Click “Check for updates”
Step 4. The missing elements will be loaded.
Step 5. If a failure occurs, click “Retry”.
If a failure occurs, click “Retry”
Method 1: Update Windows 10 features using built-in OS tools
The very first and most obvious method of obtaining the latest version of Ten is to use the Update Center built into the operating system. In order to open it, you need to:
- Go to Settings (the gear icon in the Start menu or in the Notification Panel, or faster - the key combination Win+i ).
- Then go to the “ Update and Security ” tab.
- And click the “ Check for update ” button.
Unfortunately, this method does not always work quickly. The fact is that from a purely technical point of view, it is impossible to simultaneously distribute update packages to all Windows 10 computers in the world. Inevitably, a kind of queue arises in which updates and upgrades (smaller and larger updates) are distributed in waves. This process, depending on the size of the downloaded files, can take days or even weeks. In this regard, the question arises: is it possible to speed up the Update Center? Answer: yes!
Accelerate updates using built-in Windows 10 tools
You can get the latest Windows 10 updates and new features faster by changing just one setting in the Settings menu. Finding it yourself is quite difficult.
- It is located in the already mentioned “Update and Security” item.
- Click on the “Advanced options” link.
- There we select the “ Delivery optimization ” link.
- Here you can activate the item “ Allow downloads from other computers ” and select the sources “ PC on the local network and PC on the Internet ”.
Enabling this setting in Settings can help you get the latest updates for Windows 10 faster . This happens due to the fact that files will be downloaded not only from Microsoft servers, but also from the computers of ordinary users (this is exactly the principle that torrents work on). In this case, your computer will also distribute parts of already downloaded updates to other users on the Internet. With a metered Internet connection, such transmission will be stopped. If you further click on another link “ Advanced settings ” in this settings item, you can independently limit the download speed from other Windows 10 users on the Internet , as well as the delivery of your updates to them.
Here you can set a monthly traffic limit for downloading downloaded update packages (from 5 to 500 GB). If you have a slow Internet (up to 10 Mb/s), then it would be reasonable to set the return rates to a minimum: 5% of the channel width and 5 GB.
Login to OS as administrator
Sometimes updates are installed only if the user has administrative rights.
Step 1: Right-click on “Start” and click on “Command Prompt (Admin).”
Right-click on “Start” and click on “Command Prompt (Admin)”
Step 2: Click Yes.
Click “Yes”
Step 3. Type the command below in the window and press Enter.
Enter the command in the window and press Enter
Step 4: Click Start, click on Accounts at the top of the menu and select Administrator.
Select “Administrator”
Step 5 : Click “Login.”
Click “Login”
Method 4: Cumulative Windows 10 updates from the official website
This method is suitable for searching and installing small, so-called cumulative, or cumulative updates from an official source . Like major upgrades, they can be obtained not only through the automatic Update Center built into Windows 10, but also directly from the official “”. To find updates for your computer, you need to enter the build number of your OS in the search bar of the portal (for example, 16299). Let us remind you that you can view it by selecting “System” when clicking on the Start menu with the RIGHT mouse button. In addition to cumulative updates, the list will include driver updates for all types of hardware. Needless to say, they need to be installed only with a clear understanding of the need for this action.
Please note that using this method of obtaining and installing cumulative updates carries an additional risk of their incompatibility with your computer. The fact is that if problems arise with specific updates for certain brands of laptops or computer motherboards, Microsoft, as a rule, quickly suspends their installation through the Update Center and gradually solves the problems. By downloading such packages manually and essentially installing them forcibly, you risk encountering incompatibility problems. This happens quite rarely, but you need to keep it in mind. It is most convenient to use the official catalog to download cumulative updates during a clean reinstallation of Windows 10. To be on the safe side, you can see in advance which updates have already been installed on your computer before.
Where to find installed updates in Windows 10 and how to remove them
To view a list of all Windows 10 updates installed on your computer, you need to open Settings (Win+i), go to the “Updates and Security” tab and click on the “ View installed update history ” link. Here you will see both component updates and fixes, as well as driver updates, the installation of which in the “top ten” occurs automatically in the vast majority of cases.
Removing specific Windows 10 updates is done as follows: at the very top of the update log, select the “Delete updates” link, and then in the window that opens, select items that are no longer needed and, by right-clicking on them, click “Delete”.
Troubleshooting BSOD errors
Sometimes, when installing updates, a “blue screen of death” (BSOD) appears, preventing the OS from loading normally. You can remove such updates with the "dism" command.
Step 1. After the PC restarts, click “Advanced recovery options.”
Click “Advanced recovery options”
Step 2: Click Troubleshooting.
Click “Troubleshooting”
Step 3. Select "Advanced Options".
Select "Advanced options"
Step 4. Click “Command Prompt”.
Step 5: Type “md c:tmp”.
Step 6. Type “dism /image:c: /scratchdir:c:tmp /get-packages” (show list of updates).
We print a command that will show a list of updates
Next, you should remove the most recently installed packages, as well as packages without a specified date.
Step 7. Copy the information from “Package Identify” by highlighting it with the mouse and pressing Enter.
Step 8: Type “dism /image:c: /scratchdir:c:tmp /remove-package /packagename:packagename” and press Enter.
Note! Replace the name “package_name” with the name from “Package Identify” by right-clicking in the field.
The name “package_name” is replaced with the name from “Package Identify”
Step 9. After applying Steps 7 and 8 for the entire list of packages to be removed, restart the PC.
Command line
You can start the Update Center service through the command line. To do this, run it as administrator (read here how to do this). Moreover, it is better to use the classic CMD interface rather than PowerShell.
We write the command in the line: net start wuauserv. After which we see a message that the service has started successfully.
Pause system updates
Step 1: Click Start and click Settings.
In “Start” select “Settings”
Step 2: Select Update & Security.
Select “Update and Security”
Step 3: Click “Windows Update” on the left and select “Advanced options” on the right.
Click "Windows Update" and select "Advanced options"
Step 4. Set the “Pause updates” checkbox to the “On” position.
Set the “Pause updates” checkbox to “On”
Windows 7,8 or 10: Manually download updates WSUS Offline Update
If the solutions above do not solve the problem with the update, use a third-party tool called WSUS Offline Update.
This tool will download available Windows updates from Microsoft and install them. By updating this way once, all future updates via Windows Update will be installed without problems.
Download WSUS Offline Update: at the top right click on Version XX => and the download will begin.
Unpack the downloaded archive and run the UpdateGenerator.exe file in the unpacked folder.
You need to know what bitness of Windows you are using, one way to find out is to write “Information” in the search bar and select “System Information” from the found options => OS Name and Type will indicate the necessary data to you. For example, we need to fix update problems in Window 7 86-bit - in the WSUS Offline Update program that opens, check the Windows 7 x86 Global box and click “Start”. After these steps, the download of available updates will begin.
Wait for all updates to download; the download speed depends on how many uninstalled updates have accumulated on your computer on Microsoft servers, as well as on the speed of the Internet.
After downloading, you will be told “Download /image creation/ copying successful”, click “No” (or yes, if you want to see a list of downloaded updates).
Now in the same unpacked folder where you ran UpdateGenerator.exe, go to the client => folder and run the UpdateInstaller.exe file
Click "Start" to install the downloaded updates.
That’s it, all currently available updates will be installed on your system, and the next ones will be installed in normal mode through Windows Update. That's all for today, if you have any additions - write comments! Good luck to you