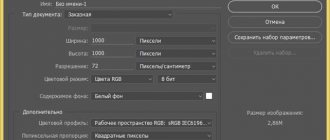
When creating a project, you have to use various sources, tools and programs. Any useful information is involved; the issue of saving time is no less important. But it happens that an object needs to be created in an application that is poorly adapted to the task at hand.
Let's say we need to create a table in a graphical environment. For many, the stumbling block will be the question of how to make a table in Photoshop CS6. It's quite simple, but building the object will take longer than in specialized programs.
How to make a table in Photoshop
Unfortunately, the graphical environment is not intended for such actions, therefore, it will not be possible to create a table directly. Well, there are geniuses among us who have imagination and intelligence. They came up with an algorithm to solve the problem posed. It’s worth noting right away that smart tables (implementation of certain functions and calculations) cannot be created. In this situation, it is only possible to create a layout.
There are the following methods for creating a table in this program:
- Rectangle tool. The principle of this method is to combine all created shapes into one table.
- Line tool. By combining the drawn lines, you can work directly with the table.
- Brush tool. Creating tables quickly.
- Images from the web. It is possible to simply take a ready-made table grid and add it to Adobe Photoshop.
- Construction in other programs. Some users create tables in special programs and then insert them by first cutting them from the original program.
Filling out the table
At the very beginning of the article, we noted that Photoshop is a graphic editor, and it does not have modules for inserting ready-made tables - like in Word, which could be filled with any content.
However, the necessary content in Photoshop, like in no other program, can be easily drawn. Moreover, if we are talking about text, enter it without any problems. We take the appropriate tool – Text – and use it to create the required table contents.
Each word or phrase will thus be placed on a separate layer. When filling a table with text content, you can notice another useful feature of the grid - it “recognizes” letters, and then, by tracking the user’s mouse movements as he moves the corresponding block to the desired location in the cell, it helps to align the placement of text in the table.
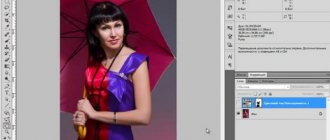
Hi all! Today I would like to tell you how to make a size table in Photoshop with text or pictures for your needs. Of course, many will say that there is no point in creating tables in photo editors, since this can be done using html code or office programs such as Word or Excel. And of course, all this is great, but in Photoshop you can create something that could not be realized anywhere else, and this way you will get an amazing design element.
Let's briefly look at why this is needed. Imagine that you are making a page layout or design of some banner where this element is needed. You wouldn’t give a layout designer an empty layout with the inscription “There should be a table here,” and a regular grid of black lines is unlikely to look cool on a good layout. And in the graphic editor we can bring to life all our design perversions.
By the way, if you want to learn how to make awesome designs for websites, social networks or awesome banners, then I recommend that you take training at this cool online web design school. There are a lot of cool destinations here. Therefore, you can choose for yourself what you like. Suitable for anyone, even an absolute beginner in Photoshop. Everything will be explained to you so that there are simply no questions left. And after that, you can already make designs yourself, offering your services on freelance exchanges such as Kwork.
We will be able to insert beautiful pictures, make effects, bend frames as we wish, and much more. Thanks to Photoshop, with the help of tables we can even make full-fledged colorful board games. The main thing is to come up with a concept and a script, and the rest is a matter of technique.
And when creating original crosswords or calendars, this skill can come in handy. For example, in this article I looked at But there I used a ready-made mesh in PNG format. What if there is no such grid or it doesn’t suit you? In general, we will do everything ourselves, without outside help.
Rectangle Tool
The method is based on mutual copying of layers with drawn figures. It is worth paying attention to the fact that this is easiest to do in Adobe Photoshop CC. Self-adjustment of distance is enabled here, which greatly simplifies this task. Let us describe the steps required to build the table.
- Before you make a table in Photoshop, you need to select the curly Rectangle tool, which is located on the Quick Access toolbar.
- We begin to create the frame of our table, that is, defective borders and stroke. At the user's discretion, you need to set the thickness of the outline and the internal fill. Object settings can be found at the top of the program. After construction, an object layer will be automatically created.
- Now we need to build the top line. At the edge we create cells of certain sizes.
- To speed up construction, we will use the hotkey combination Alt + LMB, which will allow us to duplicate the cell to the selected location. With pop-up dimensions, you can create a symmetrical table.
- Once all the free space is filled with cells, you need to merge all the cells into one table. In the layers section, select all the graphic shapes and combine everything into one layer.
Ready tables
How to make a table in Photoshop without resorting to creating it? In some cases, some users turn to ready-made table layouts that can be found on the Internet. The general procedure is almost the same as that given in the paragraph above - just save the image and open it in Photoshop, and then simply crop it.
Creating tables in various programs specifically designed for this is quite simple, but for some reason we needed to draw the table in Photoshop.
If such a need arises, then study this lesson and you will no longer have difficulties creating tables in Photoshop.
There are few options for creating a table, only two. The first is to do everything “by eye”, spending a lot of time and nerves (tested on myself). The second is to automate the process a little, thereby saving both.
Naturally, we, as professionals, will take the second path.
To build a table, we will need guides that will determine the dimensions of the table itself and its elements.
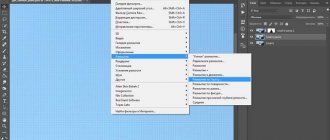
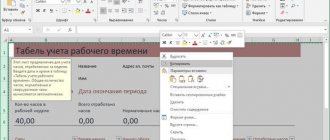
To accurately set the guide line, you need to go to the “View”
, find the
“New Guide”
, set the indentation value and orientation...
And so on for each line. This will take a long time, since we may need very, very many guides.
Okay, I won't waste any more time. We need to assign a hotkey combination to this action. To do this, go to the “Edit”
and look for the item
“Keyboard shortcuts”
.
In the window that opens, select “Program Menu” from the drop-down list, look for the “New Guide” item in the “View”
, click on the field next to it and hold down the desired combination as if we had already applied it.
That is, press, for example, CTRL
and then “
/
”. This is exactly the combination I chose.
When finished, click “Accept”
and
OK
.
Then press CTRL+/
, and in the window that opens, enter the value for the first guide.
I want to set a margin of 10
pixels from the edge of the document.
For ease of calculations, drag the origin of coordinates from the angle indicated on the screen to the intersection of the first guides defining the indentation:
If you still do not have rulers enabled, then activate them with the keyboard shortcut CTRL+R
.
I ended up with this grid:
Now we need to create a new layer on which our table will be located. To do this, click on the icon at the bottom of the layers palette:
“Line” tool to draw (well, okay, draw) the table.
, it has the most flexible settings.
Adjusting the line thickness.
Select the fill and stroke color (turn off the stroke).
And now, on the newly created layer, draw a table.
This is done like this:
SHIFT key
(if you don’t hold it down, each line will be created on a new layer), place the cursor in the right place (choose where to start from) and draw a line.
Tip: for ease of use, enable snapping to guides. In this case, you won’t have to search for the end of the line with a trembling hand.
Draw the remaining lines in the same way. When finished, the guides can be disabled using the keyboard shortcut CTRL+H
, and if they are needed, then turn them on again with the same combination. Our table:
This method of creating tables in Photoshop will help you save a lot of time.
1 vote
Good day, dear readers. Today, using a concrete example, you will be able to see how the work process of beginners differs from those who have spent enough time studying.
You will also be able to see how important advanced knowledge of Photoshop is. They will make your work not only more beautiful, but also much easier. I think this will be enough to interest you.
I can’t wait to start talking about how to make a table in Photoshop. It can be used either as a part or as a stylish independent element. Let's get started?
Line Tool
Before you make a table with text in Photoshop using lines, you need to understand the geometry of the construction, since it is more complicated than creating it with the Rectangle tool. In this case, it is necessary to use straight lines that will be perpendicular to each other. The main difficulty will be to transfer the lines so that they are parallel to each other.
Constructing a table using this method will involve the following steps.
- You must select the Line tool in the same cell as the Rectangle tool.
- Let's set the width and height of the table by drawing two perpendicular lines while holding down the Shift key.
- Using the key combination Alt+Shift+LMB, you can duplicate and move layers with objects parallel to the original layer. Select the two lines shown and duplicate them.
- Now all that remains is to create a mesh inside the object. To draw a perpendicular from point to point, hold down the Shift key.
- After constructing the table, you need to combine all the curly elements into one.
Table improvement
To make a table in Photoshop more unusual, you can add additional effects and goodies to it.
Adding Effects Using Layer Styles
In terms of changing the appearance, using layer styles is very useful. In order to use them, double-click on the layer with our lines that we managed to merge.
Here you can also go through the settings of each item and choose what you like. For example, for my table, I chose to select Stroke and Shadow, and then adjusted them to my liking. It turned out something like this.
Changing the frame using the Brush tool
But you can create a table in Photoshop not only with lines. The regular Brush tool will do the job quite well. Moreover, you don’t have to merge the layers later to combine them into one. Moreover, you can choose a tassel that will make your frame truly unique. But first, either hide the layer with the already prepared table frame, or delete it so that it does not interfere with us, but you can leave the data. After that, bring back the guides that we hid before. Now we will need them again.
- Take the Brush Tool and select the color you want to paint with. After that, right-click on the canvas and select a brush shape from the available ones, or download it from the Internet. Don't forget to select the correct size.
- Now hold down the SHIFT and begin to draw lines from one end to the other directly along the guide. The guides will pull our brush so that it is even, and holding the shift key will make the line straight.
- After this, you can remove the guides and apply some layer styles again. I decided to do the same as in the previous example, but also add embossing.
Inserting pictures into a table
And of course, I couldn’t help but mention this point. But there is nothing complicated here. You, as in the usual case, insert a photo onto the canvas, and then adjust the size of the picture using free transform ( CTRL + T ), dragging the corners while holding down the SHIFT to maintain the proportions.
And then, using the “Move” tool, simply place the drawing in the cell.
I hope that you understand the whole essence of creating tables in Photoshop according to given sizes. And now you will not have any problems in this regard.
Well, if you want to have a good understanding of Photoshop and work in this graphic editor without outside help, then I recommend that you watch these cool video tutorials. All lessons are suitable for any level of user, as everything is told in understandable human language. In a few weeks you will be swimming in Photoshop like a fish in water.
Well, that's all for me. I hope you liked the article. Be sure to subscribe to my blog and public pages on social networks. I'm waiting for you again. Good luck to you. Bye bye!
When creating a project, you have to use various sources, tools and programs. Any useful information is involved; the issue of saving time is no less important. But it happens that an object needs to be created in an application that is poorly adapted to the task at hand.
Let's say we need to create a table in a graphical environment. For many, the stumbling block will be the question of how to make a table in Photoshop CS6. It's quite simple, but building the object will take longer than in specialized programs.
Other programs for building tables
The most famous and widespread way is to involve Microsoft Office software in the process. Here you can make both a table of Photoshop sizes and other elements. The Word and Excel packages are specifically designed for constructing this graphic image. It is most convenient to use the Word text editor, since it creates a regular table without any frills. MS Excel can be used for unusual table design.
What steps does a user need to take to migrate a table?
- You need to have a ready-made table.
- You can then take a screenshot of the screen using the Prt Scr key.
- After taking the screenshot, open Adobe Photoshop and insert the screen image into the document.
- Using a selection, cut off all unnecessary parts.
What people with knowledge will do
While creating this article, I came across several publications and almost all of them contained almost the same manuals as I presented to you above. This is how newbies work or just lazy copywriters who need to think or at least look at something extra.
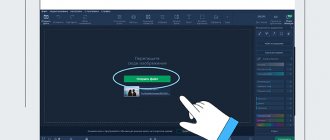
I want to show you a more convenient alternative. Look. Open the photo and in the “View” section select “New Guide Layout”.
Here you can enter the number of columns.
Add lines.
And also set indentations from the edges of the picture.
At first you will have to dig deeper to understand what is here and how. I advise you to do this. A useful skill that significantly speeds up work and makes the table straight in just a couple of minutes. Given that you have the skills.
Don’t despair if you’ve already wasted a lot of time and nothing is working out. You can take the Move tool and move the line manually.
Just drag and don't forget about Shift.
Now you can take a rectangle with rounded corners.
Draw two columns.
Reduce opacity. Naturally, this is not necessary, but I love this effect.
By clicking on the first rectangle and thereby activating it, create a new layer. It should be located exactly above this layer. As in the picture.
Now select a rectangular selection and draw a header. Don't pay attention to the evenness of the border. Everything will get better in the process.
Take the fill and click inside the selected area. Make sure that the new layer is active.
Now hold down Alt and move the cursor between two layers of the same shape (the left column and the new one, the header with fill). The cursor should change to a rectangle with a down arrow. As soon as this happens, click on the left mouse button. The result should be this effect.
Do the same with the second column.
Activate and create a new layer.
Selection. Filling.
Create a clipping mask. Yes, only now have you learned to do this.
Ready. Remove the guides.
The table is ready and contains text with pictures.
You can download this PSD mockup
.
As you can see, knowledge of Photoshop is very important. That is why I strongly, time after time, advise you to study the tools. It's boring, so make this process as fast and comfortable as possible. You can find a detailed article on how to do this on my blog. It was created quite recently.
Do you know what distinguishes a successful person from everyone else? He managed to gain the knowledge that others find unbearably boring. If you want to become a professional, pay attention to Zinaida Lukyanova’s course “Photoshop from scratch 3.0”
and learn everything you can about the tools.
This is basic knowledge, the basics, without which the further path as a whole, and even more so earning money, is impossible.
If you are interested in Photoshop and are thinking about it, then I advise you to take a free course that will help you “enter” the profession. Understand what is required of you and how to achieve it “PROFESSION WEB DESIGNER IN 10 DAYS”
.
It is much more profitable to be able to come up with a problem and independently guess how it can be solved. Otherwise, you will work endlessly for pennies, if not for free, and repeat after others. The same techniques. Same methods.
Develop your own imagination and earn more.
It is much more convenient to create tables using programs from the MS Office package - Excel and Word. The Adobe Photoshop graphic editor has other goals and processing objects. But if you try, you can draw a table
and his tools.
Drawing lines of table columns and cells
Using the Line Tool we are already familiar with, we gradually draw the corresponding graphic elements of the table.
It is desirable that the thickness of the lines does not exceed that of the contour. In this case, the indicators are the same - 3 pixels. It is very important to fix each line on a separate layer. That is, after drawing each one, press Enter. The corresponding layers are called Shape. We will find out why this is needed a little later.
Drawing a table with the grid turned on is a pleasure. However, after displaying the lines for the columns and rows, it may be helpful to turn off grid mode for a few seconds to check if there is any space between the graphic elements.
For this purpose, you can also slightly increase the image scale - up to about 120%. As you can see in the screenshot, there may well be spaces. But they can be easily eliminated by slightly stretching the corresponding lines. To achieve optimal results, you can even zoom in a little more.
How to stretch lines? We agreed to fix each of them on a separate layer. We need this precisely for situations like this - when there is a need to change the length of any of the lines.
In order to be able to easily work with lines, you need to enable the Show Transform Controls mode. Next, moving to those layers that correspond to the lines, we increase their length a little, eliminating the gaps in the table. Each time we record the result by pressing Enter.
After making sure that there are no gaps in the table, we return the original scale of the picture and turn on the grid again.
By the way, if necessary, the table can be easily modified in one way or another. For example, in our case you can see that the rightmost column is half as wide as the others.
It can thus be enlarged or removed from the table - leaving those that have the same dimensions. The solution to this problem is carried out according to the same principle as correcting spaces.
You need to select the layer corresponding to the outline. Then, by activating the Show Transform Controls option, change the width of the table.
Then you can shorten the lines using a similar method. By the way, it is better to do this without a grid and with an enlarged picture scale - so that you can immediately see the gaps and get rid of them.
You can, of course, increase the rightmost column of the original table. First, stretching the outline.
Then - “reaching out” the lines of the lines to it.
You can change the structure of a table by “merging” cells or columns – also by adjusting the length of lines. If necessary, add new ones, which will also form additional layers.
The table is ready. Now you can proceed to the stage of filling it out.