Organize, edit, delete or add items
You can easily manage your Start menu folder structure through Explorer to edit, change, or even add new items. It also gives you the ability to search for new shortcuts you create. Of course, you can do this by dragging items individually (or together) into the Start menu, but rearranging through File Explorer is much faster if you need to change a lot of items at once.
To open the Start menu folder directory, paste the following link into the address bar of Explorer:
%appdata%\Microsoft\Windows\Start Menu
It's worth noting that the Start folder doesn't show universal apps that you've installed, so they need to be managed directly from the Start menu window.
For the most part, you can uninstall any app, with the exception of some built-in apps, by right-clicking them in the Start menu and selecting Uninstall.
Resizing the Start Menu
You can quickly resize the Start menu by simply dragging the top or right edge of the menu with your mouse.
Resizing vertically works as we expect. When you resize horizontally, you can expand the Start menu with one full column of icon groups to four columns. Unfortunately, you can reduce the size of the entire menu to the width of one column.
You can also configure Windows to display several additional snippets in each column. Just go to Settings → Personalization → Start and turn on the option Show more tiles in the Start menu.
When the Show more tiles option in the Start menu is enabled, you can see that the tile column expands to the width of one medium-sized tile.
Note that if you enable the Show more tiles option, you can resize the Start menu horizontally, but only to three icon group columns instead of four.
Programs for changing the Start menu
There were quite a few conservative-minded 10 and 8 users who were accustomed to Windows 7 MP. They don't use a tiled interface at all, preferring to place frequently used applications on the taskbar.
Adherents of the traditional interface have created a market demand for special programs that automate the process of returning to the classic MP.
Below we will consider several such third-party programs where you can correct the appearance of the Start menu:
- Classic Shell;
- StartIsBack++;
- Start Menu X;
- Start10.
Read about what the program is here.
Classic Shell
The name of this completely free program speaks for itself. Its Russian version is available on the official website. During installation, the user, in addition to installing the “classic shell” itself, also has the little-interesting option of installing components to return Windows Explorer and the Internet Explorer browser to their previous appearance.
Immediately after installation is complete, clicking on the “Start” button brings up a Windows 7-style menu. Basic configuration of the installed program is done by right-clicking on the “Start” button and selecting “Settings”.
The next window can delight the conservative user. On the “Start Menu Style” tab, in addition to the default Windows 7 MP, he can select two even older menus - “Classic” and “Classic with two columns”. Moreover, the program reminds him that the “Start” button itself was previously called “Start”, and it is available to him.
By activating the “Advanced settings of the Start button”, instead of a logo or inscription, you can have any image on its surface (highlighted in blue).
By sequentially opening the next three tabs, the user can configure working keys (by the way, there is an article about setting up hot keys, which can be read here)
choose cover, icons and fonts
and options for displaying menu items.
After activating the “Show all parameters” item, 10 more tabs are added to the original four tabs, in which additional settings can be made.
The settings made can be “Save to an XML file” so that when installing the program on another device, they can be quickly restored using “Load from XML file”.
In conclusion, we note that the Classic Shell utility is no longer updated. Its successor is the Open Shell program.
StartIsBack++
This program is shareware. After the 30-day trial period, you need to buy an inexpensive license for 125 rubles. Both trial and paid editions are available for download from the manufacturer’s official website.
Don't get confused: StartIsBack is for Windows 8, and StartIsBack + is for Windows 8.1.
After standard installation of the program (with built-in activation), click the “Configure StartIsBack” button to go to the settings window. Basic settings are made in the “Start Menu” sections,
"Appearance" and
and "Switching"
The following screenshot shows the result of the actions taken.
Start Menu X
This free utility is available for download from the official website. The program, unlike the previous two, was not limited to the restoration of the classic MP. She made it more user friendly.
For some reason, links to system folders have been removed from the Windows 10 system menu. To call the often-used “Control Panel,” you have to type this phrase in the command input field to the right of the “Start” button. An alternative option, which we discussed above, is to create a “Control Panel” tile. It is, however, not for tile haters. And this is what the “Control Panel” looks like in the Start Menu. As you can see, it combines everything that relates to computer control, and for the convenience of the user, the entire screen is allocated for display. As you can see, the elements are arranged in alphabetical order (first Latin, then Russian).
“Programs” look similar. Clicking on a folder icon does not open it, but rather launches the program in it. And to open a folder, you should hover over the icon without any action. Programs can be combined into virtual groups without changing their location on the disk.
Start10
Three editions of the program are available for download on the manufacturer's website. The home edition is shareware: it has a 30-day trial period. The Start8 utility is designed for G8.
The installation of the program takes place in English, but, after launch, it has a Russian-language interface (with the exception of a few untranslated points). By default, a “load” is offered - the Fences program, which must be abandoned in time. Once installation is complete, click “Start 30 Day Trial” and enter your email address. Then, in the letter that arrives, click the green button to start the trial period.
In the settings window that appears, first of all, select the MP option. The Windows 10 style, in addition to the seven style, can also be replaced by “modern”. According to the developers, it optimally combines the successful solutions of the “seven” and “ten”. And when you select the Start menu from Windows 7, it is styled to resemble Windows 10. The appearance of the Start button and the design theme are also edited.
The setup option is shown in the screenshot.
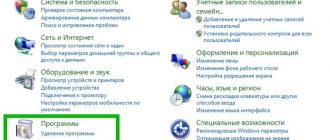
In conclusion, we suggest reading an article on how to properly remove programs from your computer.
Pinning and removing tiles
You can easily remove or pin app tiles from the Start menu by right-clicking on each one and selecting Unpin from Start Screen.
If you want to pin an app, find it in the list of apps on the left side of the Start menu, right-click and select Pin to Start.
How to change the Start menu in Windows 10
In Windows 10, you can customize the Start menu in two ways:
- changing parameters directly in the menu;
- using the Start section in Personalization.
We will use all available tools to see how to customize the Start menu in Windows 10 to suit the individual requirements of each user.
Changing size and color
If you think that the Start menu is too small or, on the contrary, takes up a lot of space on the screen, then you can easily change its size. Move the cursor to the edge of the menu and use the mouse to expand or reduce its size, as is done with Windows Explorer.
If you don't like the color scheme, then change it too:
- Right-click on the desktop and open the Personalization section.
- Go to the "Colors" tab.
- Select the color you like and turn on Show Color in Start Menu.
We've sorted out the external design, now we can move on to the functional component.
Working with tiles
Inside the Start menu there are tiles that migrated to the “ten” from the “eight” Metro interface. They can also be controlled:
- to add a new application to the tiled interface, right-click on it and click “Pin to Start Screen”;
- to remove an unnecessary tile, right-click on it and select the “Unpin” tool (by unpinning all the tiles, you will get a Start that looks similar to the one that was in Windows 7);
- To change the size, expand the section of the same name by right-clicking on the tile. There are four size options - small, medium, wide and large. Choose the right one;
- To change the name of a group of tiles, left-click on it and specify a different name.
If you are tired of constantly changing (live) tiles, disable their updating. This is also done through the context menu called by right-clicking on any element of the Metro interface.
Other options
In the Personalization section, there are several more Start menu options available for you to customize. For example, you can turn off the display of frequently used and recently added applications.
Advice! By clicking on the link at the very bottom of the settings, you can independently choose which folders will be pinned to Start. By default, Explorer and Settings are installed, but you can add Documents, Pictures, Downloads, etc. to them.
Change tile sizes
You can resize tiles in the Start menu by right-clicking it, expanding the Resize menu, and choosing the size you want.
Four small tiles fit into the size of a medium one. The four middle tiles fit into the larger tile. A wide tile is the size of two adjacent medium tiles.
Unfortunately, the "shingles" can end up a little weird, so if you have an odd number of small tiles, you may end up with empty space.
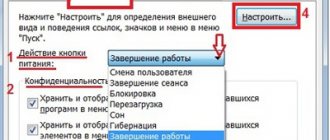
Start button settings
To access the menu settings, you need to right-click on it. Then a context submenu will appear. It can also be called by pressing the Win + X keys. Most settings are made in the “Personalization” section.
To go to Start settings, right-click on the button and select “Personalization”
Switch to full screen mode
To expand Start to full screen:
- Open the Start tab in the Personalization window.
- Move the "Open Start screen in full screen" slider to the "On" position.
To switch the Start menu to full screen mode, select the appropriate item in the Personalization window
Another way to switch Start to full-screen view is to activate tablet mode:
- Expand the notification center by clicking on its icon on the taskbar.
- Find the "Tablet Mode" item and activate it.
Start menu switches to full screen when switching to Tablet Mode
Video: How to enable full screen mode for the Start button
Start button color and shape
You can change the color, shape, and other appearance parameters of Start. To do this, go to the “Colors” tab in the “Personalization” window. On the right, select the desired color (or set it to automatically select). Here you can make the entire menu transparent by applying the appropriate settings under the color palette.
To change the color of the Start menu, you need to go to the “Colors” tab of the “Personalization” window
The menu can be easily resized using the mouse - drag its borders as far as needed.
Pin objects
In Start you can now pin a variety of objects: shortcuts to desired programs, all kinds of folders and individual files. To do this, just call up the context menu by clicking on the desired icon and select “Pin to Start Screen”. The corresponding item will immediately appear in the Start menu.
To pin an object to Start, call up the context menu and select “Pin to Start Screen”
Similarly, to unpin, right-click on a file or shortcut located in the menu and select the corresponding item in the drop-down column.
To unpin an object, right-click on it and select “Unpin from Start Screen” from the menu.
Setting up tiles
The sizes of the tiles can also be changed using the context menu: select “Change size” and select the required dimensions from four options.
To change the size of tiles in the Start menu, you need to select the corresponding item in the context menu
You can move tile icons by simply dragging them across the desktop to the desired location. Also, for user convenience, the system allows you to distribute tiles into groups. You can create groups in two ways:
- Grab the tile with your mouse, move it to the very bottom of the menu and leave it under the black line that appears. Next, name the group in the appropriate section. To rename, click on the name, highlight it and enter a new one.
To create a group, you can move the tile down and enter the name of the folder in the window that appears
- Grab one of the tiles and drag it to another if you want to combine multiple tiles into one folder. To add more applications to them, follow the same steps.
To combine tiles into groups, just move one tile to another
Other Start settings
By default, in the Start menu, the system shows the applications that the user opens most often, or those programs that were recently installed on the PC. This can be changed in Personalization by turning off the corresponding sliders.
The Start menu's display of recently added and frequently used apps changes in the Personalization window
In the same window, you select the folders that will be displayed in the menu.
In the personalization settings you can also choose the folders that will be displayed in the Start menu
Another innovation of the updated Start is the ability to hide the list of all applications. So, in the first version of Windows 10 there was an “All applications” item, but it was impossible to hide them. Now the user just needs to switch the slider opposite the corresponding item in the “Start” tab of the “Personalization” window.
Drag the desired slider to hide the list of all applications
Video: Completely customizing the appearance and content of the Start menu
Interacting with the new Start button is quite simple. Most settings are changed either through the Personalization window or by dragging tiles with the mouse. Depending on the user’s wishes, the Start menu in Windows 10 can contain a large number of necessary icons and programs or, conversely, look neat and even minimalistic.
- Author: Ekaterina K.
Rate this article:
- 5
- 4
- 3
- 2
- 1
(7 votes, average: 3.9 out of 5)
Share with your friends!
Disable Live Tile Updates
If all those flashing tiles are annoying you, just right-click them and select "Turn off live tiles."
For the most part, live tiles needlessly distract our attention, but they can be useful in the case of tiles like Weather or Calendar when it's important to have access to up-to-date information.
Grouping tiles into folders
You can also group tiles in the Start menu - provided you've updated Windows 10 to the Creators Update. These folders work just like application folders on a smartphone. To create a new folder, simply drag any tile and drop it onto another tile. These fragments will then be grouped into a folder. You can add other tiles to the folder by dragging them on top of the created folder.
Once you already have tiles in a folder, you just need to click on the folder to expand it. You can then click on any slab inside to launch the application. Click the arrow above a folder to collapse it again.
If you want to remove tiles from a folder, simply drag them back out of the folder and drop them directly into the Start menu. You can also remove a tile from the Start menu and then add it again if dragging it around is too awkward.
Remove all live tiles
If you really don't like the tiles in your Start menu, you can remove them. Just right-click them and then click "Undo from start" until they disappear.
Once you've separated the last tile, you can resize the Start menu horizontally by grabbing the right edge and dragging until the tile section disappears. After this, only the semi-classic list of applications will remain.
Remove unnecessary
You can remove unused applications directly from the start menu. Right-click or hold your finger on the name of the app you want to remove and select the uninstall option. You can also hide pinned app tiles.
Some pre-installed applications cannot be removed this way; special programs are needed for this.
Change the color of the Start menu (and taskbar)
You can easily change the color of your Start Menu and Taskbar. Go to Settings → Personalization → Colors to get started. Windows allows you to select one accent color from a pre-created group, or you can fine-tune the accent color by clicking the More color button. Just click any color you want to use. You can also let Windows choose an accent color based on your current wallpaper by selecting the Automatically select your main background color option.
After choosing an accent color, the next step is choosing the places where this color will be used. Scroll down a bit to the Other options section. You will have two options available: “In the Start menu, taskbar, and notification center” and “In window title bars.” The first option uses an accent color as the background for your Start menu, taskbar, and action center, and highlights certain elements in those places—like app icons in the Start menu. The second option uses an accent color for the title bar of your active window.
Unfortunately, the Start Menu, Taskbar, and Action Center items are all grouped together and you can't set them to different colors. You can poke around a little in the registry, but this will not completely solve the problem.
On the color personalization screen, you'll also find a Transparency Effect option to make the Start menu, taskbar, and action center transparent. This setting does not affect the accent color if it is used for these elements.
Lastly, you can enable dark mode for settings and apps.
Setting sorting and color options
To select a specific sort method from the Start menu, you must go to the Options in the Start menu. After that, go to the “ System ” section in the “ Applications and Features ” tab.
This section has three sorting methods that will be applied in the Start menu once you select them.
To change the color of the tiles, you need to go to the same “ Options ” tab and go to the “ Personalization/Colors ” section.
After choosing a color, such as red, the tiles will look like this.
To make the Start menu color red too, you need to turn on the " Show color in the Start menu, taskbar, action center, and window title bar " switch.
From the image you can see that the Start window has changed significantly, so by changing the color, we customize it, taking into account our preferences in OS design.
How application lists appear in the Start menu
By default, the Start menu displays some of your recently installed and most frequently used apps on the left side, followed by a list of all the apps installed on your system.
If you don't like it, hide the list of new or frequently used apps. Open Settings → Personalization → Start. Find “Show app list in Start”, “Show recently added apps” and “Show most used apps” and turn off anything you don’t want to see in the Start menu.
Additional options for customizing the Windows 10 Start menu
Additional features that allow you to change the appearance and behavior of the Start menu in Windows 10 include:
- Items in Settings - Personalization - Start. Most of them are very clear (or you can try and see the result: for example, see exactly how the option “Show list of applications in the Start menu” will affect the appearance), but some are not clear about the item “Choose which folders appear in the Start menu " These folders refer to the folders in the left narrow column that expand on hover in the latest versions of Windows 10.
- You can disable the automatic expansion of this left column, for more information - How to disable the drop-down panel on the left of the Start menu.
- The following materials may also be useful: How to remove search and start from full screen in Windows 10, What to do if there are tiles instead of the desktop in Windows 10.
- Don't forget about the ability to change the height and width of the Start menu (with the mouse, beyond the edge of the menu).
What folders appear in the Start menu
The User, Settings, and Shutdown options are now semi-hidden in a tiny column to the left of the Start menu. Click the button in the upper left corner of the Start menu to expand this column.
You can see the classic options with their full names, as well as a lot of open space above them. You can add other items in this space.
Open Settings → Personalization → Start. Scroll to the bottom of the page and click "Choose which folders appear on the Start menu."
Select all the folders you want to appear on the Start menu.
Enable additional folders
To enable additional directory parameters, you must go to the properties of the Start menu. To do this, go to the “ Settings ” tab, then go to the “ Personalization/Start ” section.
In this section, you need to click on the link “ Choose which folders appear in the Start menu ”. Then a window will open where you can select the folders you need.
As you can see from the image, two radio buttons are already selected. Let's select all the switches and look at the result.
As you can see in the image, all the selected items ended up in the Start menu.
Using the full screen menu
If you really like tiles. Go back to the days of Windows 8 - open the Start menu in full screen mode. Go to Settings → Personalization → Start. Enable the "Open Start menu in full screen" option.
Now, whenever you open the Start menu, you will see it in all its glory.
Start menu settings
Like any element of the Windows interface, the Start menu can be “customized” using the Settings Personalize Start menu. However, there are few settings here: you can disable the Frequently Used and Recently Installed Applications folders at the top of the menu, as well as the Recommended Applications for Installation panel (this is the first thing you should do). Additionally, Start menu settings allow you to open the Home screen in full screen mode and choose the list of folders that appear in the tile bar.
Remove suggested apps
Since you've been using the Windows 10 Start menu, you've probably noticed that it sometimes prompts you to install other apps.
To get rid of such suggestions, all you need to do is go to Settings → Personalization → Start and turn off the “Sometimes show suggestions in Start menu” option.
Note that the suggested apps are different from the pre-installed apps like Candy Crush, which you also probably don't need. To get rid of them, you need to right-click each one and delete it.
Do you have other tips for customizing the Windows 10 Start menu? Let us know! And don't forget: if you don't like the Windows 10 Start menu, you can go back to the glory days of Windows 7 by replacing the Start menu with something like Start10 or ClassicShell.