If the Start button does not work, then first reboot Windows 10
The problem may appear not only due to a Windows update, but also due to some kind of failure in the system, so the first banal, but effective step would be to restart the operating system. To do this, just restart the window interface, for which the Explorer service is responsible (in other words, explorer.exe). This can be done through any of two standard system windows - “Task Manager” and “Command Line”.
Via "Task Manager"
All processes running on the PC are displayed in the “Task Manager” - a window in which you can manage these processes: disable, enable, restart, etc. We follow these instructions:
- “Ten” allows you to expand the dispatcher menu quite quickly - right-click on a free area of the “Taskbar” and click on the line with the dispatcher.
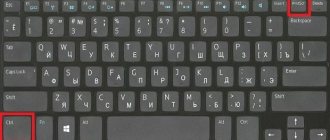
Open the “Task Manager” through the context menu of the “Taskbar” - If this method did not work (the context menu never appeared), we adopt the “old” method - press three hot buttons on the keyboard in one second: Delete + Alt + Ctrl.
Press three buttons Delete + Alt + Ctrl
- A blue menu will load, in which we click on the last item - dispatcher. If you have an English interface, select Task Manager. Through this menu, you can also completely shut down your PC - click on the familiar power button in the lower right corner and select restart or shutdown. If you chose the last option, after 15 seconds just press the physical power button yourself. This reboot method will be as effective as simply restarting explorer.exe.
Select “Task Manager” from the menu that appears
- In the first block with a list of all currently active processes, we find the “Windows Processes” menu, and in it there is already the desired “Explorer” item.
In system processes, find the “Explorer” item
- Right-click on this item and click on the first option “Restart”. We wait for the window interface to close and load again and check the operation of the Start panel.
Restart the File Explorer process
By entering the command
If you cannot restart through the manager, use an alternative method:
- We display the “Command Line” editor, which will act on behalf of the administrator. Immediately click on R and Windows on your keyboard and type a simple cmd key that corresponds to the editor. To execute this key correctly, we already hold down three keys: Ctrl + Shift + Enter. If the system has protection, a window will appear asking for permission - click “Yes”.
Enter cmd command and click OK
- If the “Search” panel opens (the search bar next to “Start” or the icon in the form of a magnifying glass), enter the same cmd query there.
If the Search panel opens, you can enter the cmd key in it
- In the results that appear, right-click on the line with the classic application - make a choice in favor of the first item.
Launch the console with administrator rights
- In the editor, we manually enter or paste (it is recommended to avoid making mistakes) the formula taskkill /f /im explorer.exe. Click on “Enter” and wait for the window interface reboot procedure to complete.
Run the command taskkill /f /im explorer.exe in the console
Restarting the process responsible for the Windows GUI
Explorer.exe is a file that is a graphical shell for Windows.
Thanks to it, Explorer, all windows and menus of the operating system work. During its operation, a problem may occur (for example, conflicts with RAM addresses). If startup does not work in Windows 10, the first thing you should do is restart the “explorer.exe” process. 1. Call the “Task Manager” using the keyboard shortcut Ctrl+Shift+Esc or the taskbar context menu.
2. Go to the “Processes” tab if the window opens in a different one.
If the dispatcher is launched in a simplified window, click on the “Details” button.
3. Find the “Explorer” or “Explorer” process and call the “Restart” command.
4. We confirm our intentions to interfere with the functioning of the system process.
The method does not always work, so you should not rely on its success.
Checking for an update for the system
The panel may not respond not only due to a single failure in the system or after an OS update, but also in the absence of an important update. In this situation, the PC as a whole begins to work slowly, so it makes sense to manually run the search for an upgrade:
- Expand the “Options” menu using the two key combination I and Windows. If the method does not work, use R and Win to call the “Run” window and enter the ms-settings: key.
Run the command ms-settings: in the window to launch a menu with parameters
- Go to the section for updates and security settings. In the first section for the upgrade center, click on the “Check Availability” button.
In the Update Center, run a check for an update
- We are waiting for the system to conduct a search.
Wait until the search for updates finishes
- If there is an update, its downloading and installation will begin. After installation, the operating system will need to be restarted in order to finally implement the updates into the system. When the upgrade is complete, check the Start panel.
Wait while system updates are downloaded and installed
Correction of the Cyrillic user name
The Start panel may stop opening if the user has changed his name by adding Russian letters to it. This profile name format is unacceptable in the Windows operating system, so the “account” must be renamed back:
- Initially, we open computer management through “Windows Search”. To do this, click on the magnifying glass icon on the “Taskbar” and enter the query in the search bar. When the result appears, click on it.
Enter the query “Computer management” into the search bar
- On the left side of the window, open the “Utilities” section, go to “Local Users and Groups” and click on the “Users” folder.
Open the Users in Utilities folder
- On the right side of the window we find the name that needs to be renamed.
In the list of users, select your “account”
- Click on his name with the right mouse button. There will be an item “Rename” - that’s what we need. Enter a new name, close the tool and restart your PC.
Click on “Rename” and give a different name to the account
Solving the problem by creating a new account in Windows 10
You can use the following trick: create a new account and start using Windows through it, if Start works in this account. Let's take a closer look at the creation procedure:
- You can get to the account creation wizard through the “Control Panel” - call it on the display through the “Run” window (R and Windows) and the control key executed through Enter.
To open the Control Panel, run the control command
- Switch to the block for user accounts.
On the “Control Panel”, find the “User Accounts” section
- In the center of the section, follow the link leading to the page for managing another account.
Click on the “Manage another account” link
- On the new page, click the link below to go to the “Options” window to create another account.
Follow the link below the table
- You can open the Settings panel right away, but there is a high chance that it will also not work together with the Start panel. Nevertheless, we try: hold down I and Windows and go to the account block.
In Settings, open the Accounts section.
- Expand the penultimate tab “Family and other people”. Click on the plus sign to add another virtual user.
To add an account, click on the plus sign
- First, the operating system will ask you to dial the email address or phone number of the current user. We do not have this information, so click on the link below “I don’t have data.”
Click on "I don't have this person's login information"
- Now the wizard will ask you to create a new Microsoft account. You can create one, but we will still go to the page for getting a new local account - click on the link to add a user without a Microsoft account.
If you want a local “account”, click on “Add a user without a Microsoft account”
- We enter the name (login) of the “account” and, if necessary, the password (twice to confirm the correctness of the entry). Click on “Next”. A new “account” will appear in the tab next to your old one.
Enter your username and, if required, password
- Now, to log out of the old “account” and log into the new one, press the hot combination F4 and any Alt. In the menu that appears, set the value to “Change user”. Click OK and the login screen will load. Select a new “account” on the left, enter a password if necessary (if you have set one) and log in - check the operation of “Start”.
Click on "Change User" in the drop-down menu
- You can also get to the login display using the familiar combination Delete + Ctrl + Alt - only we no longer select the manager, but the item “Change user” or “Exit” (“Exit”).
Click on “Change user” and log into the new “account”
- If the Start panel is working, import all the settings and files from the old account, if you had them, and then safely delete the old account.
What is the difference between the Start menu in Windows 10 and previous versions?
Due to the fact that the Windows 8.1 edition was criticized all over the world due to the lack of a Start key, the developers decided to return to the previous view of the Desktop with a familiar interface to everyone.
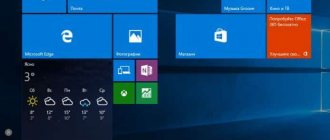
The Windows 10 Start button menu has a tiled interface
The Start button and its menu, presented in the Windows 10 edition, have a changed appearance.
The updated Start key menu is a hybrid edition that includes both the classic-look menu for older versions of Windows and the tiled architecture first introduced in Windows 8, which is most suitable for touch control.
The icons on the left half of the menu and the live tiles on the right side duplicate each other, so you can use the part that is more suitable for a particular user. They can be disabled, deleted or edited.
Unlike previous editions of Windows, in Windows 10 you can resize the Start menu like a regular window. To do this:
- Move your mouse cursor to the edge of the menu until it transforms into a double-headed arrow.
Move your cursor to the edge of the menu until it looks like a double-headed arrow
- Press the left key and drag the menu to make it larger or smaller.
Drag the menu to the right to make it larger, or to the left to make it smaller
All the previous items remain in the menu, such as programs, power management icons and others.
If you click on the “Start” button with the right mouse button, a menu with system management tabs will open. With its help, you can manage disks, change system settings, configure the network, search and perform other operations.
Right-clicking the Start button brings up a menu with system management tabs
It is possible to remove tiles and add new ones using the icons on the left side of the menu. To do this you need to do the following:
- Removing tiles:
- expand the Start key menu;
- select an unnecessary tile and right-click on it;
- in the drop-down menu, click on the “Unpin from Start Screen” icon;
In the menu, click on the “Unpin from Start screen” icon
- the tile will be removed from the right half of the menu.
- Adding tiles:
- expand the Start menu;
- select the desired icon in the left half of the menu and right-click on it;
- in the drop-down menu, click on the “Pin to Start Screen” icon;
In the drop-down menu, click on the “Pin to Home Screen” icon - The tile of the same name will appear in the right half of the menu.
If you remove all the tiles, the menu will take on an almost classic look. This can be done if the user does not use the right half when working. In addition, this increases RAM resources, since tiles take up a significant amount of it due to drawing graphic images.
Making changes to the “Registry Editor”
You can force the Start panel to open again by editing the registry. However, this action must be performed carefully and responsibly. Before making changes, be sure to back up your database:
- We launch the “Run” window through the hot combination of R and Windows - type the word regedit and start executing the command. If necessary, we allow the editor to change parameters on the PC (if a system window appears).
Paste and run regedit command
- Immediately go to the “File” menu, where we click on the export option.
Click on the "Export" function
- In a window similar to “Explorer”, select a location to store the copy and a name for it. Using the special button in the lower right corner, save the registry file.
Save a copy in any folder
- Now let's move on to the editing itself: double-click on the second main branch in the left menu HKEY_CURRENT_USER, and in it open the Software folder.
In the HKEY_CURRENT_USER tab, open the Software directory
- In the same way, we sequentially display the contents of the following directories: Microsoft - Windows - CurrentVersion - Explorer - Advanced.
The final folder should be Advanced
- When we have reached the end point of the directory (opened the Advanced folder), scroll to the end of the list on the right side of the screen and right-click on the free field below - select the creation action, and in the menu - a parameter in DWORD format.
Create a new DWORD entry in the Advanced folder
- We take the phrase EnableXAMLStartMenu as the name for the new entry.
Name the entry EnableXAMLStartMenu
- Double-click on the created item - make sure that the value field is 0. Close the editor and all previously open windows. We restart the PC using the window that is called up by the combination Alt + F4 - select “Shutdown” from the menu.
Set the value to 0
We use automatic maintenance
"Ten" and other versions of "Windows" are equipped with a special debugging tool that works in the background, eliminating most of the problems found. Typically, debugging runs automatically on a schedule, but you can command it to run manually:
- We find on the “Desktop” a sign called “This PC” (usually used to launch “Explorer”) - right-click on it and select a line in the list to launch properties.
Open computer properties via the shortcut menu
- In the system properties, look at the lower left corner - click on the link leading to the “Service Center”.
Go to Security and Service Center
- Expand the second drop-down menu “Maintenance”.
Expand the "Maintenance" item
- In the “Automatic...” block, click on the “Start...” link.
Start the service using the appropriate link
- The display will indicate that automatic maintenance is in progress. Please note that this process will take resources from the PC (RAM, processor, etc.). To ensure that maintenance is completed as soon as possible, it is recommended not to perform any actions on the PC during this period or to minimize them. Otherwise, the PC may start to slow down. After checking, we check the functionality of the Start panel.
Wait for background maintenance to complete
Security and Maintenance – Built-in Problem Solver
- Right-click on the Start menu and select “System” from the drop-down list;
- Next, in the lower left corner of the window that opens, click on “Security and Maintenance”;
- Then scroll down the list to “Maintenance” and click on “Search for solutions.” Follow the system prompts;
- After about twenty to thirty minutes, some of the problems will be solved and the Start should work.
Let's restore Start using the PowerShell console
You can solve the problem by running commands in the Tens PowerShell console. However, this method has a disadvantage: it may affect the operation of some utilities that were installed through Windows Store. If you use such applications, use this method only if all the previous ones have failed. It is also highly recommended that you create a restore point before doing the following:
- Let's try to open a new console in the “top ten” using “Search” - type a request in the form of the name of the utility.
Enter a PowerShell Query
- In the context menu called up with the right key, we select, of course, opening with system administrator rights.
Run the PowerShell console as administrator
- If the “Search” panel also does not work for you, go to the main “Explorer” screen through the computer shortcut. Open the contents of the system disk. There we go first to the Windows directory, and then to System32 and Windows PowerShell. In the nested block v1.0 we find the executable document of the blue console with the exe extension.
Find the PowerShell application on your system drive
- Right-click on it and also click on run as administrator.
Run the program as administrator
- In the console, paste the long formula using the hot combination V + Ctrl: Get-appxpackage -all *shellexperience* -packagetype bundle |% {add-appxpackage -register -disabledevelopmentmode ($_.installlocation + “\appxmetadata\appxbundlemanifest.xml”)}. To execute it later, press “Enter”.
Run the command in the blue editor
- When the procedure is completed successfully, reboot the device and see if the problem is fixed.
Method 9: Via Msconfig
- Again, hold down the “Win” and “R” keys.
- We enter the command: “msconfig”, and be sure to check the box to run the utility as an administrator.
- In Services, find and uncheck the box to disable Windows Font Cache Service.
- We also remove the “Windows Presentation Foundation Font Cache”.
- “Apply” and restart the computer.
Roll back the operating system to its previous state
If the “Start” panel stops appearing after clicking on the icon after installing the next system update in the “Update Center”, perhaps the installation of the upgrade did not go well - with errors. In this case, it is recommended to roll back to a restore point. The Windows system automatically makes a point before installing updates in case of problems. Let's use it:
- Open the “Run” menu using the Windows and R hotkeys and type rstrui.exe in the empty field. After that, click on OK - the recovery wizard appears.
Execute the rstrui.exe key to launch the recovery wizard
- It can be called up on the display through the “Control Panel” - open it through the same “Run” window and the control key and launch the “Recovery” block. Click on the link, which opens the wizard window.
Follow the link "Run System Restore"
- On the main screen, select the first recommended item if “Start” stopped functioning after the last update. Otherwise, put a checkmark next to the second option and click on OK.
Select recommended recovery if the problem appeared after the last update
- In the second case, you will see a list with all available points. We look at the creation date and select the desired state. The main thing is that the creator is the “Windows Module Installer”. Select the line and click on “Next”.
Select a point and click on “Next”
- We start the rollback using the button below.
Kickstart your recovery
- In the small window, click on “Yes” to confirm the procedure. We wait for the operation to complete and check the functionality of the “Start” key.
Click “Yes” to confirm
If for some reason you did not find the restore point created by the Module Installer, remove the update manually:
- Go to the Windows Settings menu through Windows and I and expand the update tile. In the first tab of the center, click on the link leading to the magazine.
Start searching for updates
- On the new page, follow the link to remove the update.
Click on the line “Uninstall updates”
- A window will appear on the display with a list of previously installed OS upgrades. Right-click on the first item and select the only delete option in the menu.
Select delete from the context menu
- Confirm your intention. Restart your device. After some time, the center will again find the previously deleted update and try to install it, but this time correctly. If this does not help, but you are sure that the problem is with the update, contact Microsoft support and report your problem.
Confirm that you want to remove the update
You can also use a Windows option called “Reset your computer.” You can run it in the operating system settings window, in the “Security and Updates” section.
In the “Recovery” tab, start restoring the PC to its original state