Installing Windows 10 on Mac is quite simple. The Boot Camp utility is designed for this, which even a user who is far from high technology can handle. She will walk him through several steps, which will be enough to get another operating system on his computer. After this process is completed, when you start your Apple computer, you will be asked to choose which OS you want to use at the moment: the current version of macOS or Windows 10. It’s a pity that working with Boot Camp is not available to everyone.
Telegram channel of the creator of Trashbox about technology
The fact is that the most popular and in-demand Mac format is portable MacBook laptops. Apple uses fairly fast, but very expensive memory in them. Not everyone spends money on increasing it when buying a computer, so users have plenty of machines with 128 or 256 GB of storage. This may be enough to fully use macOS. However, when installing Windows 10 via Boot Camp, you will have to cut off a significant chunk of files that will be available to the new operating system. With a 128 GB laptop this is almost impossible, with a 256 GB laptop it is extremely uncomfortable.
It would be nice if you could use an external drive for Windows 10 and connect it as needed. But Boot Camp can’t work in this way. Additional manipulations will be required, which will be discussed in these detailed instructions.
What you will need to install Windows 10 on an external drive:
- A flash drive of at least 4 GB, but more is possible.
- An external drive is better than USB 3.0, or even better - an SSD. You can use a regular internal SSD in a special USB case.
- Boot Camp app on supported devices:
- MacBook (2015) or later;
- MacBook Air (2012) or later;
- MacBook Pro (2012) or later;
- Mac mini (2012) or later;
- iMac (2012) or later;
- iMac Pro (all models);
- Mac Pro (2013) or later.
- The application for creating virtual machines VirtualBox is free.
- Disc image with Windows 10 installation files in ISO format - link to official¹.
- Non-Apple mouse and keyboard for initial setup of Windows 10².
- You may also need a hub to connect additional devices - to set up Windows 10 after installation, you need at least three USB ports.
➀ I
I recommend using the official version of Windows 10 and not even thinking about builds. This will help avoid many problems - for example, the inability to install drivers for the full operation of a Mac running the Microsoft operating system.
➁ If you are using any Apple computer with a mouse and keyboard made by the same company or built into a MacBook, they will not work within the Windows operating system until you install drivers for them - this is one of the last steps of this instruction.
Methods and features of installing MacOS on a Windows computer
There are several ways to install this OS on a PC. Each has its own characteristics:
- As the main OS. In this case, it will replace standard Windows and will manage all the computer's resources.
- A virtual machine located inside the main Windows. This method requires special knowledge and programs. Allows you to use multiple operating systems on your computer at once.
- Second additional OS. After starting your computer, you will choose which system to use. Please note that you will not be able to fully use all the resources of the device.
Prepare an external drive for installing Windows 10
The external drive you choose to use Windows 10 with your Mac needs to be prepared to install the new operating system on it. To do this, you need to format it using standard macOS tools and select the correct data processing scheme.
Attention: keep in mind that all the processes described in this paragraph will delete absolutely all data located on the external drive.
Step 1: Connect the external drive to your Mac.
Step 2: Open the standard Disk Utility application.
Step 3: Go to the View menu and select the Show all devices option.
Step 4. Select the drive that will be used to install Windows 10 in the application side menu - the drive, not the volume that is part of it.
Step 5. Click on the "Erase" button in the top bar of the application.
Step 6: Select a name for the external drive in the Name field - for example, "WIN10".
Step 7: Select the “MS-DOS (FAT)” option from the “Format” drop-down menu and “GUID Partition Scheme”³ from the “Scheme” drop-down menu.
Step 8. Click on the “Erase” button.
Step 9. Wait for the operation to complete.
The external drive now uses the MS-DOS file system (FAT) and GPT partition scheme instead of MBR.
➂ If you do not change the partition scheme to GPT, you will not be able to install Windows 10 to work fully on a Mac through the standard choice of disk to run. In this case, you will be able to use the operating system only from under the virtual machine, and this is slow and inconvenient.
Installation on Windows
If you do not want to completely replace Windows, then it is recommended to install the Mac OS as a second operating system in a virtual machine . This will be an excellent solution, since the native OS will not be affected, but you will still be able to test MAC OS on your computer. To do this, you must follow the instructions:
- First you need to install a virtual machine (for example, Virtual Box) on a computer running Windows OS. This can be any program in this area.
- Download an image of a third-party system. You can even find special versions for installation in virtual environments. Depending on the program you use, the file format will differ, so pay attention to this.
- Launch the virtual machine and install the operating system as on a regular computer. To do this you need to follow the instructions above.
- Complete all settings and use Mac OS inside Windows.
You can also not waste time installing Mac OS on a virtual PC, but download a ready-made MacBook environment . But you should understand that this installation method will not allow you to use all the capabilities of the operating system. But it helps a lot if you need to run programs that were created specifically for Mac.
Installing Mac OS on a personal computer is almost identical to Windows and takes the same amount of time. If the user decides to completely replace Windows on a Mac, then it is worth using a different hard drive for this. This way you can easily roll back your actions.
Lost.dir folder on Android - what kind of directory is it and what functions does it perform?
Prepare a USB flash drive to save Mac drivers
Similar to an external drive for a future operating system, the flash drive must also be formatted using standard Mac tools to be suitable for use with the Windows operating system. You need a file system that works on both it and macOS.
The external drive will be used in the future to regularly run Windows 10 when you need software that is not available on macOS. A flash drive will only be needed to install drivers for working with Apple hardware on a new operating system.
Attention: keep in mind that all the processes described in this paragraph will delete absolutely all data that is on the flash drive.
Step 1: Connect the USB flash drive to your Mac.
Step 2: Open the standard Disk Utility application.
Step 3. Select the USB flash drive that will be used to store Windows 10 drivers from the application side menu.
Step 4. Click on the "Erase" button in the top bar of the application.
Step 5: Select a name for the external drive in the Name field - for example, "WIN10DR".
Step 6: Select the “MS-DOS (FAT)” option from the “Format” drop-down menu.
Step 7. Click on the “Erase” button.
Step 8. Wait for the operation to complete.
The flash drive now uses the MS-DOS (FAT) file system.
➃ If you don’t have a suitable flash drive at hand, you can theoretically do without it. However, in this case, you will need the Tuxera Disk Manager application, which gives the Mac the ability to work with the NTFS file system. It is this that will ultimately be used on an external drive with Windows 10, and drivers for this OS can be loaded onto it from under macOS.
Download Windows 10 Drivers via Boot Camp
Boot Camp is an Apple proprietary utility that is designed for convenient installation and further use of the Windows 10 operating system on Mac computers. Even a child can handle it, but it is not needed in its pure form - we use only one of its functions.
For the purpose of this material, Boot Camp will only be needed to download drivers that will help connect Windows 10 with hardware manufactured by Apple. The fact is that this utility can install the system only on the internal disk of a Mac. I repeat, it “bites off” the necessary space from it, which will be used in the future with another system. This is comfortable when using Mac storage of 512GB, 1TB or more. If you have only 128 or only 256 GB, it is better to put Windows 10 on an external drive. This is why Boot Camp is only needed to download drivers⁵.
Step 1: Open the Boot Camp app.
Step 2: Go to the Action menu.
Step 3: Select the "Download Windows Support Software" option.
Step 4. Determine the location to save the drivers - the “WIN10DR” flash drive (if you used this name).
Step 5. Click on the “Save” button.
Step 6. Wait for the operation to complete.
After the operation is completed, the flash drive will contain the WindowsSupport folder with all the necessary files.
➄ To download the latest software (drivers) for running a Mac on Windows 10, you need the latest version of Boot Camp. It updates with macOS, so it's best to install the latest version through System Preferences > Software Update.
How to download the Windows 10 installation image
If you don't have a computer running Windows 10 , then you'll have to search the Internet for clean ISO files to install the operating system. Fortunately, the Internet is full of this goodness. If you are too lazy to search, just look at the link in the article “”. There you will find all the available ways to legally download the official Windows 10 image.
If you have access to Windows 10 or any other version of Windows, then you need to use the Windows Media Creation Tool.
- Download WMCT from the link from the official Microsoft website.
- Run the utility and agree to the terms of use. On the second screen, select the Create installation media .
- The next step is to select the language, bit depth and edition of Windows 10. Please note that the Windows Media Creation Tool itself will select the parameters that are relevant for a given Windows 10 computer. It’s not a fact that they will be suitable for your Mac (for example, you are downloading the image on a budget computer with 32-bit Windows 10). Therefore, it is worth unchecking the box next to Use recommended settings for this computer .
- Choose the language that suits you. Bit capacity is 64-bit (there is no point in installing 32-bit on a Mac. You can find an explanation in the instructions for Which Windows 10 bit depth to choose). Editorial is at your discretion. You can choose Home, you can choose Pro. It all depends on which version you have the key for. If there is no key and you want to download Windows 10 for evaluation purposes (or then pirate it, let’s be honest), then choose the one you like. Either Enterprise or China SL. More information about how the editions of Windows 10 differ is described in the instructions How the different editions of Windows 10 differ.
- The system will warn you that the edition of the installation media may not match the edition of Windows on your computer. Ignore this message and click OK .
- Next, select ISO file . This option will ultimately give you a finished image that can be copied to a flash drive or to the cloud for further use. The option of recording to a USB drive will not work in this case.
- The last step is to specify the location where to save the ISO file. After this, the application will start downloading the image. Wait for the process to complete. Its duration will depend on the speed of your Internet connection.
Install VirtualBox and determine the external drive ID
At this point, you already have a formatted disk that is ready to install Windows 10, as well as a flash drive with all the necessary drivers. Now you need to trick Boot Camp and the operating system installer into thinking that the external storage is internal. This can be done using Parallels or VMware Fusion, but I will use the VirtualBox application. This decision, by and large, is determined only by cost - the last utility is freely available, and for the first two you will have to pay. Actually, the choice is obvious.
Step 1. Download VirtualBox from the link - you need to select the version for the Apple operating system.
Step 2: Install the VirtualBox application.
Step 3: Launch the standard Terminal application.
Step 4: Type “diskutil list”⁶ and press Return(⏎) to display a list of disks used on your Mac.
The list will also include an external drive with the MS-DOS (FAT) file system, which you, if you followed the recommendations, named “WIN10”.
Step 5. Write down the ID of the external drive that is listed in the IDENTIFIER column - in this case it is “disk2”.
Step 6. Now you need to remove the drive logically, but leave it physically connected - to do this, find it in the Finder application and select the “Eject” option in the drive’s context menu.
➅ Here and further, commands for the “Terminal” must be entered without quotes - use only what is between them.
Installing OS X in VirtualBox
The next step involves directly installing OS X on your virtual machine. When you are ready to install, launch VirtualBox and follow the instructions below:
In the left pane, select your virtual OS X system and click Launch. Next, the HackBoot loading screen will appear with the HackBoot icon in the middle
Click on the CD icon at the very bottom of the VirtualBox window and select Select optical disk image. Select the hacked Mountain Lion ISO image downloaded earlier.
Map an external drive for use with VirtualBox
Step 1: Open the Terminal app.
Step 2: Use the command “sudo VBoxManage internalcommands createrawvmdk -filename bootcamp.vmdk -rawdisk /dev/disk2”⁷.
Step 3: Confirm that you want to use the command using your Mac Administrator account password.
A virtual disk, bootcamp.vmdk, will be created in the home folder of the system user you are currently using. You can now use VirtualBox to install Windows 10 on an external Mac drive.
➆ “disk2” is the identifier that I received in the previous paragraph of this instruction. If yours is different, just replace it within this command.
How to install Windows using Boot Camp Assistant?
The Boot Camp Assistant utility makes it possible to install an operating system from Microsoft on laptops and computers from Apple. You can select the system when you boot the device.
Models that can be installed with Windows 10
- MacBook Pro (2012 model and newer).
- MacBook Air (2012 model and newer).
- MacBook (2020 model and newer).
- iMac Pro
- iMac (2012 model and later).
- Mac mini (2012 model and newer).
- Mac Pro (2013 model).
System requirements that must be met to install Windows 10
- macOS operating system updated to the latest version.
- The device must have at least 64 GB of free space (necessary to create an additional partition for installation).
- During use, Windows 10 will require an update, which takes up significant space on your hard drive. Therefore, it is necessary to reserve 128 GB for installing a system from Microsoft.
- For some Apple models, you will need an external memory device (flash drive, portable hard drive) to install the OS. Its capacity must be at least 16 GB.
- You need to copy the installation program to an external drive to install 64-bit Windows 10 (home or professional version).
To install the OS, you must use the full version of Windows.
a DVD as the installation disk , then it is necessary to make a copy of it on the device. If Windows 10 was created on a flash drive or there is a product key, but there is no distribution kit itself, then Windows can be downloaded from the official Microsoft .
Algorithm for installing Windows 10 on MacBook
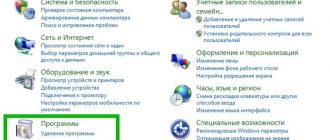
- You need to run the “Boot Camp Assistant” utility (located in the “Programs” - “Utilities” directory). Next, you need to follow all the instructions that the system will give. Thanks to this application, the user creates a Windows distribution and a BOOTCAMP partition on the hard drive. If required, you should connect an external drive during installation.
Once the user has created a new partition, it cannot be resized. Therefore, it is recommended to set the minimum value to 128 GB for comfortable operation of the software.
- After Boot Camp Assistant finishes, it will reboot and boot into Windows. Usually the system independently selects and formats the required partition. If the user uses an external drive for installation, the system will ask “where to install the OS.” BOOTCAMP must be specified. Then you need to format the selected partition. The section can be named whatever is convenient for the user.
- After formatting, the system will copy data from the external drive to the selected BOOTCAMP partition. After the process is completed, you need to disconnect the flash drive (or remove the DVD). Next, following the system prompts, the user needs to install Windows. After complete installation, the computer will reboot and automatically log into the Windows profile. Next, you should install all the software that is necessary for operation.
Create a virtual machine to install Windows
Step 1: Open the Terminal app.
Step 2: Use the command “sudo /Applications/VirtualBox.app/Contents/MacOS/VirtualBox” to launch the VirtualBox program with elevated permissions.
Step 3: Confirm that you want to use the command using your Mac Administrator account password.
Step 4: Select the New option from the VirtualBox toolbar.
Step 5: Enter a name for the virtual machine in the Name field - for example, WIN10.
Step 6: Select the "Microsoft Windows" option from the "Type" drop-down list.
Step 7: Select the “Windows 10 (64-bit)” option in the “Version” field.
Step 8: Click the Continue button.
Step 9: Use the default amount of RAM and click Continue.
Step 10: Select the “Use existing virtual hard disk” option.
Step 11. Click on the button with the image of a folder to the right of the virtual hard disk selection field.
Step 12. Click on the “Add” button.
Step 13. Select the bootcamp.vmdk file in your account’s home folder and click on the “Open” button⁸.
Step 14. Click on the “Select” button.
Step 15. Click on the “Create” button.
Step 16. Select the virtual machine you just created in the left side menu, go to the “Configure” section, expand the “System” menu and turn on the “Enable EFI (special OS only)” switch⁹, confirm your intention with the button "OK".
Step 17. Select “Optical drive” in the “Media” section and select the Windows 10 disk image that you downloaded at the beginning of this material using the “Select disk file” button.
➇ If you get an error in this step that says the bootcamp.vmdk file is busy, then you didn't eject the external drive through Finder in one of the previous steps - just do that and try again.
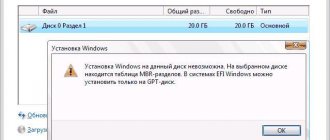
➈ Like choosing a GPT partition scheme, this is a vital step to continue running Windows 10 from an external drive without using a virtual machine. By the way, without GPT, EFI technology will not work - the system will complain that the external drive is using MBR. It will indicate the error “Windows cannot be installed on this disk. The selected disk contains an MBR partition table. On EFI systems, Windows can only be installed on a GPT disk."
Install Windows 10 on an external drive using VirtualBox
Click on the "Run" button on the VirtualBox application bar. Once done, choose to run from optical drive and Windows 10 will automatically install on your Mac's external drive. Follow the onscreen instructions to complete it. The installer will tell you that the external drive needs to be formatted with the NTFS file system, do so.
Attention: when the screen prompts you to restart your computer to complete the installation, immediately close the VirtualBox virtual machine window - otherwise nothing will work. At this point, the operating system has already copied all the necessary files and will complete the installation on its first launch.
Configuring VirtualBox to suit the needs of MacOS Sierra
Setting up the parameters won’t take you much time, so let’s get down to business right away.
- After creating the virtual machine, select it and click the “Configure” button on the top panel.
- Go to the “System” tab and in the “Boot order” window, uncheck the “Floppy disk” box.
- In the “Processor” tab we set the maximum number of processors up to the red zone.
- Let's go to the "Display" section. Here we specify the maximum video memory and disable the 2D and 3D acceleration checkboxes.
- The next section is “Media”. Here we click on the optical disk and remove it so that there remains one hard disk with the name of our OS. Then click on the green plus sign at the bottom and select the “Add SATA controller” option.
- For the created SATA controller, click on the optical disk and select the downloaded image. Make sure there are no Russian characters in the path to the image.
- Click OK.
We've figured out the setup, but we're in no hurry to launch the virtual machine. You will also need to write a couple of commands on the command line.
CMD commands for setting up VirtualBox on MacOS
Be sure to close VirtualBox before starting. Now we launch the command line with elevated privileges - this is mandatory. Next we will execute the commands.
Go to the folder with the virtual machine – cd “C:\Program Files\Oracle\VirtualBox\” .
VBoxManage.exe modifyvm “MacOS” –cpuidset 00000001 000106e5 00100800 0098e3fd bfebfbff
Where MacOS is the name of your virtual machine.
VBoxManage setextradata “MacOS” “VBoxInternal/Devices/efi/0/Config/DmiSystemProduct” “iMac11.3” VBoxManage setextradata “MacOS” “VBoxInternal/Devices/efi/0/Config/DmiSystemVersion” “1.0” VBoxManage setextradata “MacOS” “ VBoxInternal/Devices/efi/0/Config/DmiBoardProduct” “Iloveapple” VBoxManage setextradata “MacOS” “VBoxInternal/Devices/smc/0/Config/DeviceKey” “ourhardworkbythesewordsguardedpleasedontsteal(c)AppleComputerInc” VBoxManage setextradata “MacOS” “VBoxInternal/Devices/ smc/0/Config/GetKeyFromRealSMC” 1
I tried to run the installation system without these commands, but all you get is an endless reboot.
Obtain permissions to run the system from an external drive
Apple tries to protect macOS as much as possible so that an inexperienced user cannot accidentally disrupt its stable operation. Nevertheless, the company leaves interesting opportunities for enthusiasts, which we are trying to use today. At this step, we allow the loading of third-party OSes without restrictions¹⁰.
Step 1: Enable Restart Mac.
Step 2: When the screen goes dark, press Command(⌘) + R to go to the Mac Tools Menu.
Step 3: Enter your account password and go through other Apple authentication methods to confirm that you want to make the necessary changes.
Step 4: Go to the Utilities menu and launch the Secure Boot Utility application.
Step 5: Enable the “Security features disabled” radio buttons in the “Secure Boot” section and “Allow booting from external or removable media” in the “Allowed boot media” section.
➉ If you don't do this, you'll get the error "You need to reinstall the version of macOS on the selected drive" when you try to use an external drive to run Windows 10 on your Mac.
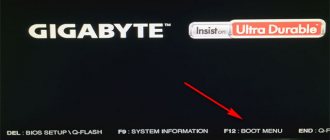
Boot your Mac using external storage
To select a drive to boot the operating system on a Mac, you need to hold down the Option(⌥) key while restarting your computer. Then options will appear on its screen, from which you need to determine the external drive with Windows 10, which you were able to create within the framework of these instructions.
If there is no external drive in this menu that is connected to the computer, then you did something wrong. To understand which step the error occurred, look at the italic numeric footnotes that are associated with the most important steps in the instructions.
Where to download Mac OS
The official version of the system can only be downloaded for Intel processors. For AMD you will have to use third-party assemblies.
Attention! Since there are no official versions of Mac OS for AMD, there is a high probability of downloading assemblies that are already initially infected with viruses.
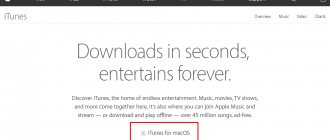
The operating system for Intel processors can be downloaded from the official games and application store as follows:
- Go to the iTunes Store and log in.
- Go to the page with the OS and download the necessary .
- Wait for the download to finish .
iPhone authentication check
After this, you can start creating a boot disk. It is worth remembering in advance where exactly the file was downloaded from the Mac OS.
Install drivers for Windows on Apple computers
After selecting the external drive to boot, the Windows 10 logo will appear on the screen, the system will finish the installation, during which another reboot may occur (you will need to use “Option(⌥)” again to select the boot drive). After that, she will ask you to go through the initial setup.
Already at this step you will need the most ordinary mouse and keyboard, which will have to be connected to the Mac, since Windows 10 cannot yet work with standard Apple ones (neither built-in nor external). You can get by with just a mouse if you use the virtual keyboard option through the accessibility menu.
The final step in setting up Windows 10 to work correctly on a Mac will be installing the drivers located on the flash drive that was created above. Connect it, go to the BootCamp folder and run the Setup.exe application, which will install all the necessary software, as administrator .
If your Apple mouse, keyboard, or trackpad doesn't work after installing Windows 10 on your Mac, you'll need to update their drivers manually using Device Manager. Problematic ones are marked with exclamation marks. It is enough to mark them, activate a manual search for drivers and specify the corresponding folder on the flash drive. It will immediately pull up the missing files.
Where to repair Macbook, iMac and iPhone
Checklist for choosing a reliable service center for repairing Apple equipment
Prices
Fair, not overpriced and not underestimated. There should be prices on the Service website. Necessarily! without asterisks, clear and detailed, where technically possible - as accurate and conclusive as possible.
Deadlines
If spare parts are available, up to 85% of complex repairs can be completed in 1-2 days. Modular repairs require much less time. The website shows the approximate duration of any repair.
Warranty and responsibility
A guarantee must be given for any repairs. Everything is described on the website and in the documents. The guarantee is self-confidence and respect for you. A 3-6 month warranty is good and sufficient. It is needed to check quality and hidden defects that cannot be detected immediately. You see honest and realistic terms (not 3 years), you can be sure that they will help you.
Stock
Half the success in Apple repair is the quality and reliability of spare parts, so a good service works with suppliers directly, there are always several reliable channels and your own warehouse with proven spare parts for current models, so you don’t have to waste extra time.
Free diagnostics
This is very important and has already become a rule of good manners for the service center. Diagnostics is the most difficult and important part of the repair, but you don't have to pay a penny for it, even if you don't repair the device based on its results.
Service repairs and delivery
A good service values your time, so it offers free delivery. And for the same reason, repairs are carried out only in the workshop of a service center: they can be done correctly and according to technology only in a prepared place.
Convenient schedule
If the Service works for you, and not for itself, then it is always open! absolutely. The schedule should be convenient to fit in before and after work. Good service works on weekends and holidays. We are waiting for you and working on your devices every day: 9:00 - 21:00
The reputation of professionals consists of several points
Company age and experience
Reliable and experienced service has been known for a long time. If a company has been on the market for many years and has managed to establish itself as an expert, people turn to it, write about it, and recommend it. We know what we are talking about, since 98% of incoming devices in the service center are restored. Other service centers trust us and refer complex cases to us.
How many masters in areas
If there are always several engineers waiting for you for each type of equipment, you can be sure: 1. there will be no queue (or it will be minimal) - your device will be taken care of right away. 2. you give your Macbook for repair to an expert in the field of Mac repairs. He knows all the secrets of these devices
Technical literacy
If you ask a question, a specialist should answer it as accurately as possible. So that you can imagine what exactly you need. They will try to solve the problem. In most cases, from the description you can understand what happened and how to fix the problem.
Openness of the service is the key to mutual trust and cooperation
Social media
If they are trying to organize a convenient service for you, you will definitely find the company on VK, Facebook, Instagram, and of course, on the Youtube channel. Here you can always, in an informal setting, look at the life of the service from the inside, evaluate examples of repairs, and communicate with specialists live. It’s convenient, and now you simply can’t live without social networks 
Faces of the company
Apple's seasoned experts and engineers are superheroes, but they don't wear masks. On the website and on social networks you can always see who you are going to, see photos and learn a little about the engineers and service managers. You can write to each of them, suggest or clarify something with someone with whom you have already communicated.
Reviews
You can understand a lot from reviews if you treat them correctly. The overall assessment of the service should be positive and high. But the rating cannot be maximum. Reviews can be both positive and negative, the main thing is that they respond to them, communicate, make decisions, help, that is, treat them like a human being.
Ask a Question
Articles
- How to reset password on MacBook
- Installing windows 10 on macbook
- Installing mac os x, high sierra on macbook
- Recovering mac os macbook air, pro
- Installing Mac OS from a USB flash drive to a MacBook
- Cleaning your MacBook from unnecessary files
- How to turn on the keyboard backlight on a MacBook?
- How to boot from a macbook flash drive
- How to reset MacBook to factory settings
- Adjust MacBook Screen Brightness
- How to connect an external hard drive to a MacBook
- How to transfer data from MacBook to hard drive
- How to close a program on a mac, hard reboot
- How to format an external hard drive on a macbook
- Macbook doesn't see hard drive
- What to do if MacBook doesn't see SSD?
- MacBook Pro slows down - what to do?
- How to disable a MacBook's graphics card
- Why is video slow on MacBook?
- MacBook Upgrade: M2 SSD for Extended Storage
- How to put 2 SSDs in one MacBook
- How to Set Up Touch Bar on Macbook Pro
- MacBook Pro graphics card test under load
- MacBook Diagnostic Mode
- Do-it-yourself MacBook calibration: instructions for calibrating the MacBook battery and monitor
- Pop-up windows and tabs with advertisements in Safari and Chrome - Viruses in OS X
- MacBook setup
- Full analysis of MacBook Retina 12” (2015)
- Converting Top Case MacBook Pro 2009 for MacBook Pro 2010.
- How to install an American keyboard on a Russian Macbook Unibody
- Replacing Macbook Unibody keyboard elements
- Cleaning the keyboard button mounts for Macbook Pro Unibody 13.3″ 2009
- Changing the keyboard on MacBook Pro.
- Increasing RAM on MacBook Pro.
- Installing Linux on Mac
- MacBook Pro 13″ Retina disassembly
- Why Word doesn't work in Yosemite
- Reset MacBook Password
- Installing a Windows 8.1 image on an iMac 2012 Mac OS X via boot camp 5
- Installing Windows 7 on MacBook and iMac
- MacBook Pro 15 disassembly instructions (part 1)
- MacBook Pro 15 disassembly instructions (part 2)
- MacBook Pro 15 disassembly instructions (part 3)
Question
Repair request
Press about us Reviews Vacancies Details Delivery and payment Cooperation Team
We repair:
- iPhone iPhone 4..5s
- iPhone 6
- iPhone 6s
- iPhone 6 Plus
- iPhone 6s Plus
- iPhone SE
- iPhone 7
- iPhone 7 Plus
- iPhone 8
- iPhone 8 Plus
- iPhone X
- iPhone XS
- iPhone XS Max
- iPhone XR
- iPhone 11
- iPhone 11 Pro
- iPhone 11 Pro Max
- iPhone exchange
- FAQ iPhone
- iPad
- iMac
- MacBook
- Time Capsule
My impressions of using Windows 10 on an external drive
I tested the circuit on a basic processor and RAM 2020 MacBook Air running macOS 10.15 Catalina. The role of the disk was taken by an external 1 TB HDD from Samsung with a connection via USB 3.0 - not the fastest solution today to use it to install the operating system. However, for occasional use of Windows 10 on a Mac, this is more than enough. The OS may not launch very quickly, and also works at a “seven” on a scale of ten, but this turned out to be enough. The ideal option would be an SSD with a Thunderbolt 3 connection.
It took several days of trial and error, as well as the help of the site team, to create this instruction. There are similar guides on other resources on the Internet, but they are full of errors that lead you on the wrong trail. Be sure to pay attention to the digital footnotes throughout the text and let it all work out.