How to record video on Skype
The application provides built-in recording functionality in the updated version of Skype 8. This feature is not available for older versions. Let's look at how to record a video on Skype for free using specialized software.
FreeVideoCallRecorder
This is a simple application for recording video from a web camera on Skype. To work, follow these steps:
- Install the program on your PC;
- Open the application. Skype will launch automatically;
- Select a recording method;
- By clicking “Browse”, set the directory where conversations will be saved;
- Start talking, start recording;
- To view the finished result, click “Show”.
How to record video in Skype automatically using VodBurner
The utility works similarly to that described above, only its functionality is more expanded. The developers offer the ability to edit recorded video. To save a conversation, do the following:
- Install the application;
- Allow access to Skype. Click the "Give" button;
- The main program window will open. The settings are located in the “Options” - “Configure” section;
- The “General” tab is used for basic settings (you don’t have to change anything). “Recording” - for recording settings. I recommend changing the directory where the recording is saved;
- Click "Go to";
Launch Skype only this way, otherwise the program will not record;
- Recording will start automatically;
- After its completion, the video file can be saved and edited by clicking the “Edit” button;
- An editor will open, where you can cut a video, add an image, music;
- Save the finished result.
How to save a call recording in Skype
To save a call on your computer, go to your chat, hover over the post thumbnail and click on the three-dot button that appears (“More options”), then “Save to Downloads” to save it in your downloads folder.
You can also select "Save As" and navigate to the folder where you want to save the call. The recording will be saved as an MP4 file.
On mobile, simply press and hold the recorded call while chatting. When the menu appears, click Save.
The recording will be automatically downloaded and saved to your device's camera folder as an MP4 file.
ON TOPIC: How to disable autosaving of Photos and Videos in Viber and WhatsApp on iPhone.
How to record in Skype 8
The programs described above are suitable for any version of Skype. Let's look at how to record video in Skype 8 on a PC. When the video call starts, click More Options at the bottom right. Looks like a “+” sign.
Select "Get Started." The program will notify you when recording begins. The recording duration will be displayed at the top of the window. To finish, click Stop. The recording will be saved in the chat. Conference participants will be able to view it by left-clicking on the video.
The video is available for thirty days, after which it will be deleted. Save it to HDD. To do this, do as in the screenshot.
Record video in Skype on iPhone
Install the mobile version of the application. Contact your interlocutor. Open the menu (+ icon) at the bottom of the screen. Select "Get Started".
The person will receive a notification. When you finish recording a video of your interlocutor on Skype, click the “Stop” link. Save the video, share it or delete it.
How to record a Skype call on iPhone, iPad or computer
You can start recording a call at any time during a Skype call on your computer and mobile devices.
To start recording a call on your computer, click the + icon at the bottom of the screen, then select Start Recording.
To start recording a call on your mobile phone, tap the + icon and then tap Start Recording.
On both your computer and mobile phone, a banner will appear on your Skype screen letting everyone know that you have started recording the call.
After the conversation, the recording is completed and then sent to your chat, where it will remain available for 30 days. You and everyone you talk to can save the recording locally or share it at any time during the month.
ON TOPIC: Tips and secrets of Viber on iPhone and Android devices that you might not know about.
Classic (“old”) Skype
Since the old version of the program does not provide a recording function, we will consider software that offers such capabilities. Before this, it is worth noting that you will need a stereo mixer, which is often built into most motherboards.
We will look at several basic programs for recording audio. All you have to do is choose the one that is most convenient for you and use it. The easiest way is to install Free Audio Recorder . The largest set of functions is provided by Amolto Call Recorder . And iFree Skype Recorder is a universal solution.
iFree Skype Recorder
When considering the most popular programs for recording calls, you should start with iFree Skype Recorder. It is completely free and easy to use. Works in several modes:
- Automatic (everything starts on its own).
- Manual (user enables recording).
Official website - https://www.ifree-recorder.com/
Instructions for use:
- Download the software from the official website.
- Run the iFreeRecorder.exe . The installation will begin directly.
- Follow the installer's prompts until the procedure is complete.
- Launch the software from a shortcut on your desktop.
- Next, open Skype and give her permission.
- Return to the program window and activate the recording function.
Amolto Call Recorder
If you need to save not only audio but also video calls, Amolto Call Recorder is what you need. The program for recording a conversation on Skype has a simple interface and many options.
The only drawback of the application is that it is paid. Initially, the user is given the opportunity for free for 10 days, then he needs to purchase the full version for $30.
Download link - https://amolto.com/files/AmoltoCallRecorderPremium.msi
Free Audio Recorder
This program is the simplest among its kind. It does not support the Russian language, but we assure you that you will not need it. The interface of Free Audio Recorder is intuitive, and any user can understand it.
At the top of the application interface there are buttons through which Free Audio Recorder is controlled. All actions in the program are saved in a special log. This will allow you to remember when the sound was recorded and where the file with it was saved.
Official website - https://www.freeaudiorecorder.net/
Saving video messages in Skype on Android
Saving a video ad on Android is child's play. Microsoft has added a built-in Skype feature that allows you to save any video messages in your Gallery on your phone, thanks to which the video files are stored in the memory of our smartphone.
To do this, simply open Skype on Android and then navigate to a conversation where a video message is available. We keep our finger on the movie thumbnail and wait for a small window with the possibility of appearing on the screen. We select the “Save to Gallery” option.
The video message will be immediately saved in the smartphone's memory and a Movies album will be created in our gallery. When we enter it, we will notice that our movie is now available in the phone's memory. We can also transfer it to your computer. Just connect your phone using a USB cable to your computer, and then copy the file from the internal memory to the disk.
Record a conversation on Skype using iFree Skype Recorder
The program is in English, but that doesn't matter.
In this manual, we will go over everything in detail (you may also be interested in the article How to run two Skypes on one computer). You can download it from the official website using the link
https://www.ifree-recorder.com/download.htm
The installer weighs about 1 MB. Follow the link and download.
The program is easy to install. There are no additional programs installed during the process.
Launch the installed program
Below we see red inscriptions: searching for Skype and waiting for access to Skype. You must allow iFree Skype Recorder access to Skype. To do this, you need to go to Skype and click the “ Give access ”
After this, the main window of the iFree Skype Recorder program will go into the waiting state for recording a call - Ready for recording....
Now all your calls will be recorded automatically and you can always listen to the information you are interested in again. Let's look at the main buttons of the program.
— stop recording. While recording a call, you can end the recording. In this case, what has already been recorded is placed in a file with the MP3 extension.
— pause the recording. You can pause the call recording. In this case, the record file will not be created, and the continuation, if there is one, will be written to the existing record. That is, the recording file will not be created until you click on the Stop button or until the call ends.
— volume levels of your microphone and speakers.
— iFree Skype Recorder program status
- from left to right. Show recorded calls, settings and help.
— your login and status on Skype
— program status
— always show the program at the top of any windows and close the program window
When you select show recorded calls, a window appears below the iFree Skype Recorder program. In it you can listen to all your recorded conversations.
When you call the context menu on a recording, a list of operations that you can do with the recording appears
If you select Call , a call will be made to the user whose conversation you recorded.
When you select help, you will be sent to the program’s official website in the help section - help.
Let's look at the program settings
On the General General , you can check the box Start iFree Skype Recorder when I start Windows - launch the program when the operating system starts.
If you check the last box, Hide to system tray startup, the program will automatically minimize to the notification area at startup.
On the Call Recording , you can choose automatic - Automatically record calls or manually record - Manually. You can choose to record the entire call, record only your voice, or only the other person's voice.
In the Recording folder field, using the Browse button, you can select a folder for recording calls. I have the option to record to desktop. It is recommended to create a folder outside the system drive (usually drive C) and designate it for storing records. If there is not enough space on drive C, you can clean the desktop, the My Documents folder, or use the CCleaner program.
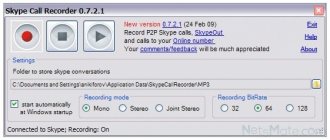
MP3 Quality tab - MP3 quality. In the Recording mode field - the type of conversation recording, you can select Mono, Stereo or Joint Stereo. I recommend Mono - this is quite enough for recording calls.
In the Recording BitRate - audio stream compression field, you can select the compression quality. Measured in kilobits per second. Choose 96 or 128. This is quite enough for high-quality recording of a Skype call.
Recording SampleRate - audio sampling rate. It is measured in Hertz. The higher the value, the better the recording quality.
Compression and sample rate affect the resulting file size.
On the Chat Reply tab you can configure your autoresponder settings.
We configure the program and minimize it to the notification area. If you need to quickly make any settings, it is not necessary to open the main program window. Call the iFree Skype Recorder context menu from the notification area and select the necessary options.
You can specify which side should be recorded: the Remote Side interlocutor, your My Side, or both sides at once - Record Both Sides. Here you can enable automatic recording of a conversation in Skype - Enable Auto Recording and enable or disable the answering machine.
That's basically the whole iFree Skype Recorder. As you can see, nothing complicated. You just need to decide on the quality of the recording. The latter can only be calculated empirically.
Download and installation procedure
The process itself is not original:
- Go to the official website of the utility and download the distribution in exe (link is below).
- We go through the standard procedure provided by the Installer Wizard (selecting a storage location for user and system data).
- We wait for the installation to complete, click on the appropriate button.
Be careful when downloading an installation file from unknown sources, there is a possibility of catching a virus.
Custom Setting
To record a conversation in Skype, you need to obtain appropriate permission from the licensed software. After the first launch, automatic saving of audio tracks to the specified address begins.
The process of setting up iFree Skype Recorder is to regulate:
- Recording quality and format.
- User data storage locations.
- Launch the application (when turned on or after double-clicking LMB).
When making a call, recording will start automatically if the corresponding option is activated (it is activated by default). The fact that recording is in progress is indicated by the inscription Recording in progress... in the program window.
You can listen to recordings of conversations and also see their entire list in the History section.
The program only records audio calls. To record video calls, use the program, the link to which is located in the lower left corner of iFree Skype Recorder, or use this program.