Updated Skype
In this case, the function of recording a conversation, including from web cameras of participants, is initially built-in. Therefore, you don’t need to download anything, just complete a simple setup. We described the procedure in more detail here (immediately go to the section of the article “Modern Skype” ). For now, let's look at a short version of it:
- Open the settings menu.
- Here you need the Calls .
- Go to advanced options.
- Activate the NDI .
- Start a video call with the desired interlocutor.
- Click on the + and select “Start recording” .
Other participants in the conversation will see a notification that you've enabled this feature. Accordingly, it is advisable to warn in advance about your intentions.
Record video on Skype using the on-screen camera
An on-screen camera is the most popular method of filming what is happening on a monitor. It is suitable for any purpose, including how to record a video from Skype with sound (see Instructions on how to turn on the camera in Skype on a laptop, phone, tablet). When working with this program, it is not necessary to capture the entire screen; it is enough to capture a specific area. This can be either the whole Skype window or only a part with a video.
When launched, the program immediately prompts you to select the area from which the video will be shot. A video format selection and volume sliders also appear. At the beginning of the recording, you need to press the “Start” key, and at the end of the conversation, press F10. The program also allows you to edit files.
Free Video Call Recorder
A simple utility allows the subscriber to record a video conversation. The user only needs to install the Free Video Call Recorder plugin and start video recording. To register you need:
- Launch the program using the icon or the Start menu.
- Select the appropriate mode. The user can record an audio track, video conversation with all participants in the conversation or with only one subscriber.
- Specify the folder where the video will be saved. To do this, click on the “Output Folder” option.
- Call a person via Skype.
- Start shooting. To start, click on the red circle. After pressing, the stopwatch will start running, displaying the length of the video.
- When the conversation is over, click on the red square.
You can view the recorded conversation in the folder that the subscriber specified before recording. You can open the file using any video player.
Program download page
Let's take a closer look at iFree Skype Recorder
The program is in English, but it is very easy to work with. It is distributed under a free license and allows you to record all conversations, even conference calls. It can be used both to record the full version of a conversation, and for “one-way” sound recording (for example, only from the interlocutor’s side, or sound from the user’s microphone). All conversations are saved as an mp3 file.
For the impatient, I present a video tutorial:
The most current version can be found at the link:
Next, run the installation file and follow the instructions of the simple wizard.
IMPORTANT: the add-on only works in the classic version of Skype.
With the advent of new versions of Skype, it may turn out that not a single add-on will work. Then you need to use screen recording programs.
Now launch Skype and then iFree Skype Recorder. If the program is launched for the first time, it will immediately want to connect to Skype itself. To do this, she will need access authorization, which must be confirmed manually.
The Skype window will pop up in front of your eyes, possibly with the window size changed, and there, in the window that appears, click “Give access.”
If everything went well, then at the bottom left of the program window your login and the phrase “Ready for Recording” will be written.
If it doesn't work, look at the end of the article.
Now the program will automatically capture and record all calls via Skype.
VodBurner
VodBurner is a simple utility with many useful tools. The program allows you not only to shoot, but also to edit the footage. A person who decides to learn how to record a video on Skype during a conversation should definitely pay attention to VodBerner.
To use you need:
- Install the utility. It is recommended to download it from the official resource using the link below.
- Launch the recorder.
- Grant rights in the messenger.
- Go to “Options – Recording” . In the settings, you can set auto-start for shooting, select a folder to save files, and adjust the display of the call window.
- Open Skype by clicking on the Go to Skype located in the recorder itself.
- Save the video. The conversation recording automatically starts after the call starts.
The only drawback of VodBurner is the lack of Russian language.
FastStone Capture is a paid program for recording video on Skype
The paid program FastStone Capture helps you both record video via Skype with sound and capture the rest of the monitor at the same time. Outwardly it resembles the well-known Windows Movie Maker. During installation, a trial period of 30 days is given.
An interesting feature of the Jing application is the fact that the video is immediately uploaded to the Internet, so before the first launch you will need to register in the program.
When starting the program, you must select a capture area, for example, a window. Each time you record, you need to check the settings, as the video may be recorded without sound. The “Start” key in the program body will begin recording. You will need to complete it in the bottom panel (the “Stop” button).
Jing – maximum video recording from Skype 5 minutes
A very unusual application that allows you to record no more than 5 minutes of video from the screen. This, of course, answers the question of whether it is possible to record a video from Skype, however, due to the poor quality and short duration, a full-fledged video will not work. The Screenr program produces approximately similar conditions.
In addition to the listed programs for recording screens with sound, you can choose others, most of which are designed for subsequent editing of the file. Examples of applications on how to record video via Skype on a computer include:
- oCam Screen Recorder;
- QIP Shot;
- Camtasia Studio.
Is it possible to record a video on Skype? - Of course yes. But at the moment the program itself does not provide such an option, so users have to install additional software. It is worth noting that programs for recording full-screen video are much heavier, which more often leads to freezing of the computer. Also, almost all software requires constant checking of settings, because after closing the program they are almost always reset. This means that when you turn it on again, there may be no sound recording. When recording in any way, it is advisable to use a headset, since recording sound from speakers leads to noise in the audio track.
Screen Camera
The subscriber can also use an analogue of VodBurner - the “Screen Camera” program. A simple and intuitive application allows you to record conversations via a webcam and edit the captured material.
To record video material you need:
- Download the installer. You can find it on the official website of the program (we left the link below the text).
- Install and open the utility.
- Select the required option. The application prompts the user to shoot a video, open a finished project, and view training material.
- Select an area to shoot. You can capture a specific area of the screen, the entire desktop, or a separate window. The settings also set the volume of the audio track.
- Click on the “Record” . After that, start a Skype call.
- After finishing the conversation, you need to click on F10 and select the required action.
You can use the free version of the utility for only 10 days, after which you will have to buy a license.
Movavi Screen Capture - an analogue of a screen camera
Movavi Screen Capture is no different in functionality from a screen camera. The only difference is in the program interface, although from time to time this application is advertised as a way to record video via Skype. During operation, you can select the video recording quality. Other opportunities are also emerging. All of them are displayed on the main panel.
Thanks to the program, you can take a screenshot of the selected area (see Solving problems with screen sharing in Skype). During operation, the time that has passed since the start of recording is displayed, as well as the weight of the received file. In addition, the video can be edited, for example, by trimming fields or highlighting a specific area.
Evaer Video Recorder
If you only need to record a video, without editing or additional options, you should use the Evaer Video Recorder utility. A person will only have to adjust the capture area and image quality.
To start recording, you need to select the desired dialogue and press the red round key. After finishing shooting, the user can select the folder in which to save the file.
⚠ Smartphones and ← gadgets
[cut]
Further. Show your desktop . You can hundred
explain once which buttons you pressed and in what order -
the interlocutor will still not understand until he sees it. Conversations are a thing
good, but it’s better to see it once... The solution is to show your screen
and repeat the steps so that the interlocutor can see for himself what is needed (or not
must) press. It's easy to do. Below the chat window where we enter
messages, there is an inconspicuous “Share” inscription. This is the menu where
You can select "Show screen". If you want, broadcast the entire screen.
Do you want a part? Collaboration is made easier, right?
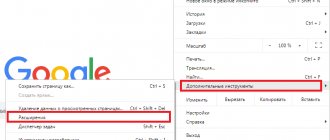
In order to use the next trick, we need
install the add-on. This is also simple. Select from the menu
Tools-Add-ons ("applications" in the new version) Extras-Download
Extras. The add-ons window appears. Top left window
search. Enter Pamela, search. Among the options found, select Pamela
Call Recorder. Short installation process... HERE! Now we can record conversations and video calls !
You can leave the recording as a memory, or you can correct it for the sake of
jokes.
Recording a conversation with Pamela Call Recorder is very easy.
The panel is very reminiscent of a standard sound recording. There are buttons here
“Start recording conversation”, “Stop recording”, “Play recording”
conversation." The recording will be saved automatically upon completion.
conversation. Plus a separate window for managing recorded files
conversations. Everything is as simple as felt boots and as comfortable as a diaper.
Starting with update from 03/31/2012!!! Featured in Review
Pamela plugin, after some time limited its free
functional. This is not a problem for us, fortunately there are still many free
programs for recording a conversation in Skype. One of these is Evaer.
How to record a video using the On-Screen Camera program?
This program is free. Installation is easy. The main thing is to check the box next to “Add a shortcut to the desktop”. Minor difficulties are caused by the fact that the program is not built into Skype and works independently of it. Sometimes, in addition to recording the video conversation itself, it is necessary to show some processes in another part of the screen. The ability to do this is the main advantage of the program.
Before you start recording, you need to select the desired area of the screen. Then click the “record” button. The video is saved in the quality you need. You can burn the video to DVD or upload it to YouTube without leaving the program. The “Video Creation” section will help you do this quickly and without unnecessary hassle. An important advantage is the editing function. This option allows you to trim the video, add titles and screensavers, and overlay audio files.