- 9shared
- 0Facebook
- 9Twitter
- 0VKontakte
- 0Odnoklassniki
The procedure for shutting down a computer takes place in several stages, each of which is very important, as it reduces the risk of damaging the file system and even the disk itself. When the user presses the shutdown button, programs and background system processes are first closed, then less critical components, and then more critical components, including RAM and processor, are sequentially disabled. But sometimes it happens that at one of the stages of the procedure, software or hardware, an error occurs.
The consequence of the error may be a fall into BSOD or a state that users call eternal termination. The computer does not turn off, the fans do not stop rotating, and the indication indicates that power is being supplied to the motherboard. The display may turn off, but it may also remain on with a characteristic animation displayed on it. What's the matter? Software conflicts, incorrect operation of drivers and peripherals, corruption of system files, problems with the hard drive and RAM, erroneous power settings, and, ultimately, the effect of viruses - any of these problems can prevent the machine from shutting down normally.
Why doesn't my computer turn off?
The reason lies precisely in the system. When the PC shuts down, the system starts to freeze. This may happen due to the following reasons:
- System file corruption in Windows.
- Service breakdown.
- Incorrect operation of the software. May appear after updating or reinstalling a new version of the software.
- Conflict of programs or services.
- Viruses or malware.
- Bad sectors on the hard drive - this can be checked using special programs.
- Installing incorrect drivers. For example, for the wrong operating system or the wrong bit size (32 or 64).
Hibernation and quick start
Incorrect power settings, as well as damage to related system files, in particular the hibernation file hiberfil.sys, is another reason why the PC sometimes does not turn off. Check this moment. Go to the power settings and do everything as shown in the screenshots below. First you should try to deactivate fast start, and if this is not enough, then you should also disable hibernation.
Energy Saving
Laptops have a special system that saves energy on your battery. At the same time, it can turn off USB ports so that there is less load on the battery and it does not discharge so quickly. In general, this method helps solve the problem on laptops, but you can also try it on a PC.
- We go to the “Task Manager” - to do this, hold down two buttons on the keyboard: “Win” and “R” - and enter the command “devmgmt.msc”.
- Open the “USB Controllers” section and find the very first one – “USB Root Hub”. Right-click on it and go to “Properties”.
- On the “Power Management” tab, turn off the topmost checkbox.
Sometimes the computer does not turn off because it is trying to install drivers for some devices. In Device Manager, look for devices that have a yellow exclamation mark. There are two ways out:
- We update the driver manually.
- Turn off the device.
After that, try turning off the computer again. If it still doesn’t turn off, then move on.
Video: PC won't turn off
Managing the power of a USB hub
Mainly, this method is relevant for laptop owners. To save battery power, some USB devices are turned off by default, meaning they no longer receive power. But not all of them are able to work correctly with this function and “inform” Windows about their status.
A situation arises that when turned off, the operating system contacts the device, but since it is de facto disabled, it does not receive a response. And as a result, the completion of work is slow and freezing. To stop this situation, you should disable the power management of the USB hub.
To do this you need:
- call Device Manager. You can do this as follows:
- press the Win + R key combination to open the Run window;
- In the input field we type devmgmt.msc and press the Ok button.
You can also:
- right-click on the Computer shortcut (in Windows XP My Computer);
- Select Management in the context menu;
- in the window that appears, select Device Manager;
- find the section USB Controllers (in Windows XP Universal Serial Bus Controllers);
- Open the drop-down list and select USB Root Hub.
Most likely, there will be several of them, and for each you will need to do the following sequence of actions:
- right-click and select Properties in the context menu;
- in the window that opens, go to the Power Management tab;
- uncheck o;
- Confirm the selected changes by clicking Ok.
You should be prepared that this measure may lead to a decrease in the battery life of the laptop. But, as a rule, most users hardly notice this. If this method does not help you, then you can always return the settings to their original state.
Disabling services or applications
During a normal shutdown, Windows terminates all programs, including those running in the background. Naturally, the more services were started while the operating system was running, the longer it took to complete them. But if one of them freezes periodically, then this interferes with the normal shutdown.
To fix this problem, you first need to identify its source.
To do this, you need to look at the logs for a description of the errors that occurred. Windows stores such information in special logs.
To access them you need:
- call the Start menu/Control Panel;
- Choose to display computer settings in small or large icons.
- then find Administration among all the parameters;
- in the window that appears, click on the Event Viewer shortcut;
- This will open a new Windows Logs window. Clicking on it will open a drop-down list;
- you need to look at two logs: Application and System.
In them we look for messages marked Error and Warning, they are marked in red and yellow, respectively. If they constantly mention the same service or application, then perhaps it should be disabled.
For this:
- in the Administration menu, select the Services shortcut;
- in the window that appears, we find an incorrectly working service;
- click on it with the mouse;
- in the new window, select the General tab;
- changes the Startup Type to Disabled.
There are two options for applications:
- remove them from the Startup list;
- manually, disable the executing process using the Task Manager (to call it, you need to simultaneously press Ctrl + Alt + Delete on the keyboard).
Open the startup list:
- open the Run window, you can call it with the Win + R key combinations or launch it through the Start menu;
- enter the msconfig command;
- the System Configuration window will open, where you need to go to the Startup tab;
- Uncheck the desired application.
Reducing program closing time
The third method requires making changes to the Windows registry. To do this, you can make entries yourself. All actions with the registry can only be performed by a user with administrator rights. To open the Registry Editor in the Run window, you need to type the command regedit
.
In the window that appears, we need the HKEY_CURRENT_USER
, then select Control Panel from the drop-down list and then Desktop.
Here you will need to change the value of three parameters:
- for AutoEndTasks you need to set the value to 1 (digit one). This option means that the operating system will automatically terminate hanging programs;
- the HungAppTimeout value can be set in the range from 1000 to 5000 ms. The function of this parameter determines after how many milliseconds the program, if it does not respond, can be considered frozen;
- WailToKiliAppTimeoul is responsible for how long Windows will wait for a response from a frozen program. This parameter is also measured in milliseconds; by default it is 20,000 ms, but it is better to change it to 5000 ms.
If the reason for the "Shutdown" slowdown is the service - WaitToKillServiceTimeout, which is located in HKEY_LOCAL_MACHINESYSTEMCurrentControlSetControl. Then its value can also be changed to 5000 ms. The structure of the registry depends on the assembly version. If you do not find the described parameters at their addresses, then use the Search, which is available through the Edit menu at the top of the window.
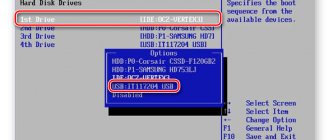
Enable ACPI
Sometimes the computer does not turn off because the connection between the operating system and the motherboard BIOS, which in normal condition should transfer hardware power management functions to it, is not established. On modern motherboards, ACPI is enabled by default, but you simply cannot disable it.
But on older models there were cases when the ACPI mode crashed, this happened especially often after flashing the BIOS. If you have a fairly old computer, and when you turn it off, the message “You can now turn off the computer’s power” appears on the screen, then you need to enable ACPI.
To do this you need:
- to restart a computer;
- without waiting for Windows to load, call the Boot BIOS setup menu (press the function key, for some models it is F8, F6 or F4, but there were also more exotic options Tab or Delet);
- then find the ACPI item in the BIOS and change its value to enable.
Finding Broken Services
When you turn off your PC, some services may crash and freeze. Therefore, as an option, you can try to find such a service and disable it.
- You need to open the event log (Win+R=eventvwr).
- Now we have entered the event log. You need to open the “Windows Logs” section. Now let's look at two items: “Application” and “System”. We need to find the error at this time. Open the error that triggered recently and look in the information field. In my case, the computer freeze was due to the Razer service. Yours may be something different.
- Now open the services (Win+R=services.msc).
- We find the service that freezes when turned off, go to “Properties” (by right-clicking) and select the startup type “Disabled”.
- At the very end, don’t forget to click on the “Apply” button.
If the services are working normally, but there is a problem with some program, then you need to go to “Programs and Features” and remove this application from the computer. If you really need it, then I advise you to first completely remove it, and only then download a new version from the Internet and re-install it.
Cable check
You can check the cable with a multimeter. The voltage should be the same as the outlet you connected this cable to. If you don't have a multimeter, replace the cable with one you know works. You can borrow a cable from a monitor. As a rule, they are the same.
Make sure the switch on the power supply is in the ON position.
Autoload
Startup may contain broken or even malicious programs that interfere with the operation of the system.
Windows 7 – you need to hold down the “Win + R” buttons and enter the command: “msconfig”.
Windows 10 – just hold down the “Ctrl+Shift+Esc” buttons.
First of all, we disable everything suspicious that you definitely don’t need when loading the OS. Here is one example of a clogged startup (see the picture below). Here, in fact, you can disable everything except the “Realtek HD Manager” - this is the sound card driver. Everything else is just garbage that clogs the system and prevents it from working properly. Someone may object and say that a video card driver is also needed, but let me remind you that this is not a driver, but a regular settings panel. The driver is loaded at the very beginning even before “Startup”.
BIOS Settings
If nothing helps, even reinstalling and rolling back to a restore point, try resetting the BIOS to factory settings. This can be done using the Load Defaults BIOS option, usually located in the BIOS Setup section, or by removing the battery powering the CMOS memory for 10-15 minutes.
Bottom line
These were the main reasons preventing the computer from being turned off through the Start menu or in another programmatic way. There is no point in delaying the solution to the problem, since soon malfunctions in the Windows 7/10 system may occur not only during the shutdown phase, but also when performing standard tasks.
- 9shared
- 0Facebook
- 9Twitter
- 0VKontakte
- 0Odnoklassniki
Configuring Forced Shutdown
If anyone has ever used Windows 7 or XP, then they know that they have a small jamb with forced shutdown of the program. That is, even if it freezes, does not respond, or is completely dead, Windows, like a true optimist, waits for this program to respond. As a result, the entire system hangs. But it is possible to register settings in the registry so that Windows does not wait too long.
- Go to the registry (Win+R=regedit).
- We follow the path: HKEY_CURRENT_USER/Control Panel/Desktop .
- In this section you need to create or change these parameters:
- AutoEndTasks – set one (1). So that Windows does not wait and terminates frozen processes.
- HungAppTimeout – set the value from 2000 to 6000. Essentially, this is the number of milliseconds after which the frozen program will be completely completed.
- WailToKiliAppTimeoul – the default value is 30000, but it is better to set it in the area from 4000 to 6000. This is the program response time, or more precisely, the time of the last response.
Checking the power supply
Open the lid of your computer and disconnect all wires from the motherboard, hard drives, optical drives, etc.
the green and any black on the power supply connector .
If the power supply is connected to a 220V network and the wires are short-circuited, the fan inside the unit should begin to rotate. This does not guarantee that the power supply is fully operational and will also start successfully under load. But if, when the contacts are closed, the fan inside the unit does not start, we can confidently say that the power supply is faulty.
If the fan does start, we will need to check one more thing. Open the power supply and see if there are any swollen capacitors.
Often, resoldering swollen capacitors eliminates the problem, but not always. If you know how to use a soldering iron, you can re-solder the capacitors yourself or ask someone who knows how to do it.
Hibernation
It is also a system failure that can be resolved using standard Windows tools.
- “Start” – “Control Panel” – “Power Options”.
- "Power button actions."
- Click on the link “Change currently unavailable settings”.
- An additional shutdown options menu will appear. Set the settings as in the picture below.
Checking the integrity of system files
Sometimes Windows won't shut down because necessary files are damaged. Here are the steps you can take:
- On your keyboard, press "Win" and "R" at the same time, then type "cmd" and "OK" to run as administrator.
- Type the command "sfc /scannow" and "Enter".
Please wait patiently until the verification process is 100% complete. Then reboot and try shutting down your PC using the command line. One of the best features of CMD is that you can directly request a force shutdown, which stops all running applications.
- In the Start menu, type "cmd" and o.
- Type “shutdown /p” on your keyboard and then “Enter.”
- Your PC should shut down immediately.
Cleaning your computer
If none of the above helps, and the computer still does not turn off, then most likely the system is broken or has viruses. So first of all, you need to check your machine with a fresh antivirus program. The scan should be performed on the entire system and all partitions and disks.
After that, go to “Startup” again and check that nothing unnecessary is hanging on when the system starts. I would also advise removing unnecessary and unnecessary programs from your computer. You can also download the Cleaner program and clean your computer of temporary files.
The last thing I would try to do is roll back the system. Open the Start menu and enter the name of the service in the search bar: “System Restore.” After starting, you will need to select one of the restore points and start the service. Look by the date - when this problem did not exist yet. After this, the system will have to try the procedure and reboot.
How to check that the Power button on the system unit is in working order
The task of the system unit's Start button is to turn on the power switch. After this, the power supply carries out self-diagnosis, and if all network parameters are normal, the power supply sends the corresponding signal to the processor - the computer starts booting. All pre-launch activities take a split second.
If the Power button does not close the contacts well, the computer will not start.
To check if the start button works:
- Check the wires going from the button to the motherboard. The connection occurs through a chip that is placed on the contacts of the system board.
- Make sure that the chip fits tightly and is well fixed to the contacts.
To do this, carefully remove and reattach the connector;
- Disconnect the computer from the network, disconnect the wires of the Power button;
- Turn on the power to the system unit again and use a screwdriver to briefly close the PowerSwitch (PowerSW) contacts. If the computer starts, the problem is due to a non-working button.
Unfortunately, in most cases it will not be possible to purchase the “Start” button separately; you will have to replace the entire housing. However, there is an alternative way to fix the problem.
The simplest solution in this case would be to transfer the functions of the Power button to the Reset button, which is used very rarely.
To do this, just swap the two-pin connectors “power sw” and “reset sw”.
BIOS
If even a system rollback does not help, then you can try resetting the BIOS to the factory configuration. During the reboot, you need to hold down the auxiliary key. The prompt can be seen on the initial boot screen in the BIOS. Frequently used keys: Del, F2, F1, Esc.
Most often this item is called “Load Fail-Safe Defaults”. After selecting the item, you will need to confirm the action by pressing the “Y” button.