Possibilities
To make it easier for you to understand what the GeForce Experience program is for and what profit we can get from it in the Microsoft Windows 10 operating system, let's look at the main features:
- Automatically download and install the latest driver from NVIDIA. In this case, we can choose to use the game version or software for work.
- The utility automatically detects all games installed on your computer and optimizes them for maximum performance.
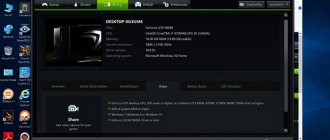
- Complete information about your personal computer is provided.
- Streaming to a SHIELD device is supported.
- Using hotkeys or an overlay, we can take screenshots of what is happening in the game.
- Supported games include a photo mode that allows you to fly around the model from all sides and take the most realistic photo possible.
- There is a function of so-called instant replays from NVIDIA.
- Events occurring in the game can be recorded using the same application.
Even these are not all the functions of the application we are considering. They will be discussed in more detail in the video that we have attached at the end of this page.
Removal process
You can remove GeForce Experience in the following ways.
Method 1: Third Party Software
To remove GF Experience, like any other programs, you can use all kinds of third-party programs that have the corresponding function. For example, you can use CCleaner.
Here we are interested in the “Uninstall programs” subsection. Typically this item is enabled by default. A list of all applications installed on your computer will appear on the right. Here you should find “NVIDIA GeForce Experience”.
Now you need to select this program and click on the “Uninstall” button to the right of the list.
After this, preparations for removal will begin.
- In the end, all that remains is to confirm that the user agrees to get rid of this program.
The advantage of this approach is the additional functionality of such programs. For example, after uninstallation, CCleaner will offer to clean up unnecessary files remaining from the software, which is a more effective way of uninstallation.
Method 2: Standard removal
A common procedure that usually does not cause any problems.
- To do this, you need to go to the “Settings” of the system. The best way to do this is through “This PC”. Here in the window header you can see the “Delete or change a program” button.
After clicking it, the system will automatically open the “Options” section, where all installed programs are removed. Here you should find GeForce Experience.
After clicking on this option, a “Delete” button will appear.
After this, the program will be deleted. In earlier versions, usually the entire NVIDIA software package was bundled and uninstalling GF Exp entailed uninstalling the drivers. Today there is no such problem, so all other software should remain in place.
Advantages and disadvantages
Like any other program, GeForce Experience for Windows 10 64 Bit has a list of characteristic positive and negative features. Let's take a closer look at them.
Pros:
- Maximum performance when recording games. If the hardware allows, recording is carried out using the computing power of the graphics adapter. At the same time, the central processor remains unloaded.
- There are a huge number of functions, including: streaming, recording, taking screenshots and so on.
- By installing this program, we will always have the latest version of the driver for the NVIDIA video card. Moreover, you do not need to check their availability yourself; the application will notify us as soon as the latest version of the software becomes available.
- Any games installed on your computer are automatically adjusted to the performance of our machine.
Along with this they look: Sapphire TriXX 7.3.0
Cons:
- The program is quite heavy and, constantly hanging in the background, it eats up some part of the RAM.
We do not recommend using this application on computers with 4 GB or less RAM.
Although there is a way out of this situation: you simply install the program, update the drivers with it, and then right-click in the system tray to close the utility. As a result, game optimization is available, the latest driver version is installed, and the program does not eat up your RAM.
Removing existing drivers
The first step if failures occur when installing NVidia GeForce video card drivers is to remove all existing drivers and programs and at the same time prevent Windows 10 from downloading them again and installing them from its sources.
You can try to remove the existing drivers manually, through the Control Panel - Programs and Features (by removing everything related to NVidia from the list of installed programs). Then restart your computer.
There is a more reliable method that completely removes all existing video card drivers from the computer - Display Driver Uninstaller (DDU), which is a free utility for precisely this purpose. You can download the program from the official website www.guru3d.com (it is a self-extracting archive and does not require installation). Read more: How to remove video card drivers.
After running DDU (recommended to run in Safe Mode, see How to Enter Windows 10 Safe Mode), simply select the NVIDIA video driver, then click Uninstall and Restart. All NVidia GeForce drivers and related programs will be removed from the computer.
How to use
So, the theory is over, and we can move on to the instructions for free downloading and installing GeForce Experience for Windows 10 64 Bit.
Download and Install
We will start with installing the program. It is produced as follows:
- We go to the very end of the same page and click the button that will allow you to download the latest Russian version of the software we need for free.
- When the archive with the application is received, unpack it using the code included in the kit.
- We install our application and immediately start working with it.
We will describe how this is done below.
Operating instructions
So, let's say the program is installed on your computer and we can move on to working with it. First of all, we do the following:
- In the upper left part of the window, click the link labeled “Drivers”.
- If the latest software for your graphics adapter is available, you will see a button where you can download and install it.
- Click the button and wait until all the necessary files are downloaded. When the download is complete, click on the driver installation button.
Attention: during the installation process, be sure to check the box next to “Clean installation”.
- When we are done with downloading and installing a new driver for the video card, we can go to the “Main” tab (located in the upper left part of the window) and optimize all our games for the performance that a particular computer or laptop can provide.
Along with this look: mfc140u.dll for Windows 10 x64
How to sign up for geforce experience
Hello dear visitor! Most recently, nvidia introduced registration in geforce experience; without this registration, you will not be able to take advantage of all the features - such as optimizing games, updating your video card drivers, recording your video games and much more.
Please note: if you want to log into the geforce experience program without mandatory registration, then you will simply waste a lot of your time and hassle, there are various instructions on the Internet to bypass geforce experience registration - this is a bit difficult and not every user can cope with this task, why complicate everything , when you can simply register your account with nvidia within 5 minutes and take advantage of all the features of the geforce experience program. And so on your computer, open the geforce experience application, in the window that opens, click on the “Launch” button.
When you click on the “Launch” button, a window will open on your computer or laptop in which you will be asked to log in using your account. Since we will be registering our account on nvidia, click on the “Log in with your NVIDIA account” button.
In the next step, we will be asked to log in through an nvidia account, since we don’t have one, we need to register, to do this, click on the “CREATE AN ACCOUNT” link.
In the next step we can proceed to registering our account. In the “Nick” line, indicate the name you like. Next, in the “Email address” line, indicate your mailbox. You must indicate the mailbox to which you have access, since a letter will be sent to this mailbox to confirm the registration of your account. If you don’t have a mailbox and don’t know how to create your own email address, then you can read the instructions on how to create a mailbox. In the next field “Password”, you will need to create and indicate your password. The password may contain Latin capital and small letters, as well as numbers. Example password No. 1 25937YA No. 2 Retro0578 No. 3 GerQO1IQNFxQ and so on. Please note that you must write down your password in a text pad or notebook. Now all we have to do is indicate our date of birth.
And so in the field “Month” “Day” “Year” we indicate the date of our birth. After all the steps have been completed, check the box next to “I accept the terms and conditions” and click on the “REGISTER” button.
When you click on the “Register” button, a window will open on your monitor in which you will see a message stating that your account has been created, and the message will also contain information that the mailbox we specified during registration was sent to a letter has been sent. Now we will need to go to our mailbox in our browser and confirm our email address.
And so we go to our mailbox, open the incoming letter from the NVIDIA service and click on the “Check email address” button.
When you click on the “Check email address” button, a page will open in your browser in which your mailbox will be checked, after a few seconds you will see a message stating that the email address has been verified - we return to the geforce experience program.
After you confirm your mailbox, we will need to click on the “Continue” button in the geforce experience program.
When you click on the "Continue" button, you will enter the geforce experience program, where you will need to go through a small setup of the program. In the first step “Optimize your games”, you can check the box “Automatically optimize recently added games”. This option allows you to automatically configure and select game settings for your computer. If you want to configure the games yourself, then you need to uncheck the “Automatically optimize recently added games” checkbox. After you have made your decision, click on the “CONTINUE” button. In the next steps of the settings there is nothing special - therefore, in the subsequent steps we simply click on the “Continue” and “Finish” button.
After all the steps completed, you will be taken to the geforce experience program, where you can take advantage of all the features of this program.
I'm in a hurry, so I'll finish the instructions, bye everyone, good luck! See you again at computerhom.ru.
System requirements
In order for the application to work well on your PC and not freeze, you need a machine with at least the following system requirements:
- CPU: x2 1.6 GHz.
- RAM: 4 GB.
- Hard disk space: from 300 MB.
- Platform: Windows.
- Graphics adapter: NVIDIA.
- Screen resolution: 1280 x 768.
What is GeForce Experience?
In a nutshell, GeForce Experience is a software package for Nvidia GPUs.
GeForce Experience includes many performance and configuration tweaks for gaming, automatic driver updates for your GPU, Nvidia Shadowplay for real-time streaming, built-in gaming filters (like Instagram filters, but for PC gaming), and a host of more powerful options.
Nvidia's GeForce experience has had a mixed reputation in the past. Some felt it was an unnecessary addition to a gaming PC. Others claim that it uses additional system resources. But in the latest versions, GeForce Experience has become a universal GPU management tool for Nvidia GPU owners.
GeForce Experience vs Nvidia Control Panel
Hold on. Doesn't Nvidia Control Panel have the same set of options as Nvidia GeForce Experience?
The fact that Nvidia installs two separate tools to configure and manage GPU settings is a bit confusing. But these are different tools that offer users different GPU options.
The Nvidia Control Panel primarily deals with universal GPU settings, as well as game-specific settings.
For example, you can control Nvidia GPU 3D settings system-wide, adjust a specific screen resolution, adjust the desktop color display, configure multiple displays, and more. If you're using a laptop with an Nvidia GPU, you can use the Nvidia Control Panel to specify when to use the laptop's integrated graphics and when to switch to the GPU, which can save your laptop's battery life.
While Nvidia Control Panel focuses on universal settings, you can also create custom settings for individual programs. These GPU settings override the general settings for that specific program. You can force the game to use a specific type of anisotropic filtering, force V-Sync to remain enabled, or define a power management mode for your GPU.
Applying these 3D settings to a game or program may have unintended consequences. You won't destroy your computer or GPU, but you may cause your games and programs to crash without warning.
Download
Using the button below you can download the latest official version of the application for free for your computer or laptop.
| Version: | 3.20.1.57 |
| Developer: | NVIDIA |
| Release year: | 2020 |
| Name: | GeForce Experience |
| Platform: | Windows 10 |
| Language: | Russian |
| License: | For free |
| Size: | 116 MB |
Error "Something went wrong"
Sometimes, when you turn on your computer, Nvidia GeForce Experience does not start and an error message appears saying “ Something went wrong, ” and the message “the program has stopped working” may be displayed.
This crash occurs due to driver problems , GeForce Experience not working properly, or a background service not running.
Stopping processes and restarting applications
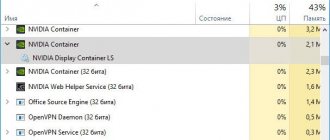
First you need to try stopping and restarting all Nvidia related processes. To do this, use the quick combination “ Win + R ” to open the “ Run ” window and type taskmgr . After which the task manager will open, in which you need to open the “ Services ” tab, find Nvidia-related services, turn it off and start it again.
Reconfiguring services
If GeForce Experience does not work in Windows 7, 8, 10, you can try setting up Nvidia service that downloads applications. Usually it is turned off. To launch it, you need to open the “ Run ” window with the combination “ Win + R ” and type services. msc .
A list of services will appear . NVIDIA Display Container LS with the left mouse button and change the startup type:
Next, in the same “ Run ” menu, you need to type “ msconfig ”, the “ System Configuration ” window will appear. You should uncheck the box below in the line “ Do not display Microsoft services ” to make it easier to find the services you need. Check the boxes for NVIDIA services, restart the computer, and then check if they are working.
Driver Update
To update drivers, you need to go to the official Nvidia website. In the window for selecting the system version and video card series, set the required values , according to which the driver will be selected for downloading.
After downloading, you need to run the executable file , which will unpack the contents into the selected folder.
The installation will begin immediately after unpacking . You should select a custom installation so that you can check the components you want. Perform a clean install box so that no older versions of the software remain on the system.
Reinstalling the utility
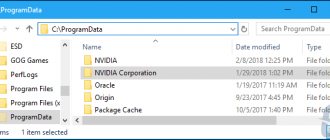
Sometimes the failure may be directly in the program itself. To completely reinstall GeForce Experience, you need to go to the NVIDIA website and download a driver pack for your computer, which will include the utility.
System update
If the above methods do not help, you can try updating Windows. By default, Windows 10 updates automatically , but if auto-update is disabled, then the procedure is as follows:
- Start menu ;
- Settings icon ;
- open " Update and Security ";
- select “ Windows Update ”;
- Click on “ Check for updates ”.
If the system finds updates, it will install them automatically.
Running in compatibility mode
GForce Experience may cause a "Something went wrong" error due to incompatibility. To fix this, you need to call up the properties of the program shortcut and check the boxes “ Run in compatibility mode ” (and specify the operating system) and “ Run as Administrator ”.
Then click “ OK ” and subsequently launch the program through the shortcut.