In this article we will try to figure out how to distribute Wi-Fi from a laptop (computer) on Windows 10? It is worth noting that today many already know that a laptop or personal computer with a Wi-Fi adapter can be used as a router for distributing the Internet network. Internet distribution is also carried out when a regular wired Internet is connected. A laptop with Windows 10 can also work as a router, increasing the range of Wi-Fi, thus distributing the Internet to which it is connected.
Features of Wi-Fi network distribution on Windows 10
Many articles have been published on the Internet about ways to distribute an accessible Internet network from a laptop or PC via Wi-Fi, on different operating systems. In this article we will look at a detailed scheme for distributing wireless Internet from a computer device that runs specifically on the Windows 10 operating system. The process of creating an access point on this version of the OS occurs exactly the same as on the seven and eight.
In the first versions of the dozen, no significant software changes were introduced; only with the release of subsequent updates was the “Mobile Hot Spot” function added, which configures the necessary parameters automatically. But despite this, when setting up the distribution for the first time, you will need explanatory instructions that will help you quickly set up an access point in Windows 10. This publication also indicates some points on which it is important to pay special attention, for example, if you cannot start the configured network or the device fails get an IP address.
This instruction will be useful to those people who have not heard about the concept of virtual Wi-Fi, and how you can distribute the Internet from computer devices to other devices. Let's take the situation as an example: you are the owner of a laptop to which the Internet is connected via cable. In addition to the laptop, there is a phone, tablet or second laptop, which also requires Internet distribution only via a wireless network. There are two solutions here. The first is to buy a router, and through it distribute the Internet to phones and tablets. Second, refuse to buy a router and use a laptop or computer with a Wi-Fi beacon as one. The same can be done if, for example, it is connected to a wired network or 3G modem and you need to distribute the Internet network to other computers or other devices:
We distribute Wi-Fi using a special program Windows 10 Hot-Spot
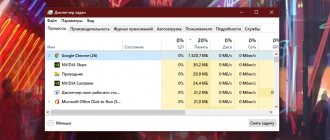
With the Windows 10 update to version 1607, Microsoft added a new program that makes WiFi distribution easier - Mobile Hot Spot. The principle of operation is to distribute the Internet via a wireless radio channel of a laptop or USB modem (in the case of 4g modems). Turn on the mobile hotspot:
- Right-click on the Internet icon;
- open “network and internet settings”;
- In the left menu, select “mobile hotspot”.
On the hotspot screen we perform 4 actions and enjoy the result:
- Turn the slider to the “ON” position;
- select an active connection through which we receive the Internet (if we distribute the Internet) and other devices will use the virtual network;
- optionally change the network name;
- If desired, change the password for accessing the virtual network.
The distribution setup is completed, we connect other devices to the Internet, distributed by a laptop or PC. If it doesn’t work out, then at the end of the article there will be a block of solutions to common problems.
How to turn on and off Wi-Fi distribution from a laptop on Windows 10? Control commands
After the laptop reboot process, you will need to constantly enter the following command to create an Internet distribution mode:
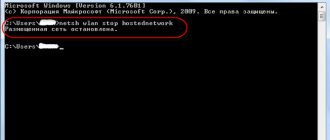
netsh wlan start hostednetwork
If you need to stop the network, you need to enter the following command:
netsh wlan stop hostednetwork
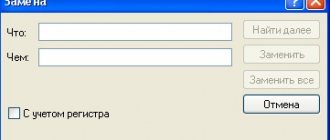
The following command is used to change the username and password:
netsh wlan set hostednetwork mode=allow ssid=”pc4me” key=12121212″ keyUsage=persistent
The network name and password (ssid=" pc4me " key= 12121212 ") are entered at your discretion.
Create (on desktop) files for direct distribution control
The process of creating a network is performed once, and the distribution must be started every time after the laptop is rebooted. Constantly copying and entering the command line is not very convenient for users of computer devices, for this reason it is recommended to create the following files for management:
- The first file that will start the network;
- The second is to stop her.
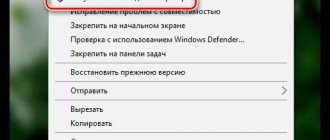
start.txt and on your desktop .
And rename the document with the .txt to a system file with the .bat extension. But the problem is that by default, Windows 10 displays files without an extension. To display it, you need to open “ Explorer ”, click on the “ View File name extensions checkbox .
Then (for the first start ) you need to right-click, select the line “ Rename ” and enter the extension .bat . It will look like the start.bat file. You can choose the file name (up to the dot) at your discretion, and the extension must be replaced with .bat .
right -click on the start .bat Edit ” line.
Now you need to copy and paste the command into the file: netsh wlan start hostednetwork . Now close it, saving all changes by clicking on the “File ” tab and selecting “ Save ”.
Thus, you get start.bat , double clicking on which starts Wi-Fi distribution. With the stop.txt you need to do the same steps to create a command file stop.bat . For it, enter the combination “ netsh wlan stop hostednetwork ”. When you run this file, the network will stop.
Via command line
- Let's check that the Internet is connected and working well. Open any browser and enter any phrase into the search bar. Also check that there are no yellow triangles or crosses opposite the connection.
- Hurray, the Internet is working! Now you need to launch the console with admin rights. Click on the main button of all windows - “Start ”, enter three letters “CMD” in the search line . Now carefully right-click and select “Run as administrator” from the drop-down list.
- First, try copying the line below, but do not press Enter. I'll write down which lines need to be changed. If you can't copy, just type it.
netsh wlan set hostednetwork mode=allow ssid=”wifigid.ru” key=”ivan1234Un” keyUsage=persistent
- In the ssid=” wifigid field. ru ” is my network SSID (the same as Wi-Fi), which will be displayed on other devices when searching. You can enter your name.
- In the field key=” ivan1234 Un ” is the password for access. Write the password that you remember.
- After the magic spell has been entered, press the “ Enter” button.
NOTE! If after the spell you see a message about an erroneous connection, then you are welcome to the next chapter - where I describe all the possible solutions to the problem that has arisen.
- So, we have only created a network, but the Internet does not travel through it yet. To do this, you need to dig a little deeper into the adapter settings. Press the Win+R keys simultaneously. Run the command ncpa.cpl.
- We will be taken to the menu where all wireless and wired connections are nested. Please note that among everyone we can see the young and youthful one, which we gave birth to. Now I will explain in more detail. According to the standard, any laptop should have three connections in this window: wired, Wi-Fi and our local one (which we created with spells on the command line). You, my dear online friends, need to choose the one through which the blood of the Internet flows. In my case, this is a cable connection, since I use an external wire from the provider.
- You need to go to the properties of this connection. Operate with the mouse, double-click and go to the properties of the beast. Now go to the second tab “Access” at the top. We need to be allowed to use the Internet on the local network that we created earlier. When you activate this property, the line “Connecting your home network” . There we will select the previously created connection.
- Again we run “ exe” and stop the network with the same spell – “ netsh wlan stop hostednetwork ”.
- Wait about 10 seconds
- Again we write the magic letter structure “ netsh wlan stop hostednetwork ”.
Look, you probably noticed that the key and connection name are written once during the first activation. You already know how to start and stop this Satan machine. To change the access password and name of the wireless network, write the full line again as at the first start - simply change the value of the “ ssid” and “key” fields.
How to make starting an access point easier
In order not to constantly go into the console and enter a command, we will create so-called launch buttons. We put on glasses to feel like a real programmer and get started.
- Open the desktop and right-click the magic mouse on any free area. In the list, select “Create”, now “Text document”. Call it what you want, I called it “StartWIFI”. Now I have a file "StartWIFI.txt".
- Right-click on it and select “Rename”. After the dot, change “tx t” to “ba t” and click. A window will pop up, simply confirm the action by clicking “Yes”.
- Now we have a magic file with the extension “.ba t”. If you write a spell into it as in the console earlier, then when you start it will be processed by the cmd . exe" and, in theory, distribute a wireless network.
- Again, right-click on the “.bat” file and select “Edit” from the list.
- A notepad will open, where you need to enter the launch spell “netsh wlan start hostednetwork”.
- Be sure to save by clicking “File” and “Save”.
- Similarly, we create a file to stop distribution. To run, simply double-click on the file with the left mouse button.
If your laptop will constantly distribute the network, and your family does not know how to start the device, then you can put the file in the autoloader so that it is activated when the system boots. Press two Windows keys and R at the same time. Write the spell shell:startup . Drag this file into the Startup folder.
No internet or WiFi
Let's look at quick ways:
- We check whether the Internet is working and the adapter is turned on to receive from the provider’s network. Be sure to check in the properties of this connection whether it is allowed to distribute the Internet to local users.
- Try disabling your antivirus program.
- We reload the car.
- Check the password you enter on secondary devices. You can change it, you already know how to do it.
- Some programs simply turn off the network connection. You just need to turn it on. Go to the “Network and Sharing Center” - turn on the transmitter.
- Check for driver updates for all network equipment. You can download from the manufacturer's official website. If the module is built-in, then you need to go to the website that released the motherboard or the laptop itself - the latest and most current software will be there.
Launch error in CMD.exe
" The hosted network failed to start. The group or resource is not in the required state to perform the required operation ” – I encountered this problem with a friend when I was trying to install a distribution on his machine. This is most likely a hardware problem.
- Press Win+R – assign the spell to devmgmt. msc.
- In the top menu, click on the 3rd item on the left “View” .
- And we indicate the display of hidden hardware - “Show hidden devices”.
- If there is at least one with an arrow icon, just click on it and “Engage”.
- If there is no adapter at all, then go to the “Other devices” section, perhaps the transmitter is there, but drivers have not yet been installed on it.
If the connection is via a 3G/4G modem
The connection occurs through specialized programs. Just go in and remove them from your computer. And you can connect in the “Cellular” in the network settings. We insert the modem, go to the tab and act according to the instructions.
The laptop does not distribute Wi-Fi, devices cannot be connected, or distribution does not start?
Often, users who have completed all the steps described above still do not have an Internet connection and distribution still does not start. Let's look at several troubleshooting methods and also deal with them.
- If distribution does not occur or the device does not connect to the network, you can try rebooting the device. Sometimes this solves the problem. Also, commands must be run as an administrator; this point is very important.
- If you have a problem creating a network using the first command in the instructions, then you should check the Wi-Fi status, which should be turned on. If it is impossible to turn on Wi-Fi, then most likely the adapter drivers are not installed on the laptop. And after installing the driver, try creating the network again.
- If Internet distribution does not start if the network driver is installed , you need to update it. To do this, it is recommended to download it from the official website.
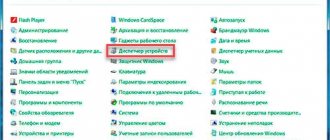
- Sometimes the problem can be fixed by rolling back the driver to a different version. To do this, you need to enter the “ Device Manager ” of Windows 10 (login through “ Start ”), then select “ Network Adapters ”, click on the desired device, select the “ Properties ” tab, then “ Driver ” and “ Roll Back ”.
- The network has started, but devices are not connected . In such a situation, you should disable your antivirus program and programs that block the connection. You also need to check that the password was entered correctly or try to restart the network by entering a new password.
- A common problem is when Internet distribution is configured, but traffic is not transmitted . In such a situation, you need to find out whether there is Internet on the PC from which you plan to distribute the Internet. If the Internet is active, then you need to proceed to the next step - this is checking the sharing settings that the user should have made when starting the network. You can also turn off your antivirus or firewall, as they may block access.
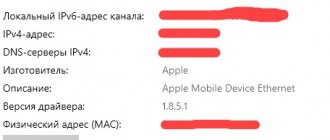
- If, after starting Wi-Fi distribution, another connection is created in the network settings , then in this case you need to click on it and select “ Details ”. In the window you need to check the IPv4 . Automatic network settings should be selected . It is also common for users to allow network broadcasting for another connection.
- Access must be enabled for the connection that is being used . For example, a user is connected to one network, but needs to start distribution from another, then in the “ Access ” section (Ethernet connection properties) you need to provide access for the desired one.
Connecting a Wi-Fi module on laptops from different manufacturers
Nowadays it is difficult to find a laptop without Wi-Fi connectivity. But for the Internet to work, it is not enough to be able to connect: the interface must be configured correctly.
To answer the question: how to set up WiFi on a Windows 10 laptop, remember that it is convenient to use special function, or “hot” keys, which differ between models from different manufacturers.
Note. Laptops have an indicator light with an antenna icon. If the indicator is on, this means that the adapter is turned on and working correctly, that is, it can “catch” Wi-Fi.
Important. A number of laptops are equipped with a separate adapter shutdown button. If the Wi-Fi module is deactivated through it, using the function keys will not be able to turn on the module. And only after pressing the mechanical switch again, the Fn keys that switch the adapter operating modes begin to work.
Acer laptop
For laptops from this manufacturer, the button that connects the Wi-Fi adapter can be located in different parts of the case. For example, in the top row of the keyboard, on the front of the laptop or on its sides.
On some Aspire series laptops, the button is located below the lock key. On older Aspire models, the tower button can be found in the lower right corner of the keyboard. In 2500 series models - in the upper right corner.
To enable hot keys, the combination Fn + F5 is most often used. If that doesn't work, you can try Fn + F3. Of course, other configurations are not excluded, but these are the main ones.
Important. If after pressing the hot keys the Wi-Fi adapter does not connect, you will need to press them again and then restart the laptop. If there is no result after a reboot, you should use another method of turning on the module, and also check its functionality.
Asus laptop
On new models of Asus laptops, there are no mechanical buttons for controlling wireless modules. But on older laptops they may be provided. Typically, the mechanical switch of the Wi-Fi module is located on the side surface of the case near the USB ports. As a rule, to control the Wi-Fi adapter, a combination of function keys is used: Fn and one button from the “F” row. ASUS laptops are characterized by the combination Fn + F2. An antenna is drawn on F2, which makes it easier to find.
HP laptop
Most HP laptops have a mechanical Wi-Fi switch. It is marked with a radiating antenna symbol, and there is also an LED on its surface.
Typically, the switch is located on the front or side of the laptop. If the button is not there, you should look for it above the keyboard. To activate the module, you need to move the “slider” to the “Enable” position. In this case, the LED color will turn blue instead of yellow.
If there is no such button, you can use the function keys. For laptops manufactured by HP, the combination Fn+F12 is typical. Wi-Fi can be turned on with this combination.
Important. There are many reasons why you cannot activate Wi-Fi, and the list of them is not limited to simply turning it off using a special button. It may be disabled in the BIOS, the module itself may have failed, or something has happened to the services, so you need to check the possible causes of the problems.
Lenovo laptop
You can turn on the Wi-Fi adapter on a laptop from this company using the buttons located on the side or on the front of the case, as well as using the keyboard buttons. For DV series laptops, the module power button is located above the keyboard. For Lenovo Thinkpad - on the left side of the case.
Basically, to control the Wi-Fi module on Lenovo laptops, the key combination is Fn + F7 or Fn + F5. On the T43 model, pressing Fn + F5 simultaneously will open an additional menu in which you must select the word “enable”.
An error titled “The hosted network could not be started... are not in the required state...”
It often happens that on Windows 10, when starting a virtual network, a window appears with the message “ The hosted network could not be started. The group or resource is not located...operations" or " The Wireless Network AutoConfig (wlansvc) service is not running. Failed to start hosted network "
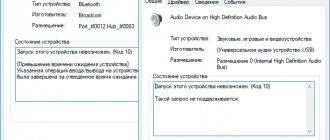
To fix this problem, you need to enter the “ Device Manager ”: open the “ Start ” menu, and then “ Settings ” of the PC and go to “ Devices ” and open “ Device Manager ” at the bottom right. Then, in the open manager, click on the “ View ” tab, in the menu that opens, click on the line “ Show hidden devices ”.
In the “ Network Adapters ” folder, find the “ Microsoft Hosted Network Virtual Adapter ” adapter. Then right-click on it and select the line “ Engage ”.
Then try again to launch with this combination - netsh wlan start hostednetwork .
- There may be other services that will appear as unused and need to be started as well.
- If there are no signs of a wireless Wi-Fi network and its adapter is not reflected in the device manager, most likely the laptop does not have a driver for it. It is also possible that the driver does not support virtual networking. In this case, you need to download the latest (updated) drivers from the official website of the laptop manufacturer.
If the “ Hot Spot ” function has already been launched previously, then there should be no problems with the distribution of the Internet via Wi-Fi on Windows 10.
Testing the possibility of Internet distribution
Everything is simple here: we launch the command line with administrator privileges using the Start context menu and execute the command in it.
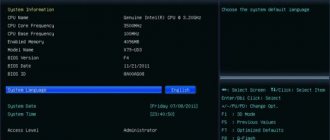
netsh wlan show drivers
The window will display detailed information about Wi-Fi: version of the installed driver, supported types of radio modules. We are looking for one of the last lines: “Hosted network support.” If it is supported, we continue; otherwise, we update the drivers for the Wi-Fi adapter or modem.
It is advisable to download them from the official support site for your laptop or modem.
Sometimes rolling back the driver also solves the problem. To do this, go to the “Device Manager” through the Start context menu, and in the “Network adapters” branch we look for our network device. Using the element’s context menu, go to its “Properties”, in the tab called “Driver”, click on the button responsible for rolling back the software.
After restarting the computer, repeat the verification procedure.