This article describes a proven method to transfer a hard drive from Windows to another computer/laptop in working order and without errors, without using any additional software.
If you purchased a new computer or received a brand new laptop to replace an obsolete one (or perhaps one that died untimely), the thought of moving Windows has probably occurred to you. That is, transfer the hard drive from Windows to the new build. Bypassing the long installation of Windows itself and its drivers, re-installation of programs, recovery of accounts and passwords. How painful it is sometimes...
If it were Linux, nothing would be easier. These systems are accustomed to loading all installed drivers right when the computer is turned on and booted: that's why they are so popular on portable devices. Windows never does this: after installing the system, the drivers are tightly bound to the devices installed on the computer. So, if you try to transfer a Windows hard drive to an updated build simply by moving the drive itself, you may encounter a number of problems.
- What's stopping you from just transferring the disk with the system?
Why can't you just transfer Windows?
- The first reason is hal.dll . It is also the level of hardware abstractions . It is incorrect drivers that cause BSOD on your computer when you are just about to boot the system under new conditions. Windows loads drivers for the old motherboard and chipset. You have already defined the characteristics of the system's main storage controller (that is, the hard drive). We haven’t even mentioned the graphics processor: if you “change” ATI to nVidia, problems with startup are guaranteed. However, there is a good chance of restoring Windows by replacing only the motherboard.
You turn on Windows... and it doesn't understand what's happening.
- Problems with activation for a respectable user are becoming more pressing. I am one of the old guards for whom this is not a problem at all. What about the rest? When transferring the system, activation is necessarily lost. Endless mentions of the lack of a license and the restrictions imposed will infuriate anyone... Especially if the computer was purchased with Windows pre-installed. Don't buy the key again. So I decided to highlight the problems with transferring Windows activation in a separate article.
- This leads to the next problem . We first bought Lenovo, but want to upgrade to a brand new Asus. Both of them, if you haven’t paid attention, like to additionally install their “personal” software , which sometimes very tightly binds the system and specific installed modules. Which are installed only on these versions of the computer or laptop.
Many PC users have encountered the problem of transferring a hard drive to another computer without reinstalling the operating system; more often than not, such attempts are doomed to failure.
Why is this happening? Yes, because the hard drive in the old computer was configured for its software and hardware (motherboard, chipset, processor type, RAM, video adapter) and when we place this hard drive in a new system unit, its filling is probably different from the old one unit and therefore it is likely that the hard drive simply will not be able to run the operating system in the new configuration of parts.
This trick can only work if the new computer's motherboard chipset and processor are identical to the old one.
And yet, how can you make the hard drive start on another computer without reinstalling the OS?
There are a couple of ways. The first is that on an old computer we install standard drivers on the hard drive and motherboard.
This is done like this: you need to go to the device manager, through the control panel or my computer, then select the hard drive in the list of devices, click update drivers, then “search for drivers on this computer” and “select a driver from the list of already installed drivers”, in the appeared window, select “disk drive”. The computer will ask to reboot, click “no” and continue working. We perform similar steps for motherboard devices.
Then we turn off the computer, remove the hard drive and start it in the new computer; if everything was done correctly, then with a 75% probability the computer will boot into the OS.
If the first method does not help, there is a second option. You can use the “sysprep” service; it erases all data about the installed operating system, as well as the drivers of all devices. To start this process, you need to enter the following parameters “%windir%system32sysprepsysprep.exe” (without quotes) in the command line, in the start menu.
In the dialog box that appears, set the parameters: in the actions to clean the system - go to the system welcome window (OOBE). And set the “prepare for use” option. In the shutdown menu, select shutdown. Then click “ok”, the process of preparing the system for installation on another PC will begin.
After completing all operations, the computer will turn off, you will only have to remove the hard drive and run it in another computer. The message “preparing the system for use” should appear, and the devices are being installed; during these processes, the PC may reboot several times. If everything is fine, then after a few minutes a menu for selecting language and time settings will appear, then the OS should start and all you have to do is install the missing drivers (motherboard, video adapter).
Read more:
- Creating a backup copy of installed drivers
- How to install and configure windows on a laptop
- How to install drivers on a laptop
- How to perform HDD diagnostics yourself
Method one - “on the ball”: removed the disk from the old computer and installed it on the new one
Why not try it? The old laptop has Windows 10, which it no longer supports. And we transfer Windows along with the disk to a brand new computer. I think everyone can pull out and screw a 3.5-inch HDD into a new place. I once “repaired” the consequences of such an operation using Windows XP as an example, so all the details are described in the article “How to move Windows with a hard drive from one computer to another.” But remember that this method has too many “BUTs”. Something like this:
- on both machines the CPUs were from the same office
- integrated video cards on both assemblies
- the interface for connecting hard drives (in principle, this is not a problem, but...) would be the same
- etc. and so on.
In general, there are no guarantees. Most likely, you will see a BSOD or Windows circular reboot. The point about updating the drivers for the hard drive before dismantling it in the article is key. Don't miss it.
Disk in idle PC
If the OS refuses to boot, you can save the data, because despite software failures, the information remains intact. But to transfer files you will need an external drive or flash drive.
Microsoft - MSDaRT
The Microsoft Diagnostic and Recovery Toolset utility is a program that allows you to boot the system from removable media, even if the files are completely damaged. The user gets access to NTFS volumes, the registry and drivers, and this is enough to copy information. You can download it from the official website class=”aligncenter” width=”492″ height=”356″[/img]
The utility needs to be downloaded to media and run on a non-working device, after which:
- Select the desired OS and its bit depth;
- Select Diagnostics - Microsoft Diagnostics and Recovery Toolset ;
- Open Explorer ;
- A window with system disks will open. You need to connect removable storage and copy all the information.
The process is extremely simple, so even the average user can handle it.
Methods for determining the partition style on a disk - mbr or gpt
Live CD
A system with a liveCD is suitable for any OS, using the Dr.Web LiveDisk recovery disk. After downloading, you need to run on your PC from the media:
- Run the program;
- Open File Manager ;
- Select the win folder and copy the necessary files.
The program with an interface from Dr.Web works on the same principle as the previous one.
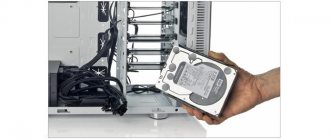
Connecting the drive to another computer
To connect the hard drive to a working PC, you need to remove it from the old computer:
- Disconnect the power cable;
- Remove the side panel from the system unit, removing the fasteners;
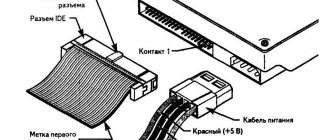
- Find the hard drive and disconnect its power and IDE or SATA cable;
- Remove its fastenings and remove it. Sometimes this requires removing the second wall of the system unit.
After removing the hard drive, you need to connect it using standard methods, which are indicated in the first paragraph.
Method two – System Preparation Tool
But this is already a completely official version. Sysprep is a powerful tool built into Windows that allows you to prepare your hard drive for moving to a new build. Yes, so that all programs installed besides Windows work. This option is recommended when:
- the hard drive from the old computer is transferred to the new assembly
- on an old computer, the motherboard and/or processor (or even everything together, including graphics GPUs) are changed
In this case, the installed Windows, its programs and user profiles will remain in their places. However, this method also has small assumptions (for more details, see the link in the article about the utility):
- in fact, this is a new installation of Windows; the initial setup process will need to be completed again UNDER THE NAME OF THE NEW USER
- Windows activation fails in any case; if you value it, there is only one way out - call the activation service
- the method on RAID arrays of combined disks does not work (I have never succeeded)
- Windows updated via the network (for example, from Windows 7 to Windows 10, from Home to Ultimate) also often cannot be moved: sysprep will not work
- if reinstallation was used by update, sysprep will also not help
Transfer (clone) Windows to another SSD/HDD drive
In this article, we will look at how to transfer an installed Windows from one hard drive to another using only built-in tools without using third-party programs (such as Paragon, AOMEI or Acronis). This instruction will help you, for example, transfer Windows from an HDD to a new SSD drive, or clone installed and configured Windows to another computer (there are nuances) or a new larger hard drive.
As an example, we will clone an installed Windows 10 to a new disk using a bootable USB flash drive, the command line and the built-in robocopy utility.
Please note that transferring an operating system by copying it to a new drive will only be guaranteed to work when transferring within the same computer (or similar hardware), when you clone your Windows to another hard drive on the same computer. If you want to copy installed Windows to a disk for another computer, then to run it on the new hardware you will have to tinker with drivers for disk controllers, chipset, and video card.
You can clone your hard drive to a new smaller drive if the space occupied on the system disk of the current Windows is less than the capacity of the new drive. If this is not the case, you will have to delete/move some files from the disk. Most often, this question arises when transferring to an SSD disk with a smaller capacity than a regular HDD.
The procedure for transferring Windows to another drive depends on what mode your computer is running in: BIOS or UEFI . Run the command:
msinfo32
If the BIOS mode line says Legacy , you have a computer with BIOS (or UEFI running in Legacy/CSM mode). If UEFI , you have a modern computer and Windows is installed in UEFI mode.
- If the computer is running in native UEFI mode and has a GPT partition table, I will label the commands for such computers UEFI GPT ;
- If you have an old computer with BIOS or UEFI but in Legacy mode, and the table is an MBR partition, the commands will be labeled BIOS MBR .
First of all, you need to create partition tables on the new disk. This can be done directly from running Windows 10 using diskpart. If the disk is new, initialize it using the console diskmgmt.msc or the PoweShell command Initialize-Disk:
Get-Disk | Where-Object PartitionStyle –Eq 'RAW' | Initialize-Disk
Now let's create a partition table on the disk. Open a command prompt with administrator rights and run the command:
diskpart
In the diskpart context, run the following commands.
list disk select disk 1 (depending on the number of your new disk that the previous command gave) clean
Next, the commands differ depending on the type of platform you have.
For UEFI GPT :
convert gpt create partition efi size=100 format fs=»FAT32″ quick label=»EFI» create partition msr size=16 create partition primary format fs=»NTFS» quick label=»NEW_SYSTEM» exit
We created a GPT partition table on the new disk, two small service partitions (EFI and MSR), and one large partition was created on the remaining space (see more about the structure of GPT partitions for EFI).
If the disk already has partitions, you can change the partition table type from MBR to GPT without losing data using the built-in utility mbr2gpt.exe.
For BIOS MBR the following commands:
convert mbr create partition primary align=1024 active format fs=»NTFS» quick label=»NEW_SYSTEM» exit
To clone Windows to a new drive, you will need a bootable USB flash drive with a Windows 10 installation image (the easiest way to create such a flash drive is using MediaCreationTool).
Restart your computer and boot from the installation disc. When the Windows Setup window appears, press Shift+F10 to open Command Prompt. In the window that opens, run the commands
diskpart list vol exit
In the screenshot below, you can see that the original Windows partition on the old drive is assigned the drive letter E:, and the large partition on the new drive (labeled NEW_SYSTEM) is assigned the drive letter D :.
If drive letters are not assigned, you can assign them from diskpart like this: select disk 1 list part select part 1 assign list volume
Now you need to copy the files from the old disk with Windows installed to the new one. The easiest way to do this is with robocopy. The following robocopy command will copy all symbolic links, files and folders with attributes, NTFS rights and timestamp. In this case, the copying log will be saved to the root of the target disk:
robocopy E:\ D:\ /E /COPYALL /COPY:DAT /SL /XJ /R:3 /W:3 /UNILOG:»D:\rcopy.log» /TEE
Copying can take a long time depending on the size of the old disk (in my case, copying a 60 GB disk took about an hour).
Now you can turn off your computer and disconnect your old hard drive.
The next step is to configure the Windows boot loader on the new disk.
If you try to boot from a new disk, the error Operation system not found will appear.
Boot your computer into the Windows installation environment again and run Command Prompt (Shift+F10).
Recovering BIOS MBR bootloader.
Check the drive letter assigned to the new large partition on the disk:
diskpart list vol
The drive is assigned the letter C :
Repair the BCD bootloader on drive C:
bcdboot C:\Windows/SC:
Fix MBR and BCD bootloader entries:
bootrec.exe /FixMbr bootrec.exe /FixBoot bootrec.exe /RebuildBcd
Restoring the bootloader on a UEFI GPT computer (this procedure is described in detail in the article restoring the Windows 10 bootloader on a UEFI computer).
You need to determine the system drive letter and assign the drive letter to the EFI partition.
Diskpart List vol.
In this example, the system partition is assigned drive letter C. You need to assign a letter to the EFI (size 100 MB and file system FAT32) using the following commands (in the commands, change the partition numbers according to your configuration):
select volume 1 assign letter M: exit
Now you need to recreate the BCD bootloader configuration:
cd /dm:\efi\microsoft\boot\ ren BCD BCD.bak bcdboot C:\Windows /l en-us /s M: /f ALL
Restart your computer and disconnect the bootable USB flash drive. Make sure Windows boots correctly from the new drive.
All installed applications, documents and settings remain in place. You have successfully copied your installed Windows 10 to a new drive.
When copying files to a new disk using robocopy, errors may occur. Open the rcopy.log file on the new disk and see which files were not copied. In my case, 94 files were not copied (in my case, only junk files were not copied).
The article omits the procedure for creating a boot entry for the Windows Recovery Environment. Usually it is located on a separate System Reserved partition. If you want to configure the Windows Recovery Environment (WinRE), follow the instructions in the article.
Macrium Reflect
Capable of cloning disks or partitions. It also has the ability to create partitions to restore the OS in case of failures. At the same time, it is completely free and works with any device class=”aligncenter” width=”670″ height=”477″[/img]
How to broadcast an image to a TV from Android via Miracast
After installation, all that remains is to click “ Clone this disk ” and then select the initial and final media. After which the utility will perform the transfer.
Transfer Windows 10, 8 and Windows 7 to another disk in Minitool Partition Wizard Bootable
Minitool Partition Wizard Free, along with Aomei Partition Assistant Standard, I would classify as one of the best free programs for working with disks and partitions. One of the advantages of the product from Minitool is the availability of a fully functional bootable ISO image of Partition Wizard on the official website (the free Aomei allows you to create a demo image with important functions disabled).
By writing this image to a disk or flash drive (the developers recommend using Rufus for this) and booting your computer from it, you can transfer your Windows or other system to another hard drive or SSD, and in this case we will not be hampered by possible OS limitations, since it is not running.
Note: I tested cloning the system to another disk in Minitool Partition Wizard Free only without EFI boot and only on MBR disks (Windows 10 was transferred), I can’t vouch for its performance in EFI/GPT systems (I couldn’t get the program to work in this mode, despite Secure Boot being disabled, it looks like this is a bug specifically on my equipment).
The process of transferring a system to another disk consists of the following steps:
- After booting from the flash drive and logging into Minitool Partition Wizard Free, select “Migrate OS to SSD/HDD” on the left.
- In the window that opens, click “Next”, and on the next screen select the drive from which Windows will be transferred. Click Next.
- Specify the disk to which cloning will be performed (if there are only two, it will be selected automatically). By default, options are enabled that resize partitions during transfer if the second disk or SSD is smaller or larger than the original one. Usually it is enough to leave these parameters (the second item copies all partitions without changing their partitions, suitable when the target disk is larger than the source one and after the transfer you plan to configure the unallocated space on the disk).
- Click Next, the action to transfer the system to another hard drive or solid state drive will be added to the program's job queue. To start the transfer, click the “Apply” button at the top left of the main program window.
- Wait until the system transfer is completed, the duration of which depends on the speed of data exchange with the disks and the amount of data on them.
Once complete, you can close the Minitool Partition Wizard, reboot your computer and set it to boot from the new disk to which the system was transferred: in my test (as I already mentioned, BIOS+MBR, Windows 10) everything went well and the system booted as usual which did not happen with the source disk disconnected.
You can download the Minitool Partition Wizard Free boot image for free from the official website https://www.partitionwizard.com/partition-wizard-bootable-cd.html
Samsung Data Migration Program
This utility was specially created by the developer to transfer data from the main disk to a solid-state drive of the corresponding brand. Therefore, if the user needs exactly this, the utility will come in handy.
Programs for storing passwords
It has a simple interface and algorithm of actions similar to the previous options presented in this article. But it is capable of not only completely transferring information, but can also provide its selective transfer. This is very useful, because SSD volumes, as a rule, are still smaller than hard drives. This feature solves the problem of copying and will allow you to transfer only the OS with all the necessary programs, and leave the rest.