No matter how large the computer disk allocated for the system volume is, there is often a catastrophic lack of memory on it.
Relatively recently, in order to free up space in this important directory, the user only had to dump some of his files onto a 1.4 Mb floppy disk, after which he could continue to work quietly on the PC for a long time.
Modern computers have tens of gigabytes of disk space, and sometimes even terabytes, however, the problem of lack of memory is still relevant.
Below is a guide with techniques for safely deleting unnecessary Windows 7 update files to avoid unpleasant situations with system crashes and errors.
Where are updates stored and what are they for?
The longer the “Seven” is used, the more upgrades are downloaded for it and the more space it takes up on the computer.
Therefore, the question of which system updates can be safely removed is quite obvious to any user.
Updates are stored in the “WinSxS” system directory and may be necessary, if necessary, to roll back the system to a working state as a result of failures.
If the PC owner does not need to do this, then erasing unused updates will not have negative consequences for the functionality of the OS.
After installing the packages, the old files are saved on the PC and if the last upgrade led to a failure, for example, in Windows XP, Vista, 7 and 8, many users, after upgrading the OS, encountered error 87, the elimination of which requires time-consuming adjustments to the registry, or a system rollback, which is possible by saving previous update files stored in the “WinSxS” directory.
If the “Seven” has been working stably for a long time and the user has sufficient experience in operating a computer, then he can quickly free up significant space on the hard drive of his home electronic friend.
After all, a folder with “ballast” usually weighs at least 4 Gb.
Is it possible to do this
Not all users think about how to remove old updates on Windows 10, because they are 100% sure that this cannot be done.
Indeed, the question regarding whether updates can be deleted is relevant and requires a mandatory answer.
There is nothing wrong with deciding to remove previously installed updates for Windows 7, 8 or 10. On the contrary, sometimes it is even necessary to do this. Only in this case it is important to take into account some nuances:
- Do it right. If you simply delete files, you might end up with something that shouldn’t be touched. As a result, the entire operating system may stop functioning.
- Uninstall, but not all updates. This is about the question of whether it is possible to remove updates on Windows 10 or other versions of the OS and whether clearing updates will lead to serious consequences. If you don't touch Windows security updates, everything will be fine.
- Choose what you delete carefully. Sometimes a user decides to remove literally all old updates for Windows 10 because a fresh package was recently installed. But new updates do not mean that everything previously installed is no longer required. Perhaps they are not old and are still relevant.
If you simply delete the files of a relatively old update manually and tamper with the system directories of Windows 10 or other operating systems without the appropriate knowledge, the consequences can be extremely serious and negative. To the point where you have to completely reinstall the operating system.
Not every specialist will decide to delete files manually, since some updates for Windows 10 and other versions may remain relevant for a long period of time. It is difficult to accurately determine by viewing system folders what is old and what should still work.
Therefore, the most correct solution would be to use current methods for cleaning updates.
Removal techniques
Initially, in Windows 7, Microsoft specialists did not provide a tool for getting rid of old system update files.
Therefore, PC owners had to use workarounds to free up valuable disk space on the hard drive.
Fortunately, the developers have released a special package “KB2852386”, which makes this process safe and easy to perform even for novice users.
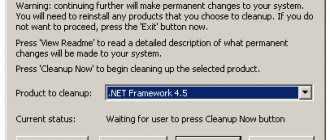
If this package is not installed automatically, then this wizard can be manually downloaded and installed on the official Microsoft resource. Its exact name is “Windows Cleanup Tool”.
Thus, to the question: “Is it possible to delete old saved updates from the system volume?” - Microsoft itself has already responded positively, but there is one very important condition.
This cleaner successfully copes with its tasks, both in 32-bit Semerka and x64, but you should definitely take into account that the installation of this wizard for cleaning old files is only possible if Semerka is updated to SP1.
Next, we will consider the most effective methods for solving the problem, which make it possible to rid your PC of unnecessary “junk” as simply and safely as possible.
The methods below will help you erase previously installed upgrades from your computer’s memory and remove updates that have not yet been installed on the system.
What patches can be removed
Before we start getting rid of updates, we should understand that at the same time the operating system will become less secure, previously patched holes, corrected errors, etc. will appear in it - depending on what function the patch being removed performs.
Seven users most often delete files KB971033 and KB976902. What happens if they are removed, and what are they responsible for? These are undesirable updates for unlicensed copies of Windows 7. The first removes the background image, and when you launch system programs and open the Control Panel, it displays a notification about using an unlicensed version of the OS. The second eliminates holes in the operating system activation mechanism, which will also lead to activation failure.
This hole is used by several dozen utilities for activation.
These files are a compulsion to legalize, but it is not necessary to pay several thousand rubles. Downloaded and installed patches in Windows 7 are easy to remove.
Method 1: Using the Cleanup Wizard
The following sequential steps must be performed:
- If the package with the code KB2852386 was not installed automatically by the OS, then download and install it manually from the Microsoft resource (in the case where the upgrade is already installed, then immediately proceed to the execution of the 2nd point of this instruction);
- Then open the program by typing in the “Run” window: “cleanmgr” and then clicking on “Ok”;
- After that, show the location of the files in the menu that appears;
- Click the “Clear system files” virtual key;
- Wait for the process to complete;
- Check the box for “Previous Windows installations”;
- Click “Ok”;
- Wait for the procedure to complete and restart the PC;
- A message will appear on the monitor asking you not to turn off the computer;
- Ready.
Note: After some time, updates will begin to download to the PC again, which will again require wiping the disk. Therefore, it is recommended to carry out this activity to remove update files quarterly.
Or you can disable the service for automatically downloading and installing upgrades (how to do this is described later in this guide).
remove downloaded Windows updates using Disk Cleanup utility
Disk Cleanup is, in addition to a user action, also the name of a system utility: Disk Cleanup.
Built-in Windows System Utilities You Need to Know About! 11 instruments
Using the built-in utilities of the Windows operating system is undoubtedly justified in most cases! Well... let's look at the built-in Windows system utilities in order: 11 pieces
The operation we require can be carried out in a few simple steps, here they are:
- in the search window (the icon is usually next to the Start icon) enter the phrase “disk cleanup”.
- Be sure to run the found application as administrator.
- The Disk Cleanup application starts launching: the utility evaluates the useless volume that can be painlessly removed from the computer. We wait…
Then in the “Disk Cleanup (C:)” window, in the “Disk Cleanup” tab, check the boxes next to the “Windows Update Cleanup” and “Windows Update Log Files” items...
In some OS builds of Windows 7, Windows 8, Windows 8.1 and launch versions there are dozens, to access the update cleanup options, find and click “Clean up system files”...
In the end, don’t forget to click OK and restart the computer!!
back to contents
Method 2: Using the Windows 7 Control Panel
The method through the “Control Panel” (CP) is very convenient to perform and allows you to achieve maximum effect. The following steps are required:
- Click “Start”;
- Click “PU”;
- Next, go to the “Programs” tab;
- Click “View installed updates”;
- If the path to the menu seems too long to the user, and he does not have time for prolonged clicking of the mouse, then he can quickly get to the desired menu using the keyboard.
To do this, hold down “Win”, click “R” and then type “wuapp” in the window that appears;
Click “Enter” or the “Ok” button;
- Click “Installed updates”;
- A list of updates will be displayed, indicating their names and calendar dates when the installation was performed. That is, you can navigate through them and decide exactly which element caused the error and needs to be removed urgently;
- You should open the context menu for the selected component and click “Delete”;
- You can also use a special key in the top menu of the window;
- Next click “Yes”;
- Wait for the process to complete;
- Restart PC;
- The help of this method will also be required to remove other elements; you just need to call up the context menu from the component or several selected for elimination (you can select them by holding down the “Shift” key) and click “Delete”;
- Click “Next” and follow the wizard’s requirements.
Disabling updates in Windows 7
Perhaps you don’t want to receive updates at all, because of a situation that has happened, or because they cause you some other inconvenience, then it’s easier for you than to download, install and remove them from the system all the time, just disable such a service. In our operating system this is done extremely simply.
- Go from “Start” to “Control Panel”;
- Find the “Windows Update” item and click on it;
- In the “Settings” tab, in the “Important updates” section, select “Don’t check for updates.”
In the same way, you can remove updates that have not yet been installed if you install updates manually, that is, it is downloaded and then you are given a choice. Everything happens exactly the same, so there is no point in describing everything again.
Among other things, when you remove updates, you reduce the resource costs for their use and free up space taken up by them. The truth is that you are unlikely to be able to feel the difference, since Microsoft does not create pointless updates and nevertheless, users who have disabled this function do not experience difficulties at all for years, although this does not always happen. If you still have questions on the topic “How to remove updates in Windows 7?”, you can ask them in the comments
if(function_exists("the_ratings")) { the_ratings(); } ?>
Although Microsoft implements optimizations and fixes for various Windows-related issues through operating system updates, this often results in compatibility issues due to lack of thorough end-to-end testing before releasing the update to the general public.
In such scenarios, the user can either wait for patches from Microsoft that are designed to fix problems caused by previous updates, or uninstall the updates to restore the stability of the computer. This can be done using the Windows Control Panel or through third-party applications such as .
In this tutorial, we will show you how to remove problematic Windows updates in Windows 10.
In Windows 10, press the Win key, type “View installed updates” and press Enter to open the list of updates in Control Panel.
On the page that opens, you can see the name of each update, the version of the program and the update itself, as well as the installation date. If you don't know exactly which update is causing problems, click on the date column to sort updates by installation date and select the latest update (if it was after its installation that the problem appeared).
To make sure you make the right decision, you can view additional information about the individual update online. To do this, simply copy the ID displayed next to each type of update and enter that information into a search engine to see if other users have encountered similar issues.
You can select an individual update from the control panel list, in which case a link to a support page will appear in the bottom bar. Copy the link, paste it into your browser, and review Microsoft's update information.
If you have decided which update you need to remove (you can later reinstall it using Windows Update), right-click on the update in the list and select the “Uninstall” option. Once the process is complete, restart your computer to complete the changes.
In the main window, select the “Win Manager” tab and go to the “Windows Updates” section. Select the update from the list, and then click the “Uninstall” button at the bottom of the window. If you want to uninstall several updates at once, check the “Batch update” option in the upper right corner of the window, then check the boxes next to the update name and click the uninstall button at the bottom of the window.
IObit Uninstaller allows you to display a new window on the screen. Select “Create a restore point” to be able to rollback the changes associated with uninstalling the update (if you change your mind or there are serious problems), and then the uninstall button.
In addition, the application is designed to find and remove any remaining files or registry entries, but most likely Windows updates will not be affected by this task, because they are usually deleted completely. However, if residues are detected by the program, you can select and eliminate everything. Depending on the update, you may need to restart your computer to complete the process successfully.
Found a typo? Press Ctrl + Enter
The article discusses ways to uninstall all updates in Windows 7 at once. Since OS developers have not built in such a function, you cannot do without third-party software.
Method 3: Using the command line features in Windows 7
You cannot ignore the method using the “almighty” OS console, or as it is more often called the “Command Line” (CL). The sequence of actions consists of the following stages:
- Click “Start”;
- Point the arrow to “All programs”;
- Then click on the “Standard” section;
- Call the context menu from “KS”;
- Click “Run as administrator”;
- Type “wusa.exe /uninstall /kb..…………..” (indicate the upgrade number in place of the dots);
- Click “Enter”;
- Wait for the process to complete;
- Click “Yes”;
- Again you will need to wait a while;
- Restart PC.
Method 4. How to remove manually?
You can also use the manual mode of removing updates from the “WinSxS” directory, but first you must deactivate the update service.
The following steps must be taken:
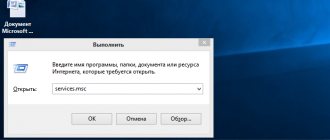
- Hold down “Win”, click “R” and type “services.msc”;
- Click “Enter” or “Ok”;
- Having sorted the list by name, select “Windows Update” and click “Stop the service”;
- Next, open the contents of the system volume in Explorer and enter the Windows directory;
- Then go to the “SoftwareDistribution” subdirectory;
- Open the “Download” directory, where you can select the elements to be deleted;
- Call the context menu from the selected elements and click “Delete”;
- Click “Yes”;
- Then repeat the same operation with the “DataStore” directory;
- Close running windows and open the context menu from the “Trash” on the Windows 7 desktop;
- Click “Empty Trash” and confirm the firmness of your intentions;
- Ready! Space for the system is freed;
- Relaunch the service management menu;
- Select “Windows Update”;
- Click “Start service”.
Removing patches through the Control Panel
The easiest way to remove patches manually in Windows 7 is to use the system tool. First, you need to go to Windows Update through the Control Panel . The latter is located in the Start .
Here you should find the “ Windows Update ” section and go to it.
To view a list of currently installed patches, follow the “ Installed updates ” link, which is located in the left corner of the bottom of the window.
In the list presented, you will see several patches at once (or maybe in your case there will be only one) that have already been installed on your computer.
You just need to select the patch that you want to delete, right-click on its name and select the appropriate item from the drop-down list (you can also just double-click on the name). First, pay attention to the installation date of the patch you are trying to remove. If you roughly remember the day after which your computer began to act up, then select from the list the patch that was installed at that very moment . Immediately after this action, the computer should restart.
If you need to completely remove several patches , then unfortunately, you won’t be able to do this at once. This means that it is impossible to select a certain number of patches, so you will have to delete each one in turn.
Method 5. How to remove only installation files?
You need to do the following:
- Using method number 3 of this guide, open “KS”;
- Type "net stop wuauserv";
- Click “Enter”;
- Type "ren %windir%\SoftwareDistribution SoftwareDistribution.OLD";
- Click “Enter”;
- Wait for the process to complete and enter “net start wuauserv” into the CS;
- Click “Enter”;
- Ready.
How to remove old updates?
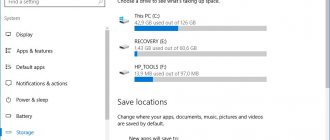
In order to “demolish” files of old Windows 10 updates, you need to perform the standard procedure for cleaning the hard drive with the system. But, in this case, you need to check the “ Clean up system files ” checkbox, since this utility is disabled by default.
After this, select the items “ Update log files ” and, if desired, optionally previous Windows installations. After the cleaning process is completed, several gigabytes of free space may be added to your computer.
A large amount of space on the drive is occupied by the previous installation of the platform. Even if a rollback is made to older but stable versions of the OS, the system will search for and try to install all deleted updates. To avoid this, you need to disable the installation of add-ons.
How to remove installed, downloaded and frozen updates?
Downloaded updates are stored in the device’s memory in the form of ordinary files. You can perform all necessary operations with these files - delete, copy, move. Among the downloaded files, there are also those that are frozen or not installed. Another name for these resources is “ update cache ”.
You can go there through a standard explorer and go to the folder along the path C:\Windows\SoftwareDistribution\Download
This is where the files we are interested in are located. You can remove problematic updates by their ID , size or download date.
You should approach cache deletion with caution. Mechanically clearing the update log can cause damage to the device. Only in an emergency, when the system is very slow or glitchy after downloading a patch, can you remove it through the explorer.
It is advisable to create a recovery point and save important files on another medium, disk or flash drive, so as not to lose them if the operation fails.
To properly clear a category with a cache, you need to go to the command line as an administrator and run the following commands one by one:
NET STOP WUAUSERV
DEL %SYSTEMROOT%\SOFTWAREDISTRIBUTION\DATASTORE\LOGS\EDB.LOG
NET START WUAUSERV
All! The update log should be empty, now you need to reboot.
Problematic updates can be removed either in a standard way or using external software.
After the action is completed, you should prohibit downloading and installing this update. Otherwise, the system will attempt to install it as soon as it detects its absence.
Uninstall the update through the control panel.
There is a standard way to properly remove unnecessary updates in the Windows operating system, through the control panel.
Through the standard icon, go to the control panel. After the window opens, you need to look for the “ Programs and Features ” column. We go there and at the top left we find the line “ View installed updates ”.
The system sorts all events by date, so the newest update will always be the first. To delete it, you need to click on the element with the mouse. After clicking, the delete button will become active. The system will ask for additional confirmation. Sometimes after this operation the computer enters reboot mode.
How to remove uninstallable updates?
Now there are no ready-made methods to remove uninstallable updates in the Windows environment, but it can still be done. However, if such an error occurs, this indicates the presence of a critical error on the computer.
To eliminate the malfunction, an integrated approach is required. Diagnostics, checking for viruses and the integrity of the hard drive are carried out.
Basic measures to eliminate a critical fault:
- Checking your computer for viruses;
- Diagnostics of the system and hard drive using special utilities;
- Checking and cleaning the registry;
- Defragmentation of hard drive sectors;
- Restoring the system from the installation distribution.
If after carrying out these measures there is no positive result, you should contact a workshop, call a specialist, or reinstall the OS.
Updates themselves do not pose a threat, but monitoring the correct installation and interaction with existing programs is necessary.
Finding out that the update has gone wrong is quite simple - the computer loses performance and begins to behave inappropriately. One update cannot completely disable the system, but it is quite likely to create some kind of malfunction.