Samsung smartphones can be flashed without much difficulty if everything is done correctly. Therefore, we immediately warn you that all requirements must be followed and then everything will go smoothly. After all, due to inattention to some little detail, it is quite possible to get a beautiful, expensive block that will only be convenient for chopping nuts, and even then not for long.
So, let's use the Odin program, which will do all the work on flashing the gadget's firmware.
Where to download Odin
This application is developed by Samsung and is intended specifically for flashing smartphones from this manufacturer. This means that in principle no problems should arise, since maximum compatibility is ensured. The program runs under Windows.
With the Odin program you can change the entire firmware completely, as well as perform more subtle manipulations. For example, she may add some kind of patch or change only the Recovery menu.
Odin and Samsung firmware - rules
To avoid any problems during the work process, you need to immediately understand some rules and strictly follow them. Very often, their violation leads to the fact that the phone turns into a “brick”. So, what should you do when flashing a Samsung smartphone with the Odin program so that everything goes well:
- Before flashing the firmware, you need to fully charge the phone and provide the computer with uninterrupted power. If there is no uninterruptible power supply, you can also use a fully charged laptop. After all, if the phone or computer turns off during the firmware process, there will be many problems, so this situation must be excluded.
- To flash the firmware, you need to use the original USB cable that came with the phone. If you take any other one, the process may not go according to plan and end in an unknown way.
- During the firmware installation, you should never disconnect the USB cable from your computer or phone. Interrupting the process can be fatal. Therefore, make sure that no one accidentally surprises you like this. Children especially love to do this, and instantly and unnoticeably.
- The path to the folder in which the firmware files will be located on the computer must be completely in English, without Russian letters. That is, create it, for example, on drive C or D, but not in the “My Documents” folder or on the desktop. And name it also in Latin letters.
In general, these simple rules apply to the procedure for flashing any phones with any programs. Just remember that the process should not be interrupted under any circumstances. Until it ends, it is better not to touch the computer at all and not launch new programs.
Creating Root access to Samsung Galaxy Note 2 phones
If you need to open the “superuser” mode, then the Odin and SF-Autoroot programs can help with this. So, we follow this algorithm of actions:
- Download SF-Autoroot for a specific phone model, which can be found in the “About phone” settings menu item. The files themselves can be easily found on the Internet. If you cannot find a file for a particular model, it is better to leave everything in stock mode, because other actions can harm the device.
- Download Odin and install USB drivers for your phone.
- Turn off the Galaxy Note 2 and put it into download mode. It turns on by simultaneously pressing 3 buttons: Volume Down + Home + Power. Then, to confirm the actions, press Volume Up and connect the device to the PC.
- In Odin, click on the PDA button, where we select the required file with the extension tar.md5. Then check the boxes next to the Auto Reboot and F. Reset Time options. Make sure that no other functions are checked.
- Click “Start” and wait for the installation to complete.
As you can see, flashing firmware via Odin is not the only advantage of this program. If you do everything wisely and according to the instructions, the application will be an excellent help for owners of Samsung devices.
Downloading and installing device drivers
For proper interaction between a computer and a smartphone, drivers are needed. Samsung users have the easiest time in this regard, because the manufacturer has already provided for everything and produces proprietary software.
For older phone models released before 2011 and with Android version up to 4.2 inclusive, you need to install the Kies program (https://www.samsung.com/ru/support/app/kies/). Drivers will be installed along with it. But when using the Odin program and Kies installed, conflicts and errors may arise, so the latter must be removed before flashing Samsung. However, the drivers will remain in the system after removal, which is what is required.
You don't have to install Kies completely, but download and install only the USB driver for Samsung devices. It is installed simply, like all other programs, it has an installer that you just need to run.
For more modern smartphones with Android version 4.3 or higher, another software is installed - Smart Switch (https://www.samsung.com/ru/support/app/smartswitch/). Drivers are also installed with it, but this software does not conflict with the flasher and it is not necessary to remove it.
Odin utility cannot detect Samsung device
Odin does not show the ID and COM of a Samsung device connected to the computer
1. Make sure your device is in Downloading mode. 2. Check that your microUSB cable is working properly. If possible, use only original Samsung cables when connecting them to the rear USB 2.0 port on the motherboard. 3. Try downloading the latest version of Odin, or, conversely, an earlier version. 4. Run Odin as administrator.
5. Try restarting your computer. 6. Uninstall your Samsung drivers and Kies program, then restart your computer and install them again. 7. Temporarily stop antivirus programs. 8. Try using a different version of the operating system (if you have several of them) or flash the device using a laptop or other PC. 9. Make sure that you have an original Samsung device and not a Chinese copy.
Putting the device into download mode
You can flash Samsung via Odin only in Download mode. To transfer your smartphone to it, you must first turn it off. Then you need to press the “Volume-” and “Nome” buttons simultaneously and, while holding them, press the power button. The phone will turn on and a message with the title “Warning!!” will appear on the screen. Here you need to press the “Volume+” button to confirm the selection of the mode you need.
If you did everything correctly, a splash screen will appear on the screen with a large inscription “Downloading...”. This means that your Samsung is ready to receive new software and you can proceed with the actual firmware. This mode is also called Odin Mode.
Firmware
Before proceeding to this stage, make sure that the phone is charged at least 60% and there will be no surprise with its sudden shutdown. Also make sure that you do not have the Samsung Kies application installed, and if you have it, uninstall it.
You must have a smartphone connected to your computer in “Download” mode and run the Odin program with administrator rights. To do this, right-click on the program icon and select “Run as administrator” from the menu.
The new firmware must also have already been downloaded and its files must be in a folder that does not have a Russian-language path. The firmware can be in the form of several files or one. Depending on this, the procedure for flashing Samsung firmware via Odin will differ. Let's look at both options.
Installing single-file firmware
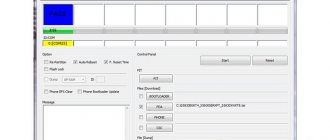
If the program normally detects the connected phone, the name of the port to which it is connected should appear in the “ID:COM” field, and below you will see the inscription “Added”. If everything is fine, then you can proceed with the actual firmware.
- Press the "AP" or "PDA" button depending on your Odin version.
- Select the folder in which the firmware is located, and then its actual file.
- Go to the “Options” tab in the left panel of the program and uncheck all the boxes there, except for “F.Reset Time” and “Auto Reboot” - you need to leave them.
- Click the "Start" button at the bottom of the Odin window. The firmware installation process will begin. In this case, different logs are displayed, and progress can be tracked using the indicator strip.
- When the process is completed successfully, “PASS!” will appear in the upper left corner.
Now you can disconnect your smartphone from the computer, exit Odin Mode, and turn it on again. Read more about this.
Installing multi-file firmware
Such firmware usually contains some changes and improvements. It is also used when restoring a phone after serious failures.
The process is, in principle, very similar to installing a single-file firmware, only here on the right side of the Odin program you need to click all the buttons and select the appropriate file for them. This is necessary because each file corresponds to its own firmware section, and you need to select them separately.
The labels on the buttons and the names of the files are similar, so it won’t be difficult to figure out which file corresponds to which button.
After selecting the files in the right panel on the “Option” tab, also uncheck all the boxes except “F.Reset Time” and “Auto Reboot” and click the “Start” button. All you have to do is wait until the process is completed and the phone can be turned off.
As you can see, it’s not much more difficult to reflash your gadget this way.
How to flash a Samsung device using Odin - step-by-step instructions
Before you start flashing the device, you need to enable a special mode so that it can work with Odin. To do this, you need to turn off your smartphone and simultaneously hold down the volume down, “Home” and device power buttons.
Single-file firmware
Turn on the Odin program. Place the downloaded firmware file in the AP or PDA field.
Click the Start button. The whole process takes 2–5 minutes. When it ends, the empty square will turn blue, and a large inscription PASS will appear in it. Your Samsung will reboot. This will complete the firmware; you can disconnect the device from the computer and check it.
Multi-file firmware
Launch the Odin program.
You have several files. Each of them must be inserted into the appropriate field (instead of “..." there will be a certain set of characters):
- PIT file - not available in all - in the PIT field
- APBOOT_"...".tar.md5 in the BL or BOOTLOADER field
- CODE_"...".tar.md5 in the APB or PDA field
- MODEM_"...".tar.md5 in the CP field, CSC_"...".tar.md5 in the CSC field
Now click Start and wait a few minutes. A message will appear indicating that the firmware has been completed, the device will reboot, and you can disconnect it from the computer. Samsung will reflash it.
Recovery Mode
To install custom Recovery, you must first download it. The main rule here: there is no universal Recovery. Search specifically for your model. The TWRP recovery option is popular, link: https://teamw.in/twrp_view_all_devices.
If the Recovery file is in .img format, then it must be converted to .tar, otherwise Odin will not be able to flash the smartphone.
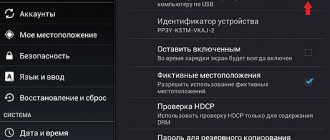
Before installing the firmware, you should change some parameters in the settings. To do this, go to “Settings” -> “Developer Options”. And in this menu you need to enable USB debugging.
Then enable “OEM Unlock” and disable “Remote Management”.
Now open Odin and place the downloaded file in the AP field. Click Start and wait a few minutes. The device will reboot and Recovery will be flashed. You can disconnect the device from the computer.
Core
The kernel is flashed in the same way as Recovery. Download the required firmware file. In the developer menu, enable USB debugging, OEM unlocking, and disable Samsung remote management. Then open Odin, put the file in the AP field and click Start. When the device restarts, you can disconnect it from the computer. The firmware will be installed.
If custom firmware is installed
Flashing a custom system build is no different from flashing an official one. First, download the latest version, open the Odin program and place the firmware files in the appropriate fields. Then click Start, wait 2-5 minutes until the PASS message appears on a blue background. Now the smartphone will reboot and the firmware installation will be completed. You can disconnect the device from the computer.
Some custom firmwares have a more convenient installation method. In particular, the developers of Cyanogen Mod have made an installer that goes through all the steps on its own. All you need to do is download it to your computer, connect your mobile device to your PC and follow the instructions of the program. After a few minutes, the installation will be completed and you will be able to use the fresh Cyanogen Mod. You can also update Cyanogen Mod conveniently and simply.
How to exit Odin Mode
After successful flashing and disconnection from the computer, your phone will remain in Odin Mode. How to get out of it, because the touch screen doesn’t work here and there’s nothing to choose there either.
It’s very simple - press and hold the “Home” “Volume +” button and the power button for a while. The phone will turn off and then you can turn it on as usual.
Share in the comments if you have ever had to flash Samsung phones and what difficulties you encountered. Any experience will be useful to other readers.