Data transfer rate
If you are just going to buy a smartphone, be sure to pay attention to its characteristics. The fact is that different models have different data transfer rates. It is rarely written in numbers - instead, the supported communication standards are indicated in the characteristics. Here is a list of them in order of increasing speed:
- GPRS;
- EDGE;
- 3G;
- 4G (LTE);
- LTE Advance.
Focus on this point in the specifications if access to the Internet is very important for you. Also remember that not all operators have 4G equipment in absolutely every major city in our country. And there’s nothing to say about towns and villages - a 3G smartphone will do just fine in them.
You can also pay attention to the supported Wi-Fi standard. In the vast majority of cases, we transfer data using Wi-Fi 802.11n. But recently, routers supporting the 802.11ac standard, which provide very high speeds for receiving and transmitting information, have become increasingly popular. If you plan to install such a router in the near future, then it is advisable to purchase a device that is capable of working with the above-mentioned Wi-Fi standard. However, this is not at all necessary.
Features of Internet connection on a push-button telephone
Ten years ago, push-button phones were very popular, but now they are used much less frequently, usually for calls and SMS. But it may happen that the only device for accessing the Internet will be just such a device, for example, Nokia or Samsung. Then, of course, you are wondering how to enable mobile Internet on such a device?
There are few differences in the initial connection of a modern smartphone (see the point about APN) and a push-button mobile phone. You'll have to do a couple more steps and that's it.
For example, we can consider a typical Samsung push-button.
Setting up a Wi-Fi network
But enough talk about theory. It's time to talk about how to set up the Internet on Android. You should start by setting up Wi-Fi. This is usually where novice users have problems, since this process is almost not automated. Note that the easiest way is to connect to your own router. It’s a little more difficult to do this with friends, at work, or somewhere else. So, you should do the following:
Step 1 : Go to Settings. If the corresponding icon is not in the notification panel, then find it in the menu.
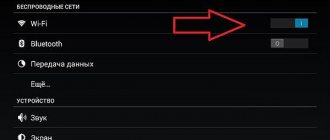
Step 2. Go to the "Wi-Fi" section. On some devices there is a switch next to it. It needs to be switched to the on position.
Step 3. If there is a checkbox in this section, then activate it.
Step 4. Now click on the name of the Wi-Fi network with which you want to turn on the Internet on Android.
Step 5. If the network is protected, then enter the password for it. For greater convenience, you can check the box next to the “Show password” item. When you are finished entering your password, click on the “Connect” button.
That's all. Now your smartphone has remembered this network and will connect to it automatically. It’s the same with public networks - if you’ve already connected to one once, then in the future in this place your device will connect to it independently. Although there are exceptions.
Setting up the Internet on your phone manually
How to set up an “Iota” access point on an Android smartphone
Now, more about setting up APN.
How to set up APN on iOS devices
- Insert the SIM card and turn on the smartphone.
- Go to “Settings”
- Select “Cellular”, “Cellular Data”.
- Enter the operator settings in the appropriate fields. If there is no data, leave the field blank. Select two options in APN TYPE - “default” and “supl”.
- Click "Save".
- Reboot the device.
How to set up APN on Android devices
- Insert the SIM card and turn on the smartphone.
- Go to the “Settings” item.
- Select “More” > “Mobile network”, check the “Data transfer” box.
- Select “Access Point”, click “Create New”.
- Create a point using operator data.
- Reboot your device.
How to set up APN on Windows mobile devices
Everything is the same as in the first two cases, only in the “Access Point” item you need to click on the plus,
and then fill out the form with the operator settings.
Next - “Save”, check the status, it should be “active”. Then you need to restart your smartphone.
Using WPS
You can connect to your friends' Wi-Fi using another method. It consists of pressing the WPS button on the router. This allows you not to enter a password and network name. But first, you also need to press the WPS button on your smartphone or tablet - in this case, not physical, but virtual.
Please note : some modern Android smartphones (based on Android 9 and higher) may not have WPS.
This is done as follows:
Step 1 : Go to Settings.
Step 2. Go to the “Wi-Fi” section we already mentioned.
Step 3: Activate the switch if necessary. Then click on the "Options" button. On many devices it is made in the form of a vertical ellipsis and is located in the upper right corner.
Step 4. Click on “Advanced Features”. On some gadgets, this step is skipped, since the “WPS” item is located directly in the context menu.
Step 5. Click on the “WPS Button” item.
Step 6. Next, you have about one minute to press the WPS button located on the router body. If you did not have time to do this, try again after a few minutes.
After this, the smartphone will connect to the network distributed by the router, as a result of which you will be able to access the Internet.
method: Via SIM card of a mobile operator
Immediately after installing the SIM card in the smartphone, it is automatically configured and connected to the global network. The cellular company sends special information to the phone, and the parameters are set independently without the intervention of the gadget owner. Unfortunately, in our world there are always exceptions, and sometimes manual configuration is required. To do this, you need to take the following steps:
- Using the description of the first step from the first instructions of this manual, open “Settings”;
- Next, go to the “More”, “Other networks” or “Other networks” tab (depending on the OS version);
- Click “Mobile networks”;
- Go to “Access points (APN)”, but sometimes there is no need to go, and the desired menu opens already at this stage of the action;
- Add an access point, most often this is done by clicking on the “+” icon;
- In the “Authentication Type” section, specify “PAP”;
- In “APN Type” type “default, supl”;
- Click “Ok”;
- In the “Name” column, type the name of the mobile company providing global network access services;
- In the “Access point or APN” column, type the address of the communication service provider, for example, for “TELE2” you need to enter “internet.tele2.ru”, for “MTS” you need to type “internet.mts.ru”, and for “MegaFon” you will need indicate “internet” (the figure below shows a screenshot with an example for subscribers;
- Click “Ok”;
- Then print the login and access code, for example, Beeline clients need to enter “beeline” in both fields, MTS subscribers, respectively, “mts”, the MegaFon operator uses “gdata” as the name and password, and for “TELE2” you don't need to enter anything;
Note: all companies providing cellular communication services indicate passwords and logins on their official Internet resources, so if in the above examples there is no data to enter, you can find them out by visiting the operator’s website or calling them by phone.
Setting up GPRS, EDGE, 3G and 4G
Setting up mobile Internet makes everything easier and more difficult at the same time. Usually, the user does not need to delve into the settings at all - telecom operators send a special file that automatically enters all the parameters. This does not happen only in the most extreme cases - when your model of smartphone or tablet is not in the operator’s database. But believe me, these databases are so extensive that all sorts of Chinese nonnames can’t be found there. If you are unlucky, you will have to configure Internet access manually. This is done on Android as follows:
Step 1: Go to Settings as you did before.
Step 2: Go to the "Other Networks" section. In some smartphones and tablets it may be called “Other networks” or “More” - it all depends on the translation.
Step 3. Here you need to click on the “Mobile networks” item.
Step 4. Then everything depends on the specific software implementation. On some devices you will be taken to a menu like the one shown in the screenshot below. In this case, you need to open the “Access Points (APN)” item. In other models, the corresponding settings may immediately open.
Step 5. Be that as it may, you need to add your operator's access point if these parameters did not arrive after you inserted the SIM card. In our case, this is done by pressing the button with a plus sign.
Step 6: After clicking the corresponding button, you will see many fields. First of all, pay attention to the items “Authentication type” (can also be called “authentication type”) and “APN type” (on older devices it is called “Access point type”).
Step 7. In the first step, you must select “PAP”. This type of authentication is used by the vast majority of cellular operators around the world.
Step 8. In the second field, manually enter “default, supl” - without quotes and spaces, as in the following screenshot. Click OK.
Step 9. Next, pay attention to the topmost item “Name”. Here you need to enter the name of the access point - usually the name of the telecom operator is entered here.
Step 10: Finally, tap on the “APN” or “Access Point” option. Enter your operator's specific Internet address here:
- MTS - internet.mts.ru
- MegaFon - internet
- Beeline - internet.beeline.ru
- TELE2 - internet.tele2.ru
Step 11: Next, enter your username and password:
- MTS - mts and mts
- MegaFon - gdata and gdata
- Beeline - beeline and beeline
- TELE2 - both fields are empty
If you use the services of some smaller telecom operator, then you can find out its settings by visiting the official website. You can also call the call center - they will tell you the APN, username, and password.
Methods for connecting the Internet to your phone
Let's take a closer look at the possible ways to connect your phone to the World Wide Web.
Internet access using a computer's USB cable
Sometimes you may need to view data on a big screen, but what if you only have Internet on your phone?
In this case, we use the smartphone as a USB modem. Then access to the cellular operator’s network will be possible from a computer. An alternative method would be to distribute Wi-Fi from your phone, but it has a significant drawback: when operating in this mode, the smartphone battery quickly drains. While when working via cable, the smartphone will not “die”, since its battery is charged simultaneously with data exchange. To connect such a “modem” you do not need to install additional programs, drivers, or make complex settings on the computer itself. All you need to do is enable Mobile Data on your phone, connect the phone to your computer via USB, and then activate USB modem mode in the settings.
Please note: In general, mobile phone plans provide limited data. If you exceed the limit, an additional fee will be charged, so it is recommended to first check the tariff conditions with the operator.
To connect via the mobile Internet of a smartphone running Android, you must perform the following steps:
- Enable mobile data (as a rule, on Android smartphones, mobile data can be connected via the “curtain”).
- Then you need to connect your smartphone to your computer or laptop via a USB cable.
- Next, you need to go to “Settings” > “Connections” > “Access point and modem”.
- Move the “USB modem” mode switch to the active position.
- In the next few seconds, your computer will have access to the Internet via mobile data.
- A new Ethernet connection will appear in the Network Connections folder.
To turn off the Internet on your computer, just move the “USB modem” mode switch to the inactive position.
Important: tariff conditions sometimes prohibit using the Internet when using your phone as an access point. The operator can limit the speed of access to the Network when distributing both via Wi-Fi and via USB or completely block the connection.
Attention: if the provider does not prohibit distributing the Internet through the phone, the Internet works on the phone itself, but not on the connected computer, to check you need to temporarily disable the firewall and antivirus.
It may happen that sites do not load with such a connection, but programs, for example, Skype, ICQ, work. Then you need to enter the DNS values manually in the settings of the new connection.
Using your cellular operator settings
After purchasing a smartphone, no matter how functional and modern, any user will first insert a SIM card into it and get in touch with the mobile operator.
In order for the services to work, an initial setup of mobile data is required. How does this happen? Usually, as soon as the subscriber inserts a SIM card, it is immediately activated. Often the necessary settings are written in the firmware of the phone itself, so it connects automatically; you don’t need to turn on anything additional. But sometimes there are times when a manual configuration method is required.
When you connect for the first time, you need to set up APN on your phone. APN (translated from English as “access point name”, Access Point Name) is a node that allows the phone to exchange data over cellular operator networks (4G, 3G and others).
When the phone establishes a connection with the operator, the operator automatically reads the data being sent, using which it provides settings for accessing the Network. If you specify them incorrectly, access to the Network will either not appear at all, or MMS, WAP and other services will be turned on incorrectly. Incorrect tariffication of services (traffic, minutes, etc.) is also possible. After entering the correct data, services are activated immediately. Detailed instructions for different operating systems are located below in the paragraph “Manually setting up the Internet on your phone.”
Connect to the Internet using a Wi-Fi connection
Wi-Fi connection is no less popular when connecting to the Internet via a smartphone than using mobile Internet.
On iOS: “Settings” > “Wi-Fi” (slide the switch) > select a network from the list of available ones, enter the password > click “Connect.” (or "Join")
On Android: “Settings” > “Connections” > “Wi-Fi” (slide the switch) > find yours in the list of available networks, enter the password > “Connect”.