When working with photographs, some users are interested in the answer to the question of how to change the creation date of a photo in order to change the metadata. After taking a photo, additional information with related information appears in the image file.
Digital cameras use the EXIF (Exchangeable Image File Format) standard, which adds comments to photo files. This additional information (metadata) describes various shooting options.
Metadata may vary depending on the camera manufacturer. In most cases, the following data is written to EXIF:
- camera model and manufacturer;
- aperture, shutter speed, ISO, etc.;
- whether a flash was used when shooting, resolution, focal length, etc.;
- geographical coordinates;
- date and time of shooting.
We are interested in information about the date and time the photo was taken because we need to change the date the photo was taken. Changes in metadata may be required in some situations: the camera settings have been lost and therefore incorrect information is stored, it is necessary to set a different shooting time than the actual one, changing the date to a later or earlier period.
Where to view photo metadata
After moving the photo to the computer, the user can view the saved metadata of the image. This information is in the file properties of this image.
You need to do the following:
- Right click on the photo.
- From the context menu, select Properties.
- In the "Properties: X" window, open the "Details" tab.
- Along with other information, the metadata contains information about the date of shooting.
To change the parameters for creating a photo, you need to edit the EXIF data. We need to change the shooting date and time.
In this guide, we'll look at how to change the creation date of a photo on your computer. The instructions in this article use tools from the Windows operating system and free graphics programs.
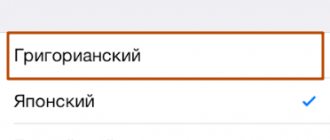
How to View the Date of Photos and Videos in the Photos App on iPhone
You might change your mind about putting a date on photos stored on your iPhone after you become familiar with the standard tools for sorting content by date in the Photos app.
To see all the photos or videos taken on your iPhone in a specific year, open the standard Photos app, go to the Photos tab, and select Years.
Similarly, you can sort your existing photos and videos by month and day through the Months and Days sections, respectively.
To view a list of all photos and videos in chronological order, use the All photos section.
In addition, the shooting date and time are always displayed above each photo or video.
♥ ON TOPIC: How to give your Wi-Fi password to guests without giving it away (QR code).
How to change the shooting date in photo properties
The easiest way to change information about a photo's creation date is to edit the capture date in the image file properties. This can be done using the Windows operating system.
Go through the steps:
- Right-click on the file.
- In the context menu, click on the “Properties” item.
- In the window that opens, go to the “Details” tab.
- Select "Date taken".
- Click on the date and select the appropriate value: year, month, day.
- Click on the "OK" button.
Using this method, you can change the shooting date, but the time the photo was taken will remain the same.
Like on Samsung a50 | s8 | s7 | a30 | a7 | j6 | a7 | a9 enable date from phone camera
To include the date on a photo from a camera, you need to install the “Data Camera” application; it can add the current date and time to you.
Alternatively, you can add a note on the day you add the line.
You can type somewhere in the note to display the city name, latitude and longitude. (You need to turn on internet or GPS to get location information).
You can drag the date and time off the screen and restore the default position.
When you're done, save the photo or share it with friends by directly tapping the share icon.
You can also hide date or time information by setting the format to invisible.
How to change the shooting date in Windows Photo Gallery
The free Windows Photo Gallery app is part of the Windows Live Essentials suite of apps. At this point in time, Microsoft has stopped distributing the main components, but the programs included in them continue to work in the operating systems Windows 10, Windows 8.1, Windows 8, Windows 7.
The article Windows Live Photo Gallery has a link to download the Windows Live core components on your computer. The user can choose what to install on the PC, for example, only Photo Album or Windows Movie Studio, without installing other components.
In the Photo Album program, you can change not only the shooting date, but also enter a different time when the shooting was taken into the photo properties.
The procedure in the Photo Album program is as follows:
- Add a photo to the program through the menu or drag an image from your computer into the application window.
- Open the View tab.
- In the “Show Details” group, click on the “Take Date” button.
- Navigate to the desired image.
- Left-click on the date to change this information, and then on the shooting time to modify this setting.
Group change of shooting date in Explorer
Built-in system tool - file manager Windows Explorer can change the shooting date settings of several photos in batch mode.
Follow these steps:
- Open your photos folder on your computer.
- Select a group of images in a photo folder.
- In the Explorer window, go to the “View” tab.
- In the "Areas" group, click the "Details Area" button.
- Information regarding the selected photos will appear on the right side of the window. In the “Date of shooting” item, change the original data to others.
- Click on the "Save" button.
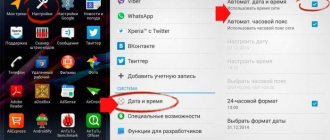
How to put date and time on a photo in Android?
How can I make a photo in Android display the date and time it was taken (without transferring the photo to the computer)?
Which Android applications allow you to set the date and time on a photo?
On existing photographs, you can set the date and time manually using editors, but this is unlikely to be of interest to anyone. But you can make sure that future photos have the date and time.
To do this, you will have to download an application, such as DateCamera. The application configures the date and time format (hours, minutes or hours, minutes, seconds), color, font size. We take photos with a special button and get photos with the date and time.
If you still need to put dates on existing photos, you can use the Timestamp Photo and Video Free application. Upload photos from the gallery and process them.
If you need to put the date and time (or just the date) on a photo on Android , then you can do this:
1) Use applications with which you can add text to images - that is, write the date / time yourself.
2) Use applications that set the date/time automatically.
The first method, of course, is not entirely convenient - it need not be particularly considered.
As for specialized free applications for setting the date and time, I can highlight 2 of them:
2) Timestamp Photo and Video Free.
Next I will write in detail about how to use them.
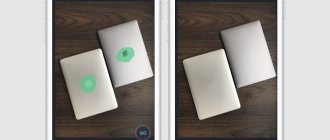
This is a camera with the function of setting the date and time on the photo.
If you need to process existing photos, then DateCamera will not work; But if you need to take a new photo with the date/time, then this application can be used.
You can customize the appearance of the inscription:
It's the first button on the left (labeled "Size").
It's the second button from the left (labeled "Format").
Here you can even turn off the time display (so that only the date is displayed) - this is very convenient.
It's the third button from the left (labeled "Format").
It's the fourth button from the left (labeled "Color").
After setting all the settings, you can start shooting.
There is a special round button on the right side for this (highlighted in the screenshot with a red rectangle):
Click on it and you will get a picture with the date/time displayed.
In the phone (smartphone) gallery it can be found in the “DateCamera” folder.
Timestamp Photo and Video Free
This application, unlike DateCamera, allows you to put the date/time on an existing photo.
How to change the shooting date of a photo in XnView
Free program XnView is a viewer of graphic formats. XnView is a powerful program that can help you edit photo metadata.
Go through the following:
- Open the file in XnView.
- You need to open the "EXIF" tab located below the viewing area.
- In the “Date of shooting” item, change the date and time the photo was taken.
How to Add Date and Time to Photos Using Android
There are situations when you need to add date and time to photos. In this article, we will discuss several apps that will help you add a date and time stamp directly to the photo itself, right on your Android device.
If you've ever owned a camera, then you probably remember having a feature that left the date and time the photo was taken in the corner of the photo. I remember this feature from the days of film photography. Modern digital cameras store this information in EXIF data, which is attached to the image file.
How to change the shooting date of a file in FastStone Image Viewer
FastStone Image Viewer is a free program for viewing and processing images. FastStone Image Viewer has a tool for changing EXIF information in digital photos.
You may also be interested in:
- Resizing photos online and on your computer
- How to make a watermark on a photo online or in the program
In FastStone Image Viewer, do the following:
- Open the folder with the photo in the program window.
- Select a photo.
- Right-click on the image.
- From the context menu, first select “Tools” and then “Change selected date/time”.
- In the “Change date/time” window, in the “Change:” field, select “date/time in EXIF (date/time of shooting)”.
- Specify the desired values, and then click on the “Apply to selected” button.
How to set the date and time in Samsung Android A50 | s8 | s7 | a5 | a7 | j6 | a7 | a9 | a30
You can use the Photo Stamper Lite application on Samsung Android. It's a free tool that extracts the date and time a photo was taken from the file properties and then places it in the corner of the photo.
Once launched, the screen will be divided into three tabs. Before choosing a photo to apply markers to, let's first go to the middle tab with settings.
By default, the token is set in a format such that, for example, December 9, 2014 is saved as September 9, 2014.
If you prefer a different date format, fortunately you can quickly change it using a template.
In the “Stamp Text” field, change the order of the letters instead of “y- m- d”, enter, for example, d- m- y”.
In the preview below, you will notice that the date will now display as 9-12-2014. Additionally, we can set the position of the marker on the photo using the "Change Text Position" option.
Then go to the first tab and select "Import from Gallery". Specify the photos from your smartphone memory that you want to put date and time on. They will be added to the list.
Finally, go to the last tab, make sure that the “Use data stored in EXIF” option is selected (this option is responsible for loading the correct shooting dates for individual photos) and click the “Start printing images” button.
Tags will be added and our photos will be saved again in a separate album in the gallery.
How to shift EXIF date in IrfanView
The free program IrfanView is designed for viewing and processing files in graphic formats. The IrfanView application has a tool for changing the shooting date attributes in EXIF, which is added to the program using a plugin.
In the IrfanView program, follow the steps:
- You need to add a photo to the program window.
- Enter the "Service" menu.
- In the context menu that opens, click on “Change shooting date/time in EXIF... (plugin)”.
- In the “Change shooting date and time in EXIF” window, select a new date and time.
- Click on the "Run" button.
How to remove the date from a photo on a Samsung phone
Now let's consider the opposite situation, when you need to remove unnecessary information from a photo on your phone. There are three ways here:
- Uncheck the option to set the date and time on the photo in the settings of your Samsung phone.
- Cut out the information using any of the graphic editors or cover it up with an eraser.
- Use special phone apps. To remove unnecessary information, you can use Photo Exif Editor software. Its capabilities allow you to adjust the location of photography, add and change tags, make changes to the date/time and solve other problems.
Now you know how to enable and set the date on a Samsung photo, and what to do to disable it or delete it if necessary. Please think again before adding information. It may be better to immediately stop applying the day and time than to look for ways to remove them later.
Editing EXIF in ShowEXIF
ShowEXIF is a free program specifically designed for editing photo metadata. Using ShowEXIF you can change the time the photo was taken to another. The ShowEXIF program does not require installation on your computer and supports the Russian interface language.
If the program opens in English when you first launch it, go to the “File” menu, click on “Language”, select Russian.
You need to do the following:
- Using the folder tree, open the folder in the program that contains the desired photo, and then select this photo.
- Enter the “Tools” menu, in the context menu, alternately click on “Operations with Date/Time” and “Change date and time in the Exif section”.
- In the “Enter a new date and time” window, fill in the fields with the new data.
- Click on the "Record" button.