How to edit a face picture correctly
The functionality of these services is quite similar to the specifics of working with desktop photo editor programs, allowing you to easily retouch photos online for free without registration. You go to the network resource I specified, upload the desired photo of the face (usually a portrait type), and then go to the photo editing window, where various tabs are located. By switching these tabs and choosing between the tools available there, you make the necessary changes to the image, then click on the “Save” button and download the result to your PC.
At the same time, a number of services have an automatic retouching function, when all operations on your photo are performed automatically, and you almost immediately receive an improved version of your photo, which you then save to your hard drive.
The result speaks for itself
Instructions for adding a caption to a photo are in my last article!
Let's start retouching
Here is our photo. As we can see, you need to smooth out facial wrinkles on the forehead, remove small pimples and red spots, and even out the skin structure.
First, create a copy of the photo using the Ctrl+J combination and work on it. The main tool we will be using is the Spot Healing Brush.
Healing brush
This is a universal thing that can be used to remove almost all visible skin defects. Usually this tool is enough for quick retouching.
Having activated the tool, simply left-click on all areas of the skin that we want to retouch. In this way, the repair brush adapts to the skin color and removes imperfections.
Look what we came up with. The face has already become much cleaner, and we only used one tool!
Now let's make the skin texture a little smoother and more even. To do this, create a copy of the edited layer using the Ctrl+J key combination we already know.
Blur
Next, in the top menu, go to “Filter” – “Blur” – “Blur on Surface”. Set the settings as shown in the screenshot and click “OK”.
While holding down the Alt key, click on “Add Layer Mask”. The color of the created layer mask will be black, so you will need to paint on it with a white brush. This way the blur will be transferred to the layer mask, and the layer will remain untouched.
Next, take a brush with minimal hardness and select white as the main color. At the top, we set the settings for the brush to approximately the same as shown in the screenshot. And now we simply move over the uneven areas of the face, smoothing them out.
That's it, quick face retouching is complete. We evened out the tone and eliminated all visible imperfections. In this way, you can retouch not only the face, but also any area of the skin: back, shoulders, arms, etc.
Now let's compare the original and our edited photo. The result is excellent, what do you think?
Makeup.Pho.to - erases acne, smoothes wrinkles on the face
This service positions itself as an online photo editor with great capabilities from the company VicMan Software, which, moreover, has released a mobile application Visage Lab, similar in functionality, with a fairly extensive toolkit for photo retouching.
- To perform facial retouching online using this service, go to https://makeup.pho.to/ru and click on the “Start retouching” button.
- Select where you will import the photo from (computer or Facebook) and upload the required photo to the resource.
Decide on the photo source
After uploading the photo, the service will automatically retouch the photo online. Options such as skin retouching, wrinkle smoothing, anti-glare, teeth whitening, and so on will be automatically applied. After viewing the result, you can remove any of the options by unchecking the corresponding box and clicking on the “Apply” button.
Automatic options for the Makeup.Pho.to service
If necessary, you can click on the “Effects” tab on the left and select any of the effects (Dreamy Retro, Poster Look, Phantasy Blue and others).
To save the result, you must click on the “Save and Share” button below. In the screen that opens, select “Download”, right-click on the image that opens and select “Save Image As” to save the photo to your PC.
Transforming photos in Photoshop
In this tutorial I would like to show you how to turn an ordinary photo into a fabulous one, and also show you different ways to use chiaroscuro.
Final result
Source materials :
Archive
Step 1 – Preparing the Background Open the photo of the girl in Photoshop. Now this photo is a little boring, an ordinary photo. The photo was taken during the day, but you want to turn this photo into a creative one. You also want to change the soft and diffused light to an accented light coming from the butterfly. In this tutorial, you will learn how to do this.
Let's start by cleaning up the background. There are several distracting bright spots in the image (See screenshot below). We will remove them in this step.
Create a new layer above the Background (BACKGROUND) and name it, for example, Background Retouching (BACKGROUND RETOUCH).
You can find the Create a new layer at the bottom of the Layers palette. If you don't see this layers palette, just press F7 on your keyboard or go to Layers and it will appear.
Select Stamp Tool (S) and darken the lightest areas of the bokeh. (If you don't know how to use the Stamp Tool, you can watch this video).
After this step, your background should look like the screenshot below.
Step 2 – Preparing the Girl's Selection In the next step we will adjust the bottom part of the background – the leaves. So that we can only adjust them and not the rest of the image, we will need to create a mask of the girl and the forest in this step.
We will need to create a mask with sharp edges, for this we use the Lasso Tool (L). For the forest, you should create a mask with a soft transition along the horizon. For this, it is ideal to use the Brush Tool (B).
Go to the Background (BACKGROUND) and select the Lasso Tool (L). Next, select the girl. You do not need to be careful when selecting the central part of the girl’s body, but you must be careful when selecting the lower part.
I know that highlighting is boring and there is little creativity involved in creating manipulations, but it is an important part of creating a realistic image. Therefore, try to be patient.
In the screenshot below, you can see how the lower body mask should look.
Click the Edit in Quick Mask Mode (Q) button, which can be found in the toolbar (or just press the Q key on your keyboard). In this mode, the mask will turn red.
Select the Brush Tool (B), select a soft round brush and select black color. Next, paint over the forest. You should end up with something like this:
Press the Q key to return to normal mode. You only see the boundaries of the mask.
So that we can work with the mask later, we need to save it. To do this, go to Selection – Save Selection (Select > Save Selection) and save it under the name, for example, Leaves (LEAVES).
Let the mask remain active.
Step 3 – Adjusting the Leaves In this step we will change the color of the leaves to give them a little more magical atmosphere. To do this, we use two adjustment layers – Selective Color and Hue/Saturation.
Using adjustment layers is much better than making adjustments directly. Any changes you make using adjustment layers can always be undone. In the case of making a correction directly, you can make as many changes as the History , plus you will lose all the last steps.
At the bottom of the Layers palette, you can find the Create new fill or adjustment layer in the same place as the new layer mentioned in the previous steps.
Let's start with Selective Color . Click the Create new fill or adjustment layer and select Selective Color . Set the values as in the screenshot.
Now you can see that due to the fact that we had the mask active (in the previous step, we did not remove the selection), the adjustment layer only affects the leaves. The mask thumbnail shows which parts of the image have been corrected - this is shown in white, the part without correction is shown in black.
Let's continue, then saturation. Before we create a Hue/Saturation adjustment layer , we need to activate the mask again. To do this, press Ctrl + click on the thumbnail of the Selective Color . The mask became active again.
Next, create a new adjustment layer Saturation , and set the values as in the screenshot below.
Since we have an active mask, again only the leaves will be subject to color correction. At this point, your image should look like the screenshot below.
Step 4 - Reduce the Saturation of the Forest In the previous step, we added cool shades to the leaves. In order to create balance, we must also give the forest in the background cool tones. To do this, we will once again apply adjustment layers, this time Color Balance and Saturation .
If we look closely at the forest, you can see green moss, which is a bit distracting. In order to reduce the saturation a little and not distract our attention, add a new adjustment layer Hue/Saturation (Hue/Saturation) and set the Saturation to -100.
Translator's note: simply create a new adjustment layer on top of all layers.
Click on the adjustment layer thumbnail. Select the Paint Bucket Tool ( G) and fill the miniature with solid black. The adjustment will disappear.
Select the Brush Tool, select a soft round brush, lower the Opacity of the brush to about 30%. Set the color to white and paint over the green parts of the forest. In areas of staining, correction will again appear and, accordingly, the saturation of moss on the trees will decrease.
Translator's note: once you have created the adjustment layer, fill the layer mask with black, before starting, click on the layer mask thumbnail to activate it, then go Editing – Fill – Black (Edit – Fill-Black). Next, select a white brush and use a layer mask to paint over the trees.
Step 5 – Adding Shades of Blue to the Forest Next, it's time to apply Color Balance , as I mentioned in the previous step. We'll apply an adjustment layer to create a colder and more magical atmosphere.
Create a new adjustment layer Color Balance and set the values as in the screenshot below.
We want to change the colors of the forest, but the entire image. We need to change the layer mask of the adjustment layer. Same as in the previous step, select the Bucket Tool (G) and fill the layer mask with solid black. Next, select the Brush Tool (B) and paint white over the forest so that the Color Balance correction appears again .
In the screenshot above, you can see where I painted in white. You may have noticed that I also colored the girl's hair to give it the same shade as the background. At this point, your image should look like the screenshot below.
Step 6 - Add Fog If you've read my tutorials, you may know that I really enjoy using fog to create a magical and fantastical atmosphere in my artwork. And this work is no exception, so in this step we will add fog along the horizon. Download the brushes linked at the beginning of the tutorial (or any other brushes that imitate fog that you are comfortable using), install the brushes in Photoshop. (If you don't know how to install them, you can watch this tutorial)
Create a new layer on top of all layers and name it FOG. Select the Brush Tool (B) and select one of the brushes you just installed. Hold down the Alt key to activate the Eyedropper Tool (I) and select some very light shades in the background. It is best to avoid using pure white and black in your work because they are rare in life. Often you will see lighter shades of blue, yellow or green instead of shades of white and black, such as brown instead of white. These shades do not look as harsh and look more realistic.
Enough talk, just draw the fog. Below in the screenshot you can see where I drew the fog to give you an idea. The mist is located behind the girl, so avoid applying the mist on top of the girl.
Step 7 – Change the color of the sweater You have already gotten rid of two distracting things - too white bokeh and moss green. Another thing that, in my opinion, distracts attention is the yellow sweater on the girl. In this step, we will change the color from yellow to blue.
First we need to select the sweater. Select the Lasso Tool (L) and create a mask.
Without removing the selection, create a new adjustment layer Saturation on top of all layers and apply the following values, as in the screenshot below.
Below, we can see what the image will look like after seven steps.
Step 8 - Darkening the Background This step is very quick. We'll just darken the leaves and forest a little. To do this, we will create a new adjustment layer Levels and set the following values to 0; 0.72; 255.
Fill the layer mask of the Levels adjustment layer with solid black. Select the Brush Tool (B), select a large soft brush, reduce the Opacity of the brush to about 40%. Set the color to white and paint over the background. In the screenshot below, you can see the area highlighted in red where I painted over with the brush As you can see, I tried to be precise and used a soft transition to get a natural look.
Step 9 – Create a Glow for the Girl As you can see in the final image, there is a strong light source (butterfly) above the girl. In this and the following steps, we will add and change the light in the image to achieve the same effect.
In this step, we will focus on creating a glow on the girl's face and hair. This step would make the tablet easier, but a mouse can also be used. All you need is a little more patience to get wonderful strokes. Create a new layer on top of all layers and name it something like Glow on Girl. Select the Brush Tool ( B) and set Diameter of the brush to 1-2 px. Opacity set to 60 - 70%. Hold down the Alt key to activate the Eyedropper Tool (I), select light blue shades in the image.Next, start painting the edges of the girl's hair and face, which should be lighter due to the glow of the butterfly.
In the screenshot below, you can see where I painted. I specifically used a black background so that you could clearly see the areas that were painted over.
As you can see, I painted the “top” of the face - the nose, cheeks, forehead and borders of the lips. I also added some highlights around her hair and little spots of light on her eyes. You must repeat all this.
Step 10 - Changing the Light on the Clothes and Trees Let's focus on adding light and shadows to the clothes and trees. Similar actions as in the previous step, only in this case, we will not paint on an empty layer, but will do it on a layer filled with a gray shade of mid-tones.
Create a new layer on top of all layers and name it something like LIGHT ON CLOTHING AND TREES. Select the Paint Bucket Tool ( G), set the gray color to #808080 and fill the layer with it.
To combine with our image, change the blending mode to Overlay (Overlay). You can find blending modes at the top of the layers palette. (See screenshot below)
Next, we'll use the Brush Tool (B) to lighten and darken some areas. When you apply white, you lighten; when you apply black, you darken.
Set Diameter of the brush to 1 - 3 px and reduce Opacity to about 5%. And paint over the areas where the light from the butterfly falls. Next, switch to black and darken the areas that remain in shadow. In the next screenshot, you can clearly see areas of darkening and lightening. The blending mode has not been changed, it is set to Normal , so you can see the precise strokes, not the final result.
As you may have noticed, the areas of clothing that face closer to the butterfly are lighter, including the trees that face closer. The opposite side of the clothes and trees is darkened. You should also add shadows under the girl and if you want, you can darken the girl's eyes with shadows.
By setting the blending mode for this layer to Overlay (Overlay), your image should look something like this.
Step 11 – Add Shadows In my opinion, the picture will look more dramatic if you add even more shadows. You've already created some of the shadows in the previous step, but in this step we'll add even more shadows.
The process of adding shadows is the same as in step 10. Create a new layer on top of all layers and name it, for example, Additional Shadows. Select the Bucket Tool (G), set the gray shade to #808080 and fill the layer with a gray shade. To combine with our image, change the blending mode to Overlay (Overlay).
Select the Brush Tool ( B), set Diameter of the brush to 2 - 4 px and reduce the Opacity of the brush to 5%. Set the color to black and paint over the shadow areas to make them darker. In the next screenshot, you can clearly see the dark areas, I switched the blending mode back to Normal so you can see the strokes better.
Step 12 – Glow from the Butterfly This step is a very quick one in which we will add a glow to the area where we will add the butterfly in the next steps.
Create a new layer on top of all layers and name it GLOW. Select the Brush Tool (B), select a soft round brush and set the brush size to 350 px. Set the Opacity of the brush to 20%. Hold down the Alt key to activate the Eyedropper Tool (I), select light blue shades in the image.
Just draw one big spot above the girl's head. In the screenshot below, you can see how the image should look at this point.
Step 13 - Additional Adjustments Before we continue to add other compositional elements to our image, we will need to make two minor adjustments - removing the highlights around the girl and adding soft shades.
Let's start by removing the highlights. Create a new layer on top of all layers and name it LESS LIGHT. Fill it again with shades of gray #808080 and change the blending mode to Overlay (Overlay).
Select the Brush Tool (B), set the color to black, Opacity to 5% and paint over the areas that are highlighted in the following screenshot.
Paint black around the edges to create a soft vignette effect.
Let's continue further, then add soft tones. You can do this very quickly by creating a new adjustment layer Photo Filter , create a new adjustment layer on top of all layers and apply the following settings, as in the screenshot below.
After all these steps, your manipulation should look like the screenshot below.
Step 14 – Add a Bokeh Texture Download the Bokeh texture from the link provided at the beginning of the lesson and move it to our document. Place the texture on top of all layers and name it BOKE.
Press Ctrl + T and scale the texture to fit the size of our document. To apply the changes, press Enter.
Next, you will need to change the blending mode to the appropriate one. You want the black to disappear, then the Screen is ideal in this case. So, change the Bokeh blending mode to Lightening (Screen).
As you'll notice, your image is lighter than it was before adding texture. This is because the background texture is not pure black, but has shades of dark gray. To make our image darker again, create a new Levels adjustment layer on top of all layers and darken the image. The values you enter will depend on what texture you are using. For me it was enough to apply the values 32; 0.94; 255, but you should definitely apply values depending on the light level of your image.
In the following screenshot, you can see what the image looks like at the moment.
Step 15 – Add Blue Shades As you can see in the final image, the glow of the butterfly is not white, but blue. Now, the lighting in your image is just a lighter version of the original color. The image will look better if we add more blue tints.
Create a new layer on top of all layers and name it something like Light Blue. Select the Brush Tool ( B), set the brush size to about 40 px and Opacity to 15%. Set the color to light blue and paint over the highlights.
In the next screenshot, you can clearly see areas of adding blue tints. I deliberately placed a background with black in the middle to make it easier to see the changes.
As you can see, the light has become more visible and the contrast is higher. It's all thanks to this simple step.
Step 16 – Blue Color If you want to create a nighttime feel, you will have to add more blue/cyan color to the image. We will make changes in this step.
First, create a new adjustment layer Color Balance on top of all layers and apply the following values, as in the screenshot below:
Due to the Color Balance , the picture became a little oversaturated. To fix this, add a new adjustment layer Saturation and set the Saturation to -20.
In this screenshot you can see how these two adjustment layers affected the image.
Step 17 – Burning the Highlights Before we continue adding other compositional elements to our image, we'll need to make one more adjustment. There are several light areas in the image that cause imbalance. These areas are highlighted in the screenshot below.
To make these areas darker, create a new Levels adjustment layer on top of all layers and apply the following values: 0; 0.67; 255.
Select the Paint Bucket Tool (G), set the color to black and fill the layer mask of the Levels adjustment layer with black. Next, select the Brush Tool (B), set the brush size to 250 px and reduce the Opacity ) Brush to about 25%. Set the color to white and paint over the designated areas.
Below, we can see what the image will look like at this point.
Step 18 – Add a Butterfly Download the butterfly image from the link given at the beginning of the lesson and move it to our document. Place it on top of all layers and call it BUTTERFLY.
Two things you'll need to do before actually compositing are removing the white background from the image and scaling accordingly.
Let's start by removing the background. Select the Magic Wand Tool (W) and click on the white background to select it. Next, simply press the Delete key to remove the selection.
To scale, go to Free Transform or just press Ctrl + T. Scale the size of the butterfly as in the screenshot, also rotate the butterfly image. Holding down the Ctrl key while scaling will help you maintain proportions.
Press Enter to apply the changes.
Step 19 – Overlaying the Butterfly The butterfly you just added has only one purpose - to. To represent the shape where we will later add broken glass shards. To do this, it is best to see the boundaries of the butterfly's outline and not be distracted by its colors.
To reduce the saturation of the butterfly, click on the BUTTERFLY layer and press Ctrl + U to activate the Hue Saturation adjustment . Set the Saturation to -100 to reduce color saturation.
In order to blend the butterfly with the rest of the image, you need to change the blending mode to Overlay (Overlay). Thanks to this mode, you will only see borders that are ideal for our idea.
After this step, your image should look similar to the screenshot below.
Step 20 – Add Glass Shards Making a butterfly from broken glass shards is actually a very easy process. The main thing is to find fragments of the same shape as the outer edge of the butterfly and then move them to the appropriate place. Download the image of broken glass from the link provided at the beginning of the lesson and move it to our document. Place the image on top of all layers and name the layer GLASS.
To blend the shards to match the rest of the image, change the blending mode to Screen . (Remember that you used the same blending mode to blend the bokeh? The principle is the same - you want the black to be transparent and the white to be visible, so the Screen blend is the best choice for you). Now, select the Lasso Tool (L) and select one of the glass shards. Next, select the Move Tool ( V) and move this shard onto the butterfly. Press Ctrl + D to deselect it. Repeat this operation several times , until you completely fill the butterfly's body. This may sound a little boring, but trust me, it won't take more than 10 minutes.
Your butterfly should look similar to the screenshot below after you complete this step.
Step 21 – Glass Adjustment If you look at your image right now, you can see that the butterfly would look better if it were a little brighter. In this step, we will fix this.
Create a new adjustment layer Levels and apply the following values 12; 0.85; 227.
We want to make only the butterfly brighter and more contrast, not the entire image. Fill the layer mask of the Levels adjustment layer with black. Further. Select the Brush Tool (B), set the Opacity of the brush to 100% and set the color to white. Paint over the butterfly.
Step 22 – Add Bokeh Now, the top of the image is too empty and uninteresting. The entire image also appears static. A small addition of bokeh will help us. The bokeh in this image isn't just because it looks pretty or anything like that. In fact, bokeh A) represents blurry shards of glass and B) helps create a sense of space.
Move the “big bokeh” texture onto our document and place it on top of all layers. Name the new layer LARGE BOKEH and change the blending mode to Lightening (Screen).
Since you want to create a feeling of space, this bokeh should create that feeling in front of the girl. Therefore, this bokeh should be larger than the other bokeh in the image. To do this, press Ctrl + T and zoom in as much as necessary. Press Enter to apply the changes.
If you look at your image right now, you may see a lot of empty and uninteresting areas. I've labeled them in the following screenshot so you can better see what I'm talking about.
Place several small bokeh on the designated areas. The procedure for doing this is the same as for placing LARGE Bokeh.
Your image should look like the screenshot below.
Step 23 – Add Shadows Two more steps and you're done! In this step, we'll make the shadow underneath the girl a little more visible and add some light to her bangs.
Create a new layer on top of all layers and name it e.g. SHADOW AND BANG. Select the Brush Tool (B). Set it to a soft round brush, set the brush size to 250 px and set Opacity to 10%. Set the color to dark brown and draw a shadow under the girl.
The screenshot shows where to draw.
Next, choose a slightly light blue color and carefully paint over the girl's bangs.
Step 24 – Sharpening This is the promised last step and it will be very quick.
In this step we will sharpen the image. To do this, press Ctrl + A to select the entire image, then Ctrl + Shift + C to copy the selection. Next, press Ctrl + V to paste it onto a new layer. Place this new merged layer on top of all layers and name it Sharpen.
Next, go to Filter – Other – Color Contrast (Filter > Other > High Pass) and set the Radius (Radius), so you can see the neat edges of the image. Click OK.
To blend the layer properly with the rest of the image, change the blending mode to Overlay (Overlay).
Final Result
Author: Jarka Hrnčárková
Retush.net service - whitens teeth, eliminates red eyes, etc.
Another service that allows you to perform facial retouching is Retush. This service allows you to work with the built-in English-language photo editor “Photocat”, which has quite a wide range of image editing capabilities.
Go to this resource, click on “Upload” and upload the photo you need to the site. On the left are the basic tabs for working with images: “Edit”, “Effects”, “Retouch”, “Frames”, “Text”, “Local retouch” retouch).
Retush.net Tabs
By switching between tabs you can select different tools and apply them to your photo. For example, in the “Retouching” tab you can apply effects to the figure (Figure), skin (Skin), eyes (Eyes), lips (Lip tint). By choosing the width of the coating (Brush size) and the intensity of the effect (Intensity) you can achieve the desired quality of your photo.
To save the result, use the “Save” button at the top right.
Face Retouching in Photoshop CS5
The author of the lesson, Pipko Alexander, is a photographer and retoucher. Other articles about photography and author's lessons on the author's website https://www.apipko.com/.
In this lesson I will look at a set of techniques and methods for face retouching. I want to show you how to extract the result you want from an obviously “technically ruined” jpeg image using Photoshop CS5 and at the same time preserve the quality and details as much as possible. To demonstrate the retouching, I specifically took a photograph that was obviously unsuccessful, which was taken at the “adjustment and shooting” stage. Professional facial retouching still involves working with a higher-quality original photo. What do we do:
- elimination of skin defects, retouching of hair strands;
- correction of facial geometry (eyes, nose, lips, cheekbones) - make the face more symmetrical;
- remove the fat highlight on the forehead;
- light correction - “stretch out” sunken eyes, the lower part of the nose, lips, chin and neck;
- Let’s add “glow” to the skin and color-correct the entire photo, emphasizing the green-yellow color of the makeup, eyes, light and background.
- preserve the leather texture and details.
Let's start the lesson on face retouching. Open the image File – Open (Ctrl+O). Create a copy of the main Background layer using the combination Ctrl+J or dragging it onto the icon for creating a new layer.
We perform all other actions with a copy. Let's start with removing skin defects. Small parts can be removed faster and easier with the Spot Healing Brush...
...by first specifying Proximity Match in the tool settings.
And we simply begin to carefully paint over the defects at 100% magnification.
We remove larger defects and moles using the Healing Brush Tool.
Hold down Alt and indicate a “healthy” area of skin next to the mole (the cross in the picture indicates the source).
Remove the scar on the forehead with the Patch Tool.
Outline the scar and select Source in the tool settings.
Then drag the circled area to a place with clean skin, next to the scar.
By combining the above tools, we remove all large and small skin defects.
Now let's work on the highlights on the forehead and nose. You can reduce glare on the skin simply and effectively using the ShineOff v2.0.3 plugin. Download, install, go to the Filter menu – Image Trends Inc – Shine Off v 2.0.3.
Setting up this plugin comes down to adjusting the degree of attenuation of glare on the skin. I set it to 100%.
Let's move on to hair retouching. Carefully remove stray strands of hair using the same Healing Brush Tool. It is important to remove the strands while maintaining the background. If the strand is on a light green area of the background, then point to the light green area as the source; if it is on a dark green area, then point to the dark green area. A few examples (crosshairs point to source).
Face retouching in Photoshop is a rather painstaking process, and the resulting quality depends on your skills in working with this tool and perseverance. We will also remove strands of hair along the forehead line, making it more neat. The hanging strands on the right can be easily removed with the Clone Stamp tool, size 130 px. At the same time, as the source of the cloned area, we try to select an area that will fit well instead of the strands.
We will correct the border between the hair and the background by aligning it in the Liquify filter. We take the “finger” tool and use it to align the “depressions” and “bulges” on the border of the hair and the background (arrows indicate the direction of movement).
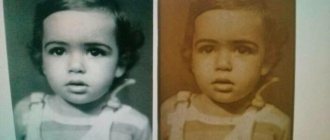
Thus, at the moment we have:
Before
After
Now let's start with light correction. Let's draw out the dark areas on the face that have sunk into the darkness: the eyes, the base of the nose, the chin and the neck. Again, create a copy of the resulting retouched layer. Then go Image – Adjustments – Shadows/Highlights.
Settings as in the image below.
Let's call it Shadows/Highlights. Add a mask to this layer.
And invert it (Ctrl+I). Take the Brush Tool (B) white and go over the dark areas of the face, trying not to touch the light areas. This is what my highlighted areas look like.
And the result for now.
The eyes are still in the dark - we are correcting them. Combine all layers into a new layer using the combination Ctrl+Alt+Shift+E. Change the blending mode of the newly created layer to Screen, add a layer mask to it and invert it (Ctrl+I). Using the same white brush, we pass only over the dark areas of the eyes. Reduce the Opacity of the layer to 60%. At the moment we have.
Before:
And at the moment:
Let's enhance the shine of the yellow highlights on the face. I have highlighted the areas that we will work with.
Again, merge all the layers into a new layer using the combination Ctrl+Alt+Shift+E. Next Select – Color Range. Use the eyedropper tool to poke at the yellow reflection, and use the eyedropper + tool.
We poke into other yellow areas. As a result, the preview mask looks something like this (the Color Range settings are there).
Click OK and get the selected area. Add a Curves adjustment layer.
We increase the brightness of the selected areas, but without fanaticism - otherwise artifacts will appear.
Apply Filter – Gaussian Blur to the Curves adjustment layer mask.
The blur level is about 15 pixels. By doing this, we increased the shine of the yellow highlights on the face and weakened the shadows. Already close to the result, at the moment the face still looks flat and the right cheek is still sunk into the shadow. Let's highlight the cheek and try to imitate the effect of light from the “beauty plate” on the face, thereby changing the light pattern of the portrait. Merge all visible layers into a new layer (Ctrl+Alt+Shift+E). Go to Select – Color Range. Using the Eyedropper tool, click on the dark area of the right cheek. The Color Range settings are below.
Click OK and add a Curves adjustment layer with the settings to the selected area.
And again blur the Curves layer mask with a Gaussian Blur filter of 15 pixels. Select the top 2 layers and merge them.
And lastly, let's highlight the face by increasing the light from the beauty dish above the model's face. Go to Select – Color Range again. Using the Eyedropper tool, click approximately between the eyebrows, the rest of the Color Range settings are below.
Click Ok. Add a Curves adjustment layer to the selected area, and immediately strongly blur the Curves layer mask with a Gaussian Blur filter with a blur level of about 66 pixels. Curves layer settings.
Let's make some more cosmetic adjustments: correct the area to the left-bottom of the lips, and add color to the eyes and makeup.
We correct the chin area with the Clone Stamp tool with a size of 210 pixels and zero hardness, and reduce the opacity of the tool to 15%. The source of the cloned region is indicated by a crosshair.
You can add color to the eyes using the Sponge Tool.
Select Mode: Saturate, Flow: 65% and check the Vibrance box.
With a brush about 130 pixels in size, we pass 1-2 times over the area between the upper eyelid and eyebrows, enhancing the color of the makeup. Lighten the eyes slightly with the Dodge Tool.
With the following settings.
Using a small brush with a size of 60-70 pixels and zero hardness, we pass over the iris 1-2 times and highlight the white near the pupil.
All that remains is to correct the facial geometry and make general color correction. Merge all visible layers into a new layer (Ctrl+Alt+Shift+E). Let's go Filter-Liquify (Shift+Ctrl+X) Use the "Finger" tool. Red arrows show the source and direction of finger movement, 750 pixels in size. Blue arrows indicate the direction of finger movement, 210 pixels in size. The main task is to correct facial asymmetry, reduce a massive jaw, and correct the shape of the ears.
We will assume that we have corrected the geometry. Let's do some general color correction. I wanted to do general toning in yellow-green shades, because... The whole picture as a whole is designed in these tones. The easiest way to do this is with the Color Efex Pro plugin from NikSoftware. Download, install. Go to Filter – NikSoftware – Color Efex Pro. Select the Cross Processing filter with the following settings.
That's all, the before and after results are shown below.
I repeat once again: this example of simple face retouching is just a way to extract the desired result from a Jpeg file that was almost “ruined” during shooting and at the same time prevent the appearance of artifacts and preserve as much detail and skin texture as possible.
Avatan - online photo editor
The next Russian-language service that allows you to edit photos for free is Avatan. To work, log in to this resource, click on the “Start retouching” button, and then “Proceed to set”.
You will enter edit mode. Click on the “Open” button, then on “Open Photo”, and upload your photo to the resource.
At the top there will be various tabs (filters, effects, textures, etc.), by switching between them and selecting different tools available in them, you can edit your photo according to your preferences.
Avatan service functionality
To save the result, there is a “Save” button at the top.
IMGonline - photo processing
The IMGonline service allows you to perform automatic retouching online using a minimum of settings. Just go to this resource https://www.imgonline.com.ua/retouch-photo.php, click on the “Browse” button and upload the required image to the service.
Decide on other settings (retouching level, general anti-aliasing level, sharpness, brightness, contrast), select the output file format (JPEG or PNG-24) and click “OK”.
This is what the IMGonline service looks like
The photo will be processed, and you can download or view the result by clicking on the corresponding inscriptions on the screen.
Smartbrain - removes skin imperfections in portrait photos
Well, the last service for today is Smartbrain. This service is positioned by the creators as a free online photo editor with an excellent set of different filters for images.
- To work with it, click on “Upload your photo”, and then on “Upload file”.
- After downloading, you will see buttons at the bottom for various options for editing your photo (filters, brightness, contrast, saturation, blur, Tilt Shift, etc.).
- With which you can make all the necessary changes to the photo.
Functionality of the Smartbrain service
To save the result, use the “Save” button at the top.