Description
Download inSSIDer in Russian is the most effective Wi-Fi scanner that helps optimize the overall performance of your wireless network.
Along with displaying advanced information, this networking tool for Windows allows you to check your signal strength using a graph. Using this feature, you can easily know whether the Wi-Fi is high or low and you should move your device or router accordingly for better connection. inSSIDer is a completely low-cost, open source software that gives you the ability to determine how many and what kind of communications are occurring on the frequency spectra available for making connections. The program allows you to check what interference will begin to be present and optimize the parameters used by your wireless connection as much as possible.
After installing this utility, you need to select, using the Channel graph option, the frequency spectrum of interest: 2.4 or 5 GHz. The choice depends on the router used: in the case of 802.11n compatible devices you have the right to choose, for example, both frequency bands, while in the case of 802.11g only 2.4 GHz.
The program shows, in real time, the spectrum occupation and power of the various detected signals. To get a full overview of what's found nearby, you'll likely need to wait a few minutes. In case your router is sharing the same wireless channel as well as other nearby devices, problems may occur due to overlap.
For more information on how it works, we suggest downloading inSSIDer for Windows 10 or refer to our article. Specifically designed for IT professionals, the diagnostic and optimization software provides the ability to find poor channel placement, RF interference, and even low levels in the 2.4 and 5 GHz bands.
Also, in case you are not a techie and want to fix the problem yourself, the inSSIDer download for Windows 7 comes with a help section that offers tips and tricks on how to fix the problem you are looking for.
The app is designed to help you recognize interference that is having a negative impact. This protocol analyzer provides information about nearby wireless networks, such as name, security method used, and broadcast channel. The commentary of this software is in full swing. Identifying and troubleshooting network connection data using this utility must have Windows.
Most computing today is wireless. There are more networks transmitting signals where you are now than you might think. The problem is that the connection you are currently authorized to connect to is not always easy. It's for this reason that applications such as insider are an important part of any Windows toolbox utility.
Many local governments and municipalities have the right to require that your signal be protected. The way your network works is that anyone who wants to will start using it is not a good idea. If you have a bandwidth limit, it can be easily exceeded. There have also been reports of people hacking into unsecured corporate networks.
App Con: does not list all support file requirements and does not automatically install those that are missing, will not install in Parallels In addition, download inSSIDer in Russian latest version, includes a GPS function that allows you to identify your location, as well as display geographic coordinates. In addition, you will begin to fully use the collected information for other programs, exporting them to KML files.
Download this best software today to identify and optimize your Wi-Fi.
Step-by-step router setup:
- Go to the router setup menu using special software or by typing “192.168.1.1” or “192.168.0.1” in the browser address bar.
- Enter your username and password to log into your personal account. If you don’t know your username and password, you can look on the router case. There should be a default information sticker.
- Go to the wireless mode settings and select the most free one in the channel window.
- Click “save” and reboot the router.
- You may need to restart the program.
Now in the program window we see that our router is operating on a new channel. Data transfer speed and signal strength should increase. This was just the easiest way to increase the performance of your wireless router. There are many tips on the Internet for improving network quality.
It is also worth noting that for the program to work, the current version of the .Net Framework is required, taking into account your operating system. For Windows 10 this is .Net Framework 4.6.
Insider is available for download from the official website, but only the English version. The program is presented in Russian on our website. Right now you can download Insider and start diagnosing your wireless network.
Bottom line
Download inSSIDer for Windows is the most useful network tool that has the ability to display detailed information about all detected ones, allowing you to monitor data traffic. It's the Swiss Army Knife of troubleshooting for millions of users around the world. inSSIDer is an interesting application. I'd like something like this on the Mac world. Its displays are cool, and provide you with the information you need to get your network working well. I had a lot of problems installing the software, however, especially on Windows 8 machines (I have two...) Couldn't install on both of them. The application requires the .NET Framework to run, but does not include components as part of the installation file, and this is required. Thanks to its easy-to-use user interface, as well as help and tutorial sections, even less experienced users can understand without any problems. Apart from the search capability, this network scanner for PC also provides other information including vendor, SSID, baud rate, MAC, signal strength and security.
Beginning of work
The first thing you need to do is create a free account on metageek.com (the site of the program's developers) and download inSSIDer for Windows or inSSIDer for Mac. This guide will use the Win10 OS version, but most of the features will be available on Apple's OS as well.
After installing inSSIDer, log in using the metageek account you just created. The first thing you'll see in inSSIDer is a large table that lists all the Wi-Fi networks nearby.
Getting started with inSSIDer
If you are already using a wireless internet connection, your network should be highlighted in yellow with a large asterisk next to it.
If your network is not marked with a star, click on the table column labeled Signal to sort the table by signal strength. This action will place nearby networks at the top of the table and will likely move your Wi-Fi network to the top. Select your network by clicking on the table row with its name - it will now be highlighted in blue. Then click on the binoculars icon to view detailed information about your network. If you have more than one Wi-Fi network in your home, you'll have to do this separately for each one. In this article we will focus on just one.
inSSIDer interface
Setting up a 5 GHz network
If you have a 5GHz access point, look at the Width column. 5 GHz Wi-Fi networks can use channel widths of 20, 40, 80, or 160 MHz. As is usually the case in our lives, more does not always mean better. It is recommended to use a channel width of 20 or 40 MHz if there are other Wi-Fi networks nearby. If your access point's channel width is set to 20 or 40 MHz, then you don't need to configure anything else and can move on to the next section of this article - Setting up a 2.4 GHz network.
80 MHz without overlapping networks is normal
If you are using a 160 MHz channel width, you should definitely reduce it! If a channel width of 80 MHz is used, then you may not have to change anything. Now see if there are any other networks on the graph above -70 dBm that are in the same channel section as yours?
If networks above -70 dBm are nearby, reduce your channel width from 80 to 40 MHz. If there are no other networks, you can safely use the 80 MHz channel without disturbing your neighbors. While wider bandwidth allows for faster Wi-Fi speeds, collaboration with neighbors is more important. If everyone uses wide channels, then no one will have speed.
80 MHz with overlapping networks is bad
2.4 or 5 GHz?
Now that you have selected your network and clicked on the binoculars, the inSSIDer interface will look like the one shown in one of the two screenshots below. If inSSIDer looks like the first screenshot (Single Access Point), then you only have one Wi-Fi network. In this case, look at the channel number in the “Configuration” section. If channel 36 or higher, scroll down to the “Set up a 5 GHz network” section in this article. If channel 14 or lower, go to the 2.4 GHz Network Setup section.
If the inSSIDer interface looks like the second screenshot (Multiple access points), then you either have multiple networks or bands. Click on each row in the table and observe the highlighted shape in the bottom graphs. These forms show the channel and signal strength of each access point. The gray shapes are other Wi-Fi hotspots nearby.
One access point
Unless you live somewhere deep in the woods, chances are you'll notice a lot of Wi-Fi networks on the 2.4 GHz graph that overlap each other. In most places on this planet the 2.4 GHz band will be crowded. It's like a bar on a Friday night with a lot of people talking loudly to each other. Agree - this is not the best place to work.
If you have a choice, 5 GHz is recommended. Let's go back to the table and look at the Channel column. Is there channel 36 or higher? So this is the 5 GHz band. If you don't have a 5GHz hotspot, it might be time to upgrade your router - it will significantly improve your Wi-Fi performance, and you might not even need inSSIDer.
Multiple access points
How to use the inSSIDer program (WI-FI network diagnostics)
This material is borrowed from the site https://hobbyits.com/
Original article
How to use the inSSIDer program (WI-FI network diagnostics)
Author: Nesteruk Dmitry | Published: 30-10-2013
A few publications ago, I promised you, dear visitors, that in the next article I would tell you how to use the inSSIDer program. So, here she is in front of you. For those who don’t know, I’ll say that this program is designed to diagnose Wi-Fi networks and channel load. The utility will inform you not only about the speed and congestion of the Wi-Fi network, but also help you find out the signal strength (RSSI), SSID (network name), degree of wireless security (WPA/WPA2), MAC address of the access point, device manufacturer, and there are many more interesting and useful things. The program will help you measure the level of a wireless Wi-Fi signal (read about how a Wi-Fi/WiMAX wireless network works here) at home or in the office. After performing diagnostics with the inSSIDer program, you will be able to select a free or less congested channel with maximum speed and minimal interference. By the way, the program can only provide information over Wi-Fi wireless networks (IEEE 802.11a/b/g/n), which operate in the 2.4 and 5 GHz frequency range. As for other devices and household appliances (wireless baby monitors, microwave ovens, Bluetooth devices) that create interference in a wireless network, the utility will not provide information on them (about what creates interference in a wireless Wi-Fi network and what are the rules you need to be guided to create a stable connection (I wrote here).
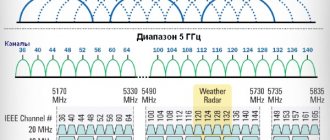
It should be remembered that 13 channels are open for use in the CIS countries (of which 1,6, 11 channels do not overlap), and in the USA and some other countries there are two less, that is, 11. This means that if the wireless Wi-Fi adapter is installed in device (computer, phone, tablet...) was created for use in the United States, then for its operation you need to use only channels 1 to 11. That is, if the 12th or 13th channel is installed on the router, then such a wireless client (phone, tablet...) will not see the access point. I hope I was able to convince you that you simply need to keep this program in your arsenal at home or in the office. So, let's get to the point.
Instructions for the inSSIDer program.
The first thing you need to do is download and install the inSSIDer program on a computer that has a wireless Wi-Fi adapter. You can download the program for your version of the operating system (Windows XP/7, Android...) from the official website. I downloaded the version of the inSSIDer program for NetBooks because it is on this device that I have a Wi-Fi adapter (the network will be scanned through it). Depending on your OS and the version you choose, the program interface may differ slightly from the one I chose, but this should not cause you any difficulties, because they all work on the same principle.
Download the latest version of the inSSIDer program from the official website (MetaGeek). Download the package from the official Microsoft website. NET Framework 3.5 SP1 I will not describe the installation of the program, because there is nothing complicated about it. Let me just say that before installing it you may need to install the NET Framework. The Microsoft .NET Framework is a set of libraries and system components that are required to run applications based on the NET Framework architecture. The following window will notify you of the need to install this set of libraries before installing the inSSIDer program (if installing the NET Framework is not needed, install the program itself).
To install the NET Framework, you need to click on the “Yes” button and find and install the required package on the Microsoft website. If you can’t figure it out, use the link I posted above. Installing the NET Framework package will take a long time. So run the installation itself and go have some tea. You can see the progress in the image below.
After you have installed a set of libraries and system components, you can begin installing the inSSIDer program. I will tell you further based on the fact that your utility is already ready for use.
Wi-Fi diagnostics using the inSSIDer program.
The program supports two bands (2.4 and 5 GHz) and displays in a table the entire list of detected Wi-Fi networks with all characteristics (MAC address, network name (SSID), signal strength (RSSI), and so on). If necessary, you can connect a GPS receiver and link the data to geographic coordinates, so that you can then export the whole thing to a KML file. And here is the program itself.
At the very top of the program window the name of the network adapter (in my case it is Broadcom) through which the wireless network will be scanned is displayed. Using the “Stop/Start” button you can stop/start scanning a wireless Wi-Fi network.
Filtering in the inSSIDer program.
Just below there is a filtering area, which makes it possible to sort out information that we do not need. Using the radio buttons “+” and “-” you can include or exclude from filtering. SSID — enter the manufacturer (ASUS, ZyXEL, TP-Link...) by which you want to filter devices on the network. For example, type "ASUS" and press ENTER, then type "HomeWork." As a result, wireless networks based on “ASUS” equipment with the SSID name “HomeWork” will be displayed. By the way, if you need a reference book on keyboard shortcuts, you can download it here, and if you want to learn how to separate them into groups, then you can go here. Channels - select the required frequency range (2.4 or 5 GHz) by which you want to filter the network. You can also enter in the field separated by a hyphen (1-7, 5-9...) the channel numbers in the range of which you would like to receive information. If you enter numbers separated by commas (3, 5,7...), you will receive information on each of them. For example, if you enter “1-7”, then the table will display only networks that use channels from 1 to 7. And if you write the numbers separated by commas “3, 7, 10”, you will receive information for each channel. Network Type—Filter by network type. You can select one of two types of Infrastructure or Adhock networks (Peer-to-Peer networks, IBSS). If you do not select by any type, all available network types will be displayed in the table. Security - using this drop-down list, you can select networks with the level of security you are interested in (WPA-Personal, WPA2-Enterprise, and so on).
Information and graphic table in the inSSIDer program.
The program contains a table with data on the wireless networks around you, a graphic field with the amplitude of the wireless network on a particular channel (2, 4 and 5 GHz), as well as a time graph of the movement and intersection of radio waves. The information table consists of several very important columns:
- SSID - network name.
- Channel—the channel(s) on which the wireless network operates.
- RSSI (Signal) - signal level (the lower the number, the better the signal).
- Security - what type of protection is used on the wireless network.
- MAC Address - physical address of the Wi-Fi router.
- Max Rate — Maximum speed of the network device.
You can disable a column that you think is unnecessary in the main menu of the program. To do this, click on the View item and uncheck the box next to the name of the unclaimed column. The tabs of the graphic windows of the 2.4 and 5 GHz frequency bands display the channels on which the wireless networks listed in the SSID operate. The visual representation of wireless networks is built in the form of a trapezoid. My Home network uses channels 5 and 9. I set channel number 5 manually in the router settings, and channel number 9 is automatically connected by the network device system in order to cover the wireless area as much as possible. It must be said that each of the selected channels includes two more channels on both sides into the network. In my case, channel number 5 captures 3.4 (5) 6.7 and channel number 9 captures 7.8 (9) 10.11. In the image below, my trapezoidal Home network is shown in green.
As you can see, the wireless network signal in my case is very good, this is indicated by the values in the RSSI line (the lower the number, the better the signal). In addition, the signal level and its intersection with other wireless networks can be monitored on the Time Graph. By watching the chart, you can more accurately determine where your signal is better.
The graph shows that my network does not overlap with any other network. Therefore, I do not need to change the channel in the router's wireless network. But if your signal is bad, and also overlaps with other wireless networks, then you need to experiment with channels. In order to change the channel, you need to go into the settings of your wireless Wi-Fi router and change the channel number.
How to change the channel number in a Wi-Fi router.
I think you understand that you need to choose a channel that will have as few other sources as possible. By the way, if your router shares a channel with another source whose signal is very good, but there is no free space for your wireless network, then it is better to switch to another busy channel where the source has a worse signal. It is better to share a channel with a source whose signal is worse, because there will be less interference in your network. So, to enter the router’s administrative panel, you need to enter the router’s IP in the address bar of your browser. As a rule, the default IP address is 192.168.0.1 or 192.168.1.1, and this can be clarified in the documentation for the router or on the label that is glued to the bottom panel. Depending on the manufacturer, the admin panel menu may differ, so I'll just say that you need to select "Wireless Settings" or something similar in meaning and change the channel.
For example, I changed my working channel 5 to 8. By the way, sometimes it makes sense to put the channels in automatic mode and then the router itself will determine the optimal channels for its operation. But this is not always relevant, and not all routers support this mode. Once you have selected the channel, do not forget to click the “Save” button and restart your network device. In the image below you can see how much worse the signal on my wireless network has become.
The signal most likely became worse because my “Home network” began to share the channel with another “Network” network (orange trapezoid color). In the image you can clearly see this on channels 2 and 10. I will of course return my wireless network to its original state. Now you know how to use inSSIDer and how to change the Wi-Fi channel. That's all, dear visitors. Subscribe to announcements of blog articles, there will be many more interesting things ahead. I hope the article was useful and easy to understand for you. See you on the blog pages. Bye!
Best regards, Dmitry.