How to use Hamachi for online games and more
There are a few preparations and things to consider before playing with Hamachi.
- you need to download and install the application on all computers that will be connected. One of the PCs will act as a host - the main machine from which the connection to the other four devices will be made;
- You need to prepare your Windows system before installing Hamachi. How to set up a local network and possible problems will be described below;
- the application is suitable for games that were released before 2011 and have license protection;
- Using Hamachi you can create not only LAN connections, but also local virtual networks over the Internet. For example, a company of several people does not have to gather together in one room; they can sit at home separately and connect computers to each other using Wi-Fi.
Only registered users of the developer's website can connect. You can register and download Hamachi using the link. You need to do this first from the main computer. After the download occurs, you will be asked to register on the site. This must be done by indicating only the correct data, after which the user will be taken to his personal account.
Now you need to create unique links to download the application for your friends. To do this, go to: “Networks” - “My Networks” - “Expand Hamachi” button, after which you can copy the links and send them to friends on social networks or by email.
Using the Hamachi program
Hamachi is an excellent tool for creating virtual networks. Quite often it is used by gamers who want to create a separate server for playing with friends. Even beginners can understand this software, but this will require a little effort. As part of this article, we would like to talk about working in Hamachi by presenting supporting guides.
Registration
First of all, new Hamachi users are faced with the registration procedure. Almost always it happens without problems, and even a novice user can figure out how to fill out personal information. However, sometimes unexpected problems arise during authorization. You can find out all the information about registration and solving difficulties in our other article by clicking on the link below.
Read more: How to register with Hamachi
Setting up for online play
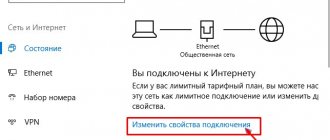
After successfully logging into your profile, it is still not possible to easily join the required network, because the program itself and the operating system are still not configured correctly. In Windows you will need to change the adapter settings through the Network and Sharing Center, and in Hamachi you can set encryption and proxy servers. All this has already been described in detail by another of our authors in the material below.
Read more: Setting up Hamachi for online gaming
Connection
After successful launch and login to your own profile, you can connect to an existing network. To do this, click on “Connect to an existing network”, enter the “Identifier” (network name) and password (if it does not exist, then leave the field empty). Often large gaming communities have their own networks, and ordinary players also share networks in communities or on forums, inviting people to play this or that game.
In the game, just find the network game item (“Multiplayer”, “Online”, “Connect to IP”, etc.) and simply indicate your IP, which is displayed at the top of the program. Each game has its own characteristics, but in general the connection process is identical. If you are immediately kicked out of the server, it means either it is full or your firewall, antivirus or firewall is blocking the program. Launch the software you are using and add Hamachi to the exceptions.
What features does Hamachi have?
This application gives you many possibilities. Once the local network is created, you can exchange files as if the computers were connected to a physical local network via LAN cables. The application has the ability to chat. To open it, you need to click on the small arrow next to the name of the created local network and select “Open chat window”.
Connecting and setting up the ZyXEL Keenetic router model Lite II
You can even play so-called “pirated” games online. The main thing is that the game build is the same on all connected computers; you just need to download it from one resource.
Note! Hamachi is automatically updated to the latest version. In case of any problems, a stable diagnostic system built into the program will help.
Advantages
How to set up a local network connection on Windows 7 using a router
Among the advantages of the program, users highlight:
- the presence of a direct IP address with which you can create your own virtual server;
- the ability to activate chat and manage connected computers on the Internet;
- clear and concise interface, there is nothing superfluous;
- there is support for almost all games, both unlicensed and Steam versions;
- a maximum of 5 PCs can be connected, but this is not the limit, since two or more computers can play.
One of the disadvantages is the lack of stability of the system, which causes connection breaks. Also, sometimes antiviruses and the Windows firewall “swear” at the application. Before starting, you should disable Windows Defender or other third-party antivirus to ensure normal, comfortable operation of the program. This must be done on all computers.
Creating a local network via the Internet
How to open access to a computer via local network Windows 10
After installing LogMeIn Hamachi, not everyone knows how to create a local network for games. First you need to run the program on the host computer. Once installed, a blue shortcut to the application appears on the desktop and in the Start menu. To open it, you need to double-click on the shortcut. It contains four system control buttons, the name of the PC and an IP address that needs to be copied or recorded, this will be useful for starting a multiplayer game.
The user needs to click on the “Create a new network...” button, then name the network, set a password and click on “Create”. The network has been created and those who have downloaded Hamachi in advance can connect to it.
Setting up the program
So, after the appropriate changes have been made to the OS, it is necessary to configure the application for further operation. This is quite simple to do and will take no more than ten minutes.
First you need to create a network that will be a “home” for the machines connecting to it. To do this, you need to go to the Network menu in the main application window - Create a new network. In the window that appears, you need to enter an identifier , or, more simply, its name, as well as a password. After which this data is issued to other users who, by going to the Network menu - Connect to an existing network, will be able to join you.
When going to the System - Settings , the user will see the application settings window. In the “ Status ” window we can see our own data - ID, name, as well as an associated account, which will allow us to manage networks and participants through the web interface.
The Security window allows you to see the RSA keys of current users. What is it for? The RSA key is stored on each client’s computer and serves as a kind of “identity certificate”, which prevents attackers from impersonating a member of the network. If necessary, you can check the box to block new network members.
The third tab - “ Options ” will allow you to configure the type of encryption, traffic compression, and program updates. The “ Additional settings ” item allows you to more flexibly configure the program’s operation. Thus, “ Interface Settings ” allow you to make working with the program more convenient. “Connecting to a server” will allow you to specify the address of the Hamachi server, and if traffic redirection is required, then specify the address and password of the proxy server.
The best online services and programs for removing voices from a song and creating a backing track
“ Peer connections ” are the most important type of settings. Here you can set the type of authentication, encryption and traffic compression, as well as local TCP and UDP addresses, if required.
Other tabs will allow you to configure the operation of the internal chat, the appearance of the program, and the path to the configuration and log files.
Windows setup
Sometimes for full-fledged work it is not enough to create a network and connect to it, you need to configure Windows. To do this, go to the “Control Panel” and go to the “Network and Sharing Center”. On the left side you need to click on “Change adapter settings”, find the “Alt” button on the keyboard to open the hidden line with tabs of system menu items. Next you should go to “Advanced” - “Advanced options”.
A list of network access services will open. During the installation of Hamachi, the corresponding service is automatically created, which you need to put at the very top of the list and click on OK. In the window with network connections, you need to find “Hamachi”, right-click on the shortcut, then “Properties” - “IPv4 Properties” and enter the following data:
- The IP address from the Hamachi application, which the user must write down immediately after opening the program window. It is located opposite the computer name;
- paste these numbers into the appropriate field from the clipboard or enter them manually;
- enter mask: 255.0.0.0;
- Don't touch DNS.
Click the “Advanced” button and set the interface metric value to “10”.
Note! Additional manipulations include disabling the firewall in Windows security settings in the same Control Panel or in Windows Defender 10. After all this, restart your computer to save the settings.
Setting up a connection on Windows 7
In this OS, the process is not much different from the settings in Windows XP. All changes concern only the interface. So, first you need to go to: Control Panel - Network and Internet - Network Connections . Having selected the Hamachi item, we still go to the settings window.
We check the absence of a checkmark on the TCP/IPv6 item and its presence on TCP/IPv4. Having entered TCP/IPv4, enter the IP address specified in the main window of the utility, and then go to the “ Advanced ” tab, gateway address, as last time, indicate 5.0.0.1, but the metric value to 10. Everything is ready!
What is WMM and how to enable it
Setting up Hamachi
Now you need to make some settings for Hamachi to play online. In principle, it is enough to add the program to the list of exceptions of the antivirus and firewall of the operating system.
Important! All of the above must be configured on all computers after installing the utility.
How to connect? On the computer that will connect, in the application you need to click on “Connect to an existing network...”, enter the IP address of the host - the computer that is the creator of the local network, as well as the password and name. You should be careful with the register of characters: if the password contains capital letters, they must be entered in capital letters, otherwise the attempt to connect will be in vain.
The host computer can now control networked PCs. You just need to right-click on the connected device.
Connect to an existing network
1. To connect to an existing network, click on the Network menu - Connect to an existing network...
2. In the Network Connection window that opens, enter the ID and password of the network you want to join and click Connect.
3. A new network has appeared in the list of our networks. It displays a computer that is also connected to this network. A green icon next to the computer name indicates that a connection with it has been established.
Possible problems with Hamachi
The main problems with Hamachi:
- A Hamachi network bridge “without access to the Internet” is possible; what to do in such a situation, many users are lost. This problem is the most common, and there can be several reasons. If the Hamachi network is not working, configuring your router or rebooting it will help fix the problem. It's also worth checking if your antivirus or firewall is blocking your network connection.
- The problem “LAN servers are restriced to local clients (class C)” occurs when trying to play CS:GO or CS:Sourse. In this case, the problem is on the side of the computer that is connected to the network. To diagnose on the host PC, you need to look at the correct IP address of the device. If the first two points differ from the host data, you need to right-click on the connected computer and click “Details” or “Details...”. Next, in the “Peer VPN Alias” line, you need to set the first two digits as on the host computer.
- You need to pay attention to the color of the indicator near one of the PCs connected to the network. It may flash green, blue or yellow. If the indicator is green, then the connection is successful, and if it is blinking, then something is wrong and the application cannot establish a connection with the remote server. A blue light indicates that the connection is not direct, and a yellow light indicates that the connection is not established.