This name has quite a lot of definitions, and you will now understand why. Let's first understand - what is a hot spot? Hot-spot or in English Hot-Spot consists of two words. The first word means “hot”, and the second means “point”. Here comes “Hot Spot”. This is where confusion immediately begins for an ordinary person, because this name can be used to call anything. And he will be right! – After all, the meaning of this word depends on the context and where it occurs.
At this point in the twenty-first century, this word is more often used in wireless networks. Wi-Fi Hot spot (HotSpot) - in ordinary language, this is a standard access point that distributes WiFi. But I will tell you more about this later in the article.
How does he work?
In fact, there is nothing complicated. Let's look at the operation of this device step by step.
- First, the device receives Internet packets from outside. That is, it is connected to the global Internet. Access to which is provided by the provider. It can connect in different ways, both by wire and by air.
- The device has a Wi-Fi network configured. You can connect any devices with a Wi-Fi module to it: laptops, phones, tablets, TV, etc. There is a key in the settings that allows you to connect an external device.
- After the connection, the connected client can have access to both the Internet and the local Wi-Fi network.
Many people confuse Wi-Fi and the Internet, but they are different things. The fact is that Hot Pot can exist without the Internet, I just introduced it into the concept for clarity. Essentially, a hotspot is a small box that builds a wireless, or, to be clearer, Wi-Fi network over the air. But if you set up the Internet and connect it correctly, then the Internet will also travel through the wireless network.
Equipment setup
Following the article How to distribute WiFi on Windows 8 and Windows 8.1, I decided to review programs for creating HotSpot WiFi on a computer, allowing you to make a WiFi access point or virtual WiFi router from a laptop or tablet on Windows 8. In general, there are many such programs on the Internet , I chose the most popular programs for review: two commercial ones, Connectify and Thinix WiFi Hotspot, and free analogues: MyPublicWiFi, mHotspot, WiFi Hotspot Creator, WiFi Virtual Router and WinHotspot. The functionality of all programs is almost the same - each of them is just the front end of the built-in function of Windows operating systems, which allows you to work in access point mode and even distribute an Internet connection - both via cable and 3G/4G via a wireless WiFi network. The difference is only in some additional features and, for most users, is insignificant. Whether you need them or not - decide.
Method 1. Connectify - classic option
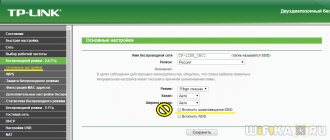
The Connectify program is actually the first program for creating an access point on Windows 7, Windows 8 and Windows 8.1 for distributing WiFi from a computer or laptop. There are two versions of the program - free and paid. The free version of Connetify allows you to create a WiFi hotspot on your laptop or computer. The paid version is called Connectify Hotspot PRO and is distinguished by the ability to distribute cable Internet and 3G/4G WiFi connections to connected devices on the network. Setting up the program is simple. The point of the setup is that you need to enter the WiFi network identifier (SSID) in the Hotspot Name field, set the WiFi password in the Password field:
This way you will create a virtual access point. Now, in order to distribute the Internet to connected clients, you need to select your Internet connection in the “Internet to Share” list and click the “Start Hotspot” button. At the bottom of the window there is a section for advanced network settings - “Advanced Settings”. Here you can select the WiFi adapter that will be used (if you have several of them). In the “Sharing Mode” field, select the type of WiFi network encryption. In the Firewall subsection there are 2 parameters - “Allow internet Access”, which allows network clients to access the Internet, and “Allow Local Network Access”, which should be disabled only if you do not want WiFi network clients to see each other in the network environment. A full set of program settings is available in the Settings menu:
Here you can configure autostart, configure the DHCP range, and forward UPnP ports. After you launch the WiFi hotspot, those connected to the network can be monitored on the Clients tab:
Video instructions for setting up the Connectify program:
Method 2. MyPublicWiFi.
In my opinion, MyPublicWiFi is the best analogue of Connectify, having almost all the same functionality, but with one significant difference: this program allows you to create exactly the same WiFi-Hotspot for free. The program is small in size, installed in two clicks and consumes few resources. What else is needed, considering that WiFi is often distributed from a laptop?! The only condition is that you must run the utility with administrator rights:
The main program window looks like this:
The setup is simple. You just need to enter the name of the WiFi network you are creating in the “Network Name (SSID)” field, in the “Network Key” field, and enter the security key for the created wireless network. Then check the “Enable Internet Sharing” checkbox and select an Internet connection (cable or 3G/4G) from the drop-down list. Done, the wireless network is configured, click the “Set up and Start Hotspot” button to start the hotspot. You can connect devices. The program has settings, although they are not rich. They are located on the Management tab:
Here you can check the “Enable Firewall” checkbox and thereby prohibit network clients from using file hosting services so that one of the clients does not clog the channel with downloads via Torrents or DC++. The second important parameter is autoloading. To have the program launched at system startup, check the “MyPublicWifi Will be launched on every system start” checkbox.
Method 3. mHotspot.
Another popular free program that allows you to turn a computer or laptop into a WiFi router is mHotspot. The program configuration comes down to specifying three parameters: “Hotspot Name” is the SSID of your network, Password is the password for your WiFi network, and in the “Internet Source” list you must select your Internet connection:
Click the Start Hotspot button to start the wireless network. The program has very few additional settings:
The only useful feature is the auto-start of mHotspot when the system starts. There is also a reset button to .
Method 4. WiFi Hotspot Creator
WiFi Hotspot Creator is a simple and fast program for sharing the Internet via a wireless network, however, it performs its functions perfectly. The only requirement is that it must also be run with administrator rights:
Otherwise, the program itself will start, but there will be no connections in the list of Internet connections.
In the WiFi Name field, enter the network name - SSID, in the Password field - the password for the WiFi network. In the “Network Card” list, you need to select an Internet connection. Click the Start button.
Method 5. WiFi Virtual Router
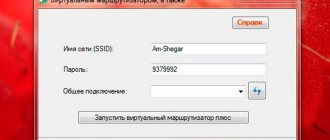
This software access point has the most minimalistic design. The configuration of the WiFi Virtual Router program is completely the same as the previous programs:
Enter the name of the WiFi network in the “Network Name (SSID)” field, the key to the WiFi network in the Password field and in the “Shared Connection” list select the connection that we will distribute over the wireless network. Click the “Start Virtual Router” button.
Method 6. WinHotSpot
Winhotspot is another simple program for creating a WiFi access point on Windows. The only thing that sets it apart from others is its unusual design. Otherwise everything is as usual:
All settings are collected on the main tab - Main. “Hotspot Name” is the SSID of the wireless network, “Hotspot Password” is the WiFi network key, Share Internet is the connection that we will distribute. We press the Start button and our laptop works as a Wi-Fi access point.
Method 7. Thinix WiFi Hotspot
This program is the second paid utility in the review. It has a trial period of 7 days. After this, the program will require money. The functionality of Thinix WiFi Hotspot is identical to previous programs and the only thing that makes the program stand out is its design. It is different, classic, which makes the utility stand out from others. What’s nice is that it has support for the Russian language, something that most competitors cannot boast of:
Although in fairness, I note that the quality of Russification does not shine. Basic settings for a virtual WiFi access point are collected in the Settings section:
The parameters are the same - network SSID, password for accessing WiFi and selecting an Internet connection for WiFi distribution:
Among the configuration features, I would like to note, perhaps, WPS support. Otherwise everything is normal. To start the WiFi hotspot, click the Start Hotspot button:
After launch, you can connect clients to the virtual WiFi router. All necessary information will be displayed on the status page.
Varieties
Strictly speaking, there are three types of hotspots:
- A stationary router is your regular home or work router that distributes Wi-Fi. You can’t take it anywhere with you, and it always stays in one place. These boxes have more serious performance than others.
- Portable routers are routers that run on a battery. And the Internet is received from a mobile provider according to 2G, 3G, 4G, LTE standards and 5G will appear soon. The same standards that are used on your mobile phone.
- Mobile – here any device with a Wi-Fi module can act as a Wi-Fi distributing device: the same smartphones, laptops, tablets, etc.
How to enable Hotspot 2.0 networks
Once you know that your device works with the new standard, you can use the following steps to enable the feature so that it lists providers when you try to connect after selecting a Hotspot 2.0 network.
- Open Settings.
- Click on Network and Internet.
- Click on Wi-Fi.
- In the Hotspot 2.0 Networks section, enable the Allow to use online registration to connect option.
When the option is enabled, Hotspot 2.0 networks will appear in your list of Wi-Fi networks when available.
More details about mobile
Imagine that you have a laptop on which you want to watch a series or a movie. And the provider, as luck would have it, is delayed and will only install an Internet cable to you tomorrow. But you are bored and want to keep yourself busy. But you have a mobile phone with internet.
So, you can easily turn your smartphone into a router and distribute the Internet from it to your laptop to download programs, watch videos, movies, TV series, etc. This is very convenient when other devices urgently need the Internet. You can also distribute a Wi-Fi network with the Internet to share it with your friends.
Settings
Below I will briefly provide instructions for setting up this function on phones, tablets and laptops. First, make sure that the device that will act as a hotspot is turned on and has Internet access. Once you have configured everything, you will be able to connect to the network of this device. But be prepared that the speed may drop slightly.
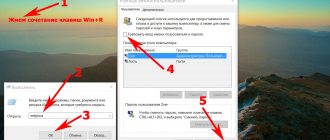
NOTE! If you share a wireless network with mobile Internet, the provider may start arguing after you log into the browser. But I only had this with YOTA, with MTS - everything was fine. If this problem arises and they ask you for money, read this article. There are instructions for MTS, but they are suitable for all mobile operators.
Android
- "Settings";
- “Network and Internet” or any section related to the Internet;
- “Access point and modem”;
- Now you need to start the Wi-Fi access point. And below we click on settings.
- Now enter the network name and password for it.
IPhone, iPad with iOS
- "Settings";
- "Modem mode";
- Turn on modem mode;
- Select the first option if your Wi-Fi was turned off;
- You will see the network password. But you can easily change it by simply clicking on it and entering a new value.
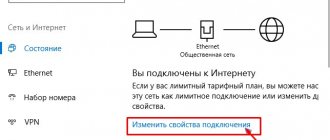
Windows 10
For laptops or computers with WiFi adapter.
- “ Start” – “ Settings”;
- Select the network menu section;
- "Mobile hot spot";
- Now we just set the name and password. But you can change these values.
- At the top you will need to start the service using the slider, and also select the connection through which the Internet is connected: cable, wireless network or 3G/4G modem.
We distribute the Internet from a laptop
After you have downloaded the program, you can start distributing. To do this you need to do the following:
- install and run the WiFi Hotspot Creator program;
- come up with a network name and password;
- launch the network and distribute WiFi.
Setting up the program even for beginners takes just a few minutes, and the included instructions and Russian translation will eliminate any questions. WiFi Hotspot Creator is distributed free of charge so that everyone has the opportunity to create their own network at any convenient time.