Every Internet user has a set of bookmarks - frequently visited sites. Although modern browsers, such as Chrome, offer synchronization, sometimes it fails. As a result, all bookmarks are lost. How to prevent this from happening? Export your bookmarks as a file and save it in a safe place.
In addition, exporting bookmarks from Chrome is an easy and affordable way to save all your important information when reinstalling Windows or transferring settings to another account.
Let's look at this issue in more detail using the Google Chrome browser as an example. Step-by-step instructions and accompanying useful information will allow even an inexperienced PC user to complete this work independently.
Possible export options:
Below is a description of these methods with screenshots.
Exporting a file via Bookmark Manager
Using Chrome's settings, it's easy to export your bookmarks to a local HTML file. This format is quite universal: it can be imported into almost any browser or opened “as is” as a web page.
So, to export bookmarks to HTML:
- Launch the Chrome browser.
- Click on the Customize and Control button ( three vertical dots in the upper right corner of the window).
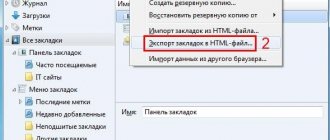
- From the drop down menu go to Bookmarks > Bookmark Manager (Bookmarks > Bookmark Manager).
- Use the Organize ( three vertical dots) > ( Export bookmarks ) Export bookmarks to save the file.
- In the system dialog, specify the format for saving bookmarks - HTML Text .
- The file will be named Bookmarks with the current date, but you can change it to any other if necessary.
- Select the folder where you want to save your browser bookmarks and click the Save .
Advice : those who plan to reinstall the operating system should save the file with bookmarks to the cloud (Dropbox / Google Drive), to a flash drive or to a NOT system drive.
Restoring (i.e. importing) bookmarks is just as easy:
- Open Bookmark Manager ( Shift + Esc ).
- Import bookmarks in the bookmark manager window .
- Specify the path to the HTML document and click on the Open button .
Related article : Restoring bookmarks: step-by-step instructions
Importing bookmarks into Chrome
To import bookmarks into Google Chrome, you will definitely need an html file. Nothing will work without him. If you have already exported from Google Chrome, then it should be there.
If the html file is on a flash drive, connect it to your computer or laptop. You will need it now.
- Launch your browser.
- Click the key combination Ctrl+Shift+O.
- Click on the “Manage” line and select “Import bookmarks from HTML file.”
- Specify the path to the file and click “Open”.
Ready. Import of bookmarks into Chrome has been completed successfully. You can check: they were added in the same window.
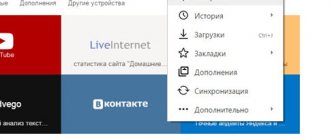
- Turn on the browser.
- Click on the icon with 3 dots, select “Bookmarks”, and then “Import bookmarks and settings”.
- A new window will appear where you need to select one of 3 options (Mozilla Firefox, Internet Explorer or HTML file) and click the “Import” button.
If you have previously used Firefox or Internet Explorer, then indicate the appropriate item. To import bookmarks from Opera, Yandex, Safari and other browsers to Google Chrome, select the latter option (but before that you need to export them to an html file).
Sync bookmarks via Google account
Another advantage of the Google Chrome browser is online bookmark synchronization. Using a Google account, you can easily open bookmarks on any computer or mobile device. All information will be stored on the cloud.
If you already have an active Google account, follow these steps:
- Launch the Chrome browser. Go to settings.
- Go to the settings section People ( Users )> Sync and Google Services ( Synchronization of Google services ).
- Enter your Google account login and password; if you are doing these steps for the first time, save them for later login.
- When the Turn on sync window appears , confirm your intention by clicking OK .
- Select the data to sync. Make sure the Bookmarks is activated.
After setting up synchronization, all marked data will be available on all devices, provided that they are connected to the same profile. You will be able to open on any device everything that will be saved as bookmarks from now on.
If desired, you can use multiple profiles in Google Chrome. The only thing you need to do is enter your account information.
Transferring bookmarks from Google Chrome - all methods
Bookmarks saved on only one device cannot be used to their full potential. There are several ways to move links to saved pages to other devices:
- synchronization;
- via file.
Why is it better to use built-in tools rather than transferring links manually:
- Fast. It only takes a few minutes to copy the list.
- Comfortable. We need a series of quick and simple operations instead of dozens of copying operations and links and transitions to sites.
- Organized. If links are grouped by directories, they will be moved in the same order and in the same folders.
Method 1. Synchronization
To access all bookmarks from any device that has the Google Chrome browser, it is possible to set up synchronization
By setting up synchronization, you will have access to all bookmarks from any device that has the Google Chrome browser - phone, tablet, laptop, computer. If you have access to the Internet, information about saved pages will never be “lost”, even if you reinstall the browser or OS on your computer.
Synchronization is the storage of some user data (bookmarks, passwords, etc.) on Google servers and importing them to paired devices. A paired device is any device on which you are logged into your account.
Attention! The synchronization account is not an email, although they can be linked.
If you have a “clean” Google Chrome without an account:
Step 1. Open your browser, left-click on the icon with a stylized human figure.
Left-click on the icon with a stylized human figure
Step 2 : Select Sign in to Chrome.
Select “Sign in to Chrome”
Step 3. In the window that appears, enter the e-mail that will be the main one for synchronization, left-click on the “Next” option.
Enter the e-mail that will be the main one for synchronization, left-click on the “Next” option
Step 4. Enter the password for your email address, left-click “Next”.
Enter the password for your email address and left-click “Next”
Step 5: Once the system message appears, click OK.
Click "OK"
If you need to add a new account for synchronization:
Step 1. Select the button with the name of the activated account. Right-click on it.
Right-click on the name of the activated account
Step 2. Select “Manage users” by left-clicking on the item.
Select “Manage users” by left-clicking on the item
Step 3. Left-click on the “Add user” link.
Left-click on the “Add user” link
Step 4. Enter the name of the new account and select its icon. If you want to create a separate desktop shortcut to log into your account, click “Add”. If not, uncheck the checkbox and click “Add”.
Enter the name of the new account, select its icon, leave or uncheck the “Create shortcut…” checkbox, click “Add”
Log in to your account on any device and wait for synchronization (a few minutes) - you will have access to all tabs without additional actions.
Method 2: Export to file
If you do not want or cannot set up synchronization (for security reasons, if you do not have access to the Internet, etc.), the list of saved pages can be exported to an external file. This file can be connected to Google Chrome on another computer or to another browser.
To export bookmarks to a file:
Step 1. Left-click “Bookmark Manager” via “Customize and manage Google Chrome” → “Bookmarks”.
Left-click on “Customize and manage Google Chrome”, then “Bookmarks”, then “Bookmark Manager”
Step 2: Left-click on the three dots “Manage” icon.
Left-click on the icon with three dots “Management”
Step 3. Select “Export bookmarks” by left-clicking on the line.
Select “Export bookmarks” by left-clicking on the item
Step 4. Select a location to store the folder and enter a file name, left-click and click “Save”.
Set the file name and storage folder, left-click and click “Save”
Copying a bookmark file yourself
You can do without browser settings and manually copy the bookmark file. It can be used for further imports and as a backup.
The default storage location for Chrome bookmarks is a hidden system folder (Windows 10, 8, 7 & Vista):
C:\Username\Local Settings\Application Data\Google\Chrome\User Data\Default
or
C:\Users\<
Mac OS:
Users/<
Please pay attention to two files:
- The file with bookmarks is called Bookmarks .
- The backup copy is called Bookmarks.bak .
Advice . If bookmarks are “broken,” to restore a previous copy of bookmarks, just rename the Bookmarks.bak to Bookmarks , replacing the previous copy.
To manually export a bookmarks file:
1. Close the Chrome browser.
2. Enable viewing hidden files in Explorer ( Folder Options > View ).
3. Go to the bookmarks folder (see path above) through Explorer or any file manager.
4. Copy the specified Bookmarks file to a safe place.
Import Chrome Bookmarks to Firefox
1. Open the Firefox browser and press CTRL + SHIFT + B to open the bookmark manager . Here, click on “Import and Backup” and open “Import Bookmarks from HTML”.
2. After that,
select the bookmark HTML file and click the “Open” button. Now close the window.
3. All Chrome bookmarks will appear in the Mozilla toolbar.
Import Chrome bookmarks into Firefox for mobile devices
To have Chrome bookmarks in the Firefox mobile browser, create a Firefox account. After that, log into the Firefox browser on both desktop and mobile . Once the synchronization is complete, you will see all the exported Chrome bookmarks in your Firefox mobile browser.
A little about Google Chrome
The creation of Google Chrome is one of the most successful projects of the search engine of the same name. It is easy to use, free, and has wide functionality. Increased convenience is ensured by the fact that the formation of a search query and navigation to the entered address is carried out in one line.
It also allows you to create shortcuts for network applications, providing the ability to download them without launching the browser itself. The dynamism of the tabs is another significant “+” of this web browser. They can be dragged outside of it and new windows can be created. There is an option for “instant bookmarks”. They, along with passwords, can be imported from different browsers.