Utility commands for working with disk images:
/Split-Image
- Splits an existing .wim file or .ffu file into multiple read-only WIM/FFU files.
/Apply-Image
— Applying new image parameters.
/Get-MountedImageInfo
— Displays information about connected WIM and VHD images.
/Get-ImageInfo
- Displays information about images in a WIM or VHD file.
/Commit-Image
— Saves changes to the connected WIM or VHD image.
/Unmount-Image
— Disconnects a mounted WIM or VHD image.
/Mount-Image
— Connects an image from a WIM or VHD file.
/Remount-Image
— Restores the image mounting directory.
/Cleanup-Mountpoints
- Removes resources associated with damaged mounted images.
Dism++: what kind of program
Dism++ is a free, portable program created by the Chinese developer Chuyu Team . It is a graphical interface for the standard Windows console utility DISM.exe , which is used to prepare and maintain installation images of this operating system. Normally, work with DISM.exe is carried out using the command line or PowerShell. The graphical interface implemented in Dism++ makes it possible to work with Windows images without being tied to console commands. Using the Dism++ interface, we can edit the Windows distribution and make some adjustments to it, make a system backup and restore from it, convert WIM and ESD system image formats, add information about Windows to the bootloader, edit the hosts file and perform other operations.
With the participation of the program, we will be able to install Windows by deploying directly from its images - WIM or ESD files. Whether they are part of a pure official distribution from Microsoft, or whether they are our created system assemblies.
You can download Dism++ on the Chuyu Team website:
https://www.chuyu.me/en/index.html
When running the 64-bit edition of the utility, it is important not to confuse it with the ARM64 edition.
How to use Dism++ to install Windows in different situations?
Service commands:
/Apply-CustomDataImage
- Canvases the files contained in a custom data image.
/Capture-CustomImage
- Writes settings to a delta WIM file in the WIMBoot system. The recorded directories include all subfolders and data.
/Get-WIMBootEntry
- Lists WIMBoot configuration entries for the specified disk volume.
/Update-WIMBootEntry
- Updates the WIMBoot configuration entry for the specified disk volume.
/List-Image
— Displays a list of files and folders in the specified image.
/Delete-Image
- Removes the specified volume image from a WIM file that contains multiple volume images.
/Export-Image
— Exports a copy of the specified image to another wim file.
/Append-Image
— Adding another image to the WIM file.
/Capture-Image
— Writes the disk image to a new WIM file. Recorded directories include all subdirectories and data.
/Get-MountedWimInfo
— Displays information about images connected from WIM.
/Get-WimInfo
- Displays information about images in a WIM file.
/Commit-Wim
— Saves changes to the image connected from WIM.
/Unmount-Wim
— Disables the image connected from WIM.
/Mount-Wim
— Connects an image from a WIM file.
/Remount-Wim
- Recovers lost WIM connection directory.
/Cleanup-Wim
- Removes resources associated with corrupted mounted WIM images.
DISM options:
/English
- Displays command line output in English.
/Format
— Sets the report format. Valid values are /Format:Table or /Format:List, specifying a table or list format. The default is a list.
/WinDir
— Specifies the path to the Windows directory.
/SysDriveDir
— Specifies the path to the system boot loader file named BootMgr.
/LogPath
— Specifies the path to the log file.
/LogLevel
— Sets the event logging level (1-4).
/NoRestart
— Prohibits automatic reboot and prompts the user to reboot.
/Quiet
— Hides all messages except error messages.
/ScratchDir
— Specifies the path to the temporary files directory.
For information about these DISM options and their arguments, specify the required option before the "/?"
Examples:
DISM.exe /Mount-Wim/?
– command prompt /Mount-Wim
dism.exe /Format /?
- Display help about DISM output formats.
dism.exe /Online /Get-Drivers/?
— hint for the mode for displaying information about drivers in the image or running Windows (/Online).
By default, a list of third-party drivers is retrieved. To list the entire list of drivers, use the /all
.
dism.exe /Online /Get-Drivers /format=table
— display a list of third-party drivers for the current Windows in the form of a table:
DISM.exe /List-Image /Imagefile:C:\test\images\myimage.wim /index:1
— display the full contents of the first image from the file specified by the
/Imagefile parameter:
Let's start work...
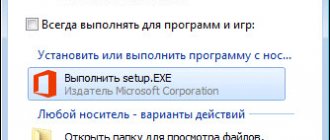
- Download a free Windows 10 image using the Rufus utility or program. For this purpose, I have prepared a bootable USB flash drive with Windows 10, thanks to which quick access to the necessary files is provided;
- Run cmd as administrator
- Enter the following commands sequentially
DISM /Online /Cleanup-Image /StartComponentCleanup DISM /Online /Cleanup-Image /AnalyzeComponentStore DISM /Online /Cleanup-Image /RestoreHealth /source: F:\sources\install.wim :1 /LimitAccess
in the last command F:\sources\ install.wim – path to the install.wim file that appears after unpacking from the downloaded image.
Working with offline images.
dism /mount-wim/?
— display a hint on the image connection mode.
Example of information displayed:
DISM system Version: 10.0.10586.0 /Mount-Wim /WimFile:path_to_WIM-file {/Index:image_index|/Name:} /MountDir:final_connection_directory [/readonly]
- Mounts the WIM file to the specified directory so that it is available for service.
Use the /ReadOnly parameter to make the mounted image read-only. Examples: DISM.exe /Mount-Wim /WimFile:C:\test\images\myimage.wim /index:1 /MountDir:C:\test\offline DISM.exe /Mount-Wim /WimFile:C:\test\ images\myimage.wim /index:1 /MountDir:C:\test\offline /ReadOnly DISM.exe /Mount-Wim /WimFile:D:\sources\boot.wim /MountDir:C:\test\offline
- connect to directory
C:\test\offline
the contents of the image
D:\sources\boot.wim
.
/WimFile
will be available
in the directory /MountDir
and commands for servicing the images will be available.
DISM.exe /Image:C:\test\offline /?
- Display quick help on commands and options for servicing offline images.
DISM.exe /Image:C:\test\offline /Add-driver /?
— display a hint on the procedure for adding a driver to an offline image.
DISM.exe /Image:C:\test\offline /Get-Features
— display information about all components included in this image.
To display information about an individual package, use the /PackagePath
to point to a .cab file or folder.
dism /Get-MountedImageInfo
— display information about connected offline images. Example of information displayed:
Connected images:
Connection directory: C:\test\offline Image file: C:\test\images\myimage.wim Image index: 1 Connected for reading or writing: Yes Status: OK. . .
dism /unmount-wim /MountDir:C:\test\offline /commit
— disable the offline image connected to the
C:\test\offline
, saving the changes made (save with commit, specified by the
/commit
).
dism /unmount-wim /MountDir:C:\test\offline /Discard
- the same as in the previous example, but without saving changes to the contents of the image (saving without committing).
Adding drivers to the WIM image
The need to add a driver arises in cases where installing a system or booting Windows PE requires non-standard drivers, for example for SCSI and RAID disk controllers or unsupported peripheral devices. The DISM utility allows you to easily add the required driver to an existing image based on information from .inf
files.
Command Format:
DISM /Image:image /Add-Driver {/Driver:folder_containing_INF | /Driver:path_to_driver.inf} [/recurse] /ForceUnsigned]
The new driver is added to the offline image specified by the /Image parameter:
.
To search for drivers in all subfolders, use the /recurse
.
To add all unsigned drivers to X64 images, use the /ForceUnsigned
.
DISM.exe /Image:C:\test\offline /Add-Driver /Driver:D:\Drivers /recurse
— add to the image all the drivers from the
D:\Drivers
and its subdirectories.
DISM.exe /Image:C:\test\offline /Add-Driver /Driver:D:\Drivers\Usb\Usb3.inf
— add a driver to the offline image based on information from the file
D:\Drivers\Usb\Usb3.inf
DISM.exe /Image:C:\test\offline /Add-Driver /DriverName:"C:\Drivers\1.inf" /DriverName:"C:\Drivers\2.inf" /DriverName:"C:\Drivers\3.inf"
— adding several drivers in one command. When adding multiple drivers, they are installed in the same order in which they are listed in the DISM command line
Successful execution of DISM in /Add-Driver
does not represent a change to the contents of the image, since to apply the changes you must either unmount the image with the
/commit
or apply the changes using the
/Commit-Image
DISM.exe /Commit-Image /MountDir:C:\test\offline
— save changes in the image mounted to the directory specified by the
/MountDir
Use DISM to manage components of your current Windows OS.
DISM
command with the
/Online
is executed in relation to the current operating system, and not its image, which allows you to perform system maintenance by removing, adding or changing its components.
Windows maintenance refers to monitoring and repairing the status of components and software packages, including all system files and the registry. A component-based servicing system or CBS ( C
omponent
Based
S
ervicing) is a set of service software tools and specialized data, part of which is the
DISM.EXE
elements of a component servicing system were implemented in Windows Vista. With each subsequent release of the OS, their capabilities were expanded, which led to some serious differences both in CBS itself and in the use of the DISM.EXE utility in different versions of Windows OS. Some of the options available in Windows 10 are not applicable in Windows 7, although Microsoft has retroactively released updates that partially implement new maintenance concepts introduced in Windows 8, 8.1, 10. Some of the maintenance features present in Windows 8 are missing, or have undergone significant changes in Windows 10. I will add that Windows servicing is a complex, not yet fully developed system, many of whose features are not documented and many of whose concepts may seriously change in the future.
A quick tip on using the /Online
for a specific version of Windows can be obtained using the command:
DISM /Online/?
How to Use DISM to Restore Windows 10 System Image
If the performance of your computer has decreased significantly, but the SFC utility could not solve the problem, you should use the DISM system tool to restore the Windows image.
Windows 10 includes a useful command line utility called Deployment Image Servicing and Management (DISM). This tool appeared in Windows Vista. In Windows 10 and Windows 8.1, the DISM tool is installed by default.
The utility can be used to restore and prepare Windows images, including Windows Recovery Environment, Windows Setup, and Windows PE. DISM can also be used to repair a system recovery image using the current OS installation and even to maintain a virtual hard disk.
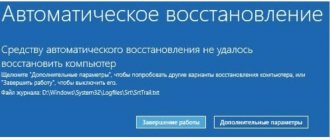
If your computer continues to experience errors and you begin to notice problems during boot, you can use System File Checker (SFC) to analyze the integrity of system files and replace damaged or missing files with a working copy.
If the SFC utility cannot fix the problem, then most likely the tool was unable to obtain the necessary files from the Windows image, which could also be damaged. In this situation, you can use DISM to repair the Windows image and then reuse SFC to fix the corrupted files.
In this guide, we will provide step-by-step instructions on how to use DISM to return your system to a stable and functional state.
Warning: Before you start using the DISM utility, it is recommended that you make a full backup of your system or create a system restore point. In case something goes wrong, you can return the system to its original state.
How to work with DISM commands in Windows 10
When working with DISM, there are three main options for restoring a Windows image: CheckHealth , ScanHealth and RestoreHealh . It is important to use them in this order.
Using the CheckHealth option in DISM
/CheckHealth command in DISM allows you to detect image corruption. This command is used only to find damage, but does not perform any repair operations.
To run this command follow these steps:
1. Search for Start menu Command Prompt , right-click on the link that appears and select Run as administrator because running DISM requires device administrator rights.
2. At the Command Prompt, type the following command and press Enter:
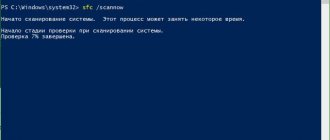
Using the ScanHealth option in DISM
/ScanHealth command in DISM allows you to scan your Windows image for any damage. Unlike /CheckHealth, the /ScanHealth check can take up to 10 minutes.
To run this command follow these steps:
1. Enter in the search menu Start Command Prompt , right-click on the link that appears and select Run as administrator .
2. At the Command Prompt, type the following command and press Enter:
Using the RestoreHealth option in DISM
/RestoreHealth command in DISM allows you to automatically repair damaged Windows images. Unlike /ScanHealth, the /RestoreHealth scan can take up to 10 minutes.
To run this command follow these steps:
1. Enter in the search menu Start Command Prompt , right-click on the link that appears and select Run as administrator .
2. At the Command Prompt, type the following command and press Enter:
Note : While running /RestoreHealth or /ScanHealth, you may notice the procedure hangs between 20% and 40% - this is completely normal behavior.
When you run the /RestoreHealth command, DISM will try to use Windows Update to replace the damaged files. However, if the problem has spread to Windows Update components, then you need to specify an alternative source of working versions of the files to restore the image.
Using RestoreHealth and Source Options in DISM
You can specify a new location for working versions of files using the /Source next to /RestoreHealth.
Before you can use the repair commands, you need to prepare a copy of the install.wim file from another computer, Windows 10 installation media, or a Windows 10 ISO file. It is also very important that the source of the working versions of the files matches the same version, edition and language of the operating system , which is used on the computer.
You can download Windows 10 ISO image with instructions below:
Note : do not forget to replace “repairSource” with the path to the source of the working versions of the files. For example: E:Sourcesinstall.wim .
Now you can run the command to repair the Windows image:
1. Enter in the search menu Start Command Prompt , right-click on the link that appears and select Run as administrator .
2. At the Command Prompt, type the following command and press Enter:
You can use the following command to limit the use of the Windows Update service:
Alternatively, you can use the following command to perform the same task:
The command will run a Windows image recovery using the working versions of the files included in the install.wim file from the Windows 10 installation media. It will not use Windows Update as a source for downloading the required recovery files.
Using DISM with the install.ESD file
Additionally, not only can you specify a path that points to install.wim, but you can also use the install.esd , which is an encrypted version of the Windows image.
If you upgraded to Windows 10 from a previous version of the operating system, the installation files may still be stored on your C drive, meaning you may have a source of working files.
To use the install.esd file to restore a Windows image to your computer, follow these steps:
1. Enter in the search menu Start Command Prompt , right-click on the link that appears and select Run as administrator .
2. At the Command Prompt, type the following command and press Enter:
You can use the following command to limit the use of the Windows Update service:
Alternatively, you can use the following command to perform the same task:
If the install.esd file is located on a different drive, use the following command:
Note : do not forget to replace “repairSource” with the path to the source of the repaired versions of the files. For example: E:Sourcesinstall.esd .
The Deployment Image Servicing and Management utility always creates a log file at %windir%/Logs/CBS/CBS.log that contains all fixed and detected issues.
How to fix problems with Windows 10
The instructions described above apply only to restoring a system image. To fix problems in Windows, use the SFC System File Checker.
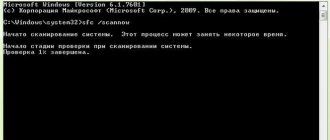
1. Search for the Start menu Command Prompt , right-click on the link that appears and select Run as administrator , because running SFC requires device administrator rights.
2. At the Command Prompt, type the following command and press Enter:
Note : It may take up to three SFC runs to resolve the issue.
The SFC utility will scan and repair damaged system files in Windows 10. To learn more about the capabilities of the tool, read the instructions.
Found a typo? Highlight and press Ctrl + Enter