How to change lock screen background in Windows 10?
The lock screen should be distinguished from the welcome screen. The first is activated when the device is locked, when the system reboots or exits sleep mode. It is a kind of prototype of the lock screen that we often use on touch phones. In Windows 10, you can change the background of this lock screen. To do this, just follow these steps:
- Click “Start” and select “Settings”. Here we select the “Personalization” section.
- In the left menu, select the “Lock Screen” subsection.
- Here you can choose either a standard Windows theme or your own photo or picture as a screensaver.
- You can also specify the activation time for the lock screen.
How to disable the background image on the lock screen?
If you want to turn off the background on the login screen, you need to edit a registry key to do so.
- Press “Win+R” and enter “regedit”.
- The Registry Editor will open. Go to the branch “HKEY_LOCAL_MACHINE\Software\Policies\Microsoft\Windows\System”. Here you need to create a DWORD value with the name “DisableLogonBackgroundImage” and the value “00000001”. To do this, right-click on the “System” section and select “New”, then “DWORD Value”.
- Setting this option to 0 will revert to the previously set lock screen background.
It is worth noting that the background will still be displayed, only the standard one from Windows 10.
How to change the welcome picture on Windows 10?
Changing the welcome picture in Windows 10 is quite difficult. This is primarily due to the fact that Microsoft developers do not provide such a function. However, there are two programs for this purpose:
- Windows 10 BG Logon Changer;
- Windows 10 Logon ChangerLogin Background Changer.
Let's consider the principle of operation of each separately.
How does Windows 10 BG Logon Changer work?
Windows 10 BG Logon Changer allows any user to change the Windows 10 welcome screen without much effort.
- Download and unpack the program. Launch the exe file. The program window will open immediately. There are three main buttons worth noting here: about the program, Windows 10 lock and the welcome screen design menu.
- To change the welcome screen, go to the “Edit Background” section and click “browse”.
- Explorer will open. Specify the path to the desired image. After making your selection, click “Save selection.”
- After selecting and saving the picture, you just need to restart your PC for the changes to take effect.
How does Windows 10 Logon ChangerLogin Background Changer work?
To disable an unnecessary picture or remove it from the welcome screen, just download and run the Windows 10 Logon ChangerLogin Background Changer program on your computer, which will help you quickly change the design of the OS home screen.
- After downloading and launching the program, its initial screen will appear. Click “Select image”.
- Explorer will open. Select an image. To secure the result, click “Save selection”.
- Reboot the computer. The welcome screen will change.
The new Windows 10 operating system is literally replete with visual updates. There wasn't a single place where the design hadn't changed. This also applies to such a section as the welcome screen. We see it every time we turn on the computer. Naturally, over time, the standard splash screen, which the welcome screen shines with, will get boring and you will want to change it. But how to do that?
Using W10 Logon BG changer to change the background on the password entry screen
Very important: it is reported that on Windows 10 version 1607 (Anniversary Update) the program causes problems and the inability to log into the system. At the office The developer's website also states that it does not work on builds 14279 and later. It is better to use the standard options for customizing the login screen in Settings - Personalization - Lock screen.
The described program does not require installation on your computer. Immediately after downloading the zip archive and unpacking it, you need to launch the W10 Logon BG Changer executable file from the GUI folder. The program requires administrator rights to operate.
The first thing you will see after launching is a warning that you take full responsibility for using the program (which I also warned about at the beginning). And after your consent, the main program window will launch in Russian (provided that in Windows 10 it is used as the interface language).
Using the utility should not cause any difficulties even for novice users: in order to change the background of the login screen in Windows 10, click on the picture in the “Background file name” field and select a new background image from your computer (I recommend that it be in same resolution as your screen resolution).
Immediately after selecting, on the left side you will see how it will look when you log in (in my case, everything was displayed somewhat squashed). And, if you are satisfied with the result, you can click the “Apply changes” button.
Once you receive a notification that the background has been successfully changed, you can close the program and then log out (or lock it with the Windows key + L) to see if everything worked.
Additionally, it is possible to set a single-color lock background without a picture (in the corresponding section of the program) or return all parameters to their default values (the “Restore Factory Settings” button at the bottom).
You can download the Windows 10 Logon background changer program from the official developer page on GitHub.
Changing the background image
Many people get tired of the deep blue color of the welcome screen very quickly. And if it’s extremely easy to change the lock screen picture using the system, then with the login screen it’s not so simple. Microsoft did not provide this feature when creating Windows 10.
By the way, it’s quite easy to change an annoying image on the locking panel. You just need to go through “Settings” to “Personalization” and find the appropriate item there.
Luckily, third-party developers have taken care of this need. They created a special utility called Windows 10 Login Background Changer. This program is easy to find on the Internet and does not even require downloading. You just need to launch it and select a new image for the screen.
Customizing the Windows 10 Welcome Screen
- 1 Change the background image
- 2 How to use the utility
The new Windows 10 operating system is literally replete with visual updates. There wasn't a single place where the design hadn't changed. This also applies to such a section as the welcome screen. We see it every time we turn on the computer. Naturally, over time, the standard splash screen, which the welcome screen shines with, will get boring and you will want to change it. But how to do that?
Changing the background image
Many people get tired of the deep blue color of the welcome screen very quickly. And if it’s extremely easy to change the lock screen picture using the system, then with the login screen it’s not so simple. Microsoft did not provide this feature when creating Windows 10.
By the way, it’s quite easy to change an annoying image on the locking panel. You just need to go through “Settings” to “Personalization” and find the appropriate item there.
Luckily, third-party developers have taken care of this need. They created a special utility called Windows 10 Login Background Changer. This program is easy to find on the Internet and does not even require downloading. You just need to launch it and select a new image for the screen.
How to use the utility
You need to find and download this application to your device. Preferably from trusted sources to avoid infecting your computer with viruses. After this, the downloaded archive is unpacked into a convenient directory.
Important! Using the utility can lead to errors in the operating system, as it changes the original parameters. Although the probability is small, it is worth considering.
To launch the application, you need to find the GUI folder in the selected directory and open it. It contains the W10 Logon BG Changer executable file. It is necessary to launch the utility and work with it. For it to work correctly, you need to use administrator rights.
As soon as you launch the program, a warning information box will appear. If you agree to take the risk, just click on Yes and continue working.
So, we come to the most important thing - directly changing the image on the welcome screen. After starting the program, a gray window will appear on the right. You need to select the file that will serve as the new background screensaver, which can be done by clicking on “Background file name” (in the Russian and English versions it is in the same place). There you find your file and then apply the changes.
Important! First find out what your screen resolution is and adjust the corresponding image to the size. Otherwise, problems may occur. However, remember that too light an image will not allow you to see what username is written. Of course, for a PC with one owner this is not critical, but for multi-profile devices it is very important.
You can criticize Microsoft as much as you like for certain changes in the interface of the latest versions of Windows, however, it is worth recognizing that it has certainly succeeded in making some improvements in the system. One of these is the startup time: Windows 10 and its predecessor start up noticeably faster than Windows 7. The picture here is spoiled by the fact that you still won’t see the desktop right away, since you must first encounter the lock and welcome screens.
Agree, both of these screens are not in demand among all users. Many would prefer to turn them off so that when the computer starts, they can see their desktop much faster and without unnecessary actions. This is quite easy to do.
Disabling the lock screen
The lock screen first appeared in the G8 and successfully migrated to Windows 10. In order to disable it, just do a few simple operations.
Press Win+R on your keyboard. In the Run window that appears, type gpedit.msc and press Enter.
The Local Group Policy Editor window will open in front of you:
Go there along the following path: “Administrative Templates” -> “Control Panel” -> “Personalization”. Once you reach the last folder, a list of available options will appear on the right.
Double-click “Disable Lock Screen” (fourth from the top).
In the window that appears, you will see that by default the option to block the display of the lock screen is not set. You just need to switch the checkbox to the “on” state and click OK.
After this procedure, the lock screen will no longer bother you. To turn it back on, simply disable the display ban.
Disabling the Welcome Screen
Another way to speed up Windows 10 startup is to disable the Welcome screen, which always requires you to enter a password. If we are talking about a home computer and you have nothing special to hide from your loved ones, then there is not much point in entering a password on the welcome screen every day.
To turn off this screen, press Win+R, type netplwiz in the window that appears and then press Enter:
In the next window, you need to uncheck the “Require username and password” checkbox.
After unchecking this box and clicking OK, the system will ask you to enter your current password twice:
If you do this, then the next time you start Windows, it will only briefly show the welcome screen, and then, without waiting for you to enter any passwords, it will immediately load the desktop.
With these two simple settings, you can significantly speed up the startup of Windows 10 on your computer, while saving yourself from a number of unnecessary actions that you had to perform every time you turn on and restart your PC.
The latest operating system from the corporation created by Bill Gates and his friend differs from its predecessors in an incredible number of innovations regarding its appearance.
The number of options that allow you to change the appearance of the OS has also increased. Today we’ll look at how to change the welcome screen for Windows 10, which the user sees every time the operating system starts.
In the top ten, Microsoft finally allows you to change the background of the welcome screen in Windows using built-in tools, which was not the case before. Now this process is carried out very quickly, and it does not require the use of third-party software. Although we will also touch on that.
Let's start with how to change the Windows 10 login screen background using the tools provided by the developer. This can be done in literally a couple of clicks, and does not cause difficulties even for people who…
1. Open “Settings” of the system (Win + I).
2. Go to the personalization section.
3. Click on the name of the third tab.
4. In the “Background” menu, select “Photo”.
By the way, the new OS allows you to display information of interest to the user on the lock screen and create a slide show on it, consisting of standard or selected graphic files from any directory.
5. Specify the proposed image or click “Browse” and select your image in the native screen resolution.
You can check what the new background image looks like using the Win+L keys.
Finding and changing the background of the welcome screen
Method 1. The simplest
- Launch “Settings” through the menu or “Win” + “l”. Open "Personalization".
Launch “Settings” through the “Start” menu and open “Personalization”
- Go to the third item on the left “Lock screen”.
Go to “Lock Screen”
- In the “Background” item, select a photo: you can set any picture by clicking on the “Browse” button, or select something from the system parameters.
In the “Background” item, select a photo
You can see what your window with a new photo will look like by pressing “Win” + “L”.
Method 2. Use tweaks.com Logon Changer snail
It is not advisable to use third-party snails, this may lead to crashes or various problems. Think carefully before doing the following:
- Install the application and launch it (through the installer window).
Install and launch the application
- Select the “Change London Screen” item (it can be either above or below) and look for the picture or photo we need on the device. Select and click “Open”.
In the “Change London Screen” item, select the picture and click “Open”
- With these steps you changed the picture.
Confirm the completed actions and click “OK”
If you need to cancel everything, there is a button (second from the top) - “Revert Wallpaper”.
Method 3: Registry Editor
This method allows you to return everything to factory settings.
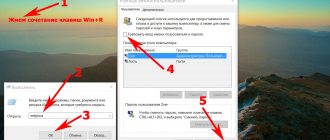
- Execute the combination “Win” + “R” and enter regedit in the line.
Call the “Run” window and enter regedit in the line
- Now we proceed sequentially along the following path: open HKLM, then Software, after which we open Policies and Microsoft, and then Windows. Next, open System and then right-click and click “Create DWORD”. Specify the name - DisableLogonBackgroundImage. Set the value to 1.
Go to the specified path, click “Create DWORD”, name DisableLogonBackgroundImage and set the value to 1
Tweaks.com Logon Changer
Before you start using the application, think carefully; using third-party software can lead to problems in the functioning of the operating system.
The utility is located on the website: https://tweaks.com/software/tweakslogon/.
1. Be sure to set the “tens” rollback point.
3. Install it and launch it from the installer window.
4. Click on the first icon at the top of the interface and set the path to the picture to which we intend to change the lock screen photo.
As a result, the picture will be replaced.
The second button will help you return everything back: “Revert Wallpaper”.
To see what happened, press Win+L to bring up the lock screen.
As you can see, it’s easy to understand even with the English version of the utility.