Key features and system requirements
This program contains many functions that will be useful to the average user who occasionally listens to music, and to the avid music lover:
- Supports more than 30 formats without the need to install additional audio codecs. These include: MPEG (.mp1, .mp2, .mp3), M4A, M4B; FLAC; AAC, AC3, APE, AT3, AA3; CDA, DTS, DSF, DFF, IT; MIDI, MO3, MOD, MPC, MTM; OFR, OGG, OMA, OPUS, RMI, S3M, SPX, TAK, TTA; UMX, WAV, WMA, WV, XM MKA.
- Play online radio stations.
- Creation of several playlists and the ability to edit them while playing music in one of them.
- Configuring “local” and “global” hotkeys that allow you to control AIMP in the active and inactive windows, respectively.
- Equalizer with dozens of ready-made settings for the most popular music genres.
- Deeply customize your look with an extensive library of covers.
- Editing audio file tags.
- Scheduler. It allows you to turn off the computer after playing the last file in the playlist or wake up the user at a designated time.
This program does not require computer resources and is completely free. From the official website you can download AIMP for Windows (7, 8, Vista, XP) and Android. Other operating systems are not supported.
How to install, configure and use Aimp
Hello readers of my blog. Marat Nauruzbaev is with you.
Many of you are wondering which audio player to use to listen to music with a wide range of features and that it is free? The standard Windows player does not always satisfy the needs of the average user, has a not entirely clear interface and is also “heavy”.
Among the wide variety of audio players, what I liked most was the simple one, which at the same time has a large number of settings, has earned many awards, and is also free . There is a version for Windows and Android, and there is a portable version that can be used directly from a flash drive without installing the program.
In this article we will talk about how to download and install Aimp, as well as how to set up Aimp and how to use it to listen to music and other mp3 files. As always, I will describe the process in detail with pictures and videos. So, let's go...
- Where and how to download Aimp
- Installation _
- Setting up Aimp
- How to use Aimp
To download Aimp audio player go to the official website of the aimp program. ru , section “Download” , select the latest (not Beta) version and click “ Download from server ”
Installation
Launch the file downloaded to your computer. We select the language we need. In addition to Russian, there is a large selection of other languages, including Ukrainian, Belarusian, Kazakh and other languages
The Aimp installation wizard starts. Click “ Next ”
We agree to the license agreement by checking the appropriate box. Click “ Next ”
Select installation options: installation folder, program version (portable or regular), click “ Next ”
Uncheck the boxes for installing additional programs. Click “ Next ”
Selecting integration options in Windows. I recommend leaving the default checkboxes. Click “ Install ”
Aimp player will begin to install on your computer
After installation, you can leave the “ Run Aimp ” checkbox and click “ Finish ”
Our Aimp player will launch with default settings
Interface overview
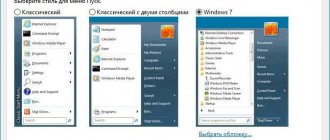
AIMP is designed in such a way that its basic functions can be used using knowledge of Windows Media Player. Conventionally, the interface can be divided into 3 functional blocks:
- Playback.
- Playlist management.
- Music library.
Note. Next, we will look at the interface of the cover installed by default in the current version 4.51.
The future of AIMP for Android
Already at the moment, the application has won the sympathy of hundreds of thousands of people. Everything is due to the huge number of possibilities:
- Easily configure AIMP for maximum sound quality.
- Change the AIMP Android theme to any one that suits you.
- Access to instant playlist creation.
- Ability to turn on radio on Android.
With each update, the capabilities only expand, which guarantees the development of the application in the future.
Play block
It consists of 3 parts:
- Header line.
- Block of information.
- Control buttons.
The title line contains 5 buttons and the name of the program in its center. The first one is responsible for calling the AIMP main menu. The second button in the form of four small squares switches the cover color combination from gray and white to black.
The last 3 buttons control the window: minimize it to a miniature, expand it to full screen and close it.
The information block contains the cover (it is automatically downloaded from the Internet), the name of the record and album, file format and bitrate.
To the right and below there are buttons:
- Playback controls (“Start”/”Pause”, “Stop”, “Next”/”Previous”).
- Volume control scale.
- Planner (looks like a clock). When you enable this option, a timer will appear next to it.
- Displays a visual image window in the form of a monitor icon.
- A sound effects manager containing an equalizer and tools for distorting the original sound.
- Repeat playing track and random play.
Below them is a recording rewind strip with timers at each end. The first displays the time elapsed since the start of playback, and the second displays the length of the recording.
When you minimize the window, a narrow strip appears on the desktop, displaying the track name, control buttons and a rewind bar. It is useful to know that AIMP has such a function.
Note. Control buttons appear only after hovering the cursor over the thumbnail.
AIMP3 player update
From time to time, AIMP3 player developers make updates to their player. To check for updates to this player in the future, go to Settings
and in the
Plugins
in checking for updates, click
Check
:
If there is a new version, updates can be made.
In this article, we looked at the installation and basic use of AIMP3 player. If you have additional questions about its use, write in the comments (below).
You can also watch the above-described process of using the AIMP3 player in the video tutorial. The only thing is that the video tutorial shows a slightly older version, in which some installation steps are slightly different compared to the new version, but the essence remains the same, so everything is quite clear:
This post will be dedicated to such a player as AIMP. I myself have been using these players for a long time and during this time this AIMP player has become my favorite. Aimp is for audio only. AIMP is not bad for PC, and the most important thing is that it is free for the user.
In the Effects Manager section: You can change the tempo, bass, and there is also a voice removal filter. I personally haven’t used the filter, but for users who need tracks, this is just what they need. Of course, it cannot be said that it worked perfectly on all files, but it still works.
The player has a convenient and multilingual interface, and you can also change it using skins. Skins can be selected on the official website.
In addition, you can customize the color scheme. AIMP also supports plugins with which you can expand the functions in one way or another.
Playlist
This window in AIMP for Windows includes the following elements:
- A number of tabs with ready-made lists.
- A string with the total playing time of the playlist, the size of the files and the number of recent ones.
- List of playable songs.
- Control buttons: “Add” and “Delete” files, “Sorting”. Playlist operations: “Create”, “Open”, “Close”, “Save”, “Rename”.
- A string to search for an entry in the list.
You can display or hide the window using the “Playlist” command in the main menu. It can also be separated from the main one and placed anywhere on the screen.
AIMP Detailed Configuration
All adjustments here are divided into special subgroups. There are quite a lot of them, so when you come across this question face to face for the first time, you may get confused. Below we will try to consider in detail all types of configuration that will help you configure the player.
Appearance and display
First of all, we will configure the appearance of the player and all the information that is displayed in it. We will start from the end, since changing external settings may reset some internal adjustments. Let's get started.
- Launch AIMP.
- In the top left corner you will find the Menu button. Click on it.
- A drop-down menu will appear in which you need to select “Settings”. In addition, the combination of the “Ctrl” and “P” buttons on the keyboard performs a similar function.
On the left side of the open window there will be settings sections, each of which we will consider in this article. Let's start by changing the AIMP language if you are not satisfied with the current one, or if you chose the wrong language when installing the program. To do this, you need to go to the section with the appropriate name “Language”.
The next step is to select an AIMP cover. To do this, go to the corresponding section on the left side of the window.
This option will change the appearance of the player. You can choose any skin from all available. By default there are three. Simply left-click on the desired line, then confirm your selection with the “Apply” button and then “OK”.
In addition, you can always download any cover you like from the Internet. To do this, you need to click on the “Download additional covers” button.
The following interface option will allow you to change the display mode of the running line of the playing track in AIMP. To change this config, go to the “Crawling Line” section. Here you can specify the information that will be displayed in the line. In addition, parameters for the direction of movement, appearance and its update interval are available.
Please note that the ticker display is not available in all AIMP skins. A similar function is definitely available in the standard version of the player skin.
The next item will be the “Interface” section. Click on the appropriate name.
The main settings of this group concern the animation of various inscriptions and software elements. You can also change the transparency settings of the player itself. All parameters are turned on and off with a simple checkmark next to the desired line.
In the case of changing transparency, you will need to not only check the boxes, but also adjust the position of a special slider. Don’t forget to save the configurations after this by clicking the special “Apply” and then “OK” buttons.
We are done with the appearance settings. Now let's move on to the next point.
Plugins
Plugins are special independent modules that allow you to connect special services to AIMP. In addition, the described player has several of its own modules, which we will discuss in this section.
- In the same way as before, go to the AIMP settings.
- Next, from the list on the left, select “Plugins” by simply left-clicking on its name.
In the work area of the window you will see a list of all available or already installed plugins for AIMP. We will not dwell on each of them in detail, since this topic deserves a separate lesson due to the large number of plugins. The general idea is to enable or disable the plugin you need. To do this, you need to check the box next to the required line, then confirm the changes and restart AIMP.
As with player covers, you can download various plugins from the Internet. To do this, just click on the desired line in this window.
The latest versions of AIMP have the “Last.fm” plugin built in by default. To enable and configure it, you need to go to a special section.
- Please note that authorization is required for its correct use. This means that you need to pre-register on the official Last.fm website.
- The essence of this plugin comes down to tracking the music you like and then adding it to a special music profile. This is exactly what all the parameters in this section are aimed at. To change the settings, you just need to, as before, check or uncheck the box next to the desired option.
Another built-in plugin in AIMP is visualization. These are special visual effects that accompany a musical composition. By going to the section with the same name, you can configure the operation of this plugin. There aren't many settings here. You can change the parameter for applying anti-aliasing to visualization and set it to change after a certain time.
The next step is to configure the AIMP information feed. It is enabled by default. You can see it at the top of the screen every time you launch a particular music file in the player. It looks like this.
This block of options will allow you to carry out detailed configuration of the tape. If you want to turn it off completely, then simply uncheck the box next to the line marked in the image below.
In addition, there are three subsections. In the “Behavior” subsection, you can enable or disable the constant display of the feed, as well as set the duration of its display on the screen. There is also an option available that changes the location of this plugin on your monitor.
The “Templates” subsection will allow you to change the information that will be indicated in the information feed. This includes the name of the artist, the title of the composition, its duration, file format, bitrate, and so on. You can remove the extra parameter in these lines and add another one. You will see the entire list of valid values if you click on the icon to the right of both lines.
The last subsection “View” in the “Information Feed” plugin is responsible for the general display of information. Local options allow you to set your own background for the feed, transparency, and also adjust the location of the text itself. For convenient editing, there is a “Preview” button at the bottom of the window, which allows you to immediately see the changes.
In this section with plugins there is also an item related to AIMP updates. We think it is not worth dwelling on it in detail. As the name implies, this option allows you to run a manual check of a new version of the player. If one is detected, AIMP will immediately update automatically. To start the procedure, you just need to click the corresponding “Check” button.
This completes the plugin settings. Let's move on.
System Configurations
This group of options allows you to set parameters that are related to the system part of the player’s operation. It's not at all difficult to do this. Let's look at the whole process in more detail.
- Call the settings window using the key combination “Ctrl+P” or through the context menu.
In the list of groups located on the left, click on the name “System”.
- The last block in this section is responsible for displaying the player button on the taskbar. This display can be turned off completely by unchecking the box next to the first line. If you leave it, additional options will be available.
- An equally important section related to the system group is “File Association”. This item will allow you to mark those extensions whose files will be automatically played in the player. To do this, just click the “File Types” button, select AIMP from the list and mark the required formats.
The next item in the system settings is called “Network Connection”. Options in this category allow you to specify the type of AIMP connection to the Internet. It is from there that some plugins often pull up information in the form of song lyrics, cover art, or for playing online radio. In this section, you can change the timeout for connection, and also use a proxy server if necessary.
The last section in system settings is “Tray”. Here you can easily customize the general appearance of the information that will be displayed when collapsing AIMP. We will not advise anything specific, since all people have different preferences. Let's just note that this set of options is extensive, and you should pay attention to it. This is where you can disable various information when you hover over an icon in the tray, as well as assign actions to mouse buttons when you click on one.
Once the system parameters are adjusted, we can start setting up AIMP playlists.
Playlist options
This set of options is very useful, as it will allow you to adjust the work of playlists in the program. By default, the player has such settings that each time you open a new file, a separate playlist will be created. And this is very inconvenient, since a huge number of them can accumulate. This settings block will help correct this and other nuances. Here's what you need to do to get into the specified group of parameters.
- Go to the player settings.
On the left you will find a root group called “Playlist”. Click on it.
A list of available changes will appear on the right. The very first parameter will allow you to block the monitor from turning off when AIMP is running. To do this, just tick the corresponding line. There is also a slider that will allow you to adjust the priority of this task. Please note that to avoid turning off the monitor, the player window must be active.
In the block called “Integration” you can change the player launch parameter. By checking the box next to the desired line, you will allow Windows to automatically launch AIMP when turned on. In the same block, you can optionally add special lines to the context menu.
This means that when you right-click on a music file, you will see the following picture.
A list of options that regulate how you work with playlists will appear on the right. If you are not a fan of multiple playlists, then you should check the box next to the “Single playlist mode” line.
You can also disable the prompt to enter a name when creating a new list, configure the functions for saving playlists and the scrolling speed of its contents.
By going to the “Add Files” section, you can configure the settings for opening music files. This is exactly the option that we mentioned at the beginning of this method. This is where you can make sure that a new file is added to the current playlist, instead of creating a new one.
You can also customize the behavior of the playlist when dragging music files into it, or opening them from other sources.
The next two subsections “Display settings” and “Sorting by template” will help you change the appearance of information displayed in the playlist. There are also settings for grouping, formatting and template adjustments.
When you're done setting up playlists, you can move on to the next step.
General player settings
The options in this section are aimed at general player configurations. Here you can configure playback parameters, hot keys, and so on. Let's look at everything in more detail.
- After starting the player, press the “Ctrl” and “P” buttons on the keyboard together.
- In the options tree on the left, open the group with the appropriate name “Player”.
There are not many options in this area. This mainly concerns settings for controlling the player using the mouse and certain hotkeys. Also here you can change the general appearance of the line template for copying to the buffer.
Next, let’s look at the options that are located in the “Automation” tab. Here you can adjust the program launch parameters, the playback mode of songs (random, in order, and so on). You can also tell the program what to do when the entire playlist has finished playing. In addition, you can set a number of general functions that allow you to customize the player's state.
The next section, “Hot Keys,” probably doesn’t need any introduction. Here you can set certain player functions (start, stop, song switching, etc.) to your preferred keys. There is no point in recommending anything specific here, since each user configures these adjustments exclusively for himself. If you want to return all the settings in this section to their original state, you should click the “Default” button.
The “Internet Radio” section is devoted to the configuration of streaming and recording. In the “General settings” subsection you can specify the buffer size and the number of attempts to reconnect when the connection is lost.
The second subsection, called “Record Internet Radio,” will allow you to specify configurations for recording music played when listening to stations. Here you can set the preferred format of the recorded file, its frequency, bitrate, folder for saving and the general appearance of the name. The buffer size for background recording is also set here.
You can learn how to listen to the radio in the described player from our separate material.
By setting up the “Album Covers” group, you can download them from the Internet. You can also specify the names of folders and files that may contain a cover image. You should not change such data unless necessary. You can also set the file caching size and the maximum allowed size for downloading.
The last section in this group is called “Phone Library”. This concept should not be confused with playlists. A music library is an archive or collection of your favorite music. It is formed on the basis of ratings and ratings of musical compositions. In this section, you can configure the settings for adding similar files to the music library, recording auditions, and so on.
General playback settings
There is only one section left in the list, which will allow you to configure general settings for music playback in AIMP. Let's get to it.
- Go to the player settings.
- The required section will be the very first. Click on its name.
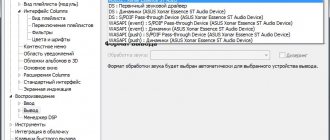
- A list of options will be displayed on the right. In the first line you should specify the device for playback. This can be either a standard sound card or headphones. You should turn on some music and just listen to the difference. Although in some cases it will be extremely difficult to notice. A little lower you can adjust the frequency of the music being played, its bitrate and channel (stereo or mono). There is also a “Logarithmic volume control” option switch available here, which allows you to get rid of possible differences in sound effects.
And in the additional section “Conversion Options” you can turn on or off various options for tracker music, sampling, dithering, mixing and anti-clipping.
In the lower right corner of the window you will also find an Effects Manager button. By clicking it, you will see an additional window with four tabs. A similar function is also performed by a separate button in the main window of the software itself.
The first of four tabs is responsible for sound effects. Here you can adjust the balance of music playback, enable or disable additional effects, and also configure special DPS plugins, if they are installed.
The second item, called “Equalizer,” is probably familiar to many. To begin with, you can enable or disable it. To do this, just check the box next to the corresponding line. After this, you can already adjust the sliders, setting different volume levels for different sound channels.
The third section of four will allow you to normalize the volume - get rid of different differences in the volume of sound effects.
The last item will allow you to set the mixing parameters. This means that you can independently adjust the fade-out of the composition and the smooth transition to the next track.
These are actually all the parameters that we would like to tell you about in the current article. If you still have questions after this, write them in the comments. We will be happy to give the most detailed answer to each of them. Let us remind you that in addition to AIMP, there are no less worthy players that allow you to listen to music on your computer or laptop.
source
Music library
The implementation of this function in this version of AIMP is such that it is very similar in appearance and capabilities to Windows Media Player 11. The music library is designed to structure the collection of music located on the hard drive. Her window consists of 3 blocks.
The first one (on the left) contains the composition tree. It features automatically created groups based on tags embedded in audio files. The button at the top of the block allows you to change the way music is sorted according to the following parameters:
- No grouping. A tree of folders containing music will be displayed.
- Albums.
- Artist and album.
- Year, artist and album title.
- Genre, artist and album.
When you click on one of the groups in the list on the left, a list of files included in it will be displayed.
The third block is a line including:
- 2 fields for searching by album or recording name.
- Buttons for adding and removing files from the audio library.
- Three-position switch for the appearance of the second block: table, table with album cover, cover only.
Installing the Aimp application
Open the resulting installation file. Specify the appropriate language. For example, Russian.
The Application Installation Wizard opens. Click the “Next” button
Check the box to confirm that we accept the license agreement. Go to “Next”
Specify your installation parameters: location directory, application version (mobile or classic), click the “Next” button
We refuse the offer of additional programs by unchecking the corresponding box. Go to “Next”
Selecting integration options in Windows. It is advisable to leave the default checkboxes. Click the “Install” button
We are waiting for the installation of the new audio player to complete on your computer.
Once the installation is complete, do not turn off the “Run Aimp” checkbox and click the “Finish” button
The application will automatically launch with default settings