Method 1: Toolbar Button
In order to change the color of text in a Word document, you need to use a button specially designed for this, located in the “Font” tool group.
- Select the piece of text you want to color.
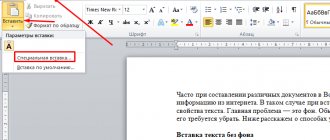
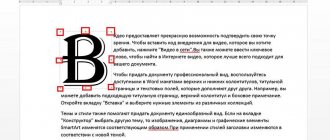
- Expand the menu of the "A" button marked in the image below.
- Choose a suitable color from the palette
or use the “Other colors” item.
This action will open the Colors dialog box, consisting of two tabs:
- Regular;
Range.
In each of them you can determine the desired color as accurately as possible. In the lower right corner a comparison of the new and current is displayed.
To confirm your choice, you must click the “OK” button, after which the color will be applied to the selected piece of text, and will also be added to the palette in the “Recent colors” list.
In the “Font Color” menu, another option for coloring letters is available – “Gradient”. By default, this sub-item presents shades of the current color, and to change them you need to use the “Other gradient fills” option.
The “Text Effects Format” block will appear on the right, in which you can not only change the color, tint, gradient features and transparency of the font, but also some other parameters for its display, for example, add an outline and other effects. We will consider working with this section in more detail in the last part of the article.
Changing font color and highlight text in Microsoft Word
The Microsoft Word text editor has many unique functions that help the user work with documents of any size. In addition to the standard formatting in the program, you can select all text or its fragments using several possible options. For example, you can change the font color, make it bold or italic. Along with this, it is possible to underline, strike through or paint over the text with a specific marker. If necessary, there is a function that allows you to change the color of a specific area. Let's look at all sorts of ways that allow you not only to make a block of information noticeable, but also to remove the existing selection in Word. The recommendations given will allow you to perform any manipulation in just a few steps.
Text formatting is one of the main functions of the editor
Method 2: Font Group Options
Another method for coloring text in a document is to use the Font group tool options.
- As in the previous case, select the text fragment whose color you want to change.
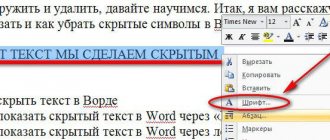
- Click on the button marked in the image below or use the keyboard shortcut “Ctrl+D”.
- In the window that opens, select the appropriate option from the “Text Color” drop-down list –
palette and “Other colors” are available.
All changes you make can be seen in the Sample area. It is also possible to change the font itself, its style, size and some other parameters.
There is the possibility of using “Text effects” - clicking on the specified button brings up the window already mentioned above, which we will discuss separately.
Having made your choice, click on the “OK” button.
As a result, the color of the text you selected will be changed.
Cancel the selected action
To remove multi-colored text selection in Word, follow exactly the same steps that you used to apply it. Everything you need to work with selecting a font or the area around it is located in one tab called “Home”. You can remove bold and italic fonts from the document by repeatedly clicking on certain buttons in the central menu, in particular, “Zh” and “K”. True, before you change and remove the selection, you need to “show” the computer the place that is to be formatted. The “No Color” and “Auto” buttons help to remove the font color. You can change the formatting style by using the Normal Style command.
How can I change the font color in a text editor, and also how can I change the font under the icons on the Desktop for XP and 7? How to change html font? We will look at these questions more closely in our article.
Font color in Word editor
When working in the Word text editor, any user may have a situation when they need to change the color of the typed text or want to change the font under the icons on the Desktop.
How to change font color in Word text editor? Typically, such a need arises to change individual words or fragments of text in order to draw special attention to them. By default, the font color is set to black. In order to change the black color to the desired color, you need to complete the following steps:
In the editor’s “Format” menu, select the “Font” command or press CTRL + D, these actions open a dialog box. In this window, in the “Font color” field, the “Automatic” parameter is already...
0 0
You will need
Computer; - Internet; - administrator rights.
Instructions
Find the item “Change color scheme” in the list on the left and click on it. The “Window Color and Appearance” window will open, in which you can select various color schemes with ready-made combinations of panel colors, windows and fonts. Operating systems typically have a huge range of different colors that can be used both in application software and in the operating system itself.
If you are not satisfied with the choice of operating system, click on the button...
0 0
To customize the desktop in Windows 7, right-click on the desktop and select menu - personalization.
Changing the desktop theme. Here you can select a theme to change your desktop background, window color, sounds and screensaver at the same time. You can customize the theme as you wish.
Desktop background - allows you to select an image (photo, drawing, etc.) that will be displayed as the Windows desktop background. Or select several images at once as a slideshow. Additionally, you can select the position of the image - fill, fit, stretched, centered or tiled (duplicate).
Window Color—Allows you to change the color of window borders, the taskbar, and the Start menu. You can adjust the window transparency and color intensity.
Sounds - allows you to configure the sound in the Windows operating system. Screensaver - You can configure the screensaver to display when inactive for a long time...
0 0
This is a quote from a message by Lebedeva-3-3 Original message
I’ve had a light screensaver on my desktop for a long time, and a white font. I recognize programs by their icons. And today I think - after all, it should be possible to change the font color.
I searched in fonts, screen properties.... found it.
Go to Start - Control Panel - Appearance and Personalization - Change the desktop background. In “Image Location” select “Solid Colors”. A choice will be offered. Select some light color and “save changes”. The font on your desktop will turn black.
Now you can download any picture of the desired size as a desktop background, for example from here...
0 0
In this article, we will tell you how to change the font size of desktop windows in Windows 7.
Follow the instructions:
Click Start - Control Panel. In the search bar, type "color" and search for Change window colors and metrics. From the drop-down list, select the part of the window whose font you want to change. For example, if you want to change the font in the menu bar, select Menu Bar from the list. Next, make any of the following changes: In the list of fonts, select the one you see fit. From the Font Size list, select the size you want. In the Color list, specify the desired font color. Repeat the above steps for all the items you want to change and click...
0 0
To change the color of icons (labels) on the desktop from white to black, I found a way in 2 steps:
1. Right mouse button: properties - design - effects - check the box “apply the following screen font smoothing method: ClearType” - OK (this is even with the standard Windows XP style)
2. Next, click Start - Settings - Control Panel - System - Advanced - in the "performance" paragraph, click on options - there in the visual effects tab, UNCHECK "casting shadows by icons on the desktop"
Note: to best customize your icon labels, there is also a ClearType setting:
Start - settings - control panel - ClearType settings - check the "enable ClearType" box - and launch the wizard - ClearType settings - configure further as you like.
READY!…
0 0
In this lesson you will learn about the settings with which you can change the design of the Windows 7 desktop.
In Windows 7, you can literally change the appearance of your desktop with just one click. You can change and customize almost everything in Windows 7: themes, wallpaper, window color, font, sounds, screensavers, desktop icons, mouse pointer, account pictures, visual effects, gadgets and screen settings.
Themes To change and customize the Windows 7 theme you need to: go to Control Panel...
0 0
Most users probably already know how to change the size of Windows desktop icons. At the same time, another part of people never takes advantage of the opportunity to change them and have the size set by default. Most likely this is due to not knowing that the size of icons on the desktop can be changed very quickly and without third-party software.
You can use one of the three methods given to change the size of desktop icons in Windows 7, Windows 8 and Windows 10.
Note: It will not work to have different sizes of icons or icons (as you wish) on the Windows desktop at the same time. But having different sizes of tile icons and shortcuts in the Windows 10 Start menu is quite possible.
Method 3: Formatting Styles
The methods discussed above allow you to change the color for any arbitrary font and/or part of the text in a document, or for all of them at once. This can be done in a few clicks, but it is inconvenient in cases where different fragments (for example, heading, subheading, paragraph) need to be “colored” in different colors. For such purposes, it is easier to create several styles, setting the desired parameters for each of them, and then applying them as needed.
We previously wrote about how to create new styles in Word yourself in a separate article - among the parameters available for customization there is also the choice of color that interests us. Next, we'll look at how to select and use preset styles and their components, such as themes and colors.
Read more: How to create your own style in Word
Important! The following changes apply to the preselected or default design style and apply to the entire document at once. In this case, selecting text in order to change its color is not necessary.
- Go to the “Design” tab (formerly called “Design”).
- If the entries in the document are formatted correctly, that is, in addition to regular text, it contains headings and subheadings, select the appropriate style, focusing on the thumbnails in the Document Formatting tool group.
The following instructions will help you format the text correctly:
Read more: How to format text in Word How to create headings in Word
- You can diversify the preset design styles by changing their colors using two tools:
- "Themes";
"Colors".
The latter can also be customized in detail by defining the colors and shades of different elements of the text document,
by giving the style a name and saving it as a template.
Highlight text with flowers
You can highlight the selected part of the text with any color, and it will look as if it was marked with a marker. We usually highlight text in yellow. It's very easy to highlight part of the text with color in two simple steps
Step 1
— Select the part of the text that should be highlighted. You can use any text selection method to highlight a portion of the text.
Step 2
- Click the
Text Highlight Color
to display a list of colors. Try hovering your mouse over different colors and you will see that the text color will automatically change. You can select any of the available colors by simply clicking on it.
If you click on the left side of the Text Highlight Color
, then the selected color will be automatically applied to part of the text; you need to click on the small triangle to display a list of colors.
Color highlighting of a separate fragment of a document
In order for color highlighting to concern not the font itself, but the area that surrounds the space of the designated fragment, the user needs to go to the “Home” category, among other tools, select the arrow, which is located in the drop-down menu near the “Color” line. This manipulation calls up a command in Word that changes the gamma of the selection itself.
The user must indicate the preferred color scheme, then use the cursor to outline the desired fragment of the document. Subsequently, this particular part will be highlighted with a specific color.
Clicking again on the previously presented command will help return the standard appearance of the electronic pointer.