Often we are forced to edit a finished document that contains headings, subheadings and other elements of structure formation, even to the point of forced breaks between pages. It's time to talk about how to remove a page break in Word. In fact, the problem is quite popular. Microsoft Office Word is the most popular text editor installed on almost all computers and tablets running Windows. No matter how popular the program is, most people don't even know a tenth of its functionality, which is why many don't know how to create and remove gaps between pages.
How to create a page break
There are several options for transferring data - manually and several using Word functions. Each of them is better suited for its purpose, has advantages and features. However, all the options are quite simple.
Page break using the Enter key (manually)
The simplest and most obvious method, which most Word users resort to. You need to place the cursor in the place from which you want to indent, and then press the Enter key until the text input line moves to a new sheet. It has a serious drawback - if you change part of the file before transferring, the formatted paragraph will “raise” or “lower” in the document. In addition, the markup will not be preserved when you change the document scale. Using Enter is only suitable for setting the space between paragraphs as 1 blank line.
Break a sheet using the Ctrl + Enter key combination
A faster and much more functional option for creating indentation. Place your mouse cursor in front of the piece of data you want to transfer, then press Ctrl and Enter at the same time. Unlike the previous method, when using this method, the formatting will not disappear when you change the scale or edit the previous part of the text. This method is great if you need to make one or more transitions throughout the entire document or edit one that has already been typed.
Breaking a sheet using the function in the “Insert” tab
This method completely repeats the functionality of the previous one. Algorithm:
- Place the mouse cursor in the desired part of the content (the part to the right will be shifted);
- Open the "Insert" tab;
- From the Pages drop-down menu (default is the cell on the far left), select Page Break.
Switching to a new sheet using the “Breaks” function
You can also transfer data through the “Layout” tab (“Page Layout”). The Breaks drop-down menu has several functions - the option has more options than the others. To do this you need:
- Place the mouse cursor in the desired part of the text;
- Go to the “Layout” (or “Page Layout”) tab, to the “Page Settings” area;
- From the Breaks drop-down menu, select the item you need.
There are a total of 3 functions in this menu:
- “Page” - all objects that are to the right of the cursor in the file will move to a new one, maintaining the formatting.
- Column is a feature that is needed if you are using appropriate text layout. It moves the data after the cursor to the beginning of a new column.
- Text wrapping is an option for web files. When using it, the content of the document wraps around an image, table or other object, which allows you to save space and create more beautiful formatting.
Switching to a new sheet via the context menu
The transfer can be done without using the main menu tabs. To do this you need:
- Select the paragraph for which you want to make settings;
- Click on the selected fragment with the right mouse button, follow the “Paragraph” link in the “Page Position” menu;
- O in the Page Breakdown area.
How to remove a page break from the next one in Word 2010
In Word version 2010, making breaks is just as easy as in earlier or later versions. Since we are talking about non-printable characters, they need to be displayed for more comfortable editing. Click the corresponding button on the panel
After this symbol is displayed, you may see breaks in the document pages.
Now, by placing the cursor at the break location using the “ Del ” key, you can delete all existing breaks.
Things to consider when using a hard divider
A user-created transition works exactly the same as a normal transition that occurs when a worksheet is filled with data. The only difference is that you decide which paragraph should be moved. In order to do this, left-click in front of the fragment that you want to transfer.
Splitting data using Ctrl + Enter is no different (except for the Breaks feature, which provides more options). This combination is recommended for speed and convenience. Both when pressing Ctrl + Enter, and when dividing sheets in another way, a technical symbol is added to the text, which creates a transition.
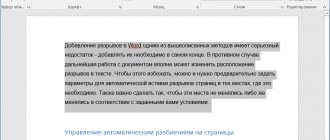
If you used a hard delimiter in a Word file, check the document carefully before printing. You can do this in preview mode. It happens that when dividing content into sheets, the file structure changes and there is no need to use the function.
Do not use strict division of text to organize numbering in the file. Word offers enough options to solve this problem - no need to use formatting.
Third way
The third method is to automatically remove absolutely all page breaks in the document or replace them with a paragraph mark or a space (depending on your goals). To do this, use the Find and Replace window.
Place the cursor at the beginning of the text and press the Ctrl and F keys. A search and replace window will appear. Click on the "Replace" tab. Next – click on the “More” button. Additional settings and options will open. Place your cursor in the "Find" field. Find the “Special” button and in the drop-down list, click on the “Page Break” line.
Place your cursor in the Replace field. If you just need to remove breaks, don't type anything on this line. If you need to replace them with spaces, type a space (with a regular key, as you do when working with text). If you want all sections to be replaced with the beginning of paragraphs, click on the "Special" button and select the appropriate line.
After that, click on the “Replace All” button. The operation is completed. The program will provide a report on how many replacements have been made. All page breaks have been removed.
This method is suitable for working with voluminous documents or with texts where page breaks are inserted erroneously and haphazardly. This happens, for example, when copying materials from a browser with complex layout.
Control automatic splitting in Word
Automatic functions for tearing sheets are needed so that you can transfer this work to the program. Word offers a large number of settings - for the functionality to work properly, you need to be able to manage them. In addition, settings that are correctly set in a particular case protect the document from loss of formatting when the text is changed.
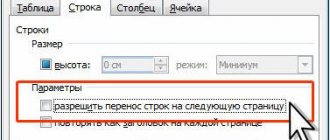
How to prevent one paragraph from tearing into 2 sheets
Sometimes you want to keep one of your content paragraphs from breaking into two when you split the page. For example, if you want to maintain its integrity for a neater appearance or to make it easier to read. To do this you need:
- Select the paragraph you want to protect from hyphenation;
- Right-click on it to bring up the context menu;
- Select “Paragraph”;
- In the new dialog box, go to the “Page Position” tab;
- In the "Pagination" area, activate the "Don't break paragraph" function;
- Save the settings by clicking "OK".
How to prevent two or more paragraphs of text from splitting (moving one of them to a new sheet separately)
Sometimes you need to not only protect a paragraph from being carried over, but also from being broken from another. This is done so that parts of the text that are related in meaning are located nearby. For this:
- Select two or more paragraphs that you want to protect from splitting and place on one sheet of paper;
- Open the “Paragraph” menu and the “Page Position” tab, as in the description of the previous function;
- Activate the “Keep in touch with the next” option.
How to add a separation before a paragraph
Thanks to this function, the data fragment will always occupy the top position on the new sheet:
- Select the required paragraph;
- Call the context menu by right-clicking the mouse;
- Follow the link “Paragraph”;
- In the “Page Position” tab, in the “Layout” area, set the “From New Page” option;
- Click OK.
Prohibition of leaving one line of a paragraph on a sheet
In a professional environment, one line that is torn off from a paragraph and located on another sheet is called “dangling”. The sheet should not begin or end this way. For strict requirements, only two or more lines are allowed. To automate this principle, you need:
- Select paragraphs that should not contain hanging lines;
- Open the context menu with a right click, then “Paragraph” and the “Page Layout” tab;
- Activate the “Prohibit dangling rows” option;
- Click "OK" to save the changes.
Usually this option is activated in Word by default, but sometimes, on the contrary, you need to disable it - this is done by clicking on the same checkbox.
Prevent table rows from wrapping when moving to a new page
In order for the table to look neater and be easier to read, it is recommended that all its rows be on one sheet in Word or when printing. To do this you need:
- Select the table to make a special context menu available;
- Right-click on the selected area and select “Work with tables”;
- Go to “Layout” - “Table” - “Properties”;
- In the window that opens, click on “Line”;
- Uncheck the box “Allow lines to wrap to the next page”;
- Save your changes.
Usually this feature is turned off in Word by default.
How to remove a page break in a Word 2016 table
It is often necessary to remove a table break when its size exceeds the table size, since the program automatically breaks and moves the table in a completely different way than we need.
We start by placing the cursor in the line where there should not be a break, i.e., where it needs to be disabled. If the table needs to be placed entirely on the page, then select it by pressing Ctrl+A.
Go to the “Working with Tables” section and select the “Layout” tab.
Next, select the “properties” menu in the “Tables” group.
A window will open in which we go to the “String” tab. Here you need to uncheck the “Allow lines to wrap to the next page” checkbox.
Click “OK”. That's it, breaking the table will be impossible. The last example today will be the ill-fated black line, which so irritates many users.
Removing a sheet split
If you applied a division by mistake or, while checking a document, realized that it was not needed, you can delete it. At the same time, the transition that occurs in Word automatically when the text reaches the end of the sheet cannot be deleted or changed - this is a mandatory feature of the program. You can only remove hyphens added by users.
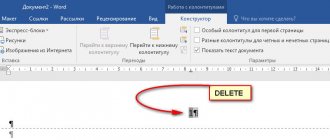
Removing a gap manually
This method is the opposite of creating a hyphen by pressing Enter. It is the simplest, but not as convenient and fast as the others:
- Place the cursor at the end of the last line of the paragraph;
- Click Delete;
- If the hyphen does not disappear, continue to press the key - perhaps a fragment of text is separated by a large number of line breaks;
In order to understand that the transition has been deleted, pay attention to the cursor at the end of the line. If the paragraph is the last one, and it occupies the final position, then all the empty lines have disappeared.
Removing a gap via “Display”
Separating sheets in Word is a technical symbol - like a tab sign. It is not visible in normal file viewing mode. In order to delete a symbol, you need to use advanced features:
- Open “Home”, click “Show all characters” (the button in the form of a special symbol, which is located to the left of the text style selection menu) - this will make all breaks visible;
- To delete a transition, select the symbol, then delete it using the Delete button.
When you remove a sheet break, the text that followed the character is formatted in the same way as the text that preceded it. The method is most relevant if you need to remove several characters - for a large number it is too time-consuming and inconvenient.
Removing a gap via “Draft”
This method is also great for manually removing multiple transitions in a document:
- Click on the “View” tab;
- Select the document display type “Draft”;
- Place the cursor near the division (before the line of text that is already on the new sheet);
- Press the Delete key.
Remove a gap using document search
This method is great when you need to remove a large number of transitions or all at once:
- Open “Home”, click “Show all characters” (the button in the form of a special character, which is located to the left of the text style selection menu) - this will make all separators visible;
- Copy one of the break icons to the clipboard (Ctrl + "C");
- Press the key combination Ctrl + “F” - this will activate text search;
- Insert a special line break character into a line if you need to remove multiple transitions;
- Select a character and press Delete, after which you can use the up and down arrows;
- If you need to remove all separators at once, use the “Replace” command - Ctrl + “H”;
- Instead of using the “Find” field, use the option at the bottom of the window - “More” - “Replace” - “Special” - “Page Break”;
- For "Replace with" enter a space;
- Click “Replace” as many times as necessary or “Replace All” to do this throughout the document.
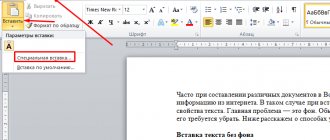
Inserting a break
For most versions of the program, the process is completely identical; for example, the algorithm for how to make a page break in Word in 2010 is similar to all subsequent versions. Having selected a place, usually at the end of a paragraph, after which there should be a page break, you need to select the “Insert” tab in the top quick access panel, in which there is a “Page Break” item in the “Pages” column. After clicking on this button, the cursor will automatically go to a new, empty page, and if the current sheet was previously followed by another one, it will be one number further. To return the text below to the top, to maintain a page break only between these sheets, just press the Delete key on the keyboard once. And to delete the inserted break itself, use the BackSpace button.
A similar result can be achieved in another way. Having selected the paragraph that should start on a new page, you need to right-click on it. In the menu that opens, you need to find the line “Paragraph” and click on it with the left mouse button. After this, a window will appear in which there will be two tabs - “Indents and Spacing” and “Page Position”. Having selected the last one, you need to check the box “From a new page” and click the “Ok” button. As a result, all text from the selected paragraph will move to a new sheet.
Bottom line
Break in Word is a function that allows you to format text in accordance with the requirements for printing or simply make it more convenient to read. The program has several ways to make a transfer, as well as customize it. Unnecessary divisions can be removed - also using several options. However, it is recommended to keep an eye on the items at once, as it can be difficult to deal with all the transfers at once.
The concept of "Section Break"
What properties does the document have? This:
- Print area boundaries
- Header and footer (we learned this in lesson 38)
- Page orientation (portrait or landscape)
- Text Style Set
I do not mention such properties as the author of the document, the number of characters, pages, and so on.
As we create the document, we can create new text styles (of course, without getting carried away), but the boundaries of the printed field, page orientation and footers are set for the WHOLE document.
But what if you need a page in landscape mode, for example, the document has a large table that will be perfectly readable in landscape mode:
To do this, it is possible to create several sections in the document.
| You can figuratively imagine that we cut the document into several parts and each part sets its own parameters for page layout, page orientation, headers and footers with changing information . |
The “Section Break” command is located on the Page Layout ribbon → Page Setup group of commands → Breaks command → drop-down menu → second section of the Section Breaks drop-down menu → 4 types of sections:
- Next page
- Current page
- Even page
- Odd page
Let's take a closer look at the types of section breaks:
How to adjust page breaks in Word 2003?
In earlier versions of Microsoft's text editor, the instructions for inserting page breaks and the tips for configuring automatically inserted breaks are absolutely identical.
There is just one caveat: to access the “Paragraph” form, where you can configure the checkboxes for setting up automatic breaks, you need to go to the “Format” section of the top menu, the “Paragraph” option.
If you want a beautiful, elegantly designed document, don't forget to use the page break feature - it's another way to present an interesting and unusually configured template to the client.