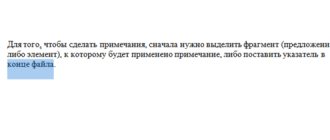
How to open the drawing panel
But the drawing panel itself is missing here and opens only when necessary. And in order to be able to draw, you need to insert a picture into the text, as described in another article, and click on it with the mouse.
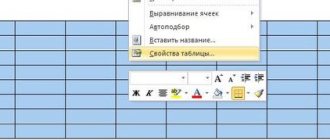
However, the drawing toolbar can be opened in another way by going to the “insert illustration” tab. Here you need to click on the arrow (in the form of a triangle) located near the “shapes” button. And at the very bottom of the window that opens, find and click on the “new canvas” button.
Opening the Drawing Panel
As a result of such manipulations, a field (canvas) for drawing will appear in the place where the cursor was, and the drawing panel will be expanded in place of the usual toolbar.
This is what the drawing panel looks like in Word
Drawing in Word
Here we will look at how drawing works in Word and where to start this work.
First, launch Word on your computer. Next, follow the instructions that will help you draw a picture in the program:
- Activate drawing mode in Word.
- Select tools from the Control Panel, such as Drawing Curve.
- Swipe it across the empty field of the document and draw something.
- Add shapes and different colors to the picture and save the changes.
As you can see, everything is quite simple. Let's look at drawing in this editor in detail.
How to enable drawing mode in Word
Let's turn on the drawing mode in Word to start drawing. This can be done in several ways, since Word versions are different. So, in Word 2007, go to the “Insert” section next, click on “Shapes” and at the bottom the “New Canvas” button (Screen 1).
Click on the square that appears twice with the mouse button (Screen 2).
After which the drawing mode is activated. That is, tools will appear at the top of the Word panel. They can be used to create and modify pictures.
You can also click on the “Insert” section, then “Shapes” and select various shapes responsible for drawing.
In future versions of Word, drawing is activated differently. Let's open Word 2020 and click the "File" button in the program. Then select “Options” and then “Customize Ribbon”. In the main tabs of Word, enable the “Drawing” function. Place a marker on it. Save the changes using the “OK” button and the “Drawing” section will be displayed in Word.
How to draw in Word with a pencil or marker
Many people use Word 2007. Using its example, let's look at drawing with a pencil. Open the “Insert” section of the program, after clicking “Shapes”, click on “Drawn Curve” (Screen 3).
This line can be used as a pencil.
For example, let's draw a circle and a square using a pencil (Screen 4).
Draw a circle and a square with a pencil to create a drawing. If you want to fill it with color, click on it with the mouse and select shape styles from the menu above. Just click on them to get a color drawing.
The pen tools, which are located in the “Drawing” section of Word 2020, are responsible for the marker. Left-click on them and create a drawing. Simply hold the marker with your computer mouse. Swipe it across the text editor field and create an image.
How to draw with shapes in Word (Word)
In Word you can draw not only with a pencil, marker, but also with shapes. To do this, left-click on the “Insert” section and go to the “Shapes” category (Screen 5).
Then click on the selected shape and place it in the desired place in the text editor. Once the shape is drawn, double-click on it to activate the shape control panel. There you can make the following changes to the shape:
- Change shape styles.
- Filling, various contours.
- Sizes of drawings, volume, rotation and more.
How to draw diagrams and flowcharts in Word
In the Word text editor, you can draw various diagrams or flowcharts. First, select the shapes that relate to the flowcharts. Click “Insert” then “Shapes” and in the “Block diagrams” section select schematic blocks (Screen 6).
Then place the cursor over the document field and use the left mouse button to draw a flowchart. Next, release the mouse button so that the diagram appears.
Using effects when drawing in Word
When drawing in Word, you can use various effects. When the drawing is ready, click on it and open the “Shadow Effect” section. Here you can select a shadow for the drawing (Screen 7).
If you need a fill, click on the “Shape Fill” button and set the appropriate color for the drawing. You can change the colors of the shape's outline. Click on “Shape Outline” and select, for example, “Blue Color”. After which the outline will be displayed in blue.
You can also set the volume of the picture; this function is responsible for the effects. Click on the “Volume” button next, on some effect, for example, a square. After which the drawing will have a different shape.
How to draw lines and shapes
At first it may seem that drawing here is only possible with the help of ready-made shapes and arrows, i.e. drawing up block diagrams. However, you can also find real drawing tools here, such as draw curve and polylines.
Using which you can draw not only diagrams, but also real drawings. It is especially convenient to use “polylines”, since to draw any contour you only need to click on the turning points of the drawing outline with the mouse. And all lines will be drawn automatically between successively located points, and no shaking of the hand or mouse will spoil the picture.
Convenient to draw using polylines
Drawing with shapes
So, in this program you can draw not only with a pencil or marker, but also with shapes. We are required to go to the “Insert” section and select “Shapes”.
Now we select any figure we like and place it in the right place in the editor. After the figure is ready, double-click on it, thereby activating the figure control panel.
You can do the following with the figure:
- Changing the style of the figure.
- Change the size, volume and rotation of the picture.
- Also do the filling, as well as various contours.
Shape Styles and Effects
After drawing the outline of an object, you can fill it with different colors or patterns. To do this, use the “Shape Fill” button. The color of the outline of the figure and its thickness can be adjusted using the “shape outline” button.
Shape styles
The tools for creating shadow and volume effects are interesting. Using these buttons, you can give the effect of three-dimensionality to a figure or the shadow it casts. Moreover, you can choose not only the direction of the shadow and its length, but also its color.
The effect of volumetric drawings
How to create tables
First, let's figure out why and who needs tables in Word? Undoubtedly, this is a very important function of this program, it is used by accountants, people who compose news articles, reports, and much more. You may not notice, but this undoubtedly useful invention is used almost everywhere in everyday life. And in order for the panel with the treasured tool to appear, you need to create a table. But how to create a table if you are working in this program for the first time and are lost among all the functionality? To make a table, we need to go to the insert tab> Table> Insert table. Look at the photo below.
After this, you will need to specify the number of columns, the number of rows, and some other parameters, and this element will fit into your work, all that remains is to fill it out.
If you need more precise customization, be it shape, size, or number of columns, no problem! You can do this too, you need to click Insert > Table > Draw Table.
Next, draw a simple rectangle and delimit the table in it as you like, with any width and length.
Rotate a picture or its element
In the new Word you can also deviate the drawing in the desired direction. And not only 90 and 180 degrees - here you can set your own any angle of rotation of the picture.
Rotate an image
It is often necessary to hide some image elements behind others in order to create a realistic effect for the entire picture. Such a tool is also available here. The selected shape can be brought to the foreground or pushed to the background of the drawing with one click of the mouse.
Thus, the drawing panel in the modern Word application is hidden, and opens only when needed. And you can draw here no worse than in the specialized Paint editor.
Grouping and ungrouping pictures, rotating pictures
When you have combined pictures in Word, they need to be grouped so that there is a single object. To do this, select the picture with the left mouse button and select “Group” from the right menu.
Now, select the picture and click “Copy”. Next, move it to another place in Word so that the drawing object is divided. This way you will get similar drawing objects.
To ungroup objects in Word, right-click on them and select “Ungroup” in the menu.
Rotating pictures in Word is done using the “Rotate” function. Select the picture and click “Rotate” (Screen 8).
From the menu, select, for example, “Rotate left 90 degrees” or other turns. After this, the drawing will turn in a different direction.
How to make a lot of underlined lines?
To underline an unlimited number of lines in the text, Method No. 3 is suitable for installing a stripe under the text.
To make several lines below or above the text at once, use Method No. 4, but instead of the “-” symbol, use “=” or “#”.
Lines below or above text
The fastest way to make a horizontal line in Word
To quickly make a horizontal line , enter three or more special characters on a new line and then press Enter. Word automatically converts these characters to a horizontal line. The style of the horizontal line depends on the characters entered:
How to make a horizontal line in Word – Styles of horizontal lines in Word
- Three or more "*" - dotted horizontal line
- Three or more "=" - double horizontal line
- Three or more "~" - a wavy horizontal line
- Three or more "#" - thick decorative horizontal line
- Three or more "-" or "_" - thick or thin single horizontal line
These horizontal lines are often used in Word documents.
How to insert a shape into a sheet
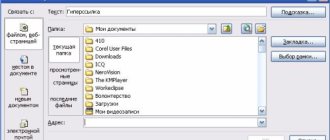
To add a shape in Word, click Insert - Shapes on the ribbon. Explore the gallery of figures that opens and select the one you need.
Click on the shape's thumbnail. Now you can insert it onto the sheet. There are two ways to insert:
- Click on the sheet at the insertion point. The object will be inserted in its standard size
- Use your mouse to stretch the shape on the sheet until you reach the desired size and aspect ratio. If you hold Shift while stretching, the program will respect the “correct” aspect ratios of the object
After completing this sequence, the figure will appear on the sheet and take the place where you outlined it. But it seems that this is not yet what we wanted to get. How else can you work with shapes? When it is inserted and selected, the Format tab appears on the ribbon. This is where the main functionality for working with shapes is collected. We have already looked at some of the tab tools in the article on image stylization, so I’ll touch on them briefly. But let's look at the special features in more detail .
Enable the Draw tab
Microsoft Word has a set of drawing tools that are similar to those in the standard Paint integrated into Windows. It is noteworthy that many users are not even aware of the existence of these tools. The thing is that the tab with them is not displayed on the program’s quick access panel by default. Therefore, before you start drawing in Word, you and I will have to display this tab.
1. Open the "File" and go to the "Options" .
2. In the window that opens, select “Customize Ribbon” .
3. In the “Main Tabs” , check the box next to “Drawing” .
4. Click OK for the changes you made to take effect.
After closing the Options Drawing tab will appear on the Quick Access Toolbar in Microsoft Word . We will look at all the tools and features of this tab below.
Drawing Tools
Format menu automatically opens , where you can find additional options.
Inserting a shape
The menu of the same name contains a list of objects added to the canvas: rectangles, flowcharts, stars, wavy and straight lines, callouts and elements, circles, shapes intended for equations.
To insert an object or lines for drawing, you need to select from the list of proposed ones and, having set the starting point on the canvas, stretch the cursor to the desired size. If you simply click on it in the insertion window, the program itself will place the element on the sheet, using a standard size.
Changing the style
In the “ Shape Styles ” tab, you can change the color of the object, its texture and frames. For a colored fill, you need to click on the “ Fill ” line in the “ Format ” menu and select the appropriate options.
By going to the “ Shape Effects ” tab, you can adjust the highlighting, anti-aliasing, add a shadow, or change the volume.
WordArt Styles
This item is intended to apply effects only to text that has been added to the shape. The WordArt section options give you the ability to add color effects and allow you to change the size, slope, curvature, and perspective of the lettering.
Ways to Add a New Font in Microsoft Word
Editing text
After selecting the desired style from the list of suggested ones, a field will appear with a standard example of text that you can replace with your own . Here you can change the tilt and direction of the text, add a shadow, glow and frame to it.
Arranging
Using these tools, you can change the alignment, position, and rotation of an element in space. There are two ways to do this: use the standard template settings or set a custom direction . To do this, you just need to drag the mouse on the rounded arrow above the object.
Change of size
This menu is for changing the size of the figure. The indicator can be adjusted manually using the arrows in the value box or by stretching the boundaries with the mouse to the desired limit.
How to Draw Lines, Borders, and Frames in Word 2013
- Software
- Microsoft Office
- Word
- How to Draw Lines, Borders, and Frames in Word 2013
Author: Dan Gookin
Here's the line. There is a line. There's a line everywhere. Among its many features, Word 2013 gives you the ability to play with lines, borders, and rectangles. There are different ways to apply lines, borders, and margins to text.
How to put a line above a title
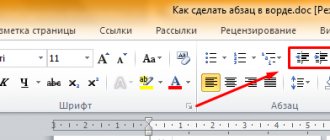
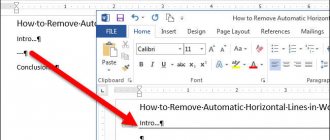
Typically lines in Word are used to add a line to the title of a document. It is a form of text formatting; plus, it helps break up the document. Here's how it's done:
- Place the insertion point in the heading or paragraph.
- In the Borders command button, select the Upper Bound command.
When you want to change the thickness, color, or style of a border, you bring up the Borders and Shading dialog box. Use the Color and Width menus to apply color and thickness.
How to Place Text or Paragraphs
To place a frame around any set of words or paragraphs, bring up the Borders and Shading dialog box and choose a frame style in the Settings column: Box, Shadow, or 3-D. Click OK.
First, select the text, and then select "Text" from the "Apply to" drop-down list in the Borders and Shading dialog box.
Another way to place a frame around a piece of text is to use a text box. Unlike text formatting, a text box is a graphic element that you can insert into a document.
How to put a title in a box
Someday, when you are tasked with creating an organization's newsletter, you will be able to surprise all your friends and those who were smart enough to avoid the task by coming up with a fancy name similar to the newsletter's headline. It looks complicated and all, but it is nothing more than skillful drawing of boundaries.
The key to creating a heading like this is to first enter all the text and then use the Borders and Shading dialog box to add different border styles above and below paragraphs.
Making rules
A common trick in page design is to place a line above or below the text. A line represents a rule, and it helps you break up text, highlight a specific paragraph, or create a block quote, callout, quotation, or. Here's how:
- Click to place the insertion point at the specified paragraph of text.
- Call Borders and Shading dialog box.
- If necessary, select the line style, width, and color.
- Click the top button.
The Top button is located to the right of the Borders and Shading dialog box in the Preview area.
- Click the "Bottom" button.
- Click OK.
You can also adjust paragraph margins inward to make the text stand out even more on the page.
If you press Enter at the end of a paragraph, you will carry the border formatting using the insertion pointer to the next paragraph.
How to draw a thick thick line
Sometimes you need one of those thick thick lines to break up the text. Choose the Horizontal Line command from the Border menu. Word inserts a thin ink line running from left to right from the margins.
- Unlike a border, a horizontal line is not attached to a paragraph, so it doesn't repeat for each new paragraph you enter.
- To adjust the horizontal line, click to select it with your mouse. Six “markers” will appear around the selected image. You can drag these handles with your mouse to set the width or thickness of the line.
- Double-clicking a horizontal line displays the Format Horizontal Line dialog box, where you can make further adjustments and add color.
- To delete a horizontal line, click once to select it and then press Delete or Backspace.
How to put a frame around a page of text
Compared to putting a border around a paragraph, you might think that putting a border around a page of text would be easier. Wrong! Try the following steps:
- Place the insertion pointer on the page you want to limit.
- Call Borders and Shading dialog box.
- Click the Page Border tab.
- Select the border you want: use a preset margin or select a line style, color, and width.
You can select a funky art design from the Art drop-down list.
- From the Apply to drop-down list, select the pages you want to frame.
You can select the entire document so that each page has borders. To select the first page, select "This section is the first page only." Other options allow you to select other pages and groups, as shown in the drop-down list.
And now the secret:
- Click the Options button.
The Border and Shading Options dialog box opens.
- From the Measure From drop-down list, select the Text option.
The Edge of Page option does not work with most printers. The text does.
- Click OK.
- Click OK to close the Borders and Shading dialog box.
To add more air between the text and the border, use the Border Shading Options dialog box and increase the values in the margin area.
To remove the page border, select "None" under Settings in step 4 and click "OK."
How to remove curbs
When you format a paragraph before entering its content, notice that the borders stick to the paragraph like a discarded rubber band under your shoe. To remove annoying paragraph borders, choose the No Borders style.
From the Border menu, select No Border.
In the Borders and Shading dialog box, double-click the None button, and then click OK.
You can also use the Borders and Shading dialog box to selectively remove borders from text. Use the preview window and click on a specific border to remove it.
Has drawing lines, frames, and borders in Word 2013 made you want to learn more about Office 2013 applications? You can try any of the eLearning for Dummies
.
Select your course
(you might be interested in more from
Office 2013
), complete quick registration, and then try out eLearning with the Try It App!
button. You'll be on the right track to get more reliable know-how: the full version is also available at Office 2013
.
About the author of the book
Dan Gookin
wrote the original book
for dummies,
DOS
for Dummies,
in 1991 and launched the phenomenon.
Since then, his bestseller list has continued to grow. His books have sold over 12 million copies, translated into 32 languages. Dan welcomes visitors to his website www.wambooli.com. ,
Editing table borders
This option is perfect for creating a place for a signature in a document. To do this, create a table with two rows. In the first line, remove all borders except the bottom one, and in the second line remove all borders except the top one.
The table also allows you to edit horizontal and vertical lines. If you right-click on the table and select the Borders and Fill line in the menu that appears, you can find a wide range of settings.
The border line can be thick or thin, solid or broken. To make a bold line, you need to change the value in the Width column. And to draw a dotted line, you need to select the required template in the Type column.
other methods
Trick #1. The line under the text is very simple. Just select a fragment and press the button in the Font block or the “Ctrl+U” key combination. And it will turn out like this.
Trick number 2. To draw a straight line at the bottom of the page, you need to find the Page Layout tab and the Page Borders button and select the location of the line there.
As you can see, Microsoft Word allows you to work not only with text, but also with lines and geometric shapes. The methods for creating straight lines vary in complexity and everyone can choose the most convenient tool for themselves.
How to Insert Text into a Word Shape
Figures without text are practically meaningless. Therefore, we learn to add inscriptions to them. To do this, right-click on the shape and select Add text from the context menu. A cursor will appear inside the shape, you can type text.
Formatting Shape Text
Once you've added text to a shape, you can further style it. By the way, all text formatting options in Word work here, not just specific ones. Let's look at the latter in more detail: