Method 1: System Tools
In Windows 10, you can mount ISO images without additional software in one of two ways.
"Conductor"
- Using the Win+E key combination, open Windows Explorer, find the desired file, right-click on it and select “Connect” from the context menu. This command is assigned by default, so you can also mount an ISO file by double-clicking the left mouse button.
A virtual optical disk will be created on which you can view the files included in the ISO image.
Create an image of any disk
To create disk images, it will be enough to use the UltraISO program. Before creating a disk image, insert the desired disk into the drive. After which you can run the program as an administrator. For more details, see: How to create an ISO disk image in Windows 10.
- Go to Tools > Create CD Image... (just press F8).
- Next, specify the save path, the required image format and click Do.
Conclusion
Nowadays, most often, users use the UltraISO program to burn a Windows 10 disk image to a flash drive. A bootable flash drive allows users to perform a complete reinstallation or a surface installation of the system. If necessary, users also have the opportunity to burn disk images onto CDs themselves.
Along with creating a bootable USB flash drive, users can mount, convert and create images from disks (many formats are supported). If you don’t yet know how to use UltraISO and burn an image to a flash drive, then we recommend that you familiarize yourself in more detail with the process of creating a bootable Windows 10 flash drive.
Method 2: Daemon Tools Lite
Demon Tools Light 10 is free software with which you can not only mount popular image formats and emulate up to four virtual drives, but also create your own images from files and disks.
- Install the program, find the ISO file, right-click on it, click “Open with” and select Daemon Tools Lite.
- We check that the image is mounted.
To create a virtual optical disk through the DTL 10 interface:
- Launch the program and click the “Quick Mount” icon at the bottom of the window.
- Find and open the ISO file.
- To unmount it, click the “Eject” icon next to the virtual disk icon.
Programs for creating a disk image
Mounting images in Deamon Tools
Deamon Tools is the market leader in disk imaging software. The first version of Deamon Tools appeared in 2000, and, despite the fact that its analogues were released onto the software market earlier, it immediately quickly gained popularity due to its friendly user interface and free Lite edition, which was more than enough for home non-professional use . Daemon Tools works with almost all disk image formats. The program's operation is invisible even for low-power devices, since it uses a minimum of system resources. The free Lite version contains limitations - in particular, it is the ability to simultaneously mount only 4 virtual drives. Whereas in the paid version Pro Advanced, 32 drives can be mounted on the computer.
Relatively recently, Daemon Tools has changed dramatically, and the classic interface has been replaced by dullness and wretchedness, but with an extremely clear description of functions and a clear internal organization of sections. The functionality of the program has been expanded, but not everything is available in the Lite version. Naked demonstration of individual functions without the possibility of using them is a marketing ploy to encourage users to purchase a paid version.
Daemon Tools Lite 10 is available for free download on the developer's website.
An important point during installation is choosing the free license option.
More on the topic: Windows 10 Sandbox
Among the innovations in the Daemon Tools version is the option to scan your computer to detect disk images and display them in the internal library. Well, let's take advantage of this opportunity.
After scanning, all possible virtual CD/DVD and hard drives will be visible in the program window. Select the desired type, open the context menu and execute the “Mount” command.
As before, disk images can be added to the Daemon Tools interface one at a time using the quick mount button.
To unmount a virtual drive, call the context menu on its connection icon at the bottom of the program window and select the appropriate command.
How to mount an image using UltraISO
UltraISO is a mega-program designed for professional use. Among its capabilities are the following: creating images of CD/DVD discs, burning them to discs and editing without unpacking, optimizing the structure to save space, converting from one format to another, etc. This program is also a reliable and proven tool for creating bootable flash drives.
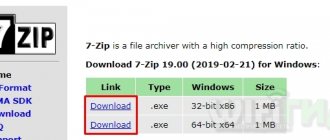
UltraISO is a paid software product. The free trial version is of little use if we are talking about making full use of most of the features. Thus, the trial version has limitations due to which it will not be possible to create or burn an ISO file whose weight is more than 300 MB. In our case, when we are talking purely about mounting a disk image into a virtual drive, this limitation does not apply. Therefore, you can safely download the trial version with a Russian-language interface from the UltraISO developer website.
After launching UltraISO, you will see a small window telling us about the limitations of the trial version and encouraging us to purchase the paid version. Click the “Trial period” button.
In the program window, open the “File” menu and click the “Open” button.
Add the image file.
Expand the “Tools” menu and select “Mount to virtual drive” among the available commands.
A small window will appear where you need to select the mount button. The button next to it - “Unmount” - must be used, respectively, to extract the CD/DVD disk image from the virtual drive.
How to burn an image to disk in Alcohol 52%
Alcohol 52% Free Edition is a free, stripped-down version of the well-known CD/DVD emulation program Alcohol 120%. Unlike the latter, the paid Alcohol 52% allows you to mount a limited number of virtual drives at the same time - up to 6 pieces. In the free version of Alcohol 52% Free Edition, this number is completely reduced to a minimum - only 2 parallel virtual drives. Also, the free version does not provide for recording discs to discs.
A free trial version of the utility can be downloaded from the link from the developer’s official website.
At the time of writing this article, it was not possible to download the program installer using the browser downloader, but the problem was successfully resolved using the Download Master download manager.
There are no limits to the tricks of developers who want paid versions of software products to be purchased from them. In the case of the trial version of Alcohol 52%, we will not just look at the demo window with an offer to buy the full version of the program, but we will even have to wait a few seconds until the “Ok” program launch button becomes active.
In the Alcohol 52% program window, expand the “File” menu and select “Open”.
Add the required file to the program window, open the context menu on it and select the “Mount to device” command.
To extract the image from the virtual drive, open the context menu again and select the “Dismount. "
Method 3: Virtual CloneDrive
Virtual CloneDrive is a free program that does not create ISO images, but supports up to 15 virtual optical drives simultaneously, mounts images from any media and works with all popular formats.
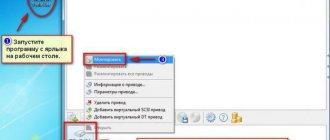
- Let's launch the program. To change the interface language, go to the “Language” tab, select “Russian” and click “OK”.
- The VCD will be minimized to the notification area. Open it, right-click on the Virtual CloneDrive icon and select “Settings”.
- In the settings window, specify the required number of virtual disks that the software can create, change other parameters if necessary, and click “OK.”
- To mount an ISO file, right-click on it and open it using Virtual CloneDrive.
- There is another way. Right-click on the program icon in the notification area, open the “Disk” tab and click “Mount”.
Select the desired file and click “Open”.
To unmount it later, select the appropriate item in the context menu of the disk.
How to Open (Mount) ISO Files Using Explorer in Windows 10
ISO is the most popular file format for disk images. When you open a disk image, you see its contents as if it were the disk it is cloning. You can use the disk image in the same way as the original disk. While previous versions of Windows required third-party software for this task, Windows 10 comes with a universal File Explorer that allows you to mount a disk image with just a few clicks or taps.
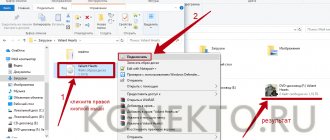
First, open File Explorer and navigate to the “.iso” file you want to open. We used the Ubuntu Linux ISO for this tutorial. The fastest way to open it is to double-click (or double-tap) the ISO file. Another method is to select it by tapping or clicking on it.
With the ISO file selected, click or tap the Manage tab on the ribbon, and then click the Mount button.
Alternatively, you can right-click or right-hold on the ISO file and then click or tap Mount from the context menu.
Even if you already have a third-party app installed on your Windows 10 computer or device that works with ISO files, you can still open them using File Explorer. Right-click or long-press on the ISO file to open the context menu, and then click or tap "Open With" and then "Windows Explorer" (which is how File Explorer was called up in previous versions).
Regardless of the method used to mount the ISO file, the result is the same: the disk image opens in Explorer and you can access all of its contents.
TIP: If autorun is enabled when you mount the ISO file, the disc's autorun menu is displayed.
Now you can access everything just like you would from a physical disk: you can copy files from the disk image, run them, and so on.
Choosing a standard application for ISO files
File association is a mechanism by which the system matches file types with programs that can open them. If you want files with the .ISO extension to be opened by default by some specific software, for example, third-party software, you need to do the following:
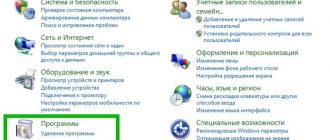
- Using the Win+I key combination, call up the “Settings” of Windows 10 and open the “Applications” section.
- In the “Default Applications” tab, scroll down the page and click “Select default applications for file types.”
- In this case, ISO files are opened by Explorer by default.
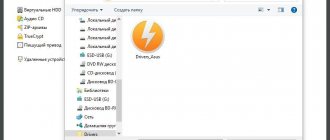
To change the launch method, click on it and select another program from the pop-up list, for example, Daemon Tools Lite.
- Now next to the ISO files there will be an icon for the software that you have assigned as the default.
We are glad that we were able to help you solve the problem. Add the Lumpics.ru website to your bookmarks and we will be useful to you. Thank the author and share the article on social networks.
Describe what didn't work for you. Our specialists will try to answer as quickly as possible.
Using a virtual drive in UltraISO
The possibilities that using a virtual drive provide are truly enormous. UltraISO helps out both in situations where there is no disk drive, when you need to install some software from the disk, and at the same time helps to correctly write any types of information to the disk. The most common use of this function is to install an image of Windows 10 and other versions of the OS on portable media.
Below is a summary of the main features of Ultra ISO:
Record to discs of any format
The option has been migrated from older programs, but everything is done with the same quality. You just need to select and move the files to be burned to disk into a special field, and click the corresponding button in the menu, moving the files to the image to be burned.
Creating an image using a real disk
Copying the files of the original disk and creating a virtual “clone” of it for further use. It will help owners of devices without a disk drive to run the contents of the disk on their PC. Activated through the “Tools” tab, sub-item “Create CD image”
Burning disk images to media
Writes a pre-created disk image to any other media for use as a disk.
Creating bootable flash drives
It is used primarily for starting and reinstalling operating systems or other complex software.
ImgBurn
ImgBurn is another lightweight ISO file management tool created in the same vein as WinCDEmu. This tool package has amazing capabilities despite its light weight. It is capable of processing CD, DVD, HD-DVD and even Bluray disc images. If I were not already a WinCDEmu user, my choice would have been ImgBurn.
By default, ImgBurn supports many image formats: ISO, BIN, CUE, IMG, NRG, CCD, CDI, DVD, GI, MDS, DI and PDI. I've never even heard of half of these formats.
ImgBurn can create ISO images of your optical discs, create ISO images from scratch, burn ISO images to discs, check disc readability and much more. The program is created so that any beginner can start working with it right away, and advanced users will be pleasantly surprised by the number of available settings in ImgBurn.
The program is available on Windows 95, 98, Me, 2000, XP, Vista, 7 and 8.