How to make horizontal and vertical lines?
All options for installing a horizontal line are described in the first section of the article.
To set a vertical line, use Method No. 1 with some amendments:
- After selecting the "Borders and Shading" function, pay attention to the right column "Sample".
- On the left side of the column, find the buttons for controlling the location of the strip - horizontal or vertical - and click on the desired one.
Select the position of the strip horizontal or vertical
Type the text.
Method No. 2 is also suitable for installing a vertical stripe:
- After selecting the “Paragraph” column, pay attention to the “Borders” button.
- Click the arrow to the right of the key and select the border location - bottom/top or left/right.
Type the text.
Underlining spaces
To find the area underlined below, you should put several spaces in one row, and then set a dot. Without the symbol at the end, the method will not be effective. As soon as the required space is filled, select the line creation sign on the main panel and get the desired result.
By clicking on the triangle next to the icon that creates the line, you can change its design to a more acceptable one. You can double underline if necessary.
To avoid a period at the end of a line, you can use the Tab key instead of a space bar. This is also convenient because the distance of indentation from one click is much greater. After filling the desired area, we also select the underline function, or press the “Ctrl + U” button combination.
Note! When using the described methods, the appearance of the document may be deformed when opening the file through another program or through a different version of Microsoft Word.
How to make a lot of underlined lines?
To underline an unlimited number of lines in the text, Method No. 3 is suitable for installing a stripe under the text.
To make several lines below or above the text at once, use Method No. 4, but instead of the “-” symbol, use “=” or “#”.
Lines below or above text
Using a figure
It’s not difficult to underline text, but how to make a line at the bottom of the line, without words? In the “Insert” section there is a function that allows you to add various shapes to the working document, including lines, with the help of which you can make the coveted underlining of an empty area.
Go to the desired option, select the “Line” item and stretch it in the required place.
If you go through the shape design settings, you can make a bold underline.
Dash and underscore
You can use dashes and underscores to draw a line or dash in Word. Press the “-” (minus) key. Hold until the required length is obtained. This will be enough to make a line or stripe for a signature.
An alternative option is the “ minus ” key held down simultaneously with SHIFT . The result appears as an underscore.
Excess length is removed as regular text, that is, character by character.
Insert a horizontal line
The second way to draw a line in Word without text is to use the special “ Horizontal Line ” tool. It is located in the “ Home ” tab, “ Borders ” section.
The element appears the full width of the Word sheet. If necessary, change the length. To do this, double-click with the left mouse button and change the parameters with the cursor (alignment, height, width, etc.).
Deleted as an object.
The simplest methods for setting underscores
First, let's use the simplest example of using the standard Word tool. On the toolbar located at the top there is a special button with the image of the letter “H” with a dash at the bottom. Just select the desired piece of text and click on it. You can do it differently and use the button before you start entering text. The effect will be the same. For those who prefer to use hot keys rather than buttons, the combination Ctrl + U is suitable for quick access to this function.
Many people do not pay attention to the fact that next to the button there is an arrow for calling an additional menu, in which you can find a lot of interesting things. Line types and color choices are indicated here. And if you enter the additional underlining section, you can use the creation of an outline and shadow, specify the line thickness, set the upper or lower underline, select lowercase letters, and on the “Advanced” tab also set the so-called kerning or even the minimum number of characters for which underlining will be applied automatically and then disabled.
How to underline in Word without words
But these are standard tools for test fields, and sometimes you need to emphasize an empty space. In the question of how to make an underline in Word without words, you can apply several simple solutions.
The easiest way is to enter the lower dashes from the keyboard, which is called by the combination of Shift and the “-” key. Such a line will be solid, but when using a regular dash without a “shift”, the line will turn out to be dotted, and it will be located exclusively in the center. Therefore, it will have to be moved to a new line, which is very inconvenient. And the text in this case will look unreadable.
An easier method is to use the Tab key along with the Shift key with the underline button enabled. This achieves setting the same or proportional length of lines and alignment when entering text. And here the main problem appears. Such methods are only applicable for printing a document, but when you need to enter text above the underlined space in the editor itself, their use turns out to be impractical (it will simply be impossible to print something). We'll have to use other methods.
I Thin, thick, double, dotted line using keyboard
Below is a picture of a keyboard with an English layout, but without a Russian layout, but this does not matter, because we are only interested in three keys: Shift, dash and Enter.
Rice. 1. Three keys on the keyboard: Shift, dash and Enter for a continuous horizontal line in Word
With these three keys you can draw a continuous horizontal line in Word: dotted or solid, thin or thick, long or short.
1) When you press the “-” (dash) key several times in the Word editor, you get a dotted line of any length.
To make a thin long line across the entire width of the page:
- We find the “dash” key on the keyboard (to the right of the “zero” key, in the green frame in Fig. 1).
- From a new (!) line in Word, press this key several times: -
- And then press the “Enter” () key. A few printed dashes will suddenly turn into a continuous horizontal thin line across the entire width of the page.
2) When you simultaneously press Shift and “-” (dash), NOT a dash is printed, but an underscore _________. This way you can make a continuous line of arbitrary length anywhere in the document.
Rice. 2. Thin and thick horizontal line in Word
Now we print a thick horizontal line across the entire width of the page:
- Again we find the same “dash” key, as well as the Shift key (on the left or on the right, as you like). Press Shift, hold and don't let go.
- And now, from a new (!) line, click on the dash several times (for example, 3-4 times) (while not releasing Shift): ___. Release Shift.
- Now press the Enter key. You will see a thick horizontal solid line.
Let's summarize some results in the form of a table:
(Click to enlarge) Lines in Word using the keyboard
II Line in Word using a table
A horizontal line can be obtained by using a table of one cell (1x1), in which only the top or bottom border is colored (will be visible), and the other three sides of the table have uncolored borders (they will be invisible).
Place the cursor in the place where the line should be. In the top menu of Word, click:
- Insert (1 in Fig. 3),
- Table (2 in Fig. 3),
- One cell (3 in Fig. 3).
Rice. 3. How to insert a 1x1 table (from one cell) in Word
The result will be a table of one large cell (1x1):
All that remains is to remove the borders from three sides in the 1x1 table. For this
- go to the “Home” tab (1 in Fig. 4),
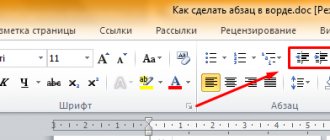
- then next to “Font” we find “Paragraph” and borders (2 in Fig. 4),
- remove all borders by clicking “No border” (3 in Fig. 4),
- select “Upper border” or “Lower border” (4 in Fig. 4).
Rice. 4. How to remove border selection from a Word table (make borders invisible)
I show this clearly in the video (at the end of the article).
By the way, in Fig. 3 it is clear that there is an easier way. You can place the cursor at the beginning of the line in Word and click “Horizontal Line” (5 in Fig. 4):
III Line in Word using drawing
Insert (1 in Fig. 5) - Shapes (2 in Fig. 5) - this is another way to get a horizontal line in Word.
To keep the line strictly horizontal, hold down the Shift key and draw the line at the same time.
Rice. 5. How to draw a line in Word
IV Line in Word using the on-screen keyboard
To find the on-screen keyboard, enter the phrase “on-screen keyboard” in Search, more details for Windows 7 HERE, and for Windows 8 HERE.
For Windows 10, you can also find the on-screen keyboard by typing “on-screen keyboard” into the Search bar.
Rice. 6. On-screen keyboard
We will create a horizontal line in the same way as in the first option with a regular keyboard. You will need three buttons on the on-screen keyboard: dash, Shift and Enter.
From a new line in Word, click on the dash (1 in Fig. 6) several times and press Enter. You will get a thin horizontal line.
2 Shift, dash and Enter
From a new line in Word, first click Shift (2 in Fig. 6), then Dash (1 in Fig. 6). You will get an underline. We will repeat this 2 more times, and then press Enter. As a result, we will see a thick horizontal line.
How to delete a line?
If you don’t like this line, then to delete it,
- you must first select it,
- and then either press the Delete key,
- or right-click on the selected line (right mouse button) and select “Cut” in the context menu that appears.
How to make a continuous horizontal line in Word: 4 ways
It would seem, why might four methods be needed?
After all, almost every person uses one method to which he is accustomed. For example, I pressed Shift and the dash key several times, and so I got a horizontal line. - What if this results in a dotted line, but you need a solid one? — Most likely, the Shift key on the keyboard is faulty. Other methods will come to the rescue here.
Perhaps the most common way to make a line in Word is to use a couple of keys on the keyboard.
Inserting a signature line
In addition to a handwritten signature, you can also add a signature line to a Microsoft Word document. The latter can be done in several ways, each of which will be optimal for a specific situation.
Note: The method for creating a signature line also depends on whether the document will be printed or not.
Adding a signature line by underlining spaces in a regular document
Previously, we wrote about how to emphasize text in Word and, in addition to the letters and words themselves, the program also allows you to emphasize the spaces between them. To directly create the signature line, we only need to underline the spaces.
Lesson: How to underline text in Word
To simplify and speed up the solution of the problem, it is better to use tabs instead of spaces.
Lesson: Tabulation in Word
1. Click in the place in the document where the signature line should be.
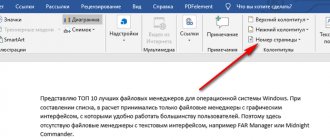
2. Press the “TAB” one or more times, depending on how long your signature line is.
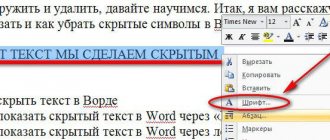
3. Turn on the mode for displaying non-printing characters by clicking on the button with the “pi” sign in the “Paragraph” , “Home” .
4. Select the tab character or characters you want to underline. They will appear as small arrows.
5. Perform the required action:
- Press “CTRL+U” or the “U” located in the “Font” in the “Home” ;
- If the standard underline type (one line) does not suit you, open the Font by clicking on the small arrow at the bottom right of the group and select the appropriate line style or lines in the Underline .
6. In place of the spaces (tab characters) you set, a horizontal line will appear—the signature line.
7. Disable the display of non-printable characters.
Add a signature line by underlining spaces in a web document
If you need to create an underline signature line in a web form or web document rather than in a printable document, you need to add a table cell in which only the bottom border is visible. This is what will act as the signature line.
Lesson: How to make a table invisible in Word
In this case, when you enter text into the document, the underline you added will remain in place. A line added in this way can be accompanied by introductory text, for example, “Date” , “Signature” .
Inserting a line
1. Click in the place in the document where you want to add a signature line.
2. In the “Insert” click the “Table” .
3. Create a table of one cell size.
Lesson: How to make a table in Word
4. Move the added cell to the desired location in the document and change its size in accordance with the required size of the signature line being created.
5. Right-click on the table and select “Borders and Shading” .
6. In the window that opens, go to the “Border” .
7. In the “Type” , select “None” .
8. In the “Style” , select the required line color for the signature, its type, and thickness.
9. In the Sample , click between the bottom margin display markers on the chart to display only the bottom border.
Note: The border type will change to “Other” instead of the previously selected “None” .
10. In the Apply to , select the Table .
11. Click “OK” to close the window.
Note: To display a table without gray lines that will not be printed on paper when printing the document, in the “Layout” (section “Working with tables” ), select the “Display grid” “Table” section .
Lesson: How to create a Word document
Insert a line with accompanying text for the signature line
This method is recommended for those cases when you not only need to add a signature line, but also indicate explanatory text next to it. Such text can be the word “Signature”, “Date”, “Full name”, position held and much more. It is important that this text and the signature itself, along with the line for it, are on the same level.
Lesson: Inserting subscript and superscript text in Word
1. Click in the place in the document where the signature line should be.
2. In the “Insert” , click on the “Table” .
3. Add a 2 x 1 table (two columns, one row).
4. Change the table location if necessary. Change its size by dragging the handle in the lower right corner. Adjust the size of the first cell (for the explanatory text) and the second (signature line).
5. Right-click on the table and select “Borders and Fill” .
6. In the dialog box that opens, go to the “Border” .
7.In the “Type” select the “None” .
8. In the “Apply to” select “Table” .
9. Click “OK” to close the dialog box.
10. Right-click in the place in the table where the signature line should be, that is, in the second cell, and again select “Borders and Shading” .
11. Go to the “Border” .
12. In the “Style” , select the appropriate line type, color and thickness.
13. In the “Sample” , click on the marker that displays the bottom margin to make only the bottom border of the table visible - this will be the signature line.
14. In the Apply to , select the Cell . Click “OK” to close the window.
15. Enter the required explanatory text in the first cell of the table (its borders, including the bottom line, will not be displayed).
Lesson: How to change the font in Word
Note: The gray dotted border that surrounds the cells of the table you create is not printed. To hide it or, conversely, display it if it is hidden, click on the “Borders” located in the “Paragraph” ( Home ) and select the “Show grid” .
That's all, now you know about all the possible methods for signing a Microsoft Word document. This can be either a handwritten signature or a line for adding a signature manually on an already printed document. In both cases, the signature or space for the signature may be accompanied by explanatory text, which we also told you about how to add it.
We are glad that we were able to help you solve the problem.
Ask your question in the comments, describing the essence of the problem in detail. Our specialists will try to answer as quickly as possible.
Did this article help you?
Not really
As you know, working in Word mainly involves the use of office text documents, contracts, official forms and forms, in which sometimes you need to leave an empty underlined space for signature. In general, the user’s needs may not be limited to just this. The scope of application of such underscores is much wider. But now we will talk specifically about how to make a line in Word for a signature. In the editor itself, you can use several simple tools that every user knows about.
How to make a continuous horizontal line in word: 4 ways
The methods for installing a continuous line differ depending on what version of Word is installed on your computer.
Method 1. Word 2003
Standard version of the program:
- Place the cursor at the beginning of the line where the line should appear.
Method 2. Word 2007
Updated version of the program:
- Place the cursor at the beginning of the line with the line.
For further work, start typing the text.
Important! To print text on a new line, you need to press the arrow keys instead of “Enter”.
Method 3. “Underlined” text
The method is only suitable for creating a line under the text:
- Find the "Home" column.
- Among the text style types, select “Underline.”
Start typing your text message.
Method 4. Separate line
The method is suitable for creating a line as a decorative element, separate from the text:
- Place the cursor at the beginning of the line.
- Press the "-" symbol at the same time as the "Shift" key.
The dotted stripe is converted to a continuous stripe automatically.
Note! This method is only available in the offline version of the Office suite.
The process of creating continuous lines in the horizontal plane is clearly presented in the video.