Home / Windows
Operating a hard drive in the Windows 7 operating system requires creating partitions and logical drives on it. This applies to both a new, clean device and a used disk purchased or transferred from another computer. The logical structure of this disk may differ from what the user needs. By considering the mechanism and logic for creating various sections and tools of the operating system, as well as third-party software products, such operations can be performed more easily and efficiently.
How to allocate disk space in Windows 7
In Windows OS, each partition has its own logical drive, which is how they are displayed in the file explorer. And although it is possible to create just one partition that covers the entire disk, in practice this is rarely done. After all, the first (and only) section is system. It is at increased risk due to possible virus or hacker attacks and inept user actions. If you keep user data on it, they may die, so a typical option for partitioning a hard drive is to create two partitions (and two logical drives): system and user.
A typical disk configuration in a home PC consists of two partitions
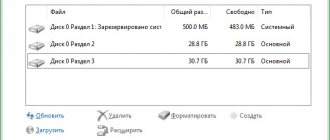
Hard disk is not allocated
When installing a new hard drive into a computer, it is best to combine the creation of partitions with the installation of the operating system.
Thus, you will have two partitions on the disk: system and user.
Video: initializing a new disk when installing it in the system
How to create partitions on a hard drive
As in the case described above, to create partitions on your hard drive, you will need to run a disk management utility or some third-party partitioning program. For example, the Minitool Partition Wizard program allows you to create a new partition on a disk easily and simply.
Video: working with hard drive partitions using the MiniTool Partition Wizard program
How to create a GPT disk
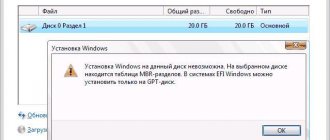
Since UEFI replaced the standard BIOS and the Windows 7 operating system was released, GPT has become the basic type of disk partition instead of the traditional MBR. If you bought a new hard drive and install an operating system on it, the algorithm will be extremely simple.
If you have a used disk, formatted MBR and with partitions on it, then the procedure will be more complex and cumbersome.
Video: Installing Windows on a GPT disk
Convert a basic disk to a dynamic disk
Before you start this process, you should know that you may lose data as a result of this operation, so it is imperative that you back up your data to an external hard drive first. So let's proceed only if you know what you are doing and be careful .
If you are using a basic disk as shadow copy storage, it is important to take the following precautions to avoid data loss and you intend to convert the basic disk to a dynamic disk. If the disk does not have a boot volume where the source files are stored, you must first unmount and remove the volume containing the source files that contains shadow copies to the dynamic disk before converting the disk. You must bring the volume containing the original files back within 20 minutes, otherwise, you will lose data stored in existing shadow copies. If the shadow copies are on a boot volume, you can convert the disk to dynamic without losing the shadow copies.
Using the user interface
To convert to Windows 8.1, open the WinX menu and select Disk Management. Right-click on the disk and select "Convert to Dynamic Disk". You will be prompted to check the disk again and click on the “Convert later” button. The process will begin and the disk will be converted to a dynamic disk.
Using the command line
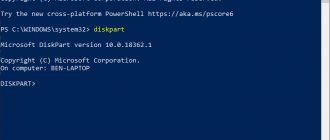
Open an elevated command prompt, type diskpart and press Enter.
Next, enter list disk. Write down the number of the drive you want to convert to dynamic.
Now type select diskn and press Enter.
Type the following type convert dynamic and press Enter.
How to remove a system disk
If you install another hard drive into your computer, which was previously the system drive on another machine, there is nothing difficult in deleting the partition with drive C, because the system will no longer boot from it.
- Run the utility with the diskpart command using the Win+R command line.
- Run the following commands in the program window:
- list disk (displays a list of physical disks on the computer);
- select disk n (select the disk to be converted);
- clean (removing all partitions on the disk);
- create partition primary (creating a primary partition on an unallocated area);
- format fs=ntfs quick (formatting a partition in the NTFS file system);
- assign (assigning a letter to the formatted section);
- exit (closes the Disktpart utility).
But on the only hard drive, you cannot delete the partition with drive C, since it contains the Windows operating system folder, the Users folder with user profiles, and the Program Files folder, in which application applications are installed by default. Deleting this partition will instantly render your computer inoperable, and many of your data will be lost forever.
At the same time, during the work process, a lot of garbage, temporary files are formed on drive C, which take up a fair amount of free space. To remove such garbage, the OS has a special program - CleanManager, which can be launched from the command line (with administrator rights) using the command cmd.exe /c cleanmgr /sageset:65535 & cleanmgr /sagerun:65535.
Running the Clean Manager utility from the command line
Running the utility in such a clever format will allow you to delete a large number of hidden file categories.
Using the utility is as simple as two times: you mark the categories you want to delete, click OK, and after a while your system disk will boast additional free space.
Selecting components to remove in the CleanManager utility window
Table: categories of temporary files available for cleaning by the Clean Manager utility
| Temporary installation files | Temporary files that are created during program installation |
| Debug dump files | Files generated by the Windows debugger |
| Old Chkdsk program files | Lost file fragments created during a disk scan using standard tools |
| Previous Windows installations | Files and folders from previous versions of Windows moved to the Windows.old folder |
| Memory dump data for system errors | If your computer is working properly and does not need diagnostics, the files can be deleted |
| Items no longer relevant after Windows update | Legacy Windows files saved during an upgrade to Windows 7 |
| Bug Report Archives | Materials used for bug reports are automatically sent to a Microsoft server; they can be safely deleted |
| Custom bug reporting queues | After a successful OS update there is no need to store these files |
| System archives of error reports | |
| System error reporting queues | |
| Windows Update Log Files |
System reserved partitions
Starting from the seventh version, the Windows operating system creates a backup partition for system needs during installation. Its size, depending on the system version and included services, ranges from 170 to 350 MB. On this partition, the operating system stores the bootloader (the main files designed to start the OS), as well as disk encryption data (if you have the BitLocker encryption system enabled).
Obviously, deleting this partition from the disk on which the operating system is installed will result in the computer not working. An OS deprived of boot files will not be able to start.
If the system partition is deleted, the OS cannot start
Disable showing the backup partition in File Explorer
In normal mode, the system partition is hidden from the user and is not displayed in Explorer. If a section is visible in Explorer, you can make it hidden again with just a few keystrokes.
Once you confirm the changes and restart the operating system, this partition will no longer appear in File Explorer and application programs.
Removing a backup partition from a second hard drive
As mentioned above, you cannot delete the backup partition from a single hard drive - the computer will become inoperable. But if your PC has two or more hard drives, this partition can be deleted on the rest without any consequences.
The subtlety is that simply deleting this section is not enough. After such an operation, an unallocated area will remain on the disk, and the next time you start the computer, the operating system will re-create the backup partition. To prevent this from happening, there should be no unallocated space on the disk - its entire volume must be distributed by the main partition and this can be done in two ways:
The first is to use the disk management utility to delete all partitions on the selected hard drive, including the backup one, and then create one partition with a volume equal to the volume of the disk. Before doing this, you should back up data from user disk partitions, otherwise they will be lost.
Video: how to delete the recovery partition
The main and logical partitions of the hard drive: their essence and conversion from one type to another
Hard disk partitions (also called volumes, also known as partitions from the English partition) can be primary or logical. Another name for the main type of disk partition is primary. Primary (or primary) disk partitions are used to run the operating system. This is the system partition C, where Windows is directly installed, and a small partition with reserved space (100 MB, 350 MB or 500 MB), which, starting with version 7, is created for the needs of the operating system. Logical disk partitions are functionally no different from the main ones. Both on the main and on the logical partitions of the disk - both there and there information is stored. The difference is that Windows cannot be started from a logical disk partition. If you turn the system partition C from primary to logical, Windows, not in all cases, but in most cases, will be able to fully function.
But in all cases it will not want to boot if it is logical to make it a technical small partition with reserved space, where, in particular, the download data is stored.
Below we will talk in detail about the essence of the main and logical partitions of the hard drive, and also consider ways to convert their type from one to another and vice versa.
Limit on the number of primary partitions on a disk
One hard drive should have no more than 4 main partitions, if there are no logical ones. If there is a need to create more than 4 disk partitions, the created 4th partition and all subsequent partitions must be logical. So, after the three main sections have been created, the 4th section, called additional or extended, will be something like a container, which, in turn, can be divided into many logical sections.
Formation of main and logical partitions
The standard Windows disk management utility does not provide the user with the ability to select the type of disk partition. The utility itself provides the optimal layout for most cases. The first 3 sections it creates are the main ones by default. And, starting from the 4th, all partitions created by the utility are automatically created as logical.
A third-party disk space manager, the AOMEI Partition Assistant program, works on exactly the same principle. The first three sections with default settings are created as main ones, and starting from the 4th – as logical ones. But, unlike the standard Windows utility, AOMEI Partition Assistant provides an advanced settings mode for creating disk partitions, where you can manually select a primary or logical type for the first three partitions to be created.
Another fan of template presets is the Paragon Hard Disk Manager program. Its default settings for creating disk partitions are also designed to create the first three partitions as the main ones. And, as in the previous program, when creating the first three sections, you can manually change the preset main type to logical, which is significant in the program as an extended one.
But Acronis Disk Director does not adhere to template parameters. The default form for creating a new disk partition involves creating a logical partition. The partition type parameters must be reassigned manually - to create the main partition, respectively, check the boxes next to the “Primary” inscription and next to the “Active” inscription if a partition is being created for Windows.
Why change the logical disk partition to the primary one and vice versa?
In what cases may it be necessary to change the logical type of a disk partition to primary and vice versa? The need to carry out the first operation is, as a rule, those very cases of unsuccessful experiments with converting Windows system partitions from primary to logical. These are also cases of problems with Windows installation when only logical partitions were initially created on the hard drive.
The need for the reverse operation - to convert the primary partition into a logical one - arises when there are more primary partitions on the disk than are needed for specific situations. For example, in the case of restoring Windows from a backup to a partition different from the original one. We are talking about transferring the system to another, already distributed hard drive, where it is necessary to preserve the structure and data of non-system partitions, and restore the “lived-in” Windows to the system partition from a backup copy. If the hard drive has 4 primary partitions with no logical partitions, or 3 primary partitions and all the others are logical, backup programs will in some cases refuse to perform the Windows restore operation. Since the backup copy may contain more than one system partition C, but also the technical partition mentioned above with reserved space for Windows needs. This small partition and the system partition C, upon completion of the recovery operation, if it were possible, would divide the main destination partition into two partitions, also the main ones. And thus the rule would be broken - either 4 main sections without logical ones, or 3 main sections, and all the rest are logical. In this case, the problem is solved like this: one of the non-system partitions where user data is stored is converted from primary to logical, which, in fact, is what it should be.
Programs for working with hard disk partitions
The hard drive management tools built into Windows 7 have a minimalistic interface and leave no room for error for the user, since all commands are executed instantly, without the ability to go back a step. Some features are even available only from the command line.
Therefore, we will look at several popular software packages for working with sections, which have everything for the untrained user: a bright and clear interface, step-by-step settings wizards, semi-automatic operating mode and the ability to roll back the last change or group of changes. In addition, all these programs can work from removable media and will be useful in an emergency when loading the operating system is impossible.
MiniTool Partition Wizard
The most compact and lightest program on the distribution market, it takes up just over 40 megabytes. In the basic version, the program is free and allows you to perform all the necessary manipulations with the hard drive:
- creating, moving and deleting disk partitions;
- resizing a partition without losing data;
- converting the partition file system (without data loss);
- formatting sections;
- cloning both selected partitions and entire physical disks.
Minitool Partition Wizard has a simple and intuitive design
The MiniTool Partiotion Wizard program can work both as part of the operating system and independently, from removable media, for which the interface has a wizard for creating a bootable flash drive or optical disk.
Acronis Disc Director Suite
Acronis Disc Director Suite is a powerful software package consisting of four programs that can be used stand-alone:
- partition manager - a program using step-by-step wizards, allows you to create, delete and modify hard disk partitions. File system conversion and quick formatting are also available;
- the boot administrator will allow you to install several operating systems on your hard drive (the manufacturer promises conflict-free coexistence of up to 100 OS versions) and, using a convenient graphical interface, choose which one to work with when starting the computer;
- Disk Editor is a powerful utility for professional use with the ability to edit data sector-by-sector without the participation of the operating system. Indispensable when restoring a damaged file system, partition table or boot record;
- The partition recovery utility will allow you to “cure” a disk damaged as a result of a virus, hacker attack or unskilled user actions. There is both a fully automatic mode (for beginners) and a manual one with the ability to work with the command line.
The main window of Acronis Disk Director contains information about disk partitions and can be used for various manipulations with disks
The Boot Disk Creation Wizard will allow you to use the full power of the software package in emergency situations when loading the OS is impossible.
Paragon Partition Manager
Paragon Partition Manager is a slightly behind competitors and progress, but still provides sufficient functionality for a home user. In addition to basic operations with disk partitions (creating, deleting, resizing) and working with the file system, it boasts built-in capabilities for low-level hard disk testing and monitoring SMART attributes. Its functions also include monitoring the health of the drive using a resident module.
The interface of the new version of Paragon Partition Manager has been adapted to Windows 10
Unfortunately, the package does not have backup tools, so calling it a program for all occasions will not work. But low system requirements allow you to use the program even on slow computers and netbooks with a small amount of RAM.
The basic version of Paragon Partition Manager will cost approximately 600 rubles. The free version is available for download from the manufacturer's website, but most of the functions are not available in it.
O&O Software, known for its disk defragmentation products, has also released a software package for working with partitions called O&O Partition Manager. It’s not that the first pancake came out lumpy, but there’s nothing here that makes the program stand out from the crowd. Basic functions of working with partitions, formatting, cloning, file system conversion. Is it possible to mention the functions for deleting classified information - the corresponding utility fills a partition on the hard drive sector by sector with zero signatures, making subsequent recovery of deleted files impossible.
The main window of the O&O Partition Manager program reports about the partitions that are on the disk
If you purchased one of the company's products, you may get O&O Partition Manager 2 at a serious discount and this will be the only argument in favor of purchasing it.
Manipulating hard disk partitions is simple and straightforward if you follow the rules. Built-in disk management tools are free, but using third-party programs is preferable, because system utilities execute commands instantly - this is useful, because in case of an error it is easy to lose data. Disk management software packages are equipped with a multi-level protection system and the risk of accidentally destroying data in them is much lower, plus there is the ability to roll back the last operation. But no matter what tool you use, remember the main rule: back up.
If you don't have enough space on your hard drive to store your data, you can replace your old hard drive with a new one with a larger capacity. The Acronis program can transfer (clone) all data, including the operating system, to a new hard drive.
However, there is another option. You can add a new hard drive (another hard drive with data and partitions) while leaving the operating system and existing data on the old one. This is faster to do than cloning.
If you have room to attach a hard drive, connect the hard drive to your computer, turn on the computer, and launch Acronis.
In the main program window, select Tools
>
Install a new disk
. The “Add New Disk Wizard” will appear.
If the program does not automatically select the drive you want to add to your computer, select the drive manually and click Next.
If the target disk contains partitions, select the “Delete all partitions on the target disk” radio button and click “Next”. At this stage, the program only creates a partition plan and does not perform any actual actions.
Initially, the disk contains only unallocated space. As you create sections on it, the appearance of the diagram will change. To create a partition, check the “Create a new partition” checkbox and click “Next”.
To create a partition, allocate unallocated disk space. Unallocated disk space is shown in green.
You must select a file system. I choose NTFS because it is the main file system of Windows NT/2000/XP.
You need to select the type for the partition to be created. “Primary partition” - select this type so that you can later create a system partition. “Logical disk” - select this type if you need a partition only for storing data.
There are two ways to specify the size and location of the partition. By dragging a section or its borders with the mouse. If the mouse pointer appears as two vertical bars with left and right arrows when it's over a section boundary, you can change its position. If the mouse pointer changes to four-way arrows when it's on a partition itself, you can move the partition left or right if there is unallocated space next to the partition. By entering the required values in the appropriate fields.
You can specify a section label. A label is usually assigned to a partition for further quick recognition. For example, System is a partition with the operating system, Data is a partition with data, etc.
You can create several more sections. I'll create another partition in the unallocated space.
Let me start by saying that for a long time I used an old laptop with the Windows XP operating system installed, I never had any problems, except for one and the main one! This is the laptop itself, which was weak and could not cope with most of the tasks I needed. It was decided to purchase a PC that would meet all modern requirements. Having allocated 50 GB for the operating system and installed “seven”, I thought that this space would be enough. But this was only for the time being.
Soon I noticed that the free space on drive C was decreasing, and there was absolutely no longer enough space... After a while, I found a way to expand drive C at the expense of drive D on Windows 7, without losing any data and without using third-party programs. The fact is that the system itself provides users with such an opportunity! We want to tell you about it!
How to make your hard drive your primary one
Energetic users of computer spaces are often faced with the need to change the main disk . Advanced users often want to use two operating systems. There are 2 hard drives . One is the core one (from which the bootloader is loaded, on which we install our operating system, the necessary programs and utilities), the other (usually each D) is a side one. Their positions need to be swapped. If you encounter this, there is no need to get lost. There are two methods: software and mechanical.
Instructions
1. The software method is done very easily, by performing a simple algorithm: At the very beginning of booting the computer, go to the BIOS by pressing the F2 or Delete key (this depends on the version). 2. After this, you need to select the position – BIOS Features Setup 3. Next, by pressing the left mouse button, click on Boot Sequence. 4. Now all you have to do is in the Hard disk drivers section, indicate which of the available disks will be the main one . To do this, locate the core rough disk and name it First primary. And for the second disk, select Second primary. 5. Now restart your computer. After rebooting, it will recognize which hard disk you installed as the main one. 6. The 2nd method is mechanical or physical, the one that involves direct work with hard drives. If you look at the hard disks from the back, you will be able to notice there the so-called jumper, which is located in a certain position. Be careful. On the main hard drive it needs to be installed in the first position, like this – | : : : , on the second - to the second, schematically it will look like this - : | : : This will tell your computer which hard drive will be the primary one and which one will be the secondary one.
To organize information on a hard drive, it is divided into several sections: logical drives, core and base partitions. In Windows Vista, a disk can contain no more than four main partitions, or 3 main and one additional. In this case, the additional partition can contain up to 127 logical disks.
Instructions
1. To create a main partition on your hard drive, you can use a specialized program. One such program is Partition Manager Special Edition. Launch Partition Manager Special Edition and select Advanced Mode. 2. In the menu on the left, select an unallocated area, and in the context menu, click on the “Create section” item.
3. You need to set the parameters of the partition to be created. Here you need to indicate that the partition being created is primary, prefer the file system and partition size, and also specify the name as a letter.
4. In the “Metamorphoses” menu, select “Apply metamorphoses”, confirm the operation in the window that opens. 5. Depending on the speed of your computer and the specified size, the process may take some time. Upon completion, a message will be displayed indicating the successful completion of the operation, the core section will be completed.
When purchasing a new hard drive or changing the parameters of an old one, it is sometimes necessary to perform operations to allow its partitions to become active. Otherwise, you risk losing access to the operating system.
You will need
- – Windows installation disk or LiveCD.
Instructions
1. First, try to make the hard disk energetic using the operating system probabilities. This method was tested on Windows XP and Vista operating systems, but it is also applicable to Windows Seven. Open the Start menu and select Run. 2. Enter the command compmgmt.msc into the field that appears. Click the "OK" button. Find the “Storage Devices” sub-item in the “Computer Management” menu and go to it. Select " Disk ". 3. Select the hard disk (or each disk) that you want to make energetic. In the right column of this window, select “Make section energetic.” In the case of Windows 7, this item will be located in the “All tasks” menu. Click the "OK" button. 4. If you cannot access the operating system, use the command line to fix the active partition. Launch the Windows Vista (Seven) installation disc or LiveCD for Windows XP. Enable command line support and run it. 5. Type diskpart and press Enter. Now enter the command list disk, then press the Enter key. A list of hard drives will appear in the working window, which will be numbered. Choose the section that you want to make energetic. 6. To do this, enter the command select disk 0 or 1, depending on the disk . Now enter the list partition command to summarize the list of existing partitions on a given hard drive . 7. Select the required partition by entering the select partition 1 or 2 command. To make this partition active, enter the active command. If you did everything correctly, then after pressing the Enter key the following message should appear: “The section is marked as energetic.” Reboot your computer to check the operating system.
Many computer users know how to swap hard drives from 2 different computers, but this does not always work out successfully. It is possible that the operating system will not boot easily, and a blue screen may occur. This is due to a mismatch between the drivers installed on the hard drive and the new computer configuration. The system starts the software before the user logs into Windows, so drivers should be uninstalled before replacing hard drives.
You will need
- – a screwdriver or screwdriver;
- – disks with drivers.
Instructions
1. Open Control Panel. Go to the add/remove programs menu, select the “Metamorphosis or remove programs” tab. Find all available drivers on your computer in the list and completely remove them. Please note that all steps associated with reinstalling device software are only required if they were originally installed on the hard drive you want to replace and/or the operating system was installed on it. If the rough disk does not store any installation files, then this step must be skipped. 2. Repeat the previous operation with a computer whose hard drive is ready for replacement. Shut down both computers and disconnect them from their power sources. 3. Using a screwdriver or screwdriver, unscrew the fasteners holding the side walls of the system unit. Carefully disconnect both hard drive cables, holding them by their bases. Remove the screws holding the rough disk in place. Repeat the operation on the second computer. 4. Change in some places harsh disks computers. Secure their location. Use the appropriate cables to connect them to the power supply and motherboard. Tighten the case covers with screws and connect the computers to power sources. 5. Turn on your computer and as soon as the numbers appear on the screen, press the F8 key. A list of operating system boot options should appear on your monitor. Select harmless mode. If the system turns on without any tasks, then install the appropriate software. After this, you can download in normal mode. If necessary, repeat this step for the second computer. 6. If after completing the described steps the priority of the system startup device has changed, set it to one that is more comfortable for you by pressing the Esc key when booting the computer. Next, you will be given options for media from which Windows can be booted; select the appropriate option. Video on the topic
Note! It is allowed to swap hard disks only after making sure that their connectors fully match. Helpful advice You will save your most important files on removable media, since nothing guarantees you that there will be no problems associated with data loss when rearranging hard drives.
The energetic partition of the hard drive is responsible for the location of the Windows boot loader. Performing the energetic partition selection operation requires a fair amount of computer knowledge and cannot be recommended to inexperienced users for security reasons.
Instructions
1. Click the “Start” button to call up the main system menu and go to the “Control Panel” item to initiate the procedure for selecting an energetic partition on the computer’s hard drive . 2. Select “System and its maintenance” and select “Administration”. 3. Expand the “Computer Management” link by double-clicking and enter the manager’s password to confirm your authority in the request window. 4. Select the “ Disk ” item in the “Storage Devices” group in the navigation area and call the context menu of the partition to be assigned by vigorously clicking the right mouse button. 5. Use the Make Partition Vigorous command to perform the selected operation. 6. Return to the main “Start” menu and go to “All Programs” to carry out the operation of selecting the energetic partition of the computer’s hard drive in an alternative way. 7. Select the “Typical” item and call the context menu of the “Command Line” element by right-clicking. 8. Select Run as Manager to comply with Microsoft security requirements and run the command line tool. 9. Enter diskpart in the command line field and type the list partition command with the number of the partition selected to be energetic in the DISKPART command line field. 10. Enter the value select partitionx, where x is the partition that you want to become active, in the DISKPART command line field and confirm the execution of the selected command by entering the active value in the DISKPART command line field. Video on the topic Please note! On one hard one, only one section can be energetic. Metamorphosis or removal of a vigorous partition may make it impossible to start the system. Helpful Hint Remember that a logical drive cannot be selected as a vigorous drive; only a core partition can be energetic.
We increase drive C at the expense of drive D without programs
In this article, you will learn how to increase the size of the system disk without reinstalling the system. BUT, you may encounter one problem that we will help you avoid!
If your system is Windows 7, then you need to go to the settings! Start
->
My Computer
(
right mouse button
) ->
Management
After this, a new window will open called “Computer Management”. In the left column, you need to select "Disk Management". After which all disks on your PC will be displayed.
In order to enlarge drive C, you need to find free space, or, more precisely, pinch off free space from an adjacent drive. To do this, right-click (RMB) on Disk D, and compress the volume to the volume that needs to be increased. Let's say 1000 MB.
And now the problem itself!
An unallocated area of 1000 MB will appear, and logically we need to right-click on drive C and click “Extend volume”, but this option will not be available! Many people try to find answers on forums or somewhere else, but in most cases, they cannot cope with the problem on their own!
How to properly expand C drive
- Let's say you have two disks (C, D), determine how much information occupies on disk D (for example, the total volume is 800 GB, and 300 GB of space is occupied)
- You will need to delete volume D without losing data. How to do it? You need to expand it by more than 300 GB, turn the unallocated area that appears into volume G. Now you will have three disks (C, D, G)
- Copy all information from drive D to drive G.
- We delete volume D, after which an unallocated area of 500 GB will appear
- Expand drive C to the required volume, say 50 GB
- The remaining 450 GB are converted back into Disk D.
Anyone who has their own website will find our next article useful, in which we described how to fill out the form correctly.
Now let's take it in order!
1.
We expand volume D, in my case by 360 GB, and an unallocated area of 351 GB appears. Please note that expansion takes 10-15 minutes.
2.
Right-click (RMB) and select “Create simple volume”. Now go to “My Computer” and you will see 3 drives: C, D, G. To avoid losing all files, copy them to drive G.
3.
Removing volume D
4.
Now we can “expand volume” C by the required amount. As you can see, C has increased to 127.93 GB.
5.
From the unallocated area we create volume D. You can leave everything as is, or return the PC to its previous form, that is, leave 2 disks: C and D. To do this, transfer back all the information from G to D. After which, delete volume G, and volume D is expanding.
The presented process will take time, but it will 100% protect you from data loss, and most importantly, you will not need to learn a bunch of third-party applications that can damage your hard drive.
If you have any questions or encounter difficulties, write to me in the comments or in “ “.