If you copied some voluminous text from the Internet, and after pasting it into a document or simply opening a finished file, you noticed that the hyphens placed in Word do not match the page layout, and removing hyphens manually will take a lot of time, this is where the question arises how to remove hyphens automatically in Word. This article will focus specifically on this issue. In it we will look in detail at an example, how to remove word hyphenation in Word.
The methods for removing hyphens in Word described in this article work both in Word 2003 and in all versions of Word 2007, 2010, 2013 and 2020.
First of all, we must determine whether these are automatic word hyphens in Word or manually placed.
Let's conduct one test that will help us determine the type of transfers. Try highlighting the hyphenation sign.
How to remove hyphens in Word – Highlighting hyphens
If you were able to identify the hyphenation sign, it means that the hyphens were placed manually. If not, then the document uses automatic hyphenation, and it will be much easier for us to remove word hyphens . Let's look at how to remove hyphens in both cases.
Word 2007, 2010, 2013
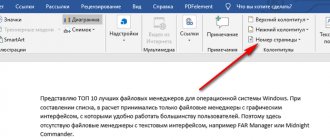
In order to remove word hyphens in Word 2007, 2010, 2013, made using the built-in placement function, you need to go to the “ Page Layout ” tab on the tool ribbon.
Select the desired fragment and select “ Hyphenation Page Settings (if corrections are required throughout the document, you do not need to select anything).
In the context menu you will see that the mode is set to “ Auto ”.
For Fr.
As a result, the words will be “whole”.
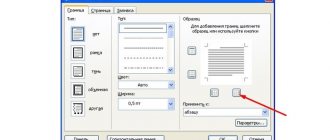
Transfer options
The hyphenation feature has configurable parameters. Where you can specify whether to insert hyphens in words containing capital letters. Capital letters (capital letters) are usually used to highlight headings, and hyphens are not needed here.
transfer options
Setting the width of the transfer zone also helps improve the external appearance of the document. As this zone increases, the number of hyphens in the text will become smaller, but when the size of this zone decreases, the text will look more even.
Thus, using a special tool for hyphenating words helps make the document text more compact and attractive due to the even distribution of letters and symbols in the lines.
Soft hyphenation in Word
To break a word, use a soft hyphen (dash or “Ctr –”) or set it manually. If you now check in the arrangement panel, it will display “ No ”, i.e. the built-in service will no longer detect such breaks made manually. Manually placed breaks can only be removed manually . The instructions above will no longer work, and for this purpose the symbol replacement .
How to sort a list alphabetically in Microsoft Word
Worth noticing! When working in a text editor, it is not recommended to use manual insertion, due to the complexity of subsequent text processing.
To remove hyphenation:
- In the ribbon on the main tab, go to the “ Find ” context menu, launch “ Advanced Search ” (you can use the key combination “ Ctrl+ F ” - “ Advanced Search ” or “ Ctrl+ H ”) and expand the parameters using the “ More ” button.
- Click the “ Special ” button at the bottom of the search form.
- Select “ Soft transfer ” from the drop-down list.
- To highlight found elements, select “ Highlight while reading ”. Click " Find Next ". ^- will appear in the search bar .
- After that, go to the “ Replace ” tab and check that the “ Replace with: ” field is empty (without spaces). Click “ Replace ” or apply to the entire document – “ Replace All ”.
As a result, the entire text will be edited and a window with statistics showing how many replacements have been made. Placed hyphens will not be changed.
There is one more possibility in this method - if you use the search with selection and at the same time close the form, you can delete all inserts by pressing the “ Delete ” key. When performing operations over the entire area, you must pay attention to the selected fragments so as not to delete unnecessary things, and to cancel the operation, use the “ Cancel input ” or “ Ctrl+ Z ” button.
Removing manually placed hyphens
If your document was hyphenated manually, then the method described above will not work. In your case, in order to remove hyphens, you will have to use the Find and Replace tool.
To do this, press the key combination CTRL-F and then click on the arrow that is located to the right of the search bar.
Next, in the menu that opens, select the “Replace” option.
As a result, the Find and Replace tool will appear in front of you. You can use it to search and automatically replace text in a Word document. In order to remove line breaks, open additional settings using the “More” button.
After this, you need to click on the “Special” button and select the “Soft transfer” option in the list that opens.
After selecting “Soft Transfer”, two characters will appear in the “Find” line, but this is normal, as it should be. Leave the “Replace with” field empty; you don’t need to enter anything in it. Now just click on the “Replace All” button.
After clicking the “Replace All” button, the Word document will search for and remove hyphens.
It should be noted that in some cases, instead of “Soft hyphen” in the search window, you must select “Continuous hyphen”.
Setting up automatic hyphenation in Word
Disabling automatic word hyphenation
You can use the method through the “ Paragraph ” menu in order to remove and prohibit automatic word hyphenation in the entire document at once. To prohibit automatic word breaks, you need to go to the “ Paragraph ” context menu on the sheet (called by right-clicking on the page).
Editing text - how to change the font format
Go to the “ Page Position ” tab and check the “ Prohibit automatic transfer ” checkbox.
In any case, when editing text, you need to take into account that no matter how powerful the editor is, it will not be able to recognize the correct or incorrect word break better than the user, and it is not always necessary to use it. It’s one thing when you work with a document yourself from start to finish, and another thing when the document is received from an external source and needs to be brought in accordance with certain design standards. Knowing the methods and their differences (soft, automatic, hyphens) - you can always quickly correct the document.
How to remove hyphens in Word
Regardless of typing in Word, many users do not use word breaks because the program, depending on the position of the text and the page layout, automatically moves words without separating them with a hyphen. Often this is simply not required when you work with personal Word documents.
However, cases when it is necessary to work with another document or text downloaded (copied) from the Internet, which contains the initial signs of translation, are not unusual. This happens when you copy someone else's text, which most often changes and does not match the page layout. In order for the translations to be correct and even to completely remove them, you need to complete the initial settings of the program.
We will talk about how to disable word wrapping in Word versions 2010 - 2020; it is possible that the disabling occurs in other versions as well.
Extra options
You can also change settings individually for text in the Page Layout tab.
In the window that opens, set the necessary parameters and save by clicking OK.
Advice! To reduce the number of hyphens in the text, you need to increase the spacing in the Zone width… field. To limit the number of consecutive hyphens, you need to increase the interval in the Max. number of consecutive hyphens field.
Word settings
For ease of use in the text editor, the following hyphenation options are provided:
- Manually
The command used is: after writing the text, open the Page Layout tab and click Hyphenation - Manual.
Next, a window appears and sequentially offers possible options for breaking down the syllables for the last words in the lines. Select the appropriate location and click Yes to confirm.
- Autotransfer
This feature can also be enabled in the Page Layout tab. In this mode, Word arranges syllables independently.
Manual placement
If word separation is done manually, no information is stored in the file to automatically cancel this function. Therefore, they can only be removed manually. The operations are:
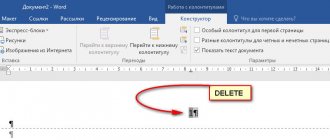
- Open the Find window. To do this, click a similar inscription in the “Editing” section (far right). Or press the hot keys “CTRL+F”.
- Click on the “More” button and, in the expanded window, expand the “Special” list.
- Select “Soft Transfer” from the list.
- Click on the “Find in” button > “Main document” (for selected text – “Current fragment”). All elements that meet this definition will be highlighted.
- Close the window and click “DELETE”. Everything selected will be deleted.
Important! When closing the window, do not accidentally click on the text. In this case, the selection of the required characters will be canceled (disappeared).
In the old “Word” - a button on the toolbar, or “CTRL + F”.