Headings – elements of the Word table of contents
We need to start with the fact that headings in the text are done according to the rules. Word must understand that the piece of text where the author has highlighted it in bold is a heading, and not just a set of letters. For this purpose, the editor has created the “Styles” tool .
Using this tool, the user shows plain text in Word and indicates where the title is. They are divided by levels:
- Main - level 1, usually only one in the text.
- Level 2, often the only one.
- Level 3 is rarely used, and level 4 is even less common.
For example, the book “Shipwreck” consists of two parts: “Everything is bad” and “Everything is good.” The title of the book is title #1. “Everything is bad” and “Everything is good” headlines No. 2. If parts of the book have chapters, they will be considered title #3.
| Heading 1 | Heading 2 | Heading 3 |
| Shipwreck | ||
| Part 1. Everything is bad | ||
| Chapter 1. No food | ||
| Chapter 2. No water | ||
| Part 2. Everything is fine | ||
| Chapter 1. Found food | ||
| Chapter 2. Found water |
Using a hypothetical book as an example , the contents were compiled manually.
For Word, it is enough to indicate in the text where the headings are and what level they are, so that the program can automatically create a hierarchical table of contents and set page numbers if necessary. For working with text only in Word, without a printed copy, pages are not so important: if you hold down the Ctrl key and click on a content element, Word will go to the selected item.
How to Make a Table of Contents Automatically in Word 2010
The first thing we need to do to create a table of contents is to highlight all the sections and subsections as headings for our future content. This will be the basis with which we can make a table of contents in Word 2010 . Let's take a closer look at how to do this.
We will designate sections and subsections as headings using the “Styles” collection in the “HOME” tab.
Table of Contents in Word 2010 – Styles Gallery
First we need to think about the structure of our content in Word . For the titles of sections, introduction, conclusion and list of references we will use Heading 1, for subsections of the second level – Heading 2.
Each heading has its own formatting parameters: its own font, color, size, line spacing, etc. But we need to change these formatting options to suit our standards. To do this, select the text of the section title.
Table of Contents in Word 2010 – Highlighted Section Heading
Since we have decided that Heading 1 will be responsible for the title of the section, in the style collection we right-click on “Heading 1” and select “Update heading 1 according to the selected fragment.”
Table of Contents in Word 2010 – Style Update
In this way, we not only changed the formatting of Heading 1, but also assigned it to the highlighted section title. Let's move on to the title of the second section. Now we don't need to change the formatting, just highlight the text of the second section and select "Heading 1".
Table of Contents in Word 2010 – Second Section Heading Highlighted
We perform similar operations for subsection headings using the “Heading 2” style.
The preparatory work has been done, so let's start creating an automatic table of contents .
Place the cursor where the content . Go to the “LINKS” tab, click “Table of Contents” -> “Auto-assembled Table of Contents 1”
Table of Contents in Word 2010 – Creating a Table of Contents
A table of contents indicating page numbers
appeared in place of the cursor in the MS Word
Styles - how to make headings
To select a style, use the mouse to select the text that will become the title. In Word 2010, without additional clicks, a menu will pop up next to the selected text, where you need to click the stylized letter “A”. Not to be confused with the strict letters “A”, which are responsible for the size of the text. The same menu will appear when you right-click on the selected fragment. The required menu can also be called up on the “Home” - “Styles” .
After clicking on the beautiful letter “A”, a menu will appear where an example of the style will be displayed in squares. When you hover the cursor, the name of the style will pop up. Interested in styles with the name “Heading No.” Where the number indicates its number (see example with the book).
If you accidentally select paragraph text and change its style, select it again and set the style to “Normal”. If everything is completely mixed up, then you need to do the following: select all the text: Ctrl + A (press the Ctrl key and the “A” key together). Now press Ctrl+SPACE (press the Ctrl key and spacebar together) - this will cancel all formatting styles. Revert back: Ctrl+Z.
How to Create a Table of Contents in Word 2010
Let's start formatting the table of contents . To do this, go to the “LINKS” tab, click “Table of Contents” -> “Table of Contents...”.
Table of Contents in Word 2010 - Go to the "Table of Contents" window
In the “Table of Contents” dialog box that opens, on the “Table of Contents” tab, click the “Edit...” button.
Table of Contents in Word 2010 – Table of Contents Dialog Box – Table of Contents Tab
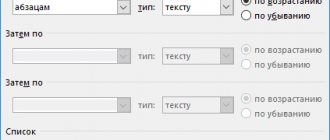
In the “Style” dialog box, select the required level and click the “Change...” button.
Table of Contents in Word 2010 – Formatting Table of Contents Style
In the “Change Style” window, set the desired formatting parameters. In our case, we use the font “Times New Roman”, size 14 PT, one and a half spacing:
Table of Contents in Word 2010 – Changing Content Formatting
We do this for each level. That is, “ Table of Contents 1” is responsible for the first level (in our case, these are section headings, introduction, conclusion and bibliography), and “ Table of Contents 2” is responsible for subsection headings.
Creating a Table of Contents
To create automatic content, we follow the following algorithm:
- Headings are created using styles.
- The cursor is placed at the place where the list of headings should be generated.
- The “Links” menu opens - the main menu bar at the top of the program window.
- Click on "Table of Contents". Click on “auto-assembled table of contents”. Here you can select the type of content.
As a result, it turns out to make content from the headings that word found in the text.
Content Creation
In order to correctly assemble the table of contents, it is advisable to go to the beginning or end of the document, since such an element should not be in the middle of the file. This is done as follows.
- First you need to place the cursor in front of the first letter among all your text information.
- Then you need to type the Ctrl+Enter key combination on your keyboard. As a result, you will be able to add a blank sheet.
- Let's go to the beginning of the document. Then go to the “Links” tab. Click on the “Table of Contents” icon. In the menu that appears, select the item “Auto-assembled table of contents 1” (you can also select the second option - it will still be correct).
- Most likely, you will get this result. The fact is that in order to compose competent content, you need to format the names of sections (in our case, the names of poems) with heading styles.
If this is not done, the Microsoft Word editor will try to enter table of contents items automatically at its discretion. In this case, he chose what was in bold text, but could have included something else in the list.
Setting up headers
In order to create correct and beautiful content, you must perform the following steps.
- Click on any verse title (you need to make sure that this text is active and can be edited).
- Notice that it has the normal text design selected.
- In order to fix this, you need to click on the “Heading 1” style icon (after placing the cursor in the right place).
- After this, you need to return to the table of contents again. Right-click on this element. In the context menu that appears, select “Update Field”.
- You will then be asked what exactly needs to be edited. Select "Update Entirely". To save the settings, click on the “OK” button.
- Now everything will be nice and neat. But only where we corrected the title.
- In order for the remaining points to be the same, everything else will have to be formatted in exactly the same way. That is, all other titles must be assigned the “Heading 1” style. Then repeat the steps above to update the content. After that you will see the following.
Agree that it will not be possible to make such an even and neat list manually. Each point is in its place and nothing has moved. It is much more pleasant to work in such a document.
Multi-level table of contents
In the case described above, all first-level headers were used. Let's consider an example in which there will be subheadings. To do this, you need to insert all the missing elements into the text.
- Add a second-level heading to your Word document. To do this, just click on the appropriate style on the toolbar.
- Then, to display a new item in the content, we will right-click on this object again. In the context menu, select the “Update field” item.
- Next, click on the “OK” button.
- Immediately after this, new subheadings will appear in the content.
Similar actions must be done after each change in the structure of the document.
Please note that the contents should not overlap the title page. Everything should be in its place.
How to write headings correctly
In the process of working with content, as a rule, some of the text rises up, while others go further. As a result, “naked” headings (titles) may appear at the bottom of the sheet. It doesn't look nice. It is necessary that at least one line remains after them.
Apart from this, it is also wrong to put the first verse on the contents page. It's easy to fix this problem. To do this, let's take a few simple steps.
- We remove everything from the first page except the content. Then we make sure that there are no headings at the end of the page in the entire document. After this, right-click again. In the menu that appears, select “Update Field”.
- But this time we select the “Update page numbers only” option. To save, click on the “OK” button.
- As a result of this, only the numbers will change, but not the content itself.
On the other hand, you could select the “Update Entire” option. In the case of our example, nothing will change. But if you made any changes manually, all this would disappear.
For example, some people like to center the word “Table of Contents” or write something extra of their own. Other users, on the contrary, may remove some items from the content.
Updating the table of contents
It happens that table of contents items lose their location . Titles scroll to the right or left. And also in a situation where something has been added or removed from the text: page numbers have changed, their number has changed, chapters have changed or been added, etc. In these situations, it is necessary to add new paragraphs or realign the table of contents.
There is no need to create content again. To do this, just click on the line in the “Table of Contents” text, click “Update table”, select the desired item - page numbers or the entire table of contents, click “Ok”, it will be automatically re-ordered.
Also in the “Links” menu, by clicking on “Table of Contents”, you can access more flexible settings for the emerging content. Below the templates, the line “Table of Contents...” will lead to the parameters. Options let you choose table of contents styles, number of heading levels to display, and other visual elements.
The Word 2010 test editor has a user-friendly interface. It is not difficult for the user to use all the functionality of the program. This does not require lengthy training or special knowledge.
How to update auto table of contents
Although we generate content automatically, it is only relevant at the time it is added to the document. If you renamed some sections, added text, and as a result the page numbering changed, or made any other changes, the auto table of contents needs to be updated.
To do this, just click anywhere on it with the left mouse button. A small menu will pop up at the top, in which we select “Update table” and then specify what exactly should be changed:
- all contents, if subsections were changed, added or removed;
- only page numbering if text was added.
However, after updating, the format of headings in the content will not change, so feel free to refresh it as many times as necessary.
If there are no formatted headers
If your document does not yet have headings formatted using autostyles, you should first go through the document and do so. In the simplest case, select each section heading in turn and apply to them the Heading 1 , which is available in the Styles the Home tab .
Then select each subheading and apply the Heading 2 (available there). The Heading 3 style will automatically appear next to it ; if you have third level subsections, format them using it.
Once all the headings are formatted with styles, go to the Links and insert a table of contents.
Table of Contents Properties
This element, like almost everything else in Word, has its own parameters. In order to change them, you need to follow a few simple steps.
- We repeat everything described above.
- Only this time we select the “Change properties” item.
- As a result, the following window will appear.
- Here you can change:
- Name;
- collection;
- category (you can create your own template);
- description;
- options.
After editing, you need to click on the “OK” button, otherwise the changes made will not be saved.
How to create an automatic table of contents
It is much more convenient to create content that will look neat even after printing the material. There are several tools for this in Word. Simple accuracy can be achieved by creating a table, writing chapters and page numbers not just in lines, but in cells. Then you should remove the borders. The result will be beautiful content, but it won't be automatic. If you want to create a full-fledged table of contents, when clicking on a line of which the user will be redirected to a given chapter, you need to try out the tools built into the program.
Custom table of contents
But there is a third option - semi-automatic mode. This content is collected as follows.
- Go to the “Links” tab again.
- This time, in the “Table of Contents” menu, select the appropriate item.
- As a result, the following window will open.
- Here you can:
- enable or disable hyperlinks;
- enable or disable display of page numbers;
- enable or disable display of pages on the right edge of the sheet;
- select the filler type;
- adjust heading levels;
- indicate the design format;
Options
For more detailed settings, click on the “Options” button.
As a result, the following window will open.
There are quite a few points to edit here. In order to see them all, you need to scroll the slider to the very bottom.
If you don’t like the changes made or you mess something up, you can always click on the “Reset” button.
Style
To edit the appearance of menu items, click on the “Edit” button.
As a result, a window will appear in which you can make changes to any desired table of contents. To do this you need:
- Select the desired item.
- View description.
- If you are not satisfied with it, click on the “Change” button.
- Immediately after this, the “Change Style” window will appear. Here you can configure basic settings.
- For more detailed settings, click on the “Format” menu.
- Immediately after this you will see the following items.
- The most necessary ones include:
- font;
- paragraph;
- tabulation;
- border;
- frame;
- numbering;
- text effects.
- To save changes at each stage, you must click on the “OK” button.
Instructions for Word 2003 and 2007 versions
Word 2003
In Word 2003, users cannot create automatic tables of contents by choosing a template they like. Only the header markup feature is available. Follow the instructions:
1 Open a document that contains text that is not formatted with headings;
2 Add levels. To do this, select each subheading in turn, click on the “Format” and in the styles tab, select the first, second or third levels;
Fig. 3 - creating heading markup in Word 2003
3When all the headings are formatted, you can move on to creating organized content. Click on the menu item “Insert” ;
4Select “Link” and in the drop-down list click on “Table of Contents and Indexes” ;
Fig.4 – transition to the content editing page
5In the window that opens, check the box next to “Page numbers on the right edge” . This will allow you to visually highlight the section and its page number. In the Sample you will see a preview of the content;
Fig.5 - creating pointers
6In the same window, open the “Table of Contents” ;
7Click on the “Structure Panel” so that it becomes inactive. If this is not done, a system error will appear when creating a list of partitions;
Fig.6 - creating a content structure panel
8Click on "OK" .
To update the section field , right-click on the content and select the update method - only page numbers or update the entire content.
Fig.7 – result of creation in Word 2003
Word 2007
In Word 2007, you can only create an automatically collected list of sections.
The user cannot manually create the arrangement of paragraphs and subparagraphs of the “Table of Contents” function in this version of Word. Follow the instructions:
- Open a document in which all the headings have been created in advance;
- Create a blank sheet at the beginning or end of the file;
- Go to the “Links” tab;
- Click on the “Table of Contents” item and select its template in the drop-down list;
Fig. 8 – settings panel for the list of titles
Next, a list with all sections of the file will automatically appear on the page. In Word 2003 and 2007, the content has a tabular structure.
It does not update automatically after changes are made to the body of the document.
Fig.9 – promoter and content editing in Word 2007
To edit a list, select it by double-clicking.
Now you can create formatting for list items - highlight headings with bold or italic text, change color, use a highlighter.
Remember! If you change the value of the section name, page numbers, or add a new part, you must manually update the table of contents for the changes to be reflected. Otherwise, when you try to print, a text with the error “Header not defined” .
To update the content, right-click on it and click on “Update Content” or go to the “Links” and click on “Update Table” .
How to remove automatic content
Often, a table of contents is needed solely to facilitate work on the text, and it is not required in the final version of the document. In such cases, the question arises: “How to remove the auto-table of contents in Word, and will the marking of subheadings be violated?” The good news is that cutting out automatic content does not affect the design of the text in any way, even if this window took up 2-3 pages. The text will simply move to the first page, taking the place of the disappeared table of contents. That is, sections starting on pages “4” and “17” will now be on pages “1” and “14”.
You can delete the automatic table of contents in two equally simple ways:
- Click on the table of contents to activate it, click on the arrow next to the file icon in the upper left corner and select the “Delete table of contents” function from the drop-down list.
- Select the table of contents with the mouse, like a regular part of the text, and click on “Delete” or “Backspace”.
Often, after finishing work on the text, the need arises to add something, correct something, or simply find the necessary information. In order not to search for the desired section manually, you can create an automatic table of contents, follow the link to the chapter of interest, and after finishing the work, delete the table of contents window again.
Preparing to create an automatic table of contents
Format the text as follows:
- For headings, chapters, and paragraphs, choose the appropriate style. To do this, on the Home ribbon, in the Styles section, select the appropriate style for formatting the header. By highlighting the title text in one style or another, you let the program know that this is a title and, therefore, this text is a potential candidate for inclusion in the table of contents.
- Place the cursor at the very beginning of the document (before the first letter).
Word 2020 User Guide
In 2020, versions of the Word program are created according to the same principle as in the 2010 version.
The only difference is the presence of a more convenient interface and more opportunities to work with custom templates.
Two ways to create:
Automatically – used for a ready-made document in which the headings are highlighted;
To add an auto-collectible to a blank page of a finished document, follow the instructions:
- Open the MS Office Word file and make sure all sections are highlighted properly. If necessary, use the “Styles” and remove/add sections yourself;
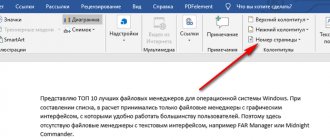
- Next, open the “Links” tab , as shown in the figure below, and click on the creation block. Next you will see a list of available templates. By clicking on one of them, a ready-made list of headings will appear on the page;
Fig. 13 - choosing a template in Word 2016
The finished table of contents in Word 2020 can be easily edited. The title “Table of Contents” itself can be changed, deleted or moved.
Also, to create the desired look, it is possible to adjust the arrangement of list items or add new elements .
Fig. 14 – template for a list of headings in Word 2016
To change the contents of an object, double-click on it with the mouse. Then open the context menu. With its help, fields, codes and field values are changed, new fonts and paragraph formatting are added.
Fig. 15 – editing auto-collected content
To create a table of contents for an empty document, in the template selection window, click on “Manual table of contents” :
Fig. 16 - creating a list manually
Now you need to independently enter the names of the document paragraphs of the first, second and third levels. Also, you must manually add all page numbers.
To add a new item to the table of contents, right-click on it and click on “Add Field” , and then select the field level.
Fig. 17 - editing
Thematic videos:
If you have Telegram, you can now download any software or game through our bot, just follow the link and try it!
« Previous entry
How to make auto content, step by step instructions
It can be done either automatically or manually. The first option takes a little time, while the second is simpler, but also longer. However, both of these options have their pros and cons.
You can do this automatically, or you can do it yourself
Instructions for working with auto content for beginners:
- At the very beginning, you need to open a text editor. It doesn't matter what version it is.
- Write the names of the subheadings. It is necessary to title all sections, subsections and chapters. At this stage you should not experiment with fonts.
- Next you should move on to formatting the headings. To do this, go to the “Home” tab, and then to the panel with headings. If you hover your cursor over them, a hint will pop up indicating what level it is. Next, you need to select the desired chapter and apply a heading of the desired level to it. The user must do the same with all tables of contents. This is necessary for subsequent work with auto content, so that in the future it will be possible to edit all headings at once.
- Changing the appearance of tables of contents. After a person decides on the location of the headings, they need to customize their appearance. To do this, you need to hover the cursor over the title of interest in the toolbar and right-click on it. The “Edit” tab will appear, you need to go to it. After which all the tools that will be required for the job will be presented. Here you need to select all the parameters individually: font, color, style, size, and so on. After completion, you need to click on the “OK” button, and all settings will apply to all tables of contents of a certain level.
- Auto content formatting. To do this, you need to go to the “Links” section, and then to the “Table of Contents” item. You need to left-click on the last item. MS Word will offer many options for formatting auto content. Here, each user selects all parameters individually. Next, you need to click on the desired option. After which it will be applied to all headers.