Category Word
Also articles about working with pages in Word:
- How to make a zebra in Word?
- How to highlight a page in Word?
- How to create a page in Word?
- How to delete a page in Word?
As a rule, in various text documents it is customary to start new chapters and sections on a new page. Filling empty space with line endings, i.e. countless presses of the “Enter” key are not the best option, so next we will look at how to create a page break in Word.
A page break in Word can be done using the menu or using the key combination “Ctrl + Enter”. First, you need to place the cursor in the required place in the document, go to the “Page Layout” tab, select the “Breaks” menu item and select “Page” from the list that appears. Using this item will allow us to split a page in Word by setting a page break immediately before the cursor.
If we apply this menu item on a blank page, we will get two blank pages, and if the cursor is located in the middle of the text, then we will be able to split the page in Word into two parts, thus moving the text after the cursor to the next new page.
Training in Word
When working with documents in Microsoft Word, when formatting text, you often encounter the problem of transferring text to a new page. Sometimes you need to make sure that the entire paragraph is on one sheet, start the next paragraph on a new page, or simply insert a blank sheet. To easily solve all these problems, it is enough to understand how to create a page break in Word.
What is a page break?
Before you figure out how to make a page break in Word, it’s worth understanding what it is. A page break is a function in the Word program that allows, after a certain paragraph, to move the rest of the text to the next page, without making unnecessary efforts during further changes and corrections.
One of the common mistakes when wanting to wrap text to another page is to use the Enter key on the keyboard, which simply moves the cursor to the line below. In this case, if there is still space left on the sheet in the lower part, and later some changes are made above, then all the text will “move away”, and on some sheets an empty space will appear at the top. To avoid this and other incidents when drawing up a document, it is enough to learn how to create breaks between pages in Word.
How to remove a page break in Word 2010
There are two types of transferring text to the next sheet (or page break) in Word: added automatically and manually. Automatic hyphens by default separate text on each sheet of the document. Manual – can be added anywhere the user needs.
First, let's figure out how to undo a manual page break in Word:
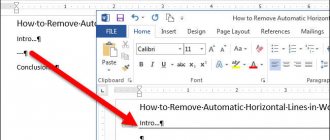
- At the top of the screen, click the “show spaces” tab, then you will see text transfers to the next sheet;
- Double-click on the one you want and delete it.
You won't be able to remove automatic hyphens completely, but you can apply the settings to certain paragraphs where they are not needed. To do this you will need to do the following:
- Select the desired paragraph.
- In the top menu, open the “Layout” tab and open the “Paragraph” window by right-clicking.
- In it, go to the “Page Position” section, check the box in front of the desired item: “Ban dangling lines”;
- Confirm the action by clicking "Ok".
Inserting a break
For most versions of the program, the process is completely identical; for example, the algorithm for how to make a page break in Word in 2010 is similar to all subsequent versions. Having selected a place, usually at the end of a paragraph, after which there should be a page break, you need to select the “Insert” tab in the top quick access panel, in which there is a “Page Break” item in the “Pages” column. After clicking on this button, the cursor will automatically go to a new, empty page, and if the current sheet was previously followed by another one, it will be one number further. To return the text below to the top, to maintain a page break only between these sheets, just press the Delete key on the keyboard once. And to delete the inserted break itself, use the BackSpace button.
A similar result can be achieved in another way. Having selected the paragraph that should start on a new page, you need to right-click on it. In the menu that opens, you need to find the line “Paragraph” and click on it with the left mouse button. After this, a window will appear in which there will be two tabs - “Indents and Spacing” and “Page Position”. Having selected the last one, you need to check the box “From a new page” and click the “Ok” button. As a result, all text from the selected paragraph will move to a new sheet.
Controlling automatic pagination
Based on the above, often in addition to adding page breaks, it is also necessary to set certain conditions for them. Whether these will be prohibitions or permissions depends on the situation; read about all this below.
Prevent page breaks in the middle of a paragraph
1. Select the paragraph for which you want to prevent page breaks from being added.
2. In the “Paragraph” , located in the “Home” , expand the dialog box.
3. In the window that appears, go to the “Page Position” .
4. Check the box next to “Do not break paragraph” and click “OK” .
5. A page break will no longer appear in the middle of a paragraph.
Prevent page breaks between paragraphs
1. Select those paragraphs that in your text must be on one page.
2. Open the dialog box of the “Paragraph” located in the “Home” .
3. Check the box next to “Keep with the next” (tab “Position on page” ). To confirm, click “OK” .
4. There will be no gap between these paragraphs.
Add a page break before a paragraph
1. Left-click on the paragraph before which you want to add a page break.
2. Open the Paragraph (Home tab).
3. Check the box next to “From a new page” located in the “Position on page” . Click “OK” .
4. A break will be added and the paragraph will move to the next page of the document.
How do I fit at least two paragraph lines at the top or bottom of one page?
Professional formatting requirements do not allow pages to end with the first line of a new paragraph and/or to begin a page with the last line of a paragraph that began on the previous page. This is called dangling strings. To get rid of them, you need to do the following:
1. Select the paragraphs in which you want to set the dangling line ban.
Paragraph group dialog box and switch to the Page Position .
3. Check the box next to “Prohibit dangling lines” and click “OK” .
Note: This mode is enabled by default, which prevents sheets from being split in Word on the first and/or last lines of paragraphs.
How to prevent table rows from breaking when moving to the next page?
In the article provided at the link below, you can read about how to split a table in Word. It is also appropriate to mention how to prevent a table from breaking or moving to a new page.
Note: If a table is larger than one page, you cannot prevent it from moving.
1. Click on the table row whose breaking you want to prevent. If you need to fit the entire table on one page, select it completely by pressing “Ctrl+A” .
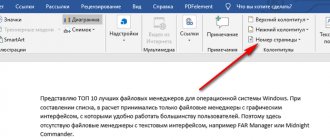
2. Go to the “Working with Tables” and select the “Layout” .
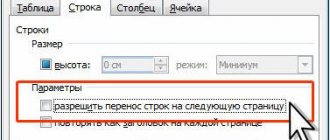
3. Call the “Properties” , located in the “Table” .
4. Open the “Line” and uncheck the box “Allow lines to wrap to the next page” , click “OK” .
5. Breaking the table or a separate part of it will be prohibited.
That's all, now you know how to make a page break in Word 2010 - 2020, as well as in its earlier versions. We also told you about how to change page breaks and set conditions for their appearance or, conversely, prohibit them. I wish you productive work and achieving only positive results in it.
Thank the author and share the article on social networks.
>
Hotkeys
The fastest way to create a page break in Word is to use hotkeys. Regardless of the version of the program, you need to place the cursor at the place after which the new sheet should begin, and simultaneously press the combination Ctrl + Enter. The result of this will be the transfer of the text below to the page below. It is worth noting that if you have selected text before using the hotkeys, it will simply be replaced by the page break that is then inserted, so before clicking you should make sure that part of the document is not selected.
Setting Paragraph Rules
Using a page break, you can not only define a paragraph after which a new sheet will appear, but also specify a rule for one or more paragraphs, which should be located entirely on one page. To do this, you need to specify the appropriate rule.
To prevent a paragraph from breaking into two pages, you need to select it and right-click on it. In the menu that opens, select the “Paragraph” item, and in the window that appears, select the already familiar “Position on Page” tab. In the list located on the left side of the window, you must check the “Do not break paragraph” checkbox. In this case, if there is not enough space to fit the entire paragraph on one sheet, it will be automatically transferred to the next. In order not to break a paragraph with another, it is necessary to select the first of them, and then perform similar actions at the final point of the algorithm.
Split a page using a table
A table is another way to divide a page into 2 parts. This method is a little more complicated, but it allows you to separate individual pages rather than the entire Word document. To use this method, go to the “Insert” tab, click on the “Table” button and create a 2 by 1 table.
To make the page division look more natural, the table should be made invisible. To do this, select the entire table with the mouse and go to the “Working with tables – Designer” section. Here you need to open the “Borders” menu and select the “No border” option.
As a result, you will get an invisible table that will divide your page into 2 parts.
Features of older versions of Word
It is worth noting that the process of how to make a page break in Word 2007 and subsequent versions of the program is somewhat different from earlier ones. The reason for this is a change in the interface of the entire Microsoft Office line. Therefore, when learning how to make a page break in Word 2003 or in previously released versions, it is worth taking this point into account so as not to look for additional information on the Internet.
The difference in the algorithms for inserting a break for these versions is only one thing: in the quick access panel, after selecting the “Insert” item, a menu will open, not a toolbar. In the list that appears, you must select the “Page Break” item - the result will be the same as for newer versions of Word.
Benefits of page breaks
Why is it useful to know how to create a page break in Word? This feature of the program allows you to beautifully design a document, while ensuring a minimum number of changes when adding or formatting text. By using page breaks, the resulting document has a higher level of readability, and it also helps to separate the structure of the text more clearly.
A page break allows you to avoid inserting several consecutive empty lines into a document, but immediately transfers the text to a new sheet. This ensures that any change made above the break will not affect the position of the transferred part of the document.
If you are formatting a large document in Word, which is divided into sections, chapters, subparagraphs, etc., then using a function such as a page break can greatly simplify your work.
Let me explain why. Your new section should start from a new sheet, so if there is empty space on the previous sheet, many users fill it with empty paragraphs - press the “Enter” button in a row. Now imagine that you need to insert a subparagraph or add text in the previous section, after which all the text after it will “float”, and your new section will no longer start on a new page.
If you need to make content in a document, then doing it manually: writing out the names of sections and putting the page number opposite them is not advisable for the same reason. It is much more convenient to create a table of contents in Word using the built-in function. By following the link, you can read an article on this topic.
In this article we will look at how you can create a page break in Word, thus separating the necessary parts of the text in the document.
First, let's turn on the visibility of non-printing characters. Go to the “Home” tab and in the “Paragraph” group, click on the “Show all characters” button.
Now place the cursor at the beginning of the text that should start on a new page. Go to the Page Layout tab and in the Page Setup group, click Breaks.
Select "Page" from the drop-down list.
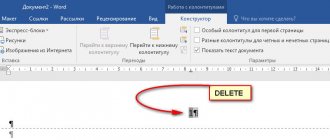
As a result, the text will be divided, and at the end of the first page (following the example) the inscription “Page Break” will appear.
This text is classified as non-printable characters, but it occupies a line. If your paragraph on a page ends at the end of the sheet, and the “Page Break” inscription is moved to a new sheet, then blank pages appear in the document. To delete them, place the cursor at the end of the text and click “Delete” - the inscription will rise and the empty sheet will be deleted.
If during the process of editing a document you have blank sheets, read the article: how to delete blank pages in Word.
You can create a page break in MS Word using hotkeys. Place the cursor at the beginning of the text, as described above, and press the “Ctrl+Enter” key combination.
Now you know how to insert a page break in a Word document.
Share this article with your friends:
How to paginate in wordpad
Author Yoshka asked a question in the Other languages and technologies
How to divide text into pages in Wordpad? and got the best answer
Answer from Alexander [guru] no, this is not provided in wordpad as it is unnecessary.. 7)
You need to open the folder C:WINDOWSsystem32driversetc. Find the hosts file in it for more details.
It is quite possible to fix it on your own. You need to open the folder in more detail.
asked in Other how to register. If you look at the Explanatory Dictionary of the Russian Language edited by T. F. Efremova:
You need to open the folder C:WINDOWSsystem32driversetc. Find the hosts file in it for more details.
When you reach the end of a page in a document, MS Word inserts a break automatically, thus separating the sheets. Automatic breaks cannot be removed; in fact, there is no need to do so. However, you can split a page in Word manually, and if necessary, such breaks can always be removed.
Why do we need page breaks?
Before we talk about how to add page breaks in a Microsoft program, it would be a good idea to explain why they are needed. Breaks not only visually separate the pages of a document, clearly showing where one ends and where the next one begins, but also help to divide the sheet anywhere, which is often required both for printing a document and for working with it directly in the program environment.
Imagine that you have several paragraphs of text on a page and you need to place each of these paragraphs on a new page. In this case, of course, you can alternately place the cursor between paragraphs and press Enter until the next paragraph is on a new page. Then you will need to do it again, then again.
All of this is easy to do when you have a small document, but breaking up large text can take quite a lot of time. It is precisely in such situations that manual or, as they are also called, forced page breaks come to the rescue. These are the ones that will be discussed below.
Note: In addition to all of the above, a page break is also a quick and convenient way to move to a new, empty page of a Word document if you have definitely finished working on the previous one and are sure that you want to move to a new one.
Adding a forced page break
A forced break is a page split that you can add manually. To add it to a document, you need to do the following:
1. Left-click on the place where you want to split the page, that is, start a new sheet.
2. Go to the “Insert” and click on the “Page Break” located in the “Pages” .
3. A page break will be added at the selected location. The text following the break will be moved to the next page.
Note: You can also add a page break using a keyboard shortcut - just press “Ctrl+Enter” .
There is another option for adding page breaks.
1. Place the cursor where you want to add a break.
2. Switch to the “Layout” and click the “Breaks” (group “Page Setup” ), where in the drop-down menu you need to select the “Pages” .
3. A break will be added at the desired location.
Part of the text after the break will move to the next page.
Tip: To see all the page breaks in a document, you need to switch from standard viewing mode ( Page Layout ) to Draft mode.
This can be done in the “View” by clicking on the “Draft” located in the “Modes” . Each page of text will be shown as a separate block.
Adding breaks in Word using one of the methods described above has a serious drawback - it is highly advisable to add them at the final stage of working with the document. Otherwise, further actions may well change the location of breaks in the text, add new ones and/or remove those that were necessary. To avoid this, you can and should pre-set parameters to automatically insert page breaks in places where they are required. It is also important to make sure that these places do not change or change only in strict accordance with the conditions you set.