10.10.2019
Good day everyone! We continue to study the Word editor, and today we will talk about how to get rid of page breaks. If it is necessary for each section to begin on a new sheet, use the page break function. It often happens that users create such breaks quite by accident, for example in the form of a black line.
As usual, today we will use several examples to study how to work with page breaks in various editions of Microsoft Word. We read and take it into account.
And sometimes, when copying a very large amount of text into another document, the new paragraph goes to the next page, that is, a gap is formed again. This upsets us; many people do not know how to remove, for example, a black line. Naturally, there is a need to remove these breaks so that the text runs consecutively, in the form that we need at the moment.
How to remove page breaks in Word 2007 in all text at once
So we need to remove the gap between the pages. There are several options, one of which is to use the Del
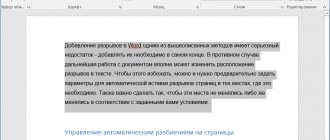
" To make it more clear where the gap is and how to remove it, we include a hidden non-printable character.
Now place the cursor at the end of the last typed line or on the left side of the break. After this, press the “Delete” key. If the gap was small, then one click is enough and the text will rise, occupying a new paragraph. If it doesn’t work out the first time, it’s okay. Most likely, the last non-printable character is followed by more spaces or repeated paragraphs.
Press until the text rises. This is a very simple option, best suited for small texts. Another option is to use the search tab. Place the cursor on the first character of the typed text and type the key combination “ Ctrl+F”
.»
This will open the search-replace tab. Now click in order “Replace”, after that - “More”. Then go to the “Special” tab and then “Page Break”. Here in the “Find” field we enter “^m”. After that, click “Replace All” again. So we quickly found and removed all page breaks in the document.
By the way, the keyboard shortcut “ Ctrl+F”
." (search) allows you to search for any desired character or word in a document, and, if necessary, replace it with the desired one throughout the document. Use this function, for example, to draw up contracts. This way, you can immediately replace the entire document with the desired date and number, the name of the organization, and the initials of the signatories, if signatures are needed on each sheet. Just copy the desired combinations in the “Replace” field.
How to remove section breaks in Word: automatic method
There is an easier and more convenient way to remove all gaps at once.
- On the main tab, find the “Editing” section at the end. Click on the “Replace” button.
- In the window that appears, expand additional settings by clicking on the “More” button.
- Select the “Section Break” option from the “special” menu at the bottom of the page.
- “^ b ”
in the “Find” line and replace everything.
Done, you have removed all breaks with a couple of mouse clicks.
Removing a page break after a table in Office Word 2013
Very often you have to deal with gaps when working with tables. If the table does not fit completely on the page, then the entire cell is automatically transferred to the next sheet. That is, it turns out to be a kind of gap.
To remove such a gap, in the “working with tables” tab, find “layout”.
On the left side of the editor we find “Table Properties”^
A window will open in which you need to go to the “String” tab. Here we check the box “Allow lines to wrap to the next page”.
How to remove a page break in a Word 2020 table
It is often necessary to remove a table break when its size exceeds the table size, since the program automatically breaks and moves the table in a completely different way than we need.
We start by placing the cursor in the line where there should not be a break, i.e., where it needs to be disabled. If the table needs to be placed entirely on the page, then select it by pressing Ctrl+A.
Go to the “Working with Tables” section and select the “Layout” tab.
A window will open in which we go to the “String” tab. Here you need to uncheck the “Allow lines to wrap to the next page” checkbox.
Click “OK”. That's it, breaking the table will be impossible. The last example today will be the ill-fated black line, which so irritates many users.
Removing a page break in the form of a black line from a Word 2003 document
Often, when working with documents, you may encounter such a phenomenon as a black stripe (line) appearing among the text. Moreover, it is impossible to remove it with a simple “delete”, just as it is impossible to place the cursor on it. It appears mainly when copying documents from websites. But removing such a feature is not at all difficult.
The first step is to select the entire document. This can be done either with the mouse, holding down the right key, or through the “Select All” menu command, or by pressing the key combination CTRL+A. Next, open the “page settings” window, where you need to go to the “paper source” tab, and here we select “borders”.
A new window will open, here in the “Type” section select “No”.
Click "OK". That's it, the strip has disappeared. Good luck in mastering the Word editor!
Page breaks in Word are a feature that allows you to format and style text in the Microsoft Office editor. This can be done manually or automatically - different methods are available to the user. The function has many settings for convenient work with data.
Multi-page documents require proper formatting
Going to a new sheet in Word is a sign that is invisible on print (technical, like a space, a tab, or the end of a paragraph). Once it is inserted into the document, all subsequent text will be printed on a new sheet. This feature is needed to work with files, each section of which requires starting from a new sheet. Using Enter multiple times is not the only or most practical way to use the function. For example, it will not allow you to fix the data and if you change the previous parts, the formatting will be lost. You can create a sheet break either manually or automatically, and also apply various settings.
There are several options for transferring data - manually and several using Word functions. Each of them is better suited for its purpose, has advantages and features. However, all the options are quite simple.
Page break using the Enter key (manually)
The simplest and most obvious method, which most Word users resort to. You need to place the cursor in the place from which you want to indent, and then press the Enter key until the text input line moves to a new sheet. It has a serious drawback - if you change part of the file before transferring, the formatted paragraph will “raise” or “lower” in the document. In addition, the markup will not be preserved when you change the document scale. Using Enter is only suitable for setting the space between paragraphs as 1 blank line.
Break a sheet using the Ctrl + Enter key combination
A faster and much more functional option for creating indentation. Place your mouse cursor in front of the piece of data you want to transfer, then press Ctrl and Enter at the same time. Unlike the previous method, when using this method, the formatting will not disappear when you change the scale or edit the previous part of the text. This method is great if you need to make one or more transitions throughout the entire document or edit one that has already been typed.
Breaking a sheet using the function in the “Insert” tab
This method completely repeats the functionality of the previous one. Algorithm:
- Place the mouse cursor in the desired part of the content (the part to the right will be shifted);
- Open the "Insert" tab;
- From the Pages drop-down menu (default is the cell on the far left), select Page Break.
Switching to a new sheet using the “Breaks” function
You can also transfer data through the “Layout” tab (“Page Layout”). The Breaks drop-down menu has several functions - the option has more options than the others. To do this you need:
- Place the mouse cursor in the desired part of the text;
- Go to the “Layout” (or “Page Layout”) tab, to the “Page Settings” area;
- From the Breaks drop-down menu, select the item you need.
There are a total of 3 functions in this menu:
- “Page” - all objects that are to the right of the cursor in the file will move to a new one, maintaining the formatting.
- Column is a feature that is needed if you are using appropriate text layout. It moves the data after the cursor to the beginning of a new column.
- Text wrapping is an option for web files. When using it, the content of the document wraps around an image, table or other object, which allows you to save space and create more beautiful formatting.
Switching to a new sheet via the context menu
The transfer can be done without using the main menu tabs. To do this you need:
- Select the paragraph for which you want to make settings;
- Click on the selected fragment with the right mouse button, follow the “Paragraph” link in the “Page Position” menu;
- O in the Page Breakdown area.
Things to consider when using a hard divider
A user-created transition works exactly the same as a normal transition that occurs when a worksheet is filled with data. The only difference is that you decide which paragraph should be moved. In order to do this, left-click in front of the fragment that you want to transfer.
Splitting data using Ctrl + Enter is no different (except for the Breaks feature, which provides more options). This combination is recommended for speed and convenience. Both when pressing Ctrl + Enter, and when dividing sheets in another way, a technical symbol is added to the text, which creates a transition.
If you used a hard delimiter in a Word file, check the document carefully before printing. You can do this in preview mode. It happens that when dividing content into sheets, the file structure changes and there is no need to use the function.
Do not use strict division of text to organize numbering in the file. Word offers enough options to solve this problem - no need to use formatting.
Control automatic splitting in Word
Automatic functions for tearing sheets are needed so that you can transfer this work to the program. Word offers a large number of settings - for the functionality to work properly, you need to be able to manage them. In addition, settings that are correctly set in a particular case protect the document from loss of formatting when the text is changed.
How to prevent one paragraph from tearing into 2 sheets
Sometimes you want to keep one of your content paragraphs from breaking into two when you split the page. For example, if you want to maintain its integrity for a neater appearance or to make it easier to read. To do this you need:
- Select the paragraph you want to protect from hyphenation;
- Right-click on it to bring up the context menu;
- Select “Paragraph”;
- In the new dialog box, go to the “Page Position” tab;
- In the "Pagination" area, activate the "Don't break paragraph" function;
- Save the settings by clicking "OK".
How to prevent two or more paragraphs of text from splitting (moving one of them to a new sheet separately)
Sometimes you need to not only protect a paragraph from being carried over, but also from being broken from another. This is done so that parts of the text that are related in meaning are located nearby. For this:
- Select two or more paragraphs that you want to protect from splitting and place on one sheet of paper;
- Open the “Paragraph” menu and the “Page Position” tab, as in the description of the previous function;
- Activate the “Keep in touch with the next” option.
How to add a separation before a paragraph
Thanks to this function, the data fragment will always occupy the top position on the new sheet:
- Select the required paragraph;
- Call the context menu by right-clicking the mouse;
- Follow the link “Paragraph”;
- In the “Page Position” tab, in the “Layout” area, set the “From New Page” option;
- Click OK.
Prohibition of leaving one line of a paragraph on a sheet
In a professional environment, one line that is torn off from a paragraph and located on another sheet is called “dangling”. The sheet should not begin or end this way. For strict requirements, only two or more lines are allowed. To automate this principle, you need:
- Select paragraphs that should not contain hanging lines;
- Open the context menu with a right click, then “Paragraph” and the “Page Layout” tab;
- Activate the “Prohibit dangling rows” option;
- Click "OK" to save the changes.
Usually this option is activated in Word by default, but sometimes, on the contrary, you need to disable it - this is done by clicking on the same checkbox.
Prevent table rows from wrapping when moving to a new page
In order for the table to look neater and be easier to read, it is recommended that all its rows be on one sheet in Word or when printing. To do this you need:
- Select the table to make a special context menu available;
- Right-click on the selected area and select “Work with tables”;
- Go to “Layout” - “Table” - “Properties”;
- In the window that opens, click on “Line”;
- Remove o;
- Save your changes.
Usually this feature is turned off in Word by default.
How to remove headers and footers from all pages at once in Word?
It's very easy to remove the header and footer from all pages at once. Double-click at the top or bottom of the screen, depending on which header we want to remove: header or footer. If you remove both lines at once, then do it one by one. First, you remove, say, the top one, and then the bottom one, or vice versa.
So, we clicked twice and a dotted line was displayed, and next to it the inscription “footer” and, accordingly, “header”. Also, the inscription has become clearer. All that remains is to erase it. As the inscription is deleted, it will be simultaneously deleted on all sheets.
Everything is quite simple. You can install the header and footer in the same way. Double-click the mouse at the top or bottom of the sheet, depending on where you want to place the header and footer. After that, write the required text, then double-click the mouse in the center of the sheet and the header and footer will be installed.
Removing a sheet split
If you applied a division by mistake or, while checking a document, realized that it was not needed, you can delete it. At the same time, the transition that occurs in Word automatically when the text reaches the end of the sheet cannot be deleted or changed - this is a mandatory feature of the program. You can only remove hyphens added by users.
Removing a gap manually
This method is the opposite of creating a hyphen by pressing Enter. It is the simplest, but not as convenient and fast as the others:
- Place the cursor at the end of the last line of the paragraph;
- Click Delete;
- If the hyphen does not disappear, continue to press the key - perhaps a fragment of text is separated by a large number of line breaks;
In order to understand that the transition has been deleted, pay attention to the cursor at the end of the line. If the paragraph is the last one, and it occupies the final position, then all the empty lines have disappeared.
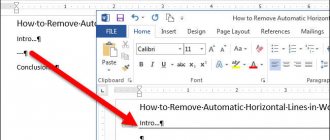
Removing a gap via “Display”
Separating sheets in Word is a technical symbol - like a tab sign. It is not visible in normal file viewing mode. In order to delete a symbol, you need to use advanced features:
- Open “Home”, click “Show all characters” (the button in the form of a special symbol, which is located to the left of the text style selection menu) - this will make all breaks visible;
- To delete a transition, select the symbol, then delete it using the Delete button.
When you remove a sheet break, the text that followed the character is formatted in the same way as the text that preceded it. The method is most relevant if you need to remove several characters - for a large number it is too time-consuming and inconvenient.
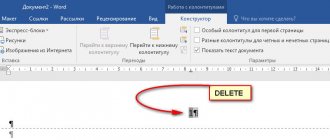
Removing a gap via “Draft”
This method is also great for manually removing multiple transitions in a document:
- Click on the “View” tab;
- Select the document display type “Draft”;
- Place the cursor near the division (before the line of text that is already on the new sheet);
- Press the Delete key.
Remove a gap using document search
This method is great when you need to remove a large number of transitions or all at once:
- Open “Home”, click “Show all characters” (the button in the form of a special character, which is located to the left of the text style selection menu) - this will make all separators visible;
- Copy one of the break icons to the clipboard (Ctrl + "C");
- Press the key combination Ctrl + “F” - this will activate text search;
- Insert a special line break character into a line if you need to remove multiple transitions;
- Select a character and press Delete, after which you can use the up and down arrows;
- If you need to remove all separators at once, use the “Replace” command - Ctrl + “H”;
- Instead of using the “Find” field, use the option at the bottom of the window - “More” - “Replace” - “Special” - “Page Break”;
- For "Replace with" enter a space;
- Click “Replace” as many times as necessary or “Replace All” to do this throughout the document.
Headers and footers for sections with content
Step 1. Go to the page with the first heading of the first level (use the Navigation Area):
Step 2. Copy the first heading of the first level “1. Legislation of the Russian Federation and in the field of construction" (see Lesson 16. Clipboard)
Step 3. We enter the header of page 4, since the content part of the first heading of the first level begins on this page (double click LM on the top of page 4):
The Constructor feed has been activated. This Ribbon contains all the commands for working with the footer.
Pay attention to the inscriptions “Header -Section 4‑” and “Same as previous”. If we add a header and footer to this section, the header and footer will be replicated across all sections, both previous and subsequent ones. God bless them with the subsequent ones, here are the previous headers, it’s a pity: on the first page the name of the organization is in the header.
Step 4. Remove the “Same as previous” mode (Designer ribbon → Transitions group of commands → “release” command As in the previous section):
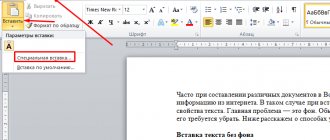
Step 5. Paste the content from the clipboard in the “Save as text” mode: Home ribbon → Clipboard group of commands → drop-down menu button of the Paste command → Save as text command):
In lesson 16, I talked in detail about the capabilities of the clipboard and why I prefer the “Save as text” command. When copying information from document to document by simply pasting from the clipboard, you can “drag in extra text styles (often simply unnecessary). But you might argue that we are working within the same document.
| Understand and remember! | 1. By simply pasting from the clipboard we will create another first level heading. 2. Updating the Level 1 Header style will update our footer (Lesson 7) |
Look at the screenshot (I pasted the contents of the clipboard with a simple paste):
How the document will behave then, I cannot predict. So don't repeat this mistake.
Now let's move on to the second heading the first level
Step 1. Go to the page with the second heading the first level (use the Navigation Area):
Step 2. Copy the second heading the first level “2. Rules and regulations in the field of energy use” to the clipboard (see Lesson 16. Clipboard)
Step 3. Enter the header of the page with the second header of the first level (double click LM on the top):
The Constructor feed has been activated.
Pay attention to the inscriptions “Header -Section 5‑” and “Same as previous”. If we add a header and footer to this section, the header and footer will be replicated across all sections, both previous and subsequent ones. But we have worked with the previous footer and are not going to change it. So…
Step 4. Remove the “Same as previous” mode (Designer ribbon → Transitions group of commands → “release” command As in the previous section):
Step 5. Remove the header and footer. You can go through the document and make sure that the headers and footers in sections 1–4 are preserved, and the headers and footers for the fifth and all subsequent sections are removed.
Step 6. Go to the section header, where the content of the second heading the first level begins (now this is section No. 6) and remove the “Same as in the previous section” mode (Designer ribbon → group of commands Transitions → “drop” command As in the previous section):
Step 7. Paste content from the clipboard in the “Save as text” mode: Home ribbon → Clipboard group of commands → drop-down menu button of the Paste command → Save as text command):
Step 8. Repeat steps 1÷7 for subsequent sections
Bottom line
Break in Word is a function that allows you to format text in accordance with the requirements for printing or simply make it more convenient to read. The program has several ways to make a transfer, as well as customize it. Unnecessary divisions can be removed - also using several options. However, it is recommended to keep an eye on the items at once, as it can be difficult to deal with all the transfers at once.
Sections let you specify specific page layout and formatting options (such as line numbering, columns, or footers) for different parts of your document. For example, the introductory part of a report might be formatted as one column, and the main part as two columns. If there are no section breaks, Word treats the document as one section.
Single column section
Section break, which defines the layout and formatting of the previous section (1)
Section with two columns
Section break, which defines the layout and formatting of the previous section (3)
Each section break determines the layout and formatting of the preceding section break. For example, if you remove a section break, the text before the break receives the formatting that follows the section break. In the above figure, when you remove the first section break (2), the first section has two columns. The last paragraph mark (¶) in a document controls the section layout and formatting of the last section in the document. If a document contains sections, the last paragraph mark determines the layout and formatting of the entire document.
Important:
View,
select
Page Layout
.
Inserting a Section Break
Types of Section Breaks
| Section break | Description |
| Next page | Start of a new section on the next page. |
| Current page | Start of a new section on the current page. This section break is useful in documents with columns. It allows you to change the number of columns without starting a new page. |
| Even page | Start a new section on the next even-numbered page. For example, if you insert an Even Page break at the end of page 3, the next section will start on page 4. |
| Odd page | Start a new section on the next odd-numbered page. For example, if you insert an Odd Page break at the end of page 3, the next section will start on page 5. |
Removing a section break
Note:
When you remove a section break, Word combines the text before and after it into one section. The new merged section will use the formatting from the second section (the one that followed the break).
Changing the section break type
- Click the section you want to change.
In the Format
Select
Document
and open the
Layout
.
Start of section in the list
select the section break type.
Important:
The procedures described below must be performed in markup mode.
If you are using a different mode, on the View
, select
Page Layout
.
Inserting a Section Break
| Section break type | Description |
| From next page | Inserts a section break and starts a new section on the next page. |
When editing your own or someone else's Word document, you often need to remove unnecessary section breaks. There is no special command for this purpose. However, removing section breaks in a text document is not difficult. There are two solutions to accomplish this task.
How to Remove a Section Break in a Word Document
Microsoft Word provides many tools that let you format the text you add to your document. But it also includes some formatting options for the document itself. This can be either columns or other features such as section breaks.
A section break in a Word document allows you to divide a document into separate sections, which you can then format without affecting the rest of the document. This is typically used to change the orientation of a single page of a document while leaving the rest of the document in the current orientation.
But if you've previously created a section break that you no longer need, or if you're editing someone else's document and want to remove one of the section breaks you added, then our guide below will show you how to do it.
How to Remove a Section Break in Microsoft Word
The steps in this article were performed in the Office 365 version of Microsoft Word, but will also work in most other recent versions of Word. The first section of this article gives a quick overview of how to remove a section break in Word, but you can continue scrolling to see the full tutorial with images, or you can click here to jump to that section.
Result: Remove a section break in Word
Learn how to find a section break in a Word document and remove the break if you no longer want to include it in the document.
Active time 2 minutes
Total time 2 minutes
Difficulty Medium
Materials
- Microsoft Word document with section break
Instructions
- Open the document in Word.
- Select the Home tab.
- Click the Show/Hide button in the Paragraph section.
- Select the section break you want to remove.
- Press the Delete key on your keyboard.
Notes
New section breaks can be added by clicking the Breaks button on the Layout tab.
You can also delete a section break by placing your cursor to the left of the break and then pressing the Delte key on your keyboard.
.