Sometimes the information that fills a Word is best presented in columns . Of course, not only does improving readability affect the presentation of information in columns , but some types of documents, such as newspaper articles, newsletters and leaflets, are often written in columnar . And students often wonder how to make cheat sheets in columns. In this article we will look at how to make columns in Word , how to remove columns , and how to make a column break .
How to make speakers
- Select the text you want to make into columns .
How to Make Columns in Word – Selecting Text for Columns
- Select the Layout tab and click the Columns .
How to make columns in Word – Columns in Word
- From the drop-down menu, select the number of columns you want to create. In our example, we want to make two columns in Word .
How to make columns in Word – Insert two columns in Word
- The text will be converted into two columns.
How to make columns in Word – Text in columns in Word
Selecting the number of columns in Word is not limited to creating 2 or 3 columns in the drop-down menu. Select More Columns at the bottom of the menu to open the Columns dialog box. Specify the required number of columns in the “Number of Columns” field.
How to make columns in Word – Columns Window, make 4 columns in Word
Working with Columns of Text in Word
From this instruction you will learn how to use columns in text documents, how to align text in columns and change the distance between them, how to add breaks between columns.
Why use speakers
Most often, the column element is used in newspapers, magazines, brochures and flyers. In particular, for a print publication, a format with columns looks more attractive and professional.
You can create one, two or three columns of the same size. Then, as you type, you will automatically move to the next column when the previous one ends, unless you manually insert a column end. You can set the width of the columns and use the usual formatting that is used in regular text documents.
Online course “Word from simple to complex”
Online course “Word from simple to complex”
Master the work in the main text editor at a high level. It doesn’t matter if you are a beginner or already work with Word, with our course you will become a real document guru!Read more
Adding Columns
- Select the text you want to convert to columns.
- In the ribbon menu, select the “Layout” , “Page Setup” .
- Click on the "Columns" .
- From the drop-down list, select the desired number of columns (for example, three).
Note that unless you first select the specific area of text you want to turn into columns, all text following the cursor is converted into columns.
Formatting Columns
When columns are created, by default they have an alignment similar to that of the text. And often this is left aligned. This is not the best option for columns, so it is better to format it to fit the width.
- Let's highlight our columns.
- In the ribbon menu, select the “Home” , “Paragraph” .
- Click on the “Align to Width” icon (a similar action can be achieved by pressing the keyboard shortcut Ctrl + J).
The text is spaced evenly within the columns. And the distances between the columns became more clear. These values can be changed.
- Place your cursor anywhere within the columns you want to format.
- From the ribbon menu, select the Layout Page Setup area .
- Click on the "Columns" and then select "Other Columns" . The Columns dialog box opens.
- Enter values for the width of the columns and the spacing between them. For example, enter 0.2 as the spacing to make the distances smaller.
- Click OK and evaluate the changes. If necessary, redo the path and change the values.
If you want to set columns of different widths, this is done in the same “Columns” dialog box. “Columns of the same width” checkbox . After this, the width and spacing values for each column will become available for editing.
If, in principle, you only need two columns - one thick, the other thinner, then when creating columns through the “Columns” button, simply select the “Left” or “Right” value, depending on where the smaller column should be located.
Inserting a Column Break
- Click in the area where you want to insert a column break. That is, from where the text should move to the beginning of the next column.
- In the ribbon menu, select the “Layout” – “Page Settings” .
- Click the “Breaks” “Column” from the drop-down menu . The text following the cursor should appear in the next column.
3 / 5 ( 4 voices)
How to remove columns
To remove columns in Word :
- place the cursor anywhere where the text is presented in columns;
- click the " Columns " command on the "Layout" tab;
- Select "Single" from the drop-down menu.
How to make columns in Word – Remove columns in Word
In Word, you can adjust columns by adding column breaks.
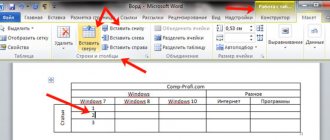
How to make a table in Word: Merging and splitting cells
The Merge section of the Layout tab contains tools for automatically merging and splitting cells, as well as for splitting an entire table into several separate tables.
To merge several cells into one, you must first select them and then click the Merge Cells .
To split a specific cell into several parts, you need to click on the cell, a text cursor will appear in the cell, and then click on the Split cells . When the Split Cells , you must specify the number of columns and rows you want.
There is an even faster way to merge and split cells: just right-click and select the appropriate item in the context menu to merge and split cells.
To split a table into two separate tables, click on the Split Table button. In this case, the text cursor must be placed in the cell that will be the first in the new table. The table is split horizontally and an empty paragraph appears between the two tables.
To merge two tables, simply delete all rows between them using the Delete key.
How to make a column break in Word
Once the columns are created, the text will automatically move from one column to another. But you can control exactly where each column starts. To do this you need to make a column break.
In our example below, we'll add a column break that will move the text to the beginning of the next column.
- Place the cursor at the beginning of the text you want to move.
How to make columns in Word - Cursor where the column breaks
- Select the Layout tab, then click the Breaks command.
- Select " Column " from the drop-down menu.
How to Make Columns in Word – Column Break
- The text will move to the beginning of the next column.
How to Make Columns in Word – Moving Text to the Next Column
Creating columns in a Word document
There is only one way to create columns in Word, and their number, orientation relative to page margins, width and indents may vary. We'll first look at how to create them, and then briefly go over the possible uses for this skill.
Creating columns in a document
In order to split the pages of a text document into two or more columns, you must perform the following steps:
- Using the mouse, select a piece of text or a page that you want to divide into columns, or press “CTRL+A” to select the entire document.
How to remove column breaks
- By default, column breaks are hidden. If you want to show breaks in your document, click the Show All Characters command on the Home tab.
How to Make Columns in Word – Non-Printing Characters
- Place your cursor to the left of the break you want to delete.
How to make columns in Word - Cursor at column break
- Press the Delete key to remove a column break.
How to delete a table
There are different ways to delete a table created in Word. Now we will learn how to do this in the most simple way, in my opinion, with which you can delete a table in any version of the program.
First you need to select it. To do this, move the cursor over the first cell of the first row (not inside the cell, but a little to the left, outside the table).
A cell is a single rectangle that makes up a table.
Press the left mouse button and, without releasing it, drag to the very end. Here is an important point - you need to pull until the last line and a little lower. The table should stand out in a special way, with a small “tail” after it.
Now press the Delete (Del) button on your keyboard. If you selected the table correctly - as written just above - then it will disappear.
Advice. If you still cannot remove it, select it again, then right-click on the selected (shaded) one. A list will open, click on the “Cut” item.
How to make a table in Word: Selecting table cells
Selecting cells in a table may seem quite simple at first glance. However, there are some nuances and tricks here.
So, before performing any operation on the cells in the table, you need to select these cells. Otherwise, the operation will be performed in the cell in which the text cursor is blinking.
Let's first consider a simple selection of one cell; as they say, you need to start small.
To select a cell in a Word table, simply move the mouse pointer to the edge of its left border, while the cursor must still be inside the cell. As the cursor approaches the left border, the cursor will change to a black arrow. Then you need to left-click (hereinafter referred to as LMB ) to select the cell.
In order to select an entire row in the table, you need to move the cursor beyond the left border of the desired row, and the cursor will take the form of a right-handed arrow. And then click LMB to select the entire table row.
To select a column , place the cursor over it. When the cursor changes to a black arrow, click LMB.
To select several adjacent cells , columns or rows, you need to hold down the LMB and drag the cursor from the first to the last cell and then release the LMB.
The same thing can be done using the Shift , but the procedure is slightly different. To begin, select the first cell (row, column), then hold Shift and select the outermost cell (row, column). This will highlight the range from the first cell to the last.
To select non-adjacent cells, you need to hold down Ctrl key and select the desired cells with the mouse cursor.
And finally, to select the entire table, you need to click on the square with arrows in the upper left part of the table. This square is also used to move the table.