You may encounter the fact that the USB keyboard does not work at boot in different situations: this often happens when reinstalling the system or when a menu appears with the choice of safe mode and other Windows boot options.
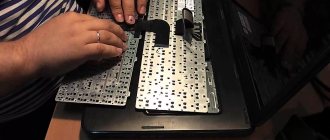
As a rule, this situation does not occur with a keyboard connected via the PS/2 port (and if it does occur, the problem should be looked for in the keyboard itself, the wire or the motherboard connector), but it may well occur on a laptop, since the built-in keyboard may also have USB interface.
Before continuing reading, check if everything is in order with the connection: whether the USB cable or wireless keyboard receiver is in place, or whether someone touched it. Even better, take it out and plug it in again, not in USB 3.0 (blue), but in USB 2.0 (Best in one of the ports on the back of the system unit. By the way, sometimes there is a special USB port with a keyboard and mouse icon).
Is USB keyboard support enabled in BIOS?
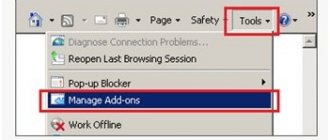
Most often, to solve the problem, it is enough to go into the computer’s BIOS and enable the initialization of the USB keyboard (set USB Keyboard Support or Legacy USB Support to Enabled) when you turn on the computer. If this option is disabled for you, you may not notice it for a long time (because Windows itself “connects” the keyboard when you boot and everything works for you), until you need to use it when loading the operating system.
It is possible that you cannot enter the BIOS, especially if you have a new computer with UEFI, Windows 8 or 8.1 and fast boot enabled. In this case, you can go to the settings (Change computer settings - Update and recovery - Recovery - Special boot options, then in the additional parameters, select entering UEFI settings). And after that, see what can be changed to make everything work.
On some motherboards, the setup for USB input device support at boot is a little more sophisticated: for example, I have three options in my UEFI settings - disabled initialization during ultra-fast boot, partial initialization, and full initialization (fast boot must be disabled). And the wireless keyboard works at boot only in the latest version.
I hope the article was able to help you. And if not, describe in detail exactly how your problem arose and I will try to come up with something else and give advice in the comments.
Any USB keyboard can suddenly outgrow its functionality - even a regular budget one, or one with an advanced design, backlighting and a bunch of additional buttons. USB keyboards are slightly, but still more vulnerable than keyboards connected via the PS/2 port. The list of possible causes of problems with the PS/2 keyboard is small: as a rule, problems arise either with the keyboard itself, or with the wire, or with the motherboard connector. The range of possible causes of problems with USB keyboards is slightly wider, respectively, due to the USB interface itself. We will discuss the possible causes of a non-working USB keyboard and ways to resolve the situation below.
Pulled wire
If the USB keyboard was working successfully, and then at one point stopped responding to input, you should first check whether the wire has been pulled out of the USB port on the computer. Even if the wire is in place, you can temporarily remove it from the USB port and insert it again after a couple of seconds.
Other USB port
If the previous method did not give successful results, you need to reconnect the keyboard to another USB port. This will either reveal that one of or eliminate one possible cause of the problem. After a motherboard failure due to a power surge, one or more USB ports may stop working, while others remain operational. If the keyboard does not work with any of the USB ports, you need to check the functionality of the USB ports themselves by connecting any other device to them - a flash drive, mobile device, printer, etc. If all the USB ports on the computer turn out to be inoperative, the problem will then need to be resolved with them.
A keyboard connected to USB 3.0 (the port with a blue output) may not work during the Windows installation process until the drivers are installed on the motherboard. In this case, the keyboard must be reconnected to USB 2.0 (port with white output).
Reinstalling the driver
If reconnecting to another USB port does not produce results, you need to check whether the keyboard works in the BIOS environment. The fact that you successfully enter the BIOS and use the navigation keys to move through its sections will mean that the problem arose at the Windows OS level. In this case, you can try to reinstall the keyboard drivers. You can do this in Windows Device Manager. You can get into it in Windows 7 by calling the “Start” menu and selecting “Control Panel”.
On Windows 8.1 and 10 systems, the path is shorter: Device Manager is available with a direct link in the context menu on the Start button.
Directly in the Device Manager window, open the “Keyboards” section, in the “HID Keyboard” item, call up the context menu and remove the driver.
We confirm the decision.
Reboot the computer.
After rebooting, the keyboard driver will be installed automatically.
For certain models of USB keyboards, manufacturers may provide their own drivers included with such keyboards. This point needs to be clarified, and if this is the case, then the driver must be installed manually by downloading it from the manufacturer’s website or by finding the installation disk included with the keyboard.
Enable USB Keyboard Support Controller in BIOS
A malfunction of the motherboard (as a consequence of the same power surge) may cause the USB keyboard support controller to be disabled in the BIOS settings. Not often, however, it also happens that the USB keyboard support controller at the BIOS level is initially disabled. This nuance will make itself felt only when it becomes necessary to operate the computer in pre-boot mode. Until this point, Windows will use the USB keyboard itself. Of course, in such cases you cannot do without a PS/2 keyboard, and if one is not stored anywhere just in case, you will need to borrow it from someone for a while. An alternative option is to use a USB to PS/2 adapter.
What should you do once you enter the BIOS? In the BIOS settings, you need to find the USB keyboard support controller option. These are usually the words “Keyboard Support” or “Legacy USB Support”. The UEFI BIOS may simply have the name "USB Support". Having found it, you need to check that the value opposite is not “Disabled” (turned off), but “Enabled” (enabled). The value “Enabled” should also be in the “USB Controller” parameter. For example, in AMI BIOS version 17.9, USB controllers are configured in the “Integrated Peripherals” section.
Faulty keyboard
And finally, the simplest test to check the functionality of the USB keyboard itself is to connect it to another computer device.
Have a great day!
The keyboard is the main tool for entering information, without which working on a computer is impossible.
Most often, for this device to work flawlessly, you just need to connect it to your computer, and it will install all the necessary drivers automatically. This happens in most cases, but not always. There are situations when, when you connect a keyboard to a USB or PS/2 connector, it is not detected on the computer and does not show any signs of operation - the indicators do not light up and the buttons do not work. In this article, we offer instructions on what to do if the keyboard on your computer does not work. We recommend reading:
Connecting a keyboard to a computer is as simple as possible - just insert its wire into the appropriate connector on the motherboard, and after that the device will start working. There are wireless keyboards, the radio receiver of which is inserted into a USB connector, after which the device works if the distance between the transmitter and the device is maintained.
Due to the simplicity of the process of connecting a computer, we can conclude that there are only 2 reasons why the keyboard does not work on the computer:
- Mechanical. There may be problems with the keyboard itself or the wire that connects it to the motherboard. The cause of the malfunction may also be a broken connector on the motherboard.
- Software. Keyboard drivers are installed automatically, but failures can occur during the installation of any software, and this situation is no exception. In addition, problems may occur not at the operating system level, but in the BIOS, where the appropriate settings for the keyboard are disabled.
Depending on which connector the keyboard is connected to the computer, we offer different options for solving problems that arise.
The keyboard on the laptop does not work - software reasons
However, the likelihood of a violation in the hardware is relatively small. More often than not, the reason is in the software, and this can be fixed without contacting specialists. Windows 10 can solve common problems on its own through the troubleshooter. You can launch it through Start - Settings, then Updates and Security. Then follow the prompts.
ctfmon.exe not running
A typical situation: when booting into a different OS / from a Live-CD, the input works, but on the login screen or in applications installed from the store, letters are not entered. Then you need to check whether everything you need is running: you will need the “Details” tab, which in the Task Manager is responsible for a detailed list of processes. The dispatcher itself can be called up by clicking on the taskbar and selecting a menu item.
If ctfmon.exe is not listed in Details, try running it manually. You can do this directly from the Manager. Click File and select Run new task. Then type ctfmon.exe in the field that opens and confirm the action by clicking “Ok”.
If this helps, then you need to add the file to startup. This can be done in the Registry Editor. It starts in the same way, only the command will be regedit.
The system may ask for confirmation - select Yes. Next, you need to select the SOFTWARE branch in the HKEY_LOCAL_MACHINE subsection, Microsoft in it, and then sequentially open Windows, CurrentVersion and, finally, Run.
Now create a new parameter via the Edit menu. Set the type to String, and use ctfmon and %systemroot%system32ctfmon.exe for the name and value, respectively.
You must reboot your device to apply these changes. Do not turn off the laptop completely; you just need to restart it using the menu item of the same name.
Incorrect operation of the keyboard after complete shutdown
The second popular case is that the Windows 10 keyboard does not work immediately after turning on the device, if it was previously turned off completely. In this case, a reboot launched from the Start menu “miraculously” helps.
The reason is an error in the quick launch. Try disabling it: in Settings, open the System section and select the power supply sub-item. In additional options, uncheck the Quick Launch box. The second method is the Power Options item in the control panel. And don't forget to save the adjusted values.
Problems with keyboard drivers
Hardware failure due to a crash or incorrect driver installation may be the cause. It's easy to check. To begin, open Device Manager. Pay attention to the sub-items Keyboards and HID Devices.
The presence of difficulties is directly indicated by question or exclamation mark icons, colored yellow and red. It happens that they appear after using so-called driver packs.
In this case, you must temporarily remove the input device. Right-click on it to open the context menu and select the appropriate item. Update your computer's configuration. This operation is launched through the Action menu.
If the method does not work, try installing the laptop manufacturer's proprietary drivers. To do this, download them from the official website. An alternative way is to install suggested updates from the Update Center.
Viruses are the reason why the Windows 10 keyboard does not work
Sometimes the reason lies in the influence of malware. A characteristic feature is proper operation at the boot stage, before the OS starts. In fact, when turned on, F8 fires, opening the BIOS settings. The key or combination depends on the device manufacturer and is indicated on the start screen.
With such a set of symptoms, it is necessary to perform virus cleaning. Moreover, it is advisable to do it from safe mode: Win + R using screen input, then loading the msconfig utility. On the boot options tab, you need to specify the Minimal sub-item in the Safe Mode item.
After a reboot, only the minimum required components will be used. A remarkable fact: sometimes a reboot is enough to completely restore operation.
Antiviruses
If the keyboard does not work on a Windows 10 laptop, then we should not forget about the defenders of our computer. A well-known product from Kaspersky in a recent version, by installing a secure input module, messes up the system parameters. To fix it, you need to disable the module using the antivirus product itself.
It is recommended to check the value of the UpperFilters parameter in the registry key
HKEY_LOCAL_MACHINESYSTEMCurrentControlSetControlClass{4D36E96B-E325-11CE-BFC1-08002BE10318} – normally kbdclass is indicated. As an alternative, you can consider reinstalling, updating, or temporarily (for the period of testing) disabling the antivirus.
What to do if the keyboard does not work on the computer via USB protocol
The most common interface for connecting a keyboard to a computer is USB. The speed of information transfer from a peripheral device to the computer is sufficient, both via the USB 2.0 protocol and via USB 3.0, so there is no difference in which connector the keyboard is connected to.
If the USB keyboard does not work when you turn on the computer, you need to do the following:
It's worth noting that users with a keyboard connected to the motherboard via USB may have trouble getting into the BIOS on the computer's boot screen if they are using an older version of the underlying software. In this case, you need to find a keyboard with a PS/2 connector or use the appropriate adapter.
Solution #4
Another reason why the keyboard does not work that worries users is the functioning of the antivirus program from Kaspersky Lab. Through trial and error, it was found that a functioning antivirus blocks the keyboard for unknown reasons.
See also: Getting my computer back to the Windows 10 desktop
What’s most interesting is that the Win key works in all applications, and the rest only in the browser window.
We disable Kaspersky Anti-Virus, delete it or update it, since this problem was not noticed in the latest versions of the application.
What to do if the keyboard does not work on your computer using the PS/2 protocol
Keyboard manufacturers are trying to move away from the PS/2 connector, abandoning it in favor of USB. It is very difficult to find a keyboard with a PS/2 connector on sale, but if you come across such peripherals and it does not work when loading Windows, most likely the problem is related to the drivers. To make the keyboard work, you need to do the following:
It is worth noting that a similar problem with keyboards connected via the PS/2 protocol most often occurs due to an error when installing the i8042prt.sys or kbdclass.sys driver.
Just because you use a USB-connected keyboard doesn't mean it can't fail at some point. No matter how cool and expensive it is, even such a keyboard can fail. By the way, I don't know about you, but I think that PS/2 keyboards are less vulnerable. True, if your keyboard on your laptop is covered, then you can either choose , or .
There can be quite a lot of problems with USB keyboards failing. For example, damage to the wire, port, drivers and much more. Naturally, we will try to deal with this problem.
Non-working USB port
If, when connected to one of the ports, the keyboard does not respond at all, then try connecting to another. Although, it happens that the port works when you connect another device. Perhaps this is some kind of glitch. Also, the port may not work due to a large voltage surge on the motherboard.
If, when you connect the keyboard to all USB ports, it does not work, then try connecting other devices to them. If they do not work, then the problem is in the USB ports of the computer.
You can also try connecting the keyboard not to USB 3.0 (indicated in blue), but to USB 2.0. And try installing or updating the drivers for the motherboard.
Causes of the error “Windows cannot start this device (Code 19)”
Before we quickly resolve this situation with problematic equipment, I would like to quickly review the basic meaning of Code 19.
- If we are talking about problems with the keyboard, CD-ROM, flash drives, then first of all, is there any physical damage. A simple example with an optical drive, code 19 is very common with it, check its internal connections, all the cables, pull it out and make sure that nothing is shaking there.
- In the case of flash drives, it’s a little more complicated, but the easiest way is to plug it into another USB port on the motherboard.
- If the problem is with the video card or sound card, then if there is another PCI port, you can connect it to it.
- Registry keys are damaged
- Driver problem
- Equipment conflict
- Viruses
- Windows Update
Installing drivers
After finding out that the keyboard does not work through any port, we try, if everything works fine there, tabs switch smoothly, then the problem is present precisely at the operating system level. It is possible that the problem is with the drivers.
Try it for your keyboard. This can be done through the device manager. You can enter it by entering “Device Manager”
, or press
Win+X
and select the desired item.
Opening the manager window, look for the “Keyboards”
, open it and right-click on the item, then click
“Delete”
.
After this, restart your computer. Next, reinsert the keyboard into any port, the drivers should be installed automatically.
Some manufacturers provide special drivers that can be downloaded from the official website. Keep this in mind. And if there was also a driver disk with the keyboard, then use it.
Virtual keyboard
Since the hardware keyboard does not work, you need to open the on-screen one. Display its icon in the system tray (bottom right, where the clock is). It is possible that the keyboard icon is already there. I assume that it is not.
Right-click on the Taskbar where there are no icons or other interface elements. Select and apply the item: “Show touch keyboard button.”
The icon appeared. Click to open an alternative keyboard.
Use it to restore the functionality of the main one.
USB controller disabled in BIOS
If the motherboard fails, the USB controller may be disabled in the BIOS, which is why the keyboard may not work. In some motherboard models, this function is disabled initially. Then, to work with the BIOS, you will need a PS/2 keyboard in any case.
So, we enter the BIOS and look for the USB controller parameters. On different motherboards this item may be called differently, for example, “Legacy USB Support”
or
"Keyboard Support"
.
Some BIOS versions may be called "Legacy Support"
.
Now look, if the value is “Disabled”, then change it to “Enabled”. There should also be a “USB Controller”
, it should also be in the Enabled position. After this, exit the BIOS and save the settings.
Jpg" align="center" lightbox="on" captionposition="center"]
The keyboard is faulty
This point is the very last and this is understandable. If nothing works, the keyboard does not respond to any actions, then most likely it is broken. If it does not work on other computers, then there are definitely no options, then the keyboard is not working.
That's all, I hope that these instructions have helped you in some way. If anything, write in the comments, we’ll sort it out.
The keyboard is the main tool when working on a computer, without which work is almost impossible. Of course, you can enter information using a mouse and on-screen keyboard, but this method is inconvenient and will not work properly.
In this article we will tell you what to do if the keyboard on your computer does not work and consider all the possible causes of this malfunction.
The keyboard is a fairly simple device and usually works flawlessly. However, there are times when the keyboard indicator lights up, but nothing is printed.
Solution 2 – Update Keyboard/Trackpad Drivers
If your laptop keyboard is not working, you may need to update your drivers. To do this, you should use the CD that you received with your laptop and install the necessary drivers from it.
If these drivers don't help (or you don't have the CD), then go to your laptop manufacturer's website and download the latest keyboard and trackpad drivers for your computer model.
To navigate to the site, you can connect a USB keyboard or use the on-screen keyboard. You can also download the necessary drivers on another computer and then transfer them to your laptop.
Why the keyboard doesn't work: reasons
There are two types of reasons why a computer keyboard may not work:
- Mechanical (cable break, moisture ingress, excessive contamination of the keyboard, violation of the integrity of the connection ports, and so on).
- Software (software failures, incorrect BIOS settings, incorrect keyboard drivers, and so on).
Let's look at all the main reasons why the keyboard does not work and troubleshooting methods.
Reinstalling drivers
If your keyboard does not work after updating Windows 10 to a newer version, you should update the drivers for this device. To do this, right-click on “Start” and go to “Device Manager”.
Next, find the “Keyboards” item and expand it. Then right-click on the problematic keyboard and select “Remove device.”
Restart your computer and Windows should find and install the required driver for the keyboard.
If this does not happen and a window appears with an error like: “...an error occurred while trying to install these drivers...”, then you need to select and install the driver manually. Remove the device using the method described above, and then right-click on it and select “Update hardware configuration.”
After this, either a red cross or a yellow exclamation mark will appear opposite the problematic keyboard. Click on the device again and select Update Driver.
Then click the “Search for driver software on this computer” button.
Next, click on “Select a driver from the list of available drivers on your computer.”
Then uncheck the box next to “Compatible devices only.” In the “Model” window, select “HID Keyboard” or “HID Keyboard Device” and click “Next”. Once the driver is installed, the keyboard should work again.
Problem with the cable or keyboard port
The first step is to assess the physical condition of the keyboard.
Look at the indication of the Caps Lock and Num Lock buttons. Most likely, if they work, then physically everything should be fine with the keyboard.
Visually inspect the keyboard cable. It may be pinched or cut. For example, many pet owners have pets that chew through cables.
Also, visually check the keyboard connection port to see if there are any fractures or bends in it. There are two types of keyboard connection ports: USB and PS/2.
It often happens that when people try to connect to a computer in a PS/2 port, they break off the tip of the wire and the keyboard does not connect.
If the keyboard's USB cable and connection port look good, then try plugging the keyboard into another USB port on the computer. The port on the computer itself may be damaged. If the keyboard works in another port of the computer, then you have a problem with the USB port. Usually there are several of them on the computer and you can simply leave the keyboard connected to the port that works.
In the case of a keyboard with a PS/2 port, you should check the functionality of the keyboard connection port on another computer, since there is only one such port on the motherboard. To test the functionality of your computer's PS/2 port, you will have to find another such keyboard.
Spilled liquid and dirt on the keyboard
A flooded keyboard is a headache for all IT specialists and a goldmine for all laptop repair service centers. Very often, when working on a computer, people pour tea, coffee, beer and other liquids onto the keyboard. As a result, the keyboard may fail.
As a rule, it is easy to determine visually and by smell that liquid has been spilled on the keyboard. Carefully inspect the keyboard. Remove a couple of keys. If you see that there are traces of spilled liquid or food on the keyboard or under the keys, then you have two options. Either buy a new keyboard, or meticulously disassemble the flooded keyboard, clean it, dry it and put it back together. With a high degree of probability, the keyboard will work.
Previously, we have already talked in detail about how to clean a computer keyboard at home.
Checking USB settings in BIOS
If the computer's power supply fails, the BIOS settings may change, which contains an item about enabling or disabling support for USB keyboards on the computer.
Additionally, in this way you can check the serviceability of the keyboard in principle, since it may not work in Windows, but work in the BIOS. In this case, the failure is caused by software or drivers.
To enter the BIOS and check the settings, do the following:
- Turn on your computer.
- Press the DEL button on your keyboard until the BIOS settings window appears.
- In the BIOS settings, find the USB Keyboard Support or Legacy USB menu.
- Make sure the setting is in the Enable state. If it says Disable, then switch to Enable.
You can also set the remaining BIOS settings related to USB to Enable. You may be able to get ports on the front panel of your computer case that once stopped working.
Methods for solving the problem
Before proceeding to the description of ways to get rid of the problem, you need to enable the virtual keyboard:
- Open “Start” and go to “Settings”.
- Find the “Special Features” block.
- Move to the “Keyboard” tab, activate the “Enable on-screen keyboard” item.
Let's move on to finding a solution to the problem under consideration.
Method No. 1 - use a different port
The first thing you need to do in this situation is to plug the keyboard wire into another free USB port. Such a banal solution often works if the cause of the failure was a malfunction of a specific UBS port or the lack of drivers for USB 3.0.
Method No. 2 – launching the ctfmon.exe process
It is possible that the keyboard functions properly in the BIOS and in regular programs (text editors, browsers, games, etc.), but it turns off when you open the login window in the system and when you go to applications downloaded from the Microsoft store. The reason for this behavior usually lies in the fact that the ctfmon.exe process is not running in the OS - you can check this through the “Task Manager”.
If the process is really not running, you need to perform the following sequence of actions:
- Right-click on “Start”, open the “Run” window, insert the command “ctfmon.exe”, click on “OK”.
- Open the Run window again, insert the “regedit” query, and click OK.
- Follow this path: HKEY_LOCAL_MACHINE\SOFTWARE\Microsoft\Windows\CurrentVersion\Run\.
- Right-click on the right side of the open window, go to “Create”, select the “Stock parameter” option.
- Give the new parameter the name “ctfmon.exe” and insert “C:\Windows\System32\ctfmon.exe” into the “Value” column.
Software or driver failure
Keyboards with older PS/2 connectors are more susceptible to software glitches. However, there are still quite a lot of such keyboards in use, although manufacturers have almost stopped producing them.
To resolve the problem of your keyboard not working due to software, you need to turn on your computer and log into your desktop. Since the keyboard has stopped working and does not print, and a password may be set on the account, you will need to use the on-screen keyboard and type the password with the mouse.
Now that you are on the desktop of your computer, you need to get to Device Manager.
In Windows 8 and Windows 10, to do this, right-click on the Start
and select
Device Manager
.
Start button
.
Next, right-click on the word Computer
and select
Computer Management
-
Device Manager
.
Device Manager displays information about all devices on your computer. Expand the Keyboards branch. If there is an orange question mark next to your keyboard, it means the device is not installed correctly on the system.
Right-click on your keyboard and select Uninstall
.
After that click Action
—
Update hardware configuration
.
The computer will rescan all devices and install the keyboard correctly.
If the keyboard doesn't work only on the login screen and in Windows 10 apps
A common case is that the keyboard works properly in the BIOS, in regular programs (notepad, Word, etc.), but does not work on the login screen in Windows 10 and in applications from the store (for example, in the Edge browser, in search on the taskbar and etc.).
The reason for this behavior is usually that the ctfmon.exe process is not running (can be viewed in the task manager: right-click on the Start button - Task Manager - "Details" tab).
If the process is really not running, you can:
- Run it (press Win+R keys, type ctfmon.exe in the Run window and press Enter).
- Add ctfmon.exe to Windows 10 startup by following these steps.
- Launch Registry Editor (Win+R, type regedit and press Enter)
- In the Registry Editor, go to HKEY_LOCAL_MACHINE\SOFTWARE\Microsoft\Windows\CurrentVersion\Run\
- Create a string parameter in this section with the name ctfmon and the value C:\Windows\System32\ctfmon.exe
- Restart the computer (reboot, not shutdown and turn on) and check the operation of the keyboard.
Factory defect or keyboard has reached the end of its service life
Any technology tends to break down and fail. If the keyboard was purchased relatively recently, then you may have encountered a manufacturing defect. In this case, you can contact the keyboard manufacturer's support service and expect a replacement device.
The fact is that many manufacturers value their reputation and, without entering into long debates with the buyer, immediately send a brand new keyboard by mail.
If you have had the keyboard for more than a year, then most likely it has failed due to service life and you should buy a new one.
Software problems
You can start from this point if you are sure that everything is fine with the hardware (physical) component. We recommend, however, that you check the software components secondarily, because if yesterday everything worked correctly, but today it stopped, and you did nothing, then most likely this is not the problem. However, you still need to get checked. And for this you have to do the following:
- Check if the driver is installed;
- Check its correct operation;
- If possible, reinstall the driver or reconnect the device;
The latter is closely related to the first block in this article. After all, if you remove the device, no matter how it was connected, and then reconnect it, Windows 10 will probably start installing it. If not, then you can find “Installing new devices and components” in the PC settings section and initiate this installation.
If all this does not help you, then also find the “Troubleshooting” item in the OS settings. The operating system will automatically scan your PC and offer you a list of problems found, as well as offer solutions for them. As a rule, it will not require any action from you.
Important note - if the OS found a problem, but could not fix it, then do not despair and throw the keyboard into the trash. Try alternative methods to resolve the situation.
It is also important that if the problems started suddenly and were not preceded by anything, and the device is new, then the problem may probably be that your computer has started to slow down. It happens that the OS, even on powerful PCs, does not have time to process requests, which means letters disappear. Let's consider this case separately.