A fairly common question is how to make a transparent background in Paint Tool Sai. This graphic editor is very popular, and the function of turning on the alpha channel allows you to combine several projects. Let's look at all the features of this drawing layer display mode and how to enable it.
How to set a transparent background in Pain Sai
All artists should gradually expand their knowledge regarding working in virtual space through graphic editors. This is due to the fact that creating an image in virtual space provides quite a lot of possibilities.
An example is the use of the alpha channel function. Enabling this function allows you to create images supposedly on a transparent background, that is, there is no background. This function is applicable only for further use of the image when working in the editor, since when printed, the background will be filled with white or black depending on the set parameters, or will remain transparent, that is, the background will be the paper used directly.
Beginning of work
Before you change the transparent background in Paint Windows 7, you should open the image that you will be adjusting.
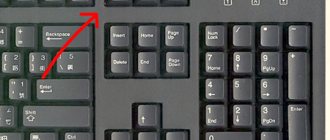
This is done by right-clicking on the file and selecting the appropriate item from the drop-down menu (Open with – Paint). Please note that compatible formats include BMP, JPFG and GIF; others will not work. If the image exceeds the screen size, you need to go to the lower left corner and make an 800% increase by clicking on the magnifying glass located on the toolbar and selecting the number 8.
Saving a picture
You can save the picture in the same way as you opened it, namely File > Save or Ctrl+S. Save the image in PNG or GIF formats, but in no case in JPEG (JPG), it does not support a transparent background, and all your work will be in vain.
Many users are wondering how to save an image: as a GIF or as a PNG. The choice definitely falls on PNG, since this extension supports translucent tones, takes up much less space, and maintains quality. Some give the argument in favor of GIF that older browsers do not support it, but since there are currently a minimum of such browsers, the argument remains insignificant.
Selecting a color palette and drawing the outline of the image
On the color palette, you should make a choice of yellow-green (also called lime) color. This is usually chosen because a color contrasting with the rest of the picture is needed, and the selected tone is quite rare in images.
After this, using the Line tool, select the object that will be cut out. If the image is placed on a white background, you can use the “Pencil” to fill in the missing pixels. This will cause a wide green line to appear around the image.
Next, you need to right-click on the lime color and use the Select tool to outline the rectangular areas of the background color. This should be done carefully, trying not to enter the object. There is no need to worry too much about the extra triangles remaining around the outline of the drawing; they are removed later using the Eraser tool. After activating it, you need to select the smallest possible square in the menu that appears.
After all the manipulations, you get an object with a green screen around it. If you are interested in how to change the background in Paint, then you need to zoom out to 100 percent (1 in the zoom menu) and click on the paint bucket in the panel (Color Fill tool). Then select the desired color in the palette and click anywhere on the green background. After this, the background will become different.
Eraser
magic eraser tool removes similar colors, moreover, it automatically converts the background layer to a normal one. Below are step-by-step instructions for creating a transparent background for a picture:
- Open image . After opening the image, it is not necessary to remove the lock; the “ magic eraser ” tool itself removes the lock and changes the image type from background to normal.
- Find the eraser and, by right-clicking on the panel that opens, select the magic eraser .
- Next you need to configure the settings . By default they should be as follows: tolerance - 32, anti-aliasing - active, adjacent pixels - active, sample from all layers - inactive, opacity - 100%. If the parameters are not the same, then you need to change them for more comfortable work and better results. The Tolerance parameter specifies the sensitivity. The “ smoothing ” parameter is needed to ensure that the contours of the object are visually smooth. The “ adjacent pixels ” function is needed so that when selecting an object, other parts of the image of the same tone, but in different places, are not selected.
- You need to drag the magic eraser across the background around the object. Note that after using the tool, the lock was removed, and the background image became standard.
- Next, you can use a regular eraser to remove the remnants of the background and finish editing, which will allow you to make a picture on a transparent background.
We treat a broken flash drive - programs for restoring a memory card
Move an image to a new background
In order to move the image to another background, you need to select white in the palette and use the Fill tool to paint over the entire lime background. After this, press the key combination “Ctrl+A” - and the second (lower) button is activated on the pop-up toolbar. After making sure that the new background has opened in another program window, you need to copy the image (key combination Ctrl+C) and paste it into this second window (key combination Ctrl+V). The work is ready! All that remains is to save it.
How to make a flare of light in paint.net?
Here we will look at a rather simple and effective moment, how to make a light highlight on an image using Paint.NET. It is no coincidence that this question is placed in the Paint.NET lessons for beginners section, because it is completed in one step.
We will create a sun flare on a 3D emoticon, which you can learn to draw in the Paint.NET lesson - How to create a funny 3D emoticon in Paint.NET. To draw the highlight of the light, we will use the Paint.NET Gradient tool.
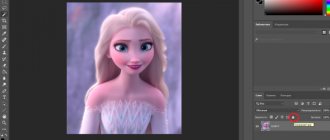
So, let's choose white as the main color, and set transparent as the secondary color. To do this, the Transparency (Alpha) option in the Palette window in Paint.NET needs to be set to 0. In the image above, you can see that this option is located in the lower right corner. In the figure, the value of this parameter is indicated as 225 because the figure is presented for the base color - white, which is not transparent. Select the gradient type - circular, you can see how it looks in the above figure in the upper left corner. And using the left mouse button, make a gradient in the place in the image where the color highlight should be. The result we got can be seen in the figure below. We specifically kept the gradient markers in the image below.
A few nuances
When editing detailed images, it will be much easier to work if you zoom in on the image.
This can be done by selecting the “Scale” sub-item in the “View” menu or simply clicking the “Zoom in” button located on the ribbon. Please note that larger image sizes will require more tracing time. To reduce the size of the picture, press “Ctrl+A” and drag the marker located at the bottom left up. It is important to maintain proportions so that the image does not turn out distorted.
During the work, errors will inevitably occur, and therefore you will have to edit the line. In order to be able to quickly undo previous actions, it is recommended to constantly keep your fingers on the “Ctrl+Z” key combination.
If the image has a curved border, it is advisable to use the Curve tool. To do this, click the corresponding button on the toolbar, draw a straight line from the beginning to the end of the border section, which then needs to be pulled to the left or right, describing a curve.
In order for the greenscreening method to work, in Paint Winwows 7 a transparent background must be set in the settings for inserts. If you do not set this setting, the background will be added from the original image. The Insertion Settings control panel will appear on the left side of the image you are editing, below the main panel, when one of the selection tools is used.
Removing the background
If there is a need to transfer an object to another background, then you inevitably have to face the question of how to remove the background in Paint. This is done quite simply:
- using the “Magic Wand” tool, the background is selected;
- the selected part is deleted using the Delete button or the “Clear Selection” command from the “Edit” menu, as a result of which a background in the form of a “chessboard” appears, conditionally showing transparency;
- The resulting image is saved (preferably in PNG or GIF format), which can later be used at your discretion.
Creating a transparent background for a finished image
However, most often it is necessary to make the background transparent not for a picture created from scratch, but for a finished image that needs to be edited. To do this, again go to the “File” section in the menu, but this time select the “Open” item.
A window opens in front of us in which we need to select the image to edit. After we have decided on the choice of image, click on the “Open” button.
As soon as the file opens in the program, we return to the main menu again. Sequentially click on the items “Layer” - “Transparency” - “Add alpha channel”.
Next, we use a tool called “Selecting adjacent areas,” although most users call it a “magic wand” because of its characteristic icon. The "Magic Wand" is located on the toolbar on the left side of the program. Click on the logo of this tool.
After this field, click on the background with the “magic wand” and press the Delete button on the keyboard. As you can see, as a result of these actions, the background becomes transparent.
Making a transparent background in GIMP is not as easy as it seems at first glance. An uninitiated user can spend a long time sorting through the program settings in search of a solution, but still not find it. At the same time, knowing the algorithm for performing this procedure, creating a transparent background for images, each time, as you get better at it, becomes easier and easier.
Instructions
Be sure to make a backup copy of the original image (or save it under a different name and only then proceed with modification).
To remove the background
The first method is to select the Scissors tool. Use it to outline the object around which you want to remove the background. Having closed the contour, adjust the positions of its points, and if necessary, add new, intermediate ones, the positions of which must also be adjusted. After that, click the middle of the object and the outline will become solid and the dots will disappear.
Copy the selected object by pressing Ctrl+C. Create a new image of such a size that this object fits into it. In this case, select the desired background
. Paste the contents of the clipboard there by pressing Ctrl+V. Select the Rectangular Marquee Tool and click on any point outside the outline. After that, save the result under a name that does not exist yet. In a similar way, you can paste the contents of the clipboard into an existing one with a background. After this, do not forget to move the object using the arrow keys to the desired location before deselecting it.
You can do without creating a new image. To do this, select “Invert Selection” from the “Edit” menu. The object will no longer be selected, but the background will become so. To remove it, in the old version of GIMP press Ctrl+K, and in the new version press Ctrl+X. After that, select your desired background
and perform the operation “Image” - “Flatten image”.
To remove the background
the second way is to use the Eraser tool instead of the Scissors tool.
Select the background
, and then set the eraser diameter so that it can easily erase the background around the object.
Having cleared the space around it, remove the remaining areas of the background
using the Rectangular Marquee tool and the keyboard shortcut Ctrk+K (or Ctrl+X). Then flatten the image as above.
To now move the object to another background, select the Magic Wand tool and click anywhere on the background
around the object.
Then perform the operation “Selection” - “Invert Selection”. Press Ctrl+C. Having opened a file with a different background, paste an object into it by pressing Ctrl+V, turn on the Rectangular Marquee tool, adjust the position of the object with the arrow keys, and then click anywhere on the background
. Save the result under a different name.
Related article
Sources:
- how to remove background from photo in gimp
When photographing something, it’s not always possible to capture exactly the frame you wanted. Often, when looking at a photograph on a computer, you begin to realize that only a specific fragment of the entire photograph is required. Also, sometimes a fragment of a photograph is needed if you want to use it to make an avatar on a social network or forum, or some kind of collage. In this article you will learn how to cut out a fragment from a regular photo using various programs.
Instructions
The easiest option is to use Adobe Photoshop. Open the program and load the photo you want to crop. In the toolbar, find the Crop tool, which is like black. Use the left mouse button to select a rectangular fragment, frame it by eye or select the ones you need in the top panel, and press Enter. Save the image under any name.
You can also get a fragment by cutting a photo from a video. To do this, open
Open source and free to install on Linux and Windows.
How to change the background of an image in the GIMP application.
It is inferior in functionality to Photoshop, but nevertheless contains ample opportunities:
- Setting up the working environment.
- Convenient full screen mode.
- Photo correction: transformation, perspective, color correction, various filters.
- Retouching.
- Supports various equipment and file formats, including psd.
GIMP allows you to work with layers, paths, masks, channels, use drawing tools, selection tools, text decoration, add plugins and scripts. From the official website of the program you can download very detailed instructions in Russian. In fact, the application simplifies the functions of the famous Photoshop editor. Used for quick editing of photos and drawings, for example, icons for the Internet. The advantage compared to Photoshop is that it loads much faster with average computer characteristics.
Often when preparing images for the Internet, you need to change the background in GIMP or make it transparent. This does not require special skills, but requires patience, perseverance and accuracy.
Step-by-step instructions in Paint: how to make a transparent background
Step one. In the “File” menu, select “Open” and click “Browse” to open the desired image.
Step two. Before you make a transparent background in Paint, you need to select the “Magic Wand” in the toolbar and set its sensitivity to 50 percent. For complex backgrounds, sensitivity should be set at 25-40 percent.
Step three. You need to click the “Magic Wand” on the white background, which then turns into pale blue.
Step four. It is necessary to delete the background selected in this way using the Delete key on the keyboard or through the “Edit” menu - the “Clear selection” item.
As a result, the background will become transparent, although in Paint it will have a checkerboard coloring.
However, the work on how to make a transparent background in Paint does not end there. Step five.
After all the above manipulations, some areas in the picture will still remain white. In order to make them transparent, you need to repeat the previous steps for them as well. Step six. The resulting image with a transparent background must be saved by selecting “Save” in the “File” menu and specifying the file name, and selecting the required format (PNG or GIF) in the drop-down list.
Replacing the background
This function allows you to replace the background or even make it transparent. Detailed instructions for its use:
- Open the picture and remove the lock.
- On the work panel, select “ quick selection ” and adjust its size. The size can be adjusted using the brace keys on the keyboard, the left key decreases and the right increases the size of the brush.
- After that, we simply drag the tool over the unnecessary image, and it is automatically selected. Selection works on the principle of finding pixels that are similar in color and adjacent to pixels in the brush area.
- To remove the background in the best possible way, you should use the refine edge . To do this, you need to select any selection tool and click on the button in the upper right quarter of the screen “ refine edge ”, however, if the background image was selected before, then use the key combination shift + ctrl + I , an inversion will occur and the image will be selected, the edges of which need to be clarified. This will open a panel where you can select a contrasting background and adjust anti-aliasing , feathering, contrast and edge position. The most commonly used function is the anti-aliasing function, which will visually make all transitions between pixels smoother.
- Then you can press the delete and everything selected will be deleted. The selected part can be removed using a regular eraser by simply starting to move it over the selected area (only the background image will be erased).
- You can also not only erase the background, but also copy it and paste it into another photo or text editor. To do this, you need to copy and paste the selected background in another program, or perhaps copy the illustration by using inversion and pressing ctrl+c.